
Why are your neighbor’s peas already a foot tall while yours are still shivering in the mud? We’ve been told peas love the cold, but there’s a massive difference between ‘tolerating’ frost and ‘thriving’ in it. Planting your seeds in bare, exposed soil is like asking a newborn to sleep on the porch. If you want a harvest that starts weeks earlier and yields twice as much, you need to stop thinking about ‘plants’ and start thinking about ‘protection.’ Here is the secret to the pea shield.
I’ve spent the better part of forty years watching the spring weather play tricks on my garden. One day it is a balmy 60°F (15°C) and the next, a biting wind is whipping across the rows, turning my tender pea shoots into brittle sticks. I used to think that was just the “luck of the draw” until I started using cloches. These simple covers—what I call the pea shield—transform the ground from a cold, damp basement into a cozy nursery. If you are tired of waiting for the ground to “warm up naturally,” you have to realize that you can actually force the issue yourself.
The beauty of this method is that it doesn’t require a fancy greenhouse or expensive electrical heaters. It is about working with the sun and understanding how a small pocket of trapped air can change everything for a seed. When we talk about “shielded success,” we are talking about giving your peas a 10-day head start on germination and a 3-week jump on the harvest. It’s the difference between picking your first pod in May or waiting until the heat of June turns your crop bitter and tough.
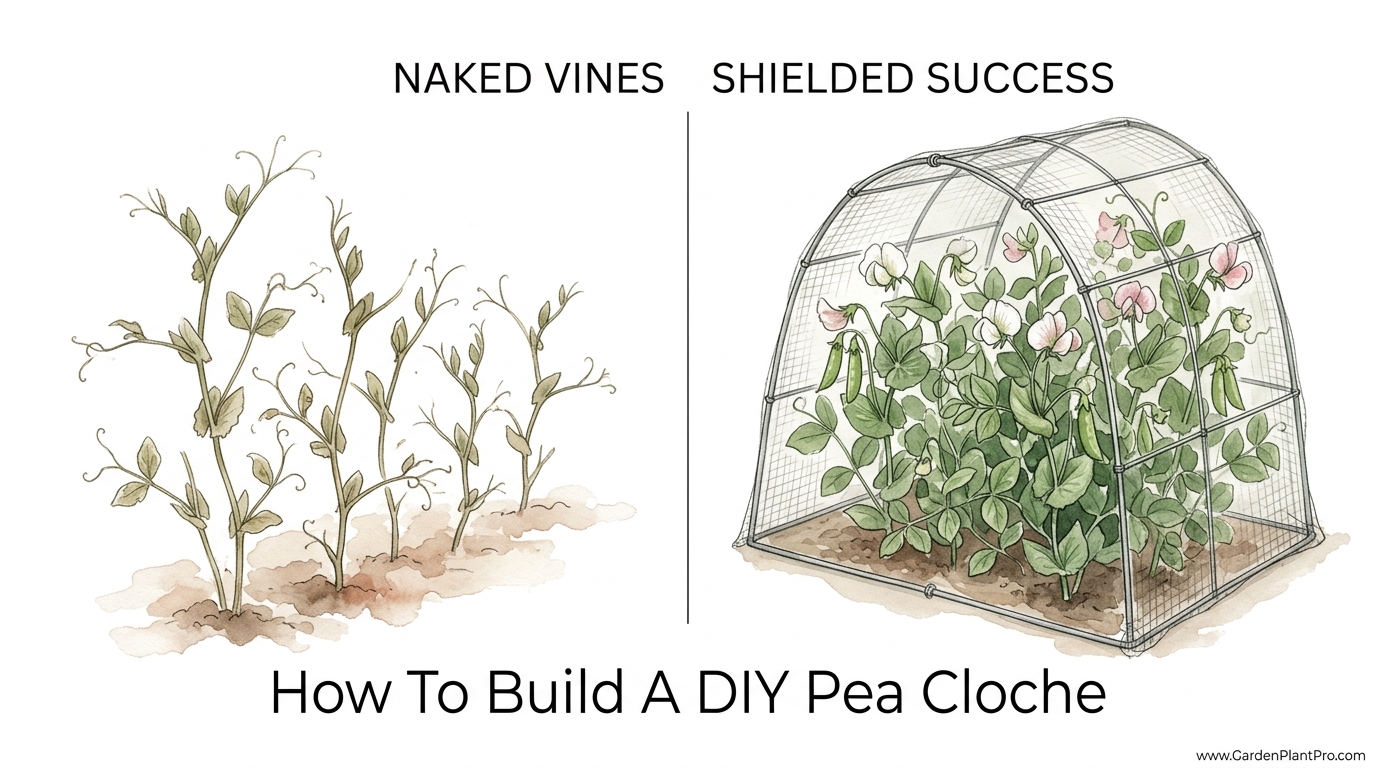
How To Build A DIY Pea Cloche
A pea cloche is essentially a miniature, portable greenhouse designed to sit directly over your garden row. The word “cloche” comes from the French word for “bell,” referring to the traditional glass bell jars that 17th-century French market gardeners used to protect their crops. While those glass jars are beautiful, they are heavy and expensive. For a modern backyard garden, we use clear plastic or polycarbonate to achieve the same result at a fraction of the cost.
In the real world, gardeners use cloches to create a microclimate. This is a localized zone where the temperature and humidity are different from the surrounding area. By placing a transparent barrier over your pea seeds, you trap the sun’s energy. The soil absorbs this heat during the day and slowly releases it back into the trapped air at night. This keeps the soil temperature consistent, which is exactly what a pea seed needs to wake up from its winter slumber.
Most of the time, I see people using these in the “shoulder seasons”—that tricky time in early spring and late autumn. For peas, the spring cloche is vital because it prevents the seeds from rotting. When the ground is 40°F (4°C) and soaking wet, a pea seed might take 30 days to sprout. If it sits in that cold mud for a month, it often rots before it ever sees the sun. A cloche warms that soil to 60°F (15°C) or higher, cutting that germination time down to about 8 to 10 days. That speed is what keeps the seed healthy and gets the roots established before the pests arrive.
Common Cloche Designs for the Home Garden
There are three main ways you can build these shields, depending on how much space you have and what materials are sitting in your shed. The most basic version is the Milk Jug Cloche, which is just a clear 1-gallon (4-liter) plastic jug with the bottom cut off. You pop it over a single cluster of seeds, and you’re done. It’s perfect for small patches, but a bit tedious if you’re planting a 20-foot (6-meter) row.
The A-Frame Cloche is another favorite. It uses two sheets of rigid clear plastic or old window sashes leaned against each other to form a “tent” over the row. It’s sturdy and excellent for shedding snow if you get a late-season flurry. However, the gold standard for most of us is the Tunnel Cloche. This uses flexible hoops made of wire or PVC pipe covered with a sheet of clear polyethylene plastic. It allows you to cover an entire row of peas in one go, providing uniform warmth and protection.
How the Pea Shield Works: The Science of the Soil
To understand why the shield is so effective, you have to look at what happens beneath the surface. Soil is a giant thermal mass. During a typical spring day, the sun hits the bare earth, but the wind immediately whisks that heat away. When you put a cloche in place, you stop that “convective cooling.” The air inside the cloche becomes a stagnant layer of insulation. As the sun shines through the clear plastic, the infrared radiation warms the soil directly. Because the air is trapped, the soil temperature can rise by 5°F to 10°F (3°C to 6°C) more than the soil just a foot away.
This warmth also kickstarts the biological activity in your garden. The beneficial microbes and fungi in the soil are like us—they don’t like to work when it’s freezing. Once the soil hits that magic 50°F (10°C) mark, these organisms start breaking down organic matter, making nitrogen more available to your young pea plants. This is why shielded peas often look darker green and more robust than their “naked” counterparts; they are literally eating better because the soil is awake.
Another factor is humidity. Young pea shoots are very susceptible to “dessication”—drying out. Spring winds can be incredibly dry, sucking the moisture right out of a tender leaf. Inside the cloche, the plants transpire (breathe out) moisture, which stays trapped in the air. This creates a high-humidity environment that reduces the stress on the plant’s tiny root system. It’s like a spa for your seedlings, allowing them to focus all their energy on vertical growth rather than just trying to survive the wind.
Step-By-Step: Building a 10-Foot Tunnel Cloche
If you want to do this right, I recommend building a tunnel cloche. It is the most efficient way to manage a standard garden bed. Here is how I’ve been doing it for years. You will need some 1/2-inch (13mm) PVC pipe, some 6-mil clear plastic sheeting, and a handful of garden stakes or rebar.
- Step 1: Set the Hoops. Take 5-foot (1.5-meter) lengths of your PVC pipe and bend them into an arch over your row. I find that spacing them every 3 feet (1 meter) provides enough support so the plastic doesn’t sag. Anchor the ends of the pipe by sliding them over short pieces of rebar driven into the ground, or simply bury the ends 6 inches (15cm) deep in the soil.
- Step 2: Drape the Plastic. Lay your clear plastic over the hoops. You want about 12 inches (30cm) of extra plastic on each side and about 2 feet (60cm) of extra on the ends. This allows you to weigh it down securely.
- Step 3: Secure the Perimeter. Use heavy stones, bricks, or mounds of soil to pin the edges of the plastic to the ground. Do not skip this step. A cloche is essentially a sail; if the wind gets under it, your “shield” will end up in your neighbor’s yard, likely taking your pea plants with it.
- Step 4: Seal the Ends. Bundle the extra plastic at the ends of the tunnel and tie them to a stake driven into the ground. This creates a tight “sausage” shape that keeps the heat from leaking out the sides.
Once your tunnel is up, you should see condensation forming on the inside within an hour. That is the sign that your microclimate is working. If the sun is out, the temperature inside will climb quickly, so you’ll need to keep an eye on it to make sure it doesn’t get too hot.
The Benefits of Shielded Success
The most immediate benefit is germination speed. I’ve run side-by-side tests where cloched peas were up and showing their first true leaves while the unprotected seeds in the next bed hadn’t even cracked their shells. But the advantages go beyond just speed. You are also providing a physical barrier against early-season pests. Birds, particularly pigeons and crows, love to pull up freshly sprouted peas just to eat the seed at the base. A cloche makes that impossible.
There is also the benefit of cleaner plants. Heavy spring rains can splash soil onto the leaves of your peas, which often carries soil-borne diseases like powdery mildew or wilt. The shield keeps the foliage dry and clean. Since the plants are protected from the battering of wind and rain, they don’t develop the “thickened,” stunted stems often seen in weather-worn seedlings. Instead, they grow tall and supple, ready to climb their trellis the moment you remove the cover.
Finally, consider the extended harvest window. Peas stop producing once the daytime temperatures consistently hit 80°F (27°C). By starting three weeks earlier with a cloche, you are effectively adding three weeks of prime “cool-weather” production time to the front end of your season. You’ll be harvesting sweet, tender pods while everyone else is just watching their plants start to flower.
Challenges and Common Mistakes
The biggest mistake I see beginners make is overheating. It is easy to think that if some heat is good, more heat is better. That is not true for peas. If the temperature inside your cloche hits 85°F (29°C), the pea plants will stress out, and the pollen can actually become sterile. You must vent your cloche. On any day when the sun is shining and the outside air is above 45°F (7°C), you should open the ends of your tunnel or prop up the edge of your cloche to let fresh air circulate.
Another pitfall is forgetting to water. Because the cloche keeps the rain off your soil, it can actually become bone-dry underneath while the rest of the garden is a swamp. You have to lift the shield every few days and stick your finger into the soil. If it’s dry past the first knuckle, give those peas a good drink. I prefer to water in the morning so the foliage has time to dry before the “greenhouse effect” kicks in for the afternoon.
Lastly, watch out for slugs. Slugs love the damp, warm environment of a cloche just as much as your peas do. If you aren’t careful, you can accidentally create a 5-star hotel for every mollusk in the county. I always recommend putting down a few organic slug pellets or a copper barrier inside the cloche at the time of planting to ensure your seedlings don’t become a midnight snack.
DIY PROJECT: Collect rainwater no matter where you live...

This DIY project is the best way to legally collect rainwater NO MATTER where you live. Get chlorine-free water, cut down on your water bills, and have enough for an emergency situation or to water your garden. Read More Here...
Limitations: When the Shield Isn’t the Answer
While I swear by the pea shield, it isn’t a magic wand for every situation. If your soil is naturally very heavy clay and stays waterlogged, a cloche can actually make things worse by preventing the soil from drying out through evaporation. In that case, you might end up with “damping off,” a fungal disease that kills seedlings at the soil line. You need to fix your drainage—perhaps with raised beds—before the cloche will truly be effective.
Also, cloches are temporary structures. Once your peas reach about 6 to 8 inches (15 to 20cm) tall, they will start looking for something to climb. At this point, they usually outgrow the height of a standard tunnel cloche. If you leave them covered too long, they will cramp up against the plastic, which leads to poor air circulation and disease. The shield is a starter tool, not a season-long home.
Comparison: Shielded Success vs. Naked Vines
To help you visualize the difference, I’ve put together this comparison based on my own garden logs over the last few seasons. These numbers assume a typical temperate climate spring.
| Factor | Naked Vines (Exposed) | Shielded Success (Cloche) |
|---|---|---|
| Germination Time | 21–35 days | 7–12 days |
| Soil Temp Requirement | Min 45°F (7°C) | Warmed to 60°F+ (15°C+) |
| Seed Rot Risk | High (in wet springs) | Very Low |
| Pest Protection | None (birds/rabbits) | Excellent physical barrier |
| First Harvest | Early to Mid-June | Mid to Late May |
Practical Tips and Best Practices
After years of tinkering, I’ve found a few “pro tips” that make the pea shield even more effective. First, pre-warm the soil. Don’t wait until the day you plant to put your cloche out. Set it up two weeks before you intend to sow your seeds. This gets the “thermal engine” of the soil running, so the seeds hit the ground running. You’ll see much more uniform germination this way.
Second, use a soil thermometer. You can’t manage what you don’t measure. A simple $10 garden thermometer will tell you exactly when your soil is ready. For peas, I look for a steady 50°F (10°C) at a depth of 2 inches (5cm) inside the cloche before I drop my seeds. It takes the guesswork out of the process.
- Double Cover: If a truly deep freeze is predicted (below 25°F / -4°C), throw an old blanket or a piece of burlap over the top of the plastic cloche at night. This adds an extra layer of “dead air” space and can save your crop.
- Ventilation Logic: If you see large droplets of water running down the inside of the plastic, it is too humid. Open the ends for an hour to let the air exchange. You want a light fog, not a rainstorm inside.
- Anchoring: If you live in a windy area, use “earth staples”—long U-shaped wires—to pin the hoops themselves into the ground, in addition to weighting the plastic.
Advanced Considerations: Transitioning to the Trellis
The trickiest part of using a pea shield is the “hand-off”—the moment you remove the cloche and ask the plants to survive on their own. This is called hardening off. You shouldn’t just rip the plastic off on a Tuesday morning and leave. Instead, spend a week gradually increasing the ventilation. Start by leaving the ends open all day. Then, remove the plastic for a few hours in the afternoon. Finally, take it off entirely on a cloudy, calm day.
Once the shield is off, get your mulch down immediately. A thick layer of straw or shredded leaves will help maintain that soil temperature you worked so hard to build. It also prevents the moisture from evaporating now that the “lid” is gone. Since your peas were started in a cloche, they will likely be taller than you expect, so have your netting or brushwood ready for them to grab onto within 24 hours of uncovering.
Example Scenario: The Early Bird Harvest
Let’s look at how this plays out in a real garden. Imagine it’s late February in a temperate zone. The ground is finally workable, but the air is still a chilly 38°F (3°C). A typical gardener waits until late March to plant, hoping for a harvest by mid-June. However, the “shielded” gardener sets up a tunnel cloche on February 20th. By March 5th, the soil under the plastic has hit 55°F (13°C). The seeds are sown.
By March 15th, the peas are already an inch tall. While the neighbor is finally putting their seeds in the cold, wet mud, the shielded peas are already developing strong root systems. By mid-April, the cloche is removed, and the peas are 8 inches tall and starting to climb. When the first heatwave of June arrives, the shielded gardener has already finished their first big harvest and is enjoying sweet peas with dinner, while the neighbor’s plants are just starting to pod up and are struggling with the heat.
Final Thoughts
Gardening is often a game of margins. We are always looking for that extra 5% of growth or that one-week head start. The pea shield is one of the few techniques that offers a massive return for a very small investment of time and material. It’s about taking control of the environment and giving your seeds the “nursery” they deserve instead of the “porch” they are usually given.
Don’t be afraid to experiment with different materials. Whether you use recycled milk jugs or a 20-foot professional tunnel, the principle remains the same: trap the heat, block the wind, and watch the magic happen. Once you see the difference in your spring harvest, you’ll never go back to planting in “naked” soil again. It’s a lesson the old-timers knew well, and it’s one that still holds true in every backyard today.
If you find success with this, you might want to look into other ways to manage your garden’s microclimate, such as using heavy mulching for moisture retention or drip irrigation to keep those roots hydrated without wetting the leaves. Every little step you take to protect your plants is a step toward a more bountiful and less stressful gardening season. Now, get out there and build your shield!