
Is your watering schedule actually starving your celery of its most basic biological need? Celery isn’t a standard vegetable; it’s a marsh plant in disguise. When you water with a hose once a day, you’re putting the plant through a stress cycle that triggers defense mechanisms, turning every stalk into a stringy, bitter mess. To get that gourmet crunch, you have to stop watering and start ‘flowing’. Here’s the secret to creating a dynamic hydration system that mimics the swamp and produces the sweetest stalks you’ve ever tasted.
Speaking as someone who spent years hauling a hose to the garden every morning only to harvest stalks that tasted like wooden pencils, I can tell you there is a better way. We often treat our garden beds like a bank account where we deposit water and wait for the plant to spend it. But celery doesn’t want a savings account; it wants a river. It wants a environment where the moisture level never fluctuates, staying perfectly balanced between soggy and dry.
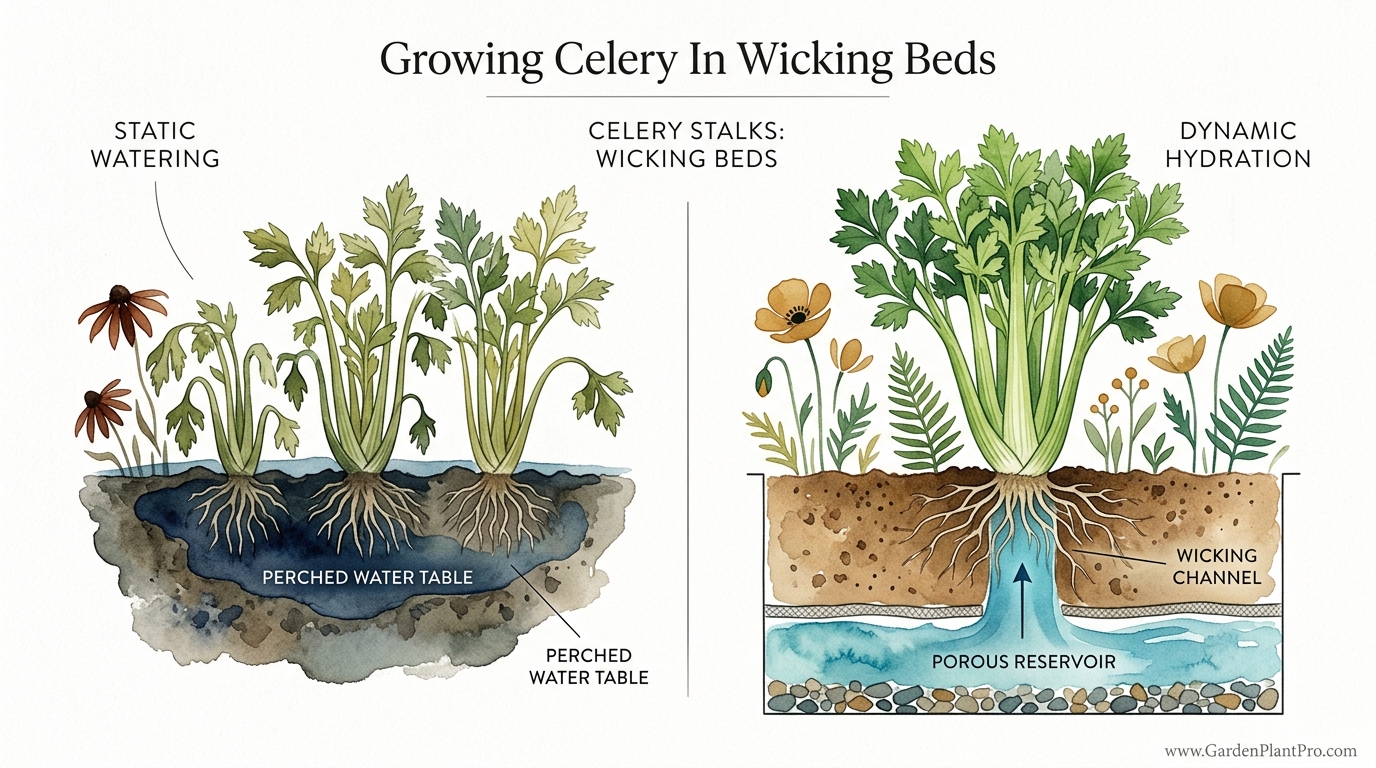
This is where the concept of dynamic hydration comes into play. Unlike static watering, where the soil undergoes a dramatic wet-dry-wet cycle, a wicking system provides a constant, capillary-driven flow of moisture. This setup mirrors the boggy, nutrient-rich environments where wild celery first evolved. When you remove the stress of thirst, the plant focuses all its energy on cell expansion rather than fiber production. The result is the kind of thick, juicy stalk you usually only find in high-end farmers’ markets.
Growing Celery In Wicking Beds
Growing celery in wicking beds is essentially the process of creating a self-contained ecosystem that manages its own water table. At its simplest, a wicking bed is a container with a water reservoir at the bottom and a layer of soil on top. These two layers are separated by a permeable barrier, allowing moisture to move upward through the soil via capillary action—much like how a sponge draws up a spill on a countertop.
This system exists because traditional top-down watering is incredibly inefficient for shallow-rooted, thirsty plants. In a standard raised bed, water often drains away before the plant can use it, or it evaporates from the surface. In a wicking bed, the water is tucked away under the soil, protected from the sun and wind. This setup is used everywhere from arid Australian backyards to urban rooftops in New York because it slashes water usage by up to 50% while producing superior yields.
Think of the wicking bed as a “bottom-up” buffet for your plants. Instead of waiting for a rain event or a gardener with a watering can, the celery roots reach down into a zone of “perfect” moisture. For a plant like celery, which is almost 95% water, having a reservoir ensures that the internal hydraulic pressure of the stalks stays high. This pressure is what creates the “snap” when you bite into a stalk. Without it, the plant produces lignin—the stuff wood is made of—to keep itself upright, leading to that dreaded stringiness.
The Biological Blueprint of the Marsh Plant
To understand why wicking beds are so effective, we have to look at the history of Apium graveolens. Wild celery is a native of the Mediterranean and parts of Asia, where it grows in salty, boggy soils near the coast. It is a true halophyte, meaning it can tolerate higher salt levels than most vegetables, and its root system is adapted for constant immersion.
In a traditional garden, we often force celery to act like a carrot or a pepper, plants that prefer a bit of “breathing room” between waterings. Celery, however, lacks the deep taproots or waxy leaf coatings that allow other plants to survive dry spells. When the soil moisture drops even slightly, the plant enters a state of high-alert stress. It closes its stomata (tiny pores on the leaves) to prevent water loss, which also stops photosynthesis. This “stop-start” growth is what causes the stalks to become hollow and bitter.
Dynamic hydration through a wicking system solves this by maintaining a “perched water table.” This is a scientific term for a layer of saturated soil that stays within reach of the roots. In a wicking bed, the moisture is always available, meaning the plant’s stomata stay open longer, growth remains continuous, and the flavor remains mild. You aren’t just watering the plant; you are maintaining its biological equilibrium.
How the Wicking Mechanism Works
The “magic” of a wicking bed relies on two physical forces: adhesion and cohesion. Adhesion is the attraction between water molecules and the soil particles, while cohesion is the attraction of water molecules to each other. Together, they create capillary action. Imagine a very thin glass tube dipped in water; the water will naturally climb up the tube. The tiny spaces between your soil particles act just like those tubes.
Successful wicking depends on the height of the soil. Most garden soils can effectively wick water up to about 30 cm to 40 cm (12 to 16 inches). If your bed is deeper than this, the top layer of soil will stay dry, and your young celery seedlings might struggle to establish. This is why wicking beds are designed with a specific reservoir-to-soil ratio. Usually, the reservoir takes up the bottom 20 cm (8 inches) and the soil sits in the 30 cm (12 inches) above it.
Another critical factor is the “wick” itself. In many systems, a portion of the soil actually extends down into the water reservoir, acting as the primary conduit. Others use a specialized wicking media like scoria or gravel combined with a geotextile fabric. The fabric allows water vapor and liquid to pass through while preventing the soil from falling into the reservoir and turning it into a muddy, anaerobic mess.
Setting Up Your Celery Wicking Bed
Building a home for your celery doesn’t require an engineering degree, but it does require attention to detail. Start with a sturdy, waterproof container. This could be a repurposed IBC (intermediate bulk container), a timber raised bed lined with a heavy-duty pond liner, or even a large plastic trough.
The Reservoir Layer
Fill the bottom of your container with a coarse material. Scoria (lava rock) is a favorite among experienced gardeners because it is porous and has a high surface area, which helps with wicking. You can also use 20 mm (3/4 inch) gravel or even specialized plastic “wicking cells.”
Inside this reservoir, install a length of 50 mm (2 inch) perforated pipe—often called “ag pipe” or “weeping tile.” This pipe should be coiled at the bottom and connected to a vertical fill pipe that sticks out above the soil. This allows you to pour water directly into the reservoir without ever wetting the soil surface.
The Overflow Point
This is the most important step. You must drill a hole in the side of the container at the exact level where the reservoir ends and the soil begins. Insert a small pipe here. This acts as an overflow. When you fill the bed, the water will eventually come out of this hole, telling you the reservoir is full. More importantly, it prevents the soil from becoming waterlogged. If the water level rises too high into the soil, it will squeeze out the oxygen and rot your celery roots.
The Soil Interface
Lay a sheet of geotextile fabric over the reservoir material. This fabric acts as a filter. It keeps the soil where it belongs but lets the water move up. Some gardeners prefer to use a layer of sand or even old hessian sacks, but a dedicated geotextile is the most durable option. Once the fabric is down, you are ready to add your growing media.
The Ideal Growing Media for Celery
Don’t use standard garden soil in a wicking bed. It is often too heavy and will compact over time, killing the capillary action. Instead, you want a mix that is high in organic matter and has excellent “wicking” properties. A blend of 50% high-quality compost, 25% coco coir (coconut fiber), and 25% perlite or coarse sand is a fantastic starting point.
Coco coir is a secret weapon for celery. It can hold many times its weight in water while still maintaining air pockets. Since celery is a heavy feeder, the high compost content provides a steady supply of nutrients. You can also mix in a handful of organic blood and bone or a slow-release nitrogen fertilizer at this stage.
DIY PROJECT: Collect rainwater no matter where you live...

This DIY project is the best way to legally collect rainwater NO MATTER where you live. Get chlorine-free water, cut down on your water bills, and have enough for an emergency situation or to water your garden. Read More Here...
Ensure the soil is pre-moistened before you put it in the bed. If you add dry soil, it can be very difficult to “start” the wicking process. Think of it like a dry sponge; it takes a moment to start absorbing. Once the soil is damp and settled, you have created the perfect “marsh” for your crop.
Planting and Spacing for Maximum Crunch
Celery is a patient man’s crop. It takes a long time to grow—often 16 to 20 weeks from seed to harvest. Because of this long window, I always recommend starting with seedlings or “starts” rather than direct-sowing into the wicking bed.
Seedling Establishment
When you first transplant your celery into the wicking bed, you have to water from the top for the first 10 to 14 days. Even though the reservoir is full, the tiny roots of the seedlings aren’t deep enough to reach the moisture being wicked up from below. Once you see new green growth in the center of the plant, you can stop top-watering and let the wicking system take over.
Spacing Strategies
Standard garden books suggest spacing celery 30 cm (12 inches) apart. However, in a wicking bed where moisture and nutrients are never in short supply, you can plant more intensively. Spacing your plants 15 cm to 20 cm (6 to 8 inches) apart in a “staggered” or hex pattern works beautifully.
Close spacing creates a microclimate. The leaves will eventually touch, shading the soil and reducing evaporation even further. This also helps with “self-blanching,” as the lack of light reaching the inner stalks keeps them pale, tender, and sweet.
Nutrient Management in a Closed System
Celery is widely known as one of the “hungriest” plants in the vegetable kingdom. It requires a massive amount of nitrogen to produce those thick stalks. In a wicking bed, nutrient management is slightly different than in a traditional garden because you have a closed system.
The Nitrogen Demand
During the peak growth phase—usually months 3 and 4—celery needs a constant supply of nitrogen. Since you aren’t watering from the top, you can’t just sprinkle granular fertilizer and expect it to reach the roots quickly. Instead, use the fill pipe. Adding a diluted liquid seaweed or fish emulsion directly into the reservoir is like giving your celery an intravenous nutrient drip.
Calcium and “Black Heart”
A common problem with celery is “black heart,” where the center of the plant turns black and begins to rot. This is caused by a calcium deficiency. Interestingly, it’s rarely because the soil lacks calcium; it’s usually because the plant couldn’t transport the calcium due to inconsistent water. Since wicking beds provide the most consistent hydration possible, they are naturally the best defense against black heart.
To be safe, you can add a tablespoon of garden lime or gypsum to the soil mix at planting time. This ensures that the calcium is physically present when the “dynamic hydration” starts moving it through the plant’s tissues.
Benefits of the Wicking Method
Choosing a wicking bed over a standard garden plot offers several measurable advantages that directly impact the quality of your celery harvest.
- Unmatched Flavor: Because the plant never experiences drought stress, it doesn’t produce the bitter tannins often found in “tough” celery.
- Water Efficiency: By storing water underground and using mulch on top, you lose almost zero water to evaporation. This is a lifesaver in hot summers.
- Labor Reduction: Instead of watering every day, you might only need to fill the reservoir once every week or two, depending on the weather.
- Rapid Growth: Plants in wicking beds often reach maturity 10-15% faster because they never have to “pause” their growth due to thirst.
Challenges and Common Mistakes
While wicking beds are “set and forget” to an extent, they aren’t magic. There are a few pitfalls that can ruin a crop if you aren’t careful.
Anaerobic Conditions
If your overflow pipe is blocked or installed too high, the soil can become completely saturated. This displaces the oxygen. Without oxygen, “bad” bacteria take over, and your reservoir will start to smell like rotten eggs. If you notice a swampy odor, check your overflow immediately and flush the system with fresh water.
Salt Buildup
Because water is always moving upward and evaporating from the leaves, salts from fertilizers and tap water can accumulate at the soil surface. Over several seasons, this can become toxic to plants. To avoid this, “flush” the bed once a year by watering heavily from the top until water pours out of the overflow pipe for several minutes. This washes the salts back down and out of the system.
The “Dry Top” Syndrome
In very hot weather, the top 2 cm (1 inch) of soil in a wicking bed can become bone-dry and crusty, even if the reservoir is full. This can be hard on the shallow roots of the celery. Using a thick layer of organic mulch, such as pea straw or sugar cane mulch, is essential. Mulch acts as a lid, keeping the moisture right up at the surface where the celery needs it most.
Varieties That Love the Wicking Life
Not all celery is created equal. Some are bred for the tough conditions of a standard garden, while others truly shine when given the luxury of a wicking bed.
| Variety | Best For | Character |
|---|---|---|
| Tall Utah | General Use | The classic grocery store celery. Very crisp and reliable in wicking systems. |
| Red Venture | Gourmet Salads | Beautiful red-tinted stalks. High in antioxidants and loves the constant moisture. |
| Pascal | Short Seasons | A vigorous grower that produces thick, green stalks without needing much blanching. |
| Pink Flamingo | Visual Appeal | An heirloom variety with bright pink stalks. Extremely tender but prone to wilting in dry soil—perfect for wicking beds. |
Advanced Considerations for the Serious Gardener
If you want to take your celery game to the next level, consider the temperature of your reservoir. During a blistering summer, the water in a black plastic container can get quite warm. Warm water holds less oxygen. Using light-colored containers or insulating your beds with timber cladding can keep the “marsh” cool. Celery prefers a root temperature between 15°C and 20°C (60°F to 68°F).
Another advanced tip is the use of biochar in the wicking layer. Mixing biochar into your scoria or gravel can help maintain a healthy microbial population within the reservoir itself. These microbes can help break down any organic matter that slips through the filter, keeping the water clean and oxygenated.

Do you have some charcoal in your house right now? We call charcoal a “miracle leftover” for anyone who wants to be a little more self-sufficient and cut costs. That’s because it can help you with so many different things around the house and garden. You can even use it to make an energy-free fridge. Read More Here...
Lastly, think about your climate. If you live in a region with heavy rainfall, your wicking bed will stay full naturally. However, in very arid zones, the “wicking height” might decrease as the air pulls moisture out of the soil faster than it can climb. In these cases, keeping your bed slightly shallower—about 25 cm (10 inches) of soil—can ensure the surface stays moist.
Practical Example: A Season in the Bed
Let’s look at a typical timeline for a wicking bed in a temperate climate. In early spring, you build your bed and fill it with a rich coco-compost mix. You plant six ‘Tall Utah’ seedlings in a small 60 cm x 60 cm (2 foot x 2 foot) wicking crate.
For the first two weeks, you water the surface every morning. By week three, the plants look sturdy, so you fill the reservoir through the pipe until it spills from the overflow. You then walk away. For the next month, you do nothing but check the water level with a dipstick (a simple bamboo skewer dropped down the fill pipe).
In month three, you notice the celery is drinking faster. The reservoir, which used to last 14 days, now needs a refill every 7 days. You add a splash of liquid fertilizer to the water. By month five, you have a forest of stalks 45 cm (18 inches) tall. You harvest the outer stalks as needed, and the plant continues to produce from the center. You’ve used half the water of your neighbors, and your celery actually tastes like celery, not stringy water.
Final Thoughts
Transitioning to wicking beds is more than just a change in equipment; it’s a change in philosophy. It’s about moving away from the “emergency response” style of gardening where we only water when we see a plant wilting. For a plant as demanding as celery, that constant, quiet supply of moisture is the difference between a frustrating hobby and a professional-grade harvest.
By mimicking the natural marshland habitat of the celery plant, you are removing the environmental variables that cause bitterness and tough fibers. You are giving the plant the freedom to grow at its biological maximum.
Whether you are building your first small wicking bucket or converting an entire garden of raised beds, the lessons of dynamic hydration apply. Start with a good reservoir, use a high-wicking soil mix, and keep that nitrogen flowing. Your taste buds—and your water bill—will thank you. Experiment with different varieties and don’t be afraid to plant them close. In the world of the garden marsh, more is often merrier.