
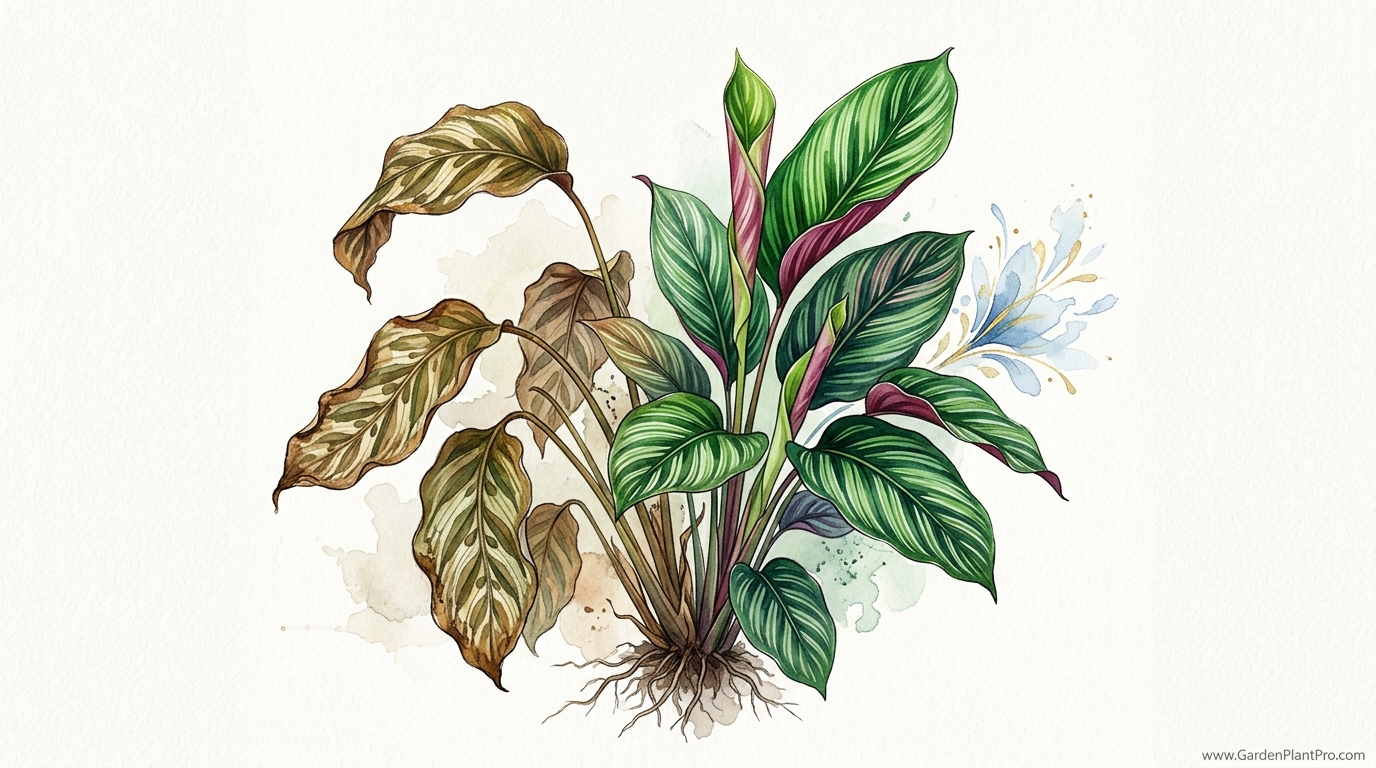
Before you throw that ‘dead’ Calathea in the trash, look beneath the soil at its secret survival engine. We often see a pot of yellowing leaves and think ‘failure.’ But for a Calathea, the leaves are temporary; the rhizome is the asset. If the root is firm, the plant isn’t dead—it’s just dormant. Learn how to stop treating your stressed plants like trash and start unlocking their hidden regrowth potential.
I’ve been gardening for more decades than I care to admit, and if there is one thing these “prayer plants” have taught me, it is that they are masters of the dramatic exit. You might wake up one morning to find your prized Medallion or Ornata looking like a pile of scorched parchment. Most folks take that as a sign to head to the compost bin, but a seasoned gardener knows better. We look for the life that the eyes can’t see, tucked away in the dark, damp earth.
Reviving a Calathea isn’t just about watering it more or moving it to a different window. It is about understanding the biological contract the plant makes with its environment. When conditions get too harsh—maybe the air is too dry or the tap water is too chemical-heavy—the plant makes a strategic retreat. It sheds the “expensive” leaves to save the “bank account,” which is that chunky rhizome underground. If you can protect that bank account, the plant can always rebuild its leafy empire.
How To Revive A Dying Calathea
Reviving a dying Calathea is the process of restoring a plant that has lost its foliage or vigor by focusing on the health of its underground storage system. In the world of botany, we call these plants “drama queens,” but in reality, they are just highly sensitive indicators of their environment. When a Calathea “dies back,” it is often entering a self-induced dormancy to protect its core from stress.
This survival mechanism relies on the rhizome, a thick, horizontal underground stem that puts out both roots and shoots. Think of the rhizome as a battery pack. As long as that battery still holds a charge—meaning it is firm, fleshy, and not mushy—the plant has the potential to sprout entirely new leaves. In real-world terms, this means a “dead” pot of dirt can become a lush, vibrating centerpiece again within a few months if you treat the soil right.
Gardeners typically use revival techniques when a plant has suffered from extreme underwatering, low humidity, or a pest invasion like spider mites. Instead of giving up, we perform a “hard reset.” This involves clearing away the failed experiments of the past (the dead leaves) and creating a nursery-like environment for the rhizome to wake up. It is a test of patience, but the reward is a plant that is often more resilient than the one you originally bought from the store.
The Step-by-Step Recovery Process
The first thing I tell my neighbors when they bring me a crispy plant is to stop hovering. Recovery takes time, and you can’t rush a rhizome. You have to start by assessing the damage and then systematically removing the obstacles to growth. Here is the process I’ve used for years to bring back even the most “hopeless” cases.
Step 1: The Rhizome Inspection
Gently tip the plant out of its pot. You need to see what’s going on under the hood. Shake off the old, tired soil—carefully, now—and look for those chunky, ginger-like structures. If they are orange, white, or light brown and firm to the touch, you are in business. If they crumble like dust or turn to mush in your fingers, then I’m sorry to say the “battery” has leaked and the plant is truly gone.
Step 2: Pruning the Past
Once you’ve confirmed the rhizome is alive, take a pair of clean, sharp shears and cut away every bit of dead, brown, or yellowing foliage. I usually cut about 1 inch (2.5 cm) above the soil line. Don’t be afraid of the “bald” look. Leaving dead leaves on the plant only invites fungus and forces the plant to waste energy on parts that will never be green again. We want all that energy going into new shoots.
Step 3: The Humidity Tent
In my garden, I call this the “Intensive Care Unit.” After repotting into fresh soil, find a clear plastic bag. Place it over the pot to create a mini-greenhouse. This traps the moisture and keeps the humidity at nearly 100%. For a plant without leaves, this high humidity prevents the rhizome from drying out and signals that it’s safe to send up new growth. Poke a few small holes for air, or open it once a day to let the air refresh.
Step 4: The Waiting Game
Place the pot in a warm spot with bright, indirect light. Avoid direct sun at all costs; you don’t want to cook the rhizome inside that plastic bag. You might not see anything for three weeks, or it might take two months. One day, you’ll see a tiny, tightly furled green spike pushing through the soil. That is your “Phoenix” rising from the ashes.
Understanding the “Survival Engine”
To really master Calathea care, you have to understand why the rhizome is so special. Unlike a simple root, a rhizome is a modified stem. It contains axillary buds, which are the “blueprints” for new stems and leaves. When the environment is perfect, these buds stay quiet, and the plant grows normally. But when stress hits, these buds act as a backup system.
The rhizome also stores starch and nutrients. This is why a Calathea can survive for a surprising amount of time without any leaves at all. It is living off its savings. In the wild rainforests of South America, these plants often deal with fluctuating light and moisture under the canopy. The ability to “die back” and wait for the rainy season is a feature, not a bug.
When you are reviving a plant, you are essentially mimicking that tropical rainy season. You provide the consistent warmth (between 65°F and 80°F, or 18°C to 27°C) and the high humidity that tells the rhizome the “drought” is over. This is the secret to a green thumb: you aren’t forcing the plant to grow; you are just convincing it that the world is a safe place again.
Benefits of Saving a Stressed Plant
Many people ask me why I bother with a “dead” plant when a new one only costs twenty dollars at the nursery. To me, there are practical and personal reasons that make revival the better choice every time. First, a revived plant already has a mature root system. A new sprout from an old rhizome will often grow much faster and produce larger leaves than a tiny seedling would.
There is also the matter of environmental adaptation. A plant that has lived in your home for a year has already survived your specific light levels and temperature swings. The leaves might have failed, but the “genetic memory” in that rhizome is tuned to your house. Once it regrows, it is often much “tougher” than a fresh hothouse plant that has just been shipped across the country.
- Cost Efficiency: You save money by not replacing plants every time they have a tantrum.
- Skill Building: Learning to revive a plant teaches you more about soil, water, and light than ten “easy” plants ever could.
- Genetic Maturity: The established rhizome can support rapid, robust growth once it wakes up.
- Reduced Waste: You keep plastic pots and peat-heavy soil out of the landfill.
Challenges and Common Mistakes
Even with the best intentions, it is easy to trip up when you’re trying to play plant doctor. The biggest mistake I see is overwatering during the “bald” phase. Remember, without leaves, the plant has no way to “sweat” out excess water through transpiration. If you keep the soil soaking wet, the rhizome will rot before it ever has a chance to sprout.
Another common pitfall is using the wrong water. Calatheas are notorious for their hatred of fluoride and chlorine. If you are using water straight from the tap, the chemicals can build up in the soil and “burn” the delicate new root hairs as they try to form. I always tell my neighbors to use distilled water or rainwater, especially when the plant is in recovery.
| Mistake | The Result | The Fix |
|---|---|---|
| Overwatering “Bald” Plants | Rhizome Rot | Keep soil barely damp, never soggy. |
| Direct Sunlight | Cooked Rhizome | Use bright, filtered light only. |
| Using Tap Water | Chemical Burn | Use distilled, rain, or RO water. |
| Too Much Fertilizer | Salt Buildup | Avoid fertilizer until you see 3+ new leaves. |
Environmental Factors and Garden Conditions
To keep your revived Calathea from heading back to “death’s door,” you have to manage the invisible factors in your room. Humidity is the big one. These plants come from the jungle floor where the air is thick enough to drink. If your home humidity is below 50%, the leaf edges will start to crisp up again faster than you can say “Medallion.”
DIY PROJECT: Collect rainwater no matter where you live...

This DIY project is the best way to legally collect rainwater NO MATTER where you live. Get chlorine-free water, cut down on your water bills, and have enough for an emergency situation or to water your garden. Read More Here...
Temperature stability is just as important. In my experience, a cold draft from a window or a blast of hot air from a radiator is the quickest way to send a Calathea into a tailspin. They like a steady range, ideally between 18°C and 24°C (65°F to 75°F). If you’re comfortable in a light t-shirt, your plant is probably happy too. If you’re shivering or sweating, they are likely struggling.
Light is the final piece of the puzzle. Think of the rainforest: the sun is bright, but it is filtered through layers of leaves above. You want “dappled” light. An east-facing window is usually perfect because it gives the plant gentle morning sun without the harsh, leaf-searing heat of the afternoon. If you only have a south-facing window, a sheer curtain is a mandatory investment.
The Perfect Soil Mix for Revival
When you’re repotting a struggling rhizome, the soil isn’t just a place to stand; it is a life-support system. Standard “all-purpose” potting soil is often too heavy and holds too much water, which leads to the “suffocation” I mentioned earlier. You want a mix that is airy, loose, and slightly acidic (pH 6.5 to 7).
My “go-to” recipe for Calatheas is a blend of 50% peat moss or coco coir for moisture, 20% perlite for aeration, and 30% orchid bark or pine fines for structure. This mix allows the roots to breathe while still holding onto enough “sip-able” moisture. If you want to get fancy, adding a handful of worm castings or a bit of horticultural charcoal can help keep the soil “sweet” and provide a gentle, slow-release nutrient boost.
Avoid using garden soil or anything that contains “moisture crystals.” Those crystals are meant for outdoor pots in the sun and can hold way too much water for a sensitive indoor Calathea. The goal is a medium that feels like a wrung-out sponge: damp to the touch, but it shouldn’t drip if you squeeze a handful of it.
Limitations: When This May Not Work
I have to be honest with you—sometimes, the damage is just too deep. While the rhizome is a powerful survival engine, it isn’t immortal. If a plant has been sitting in waterlogged soil for weeks, an anaerobic bacteria can take hold and liquefy the rhizome. Once that structure is mushy and smells like rotting cabbage, there is no magic trick in the world that will bring it back.
Cold damage is another “hard limit.” If a Calathea has been exposed to temperatures near freezing (below 10°C / 50°F) for an extended period, the cells in the rhizome can actually rupture. In these cases, the plant might look okay for a day or two, but the “insides” are essentially mush. If you’re trying to revive a plant that spent a night in an unheated garage during a frost, your chances of success are unfortunately slim.
Finally, consider the scale of the plant. A tiny starter plant with a very small rhizome has less “stored energy” than a large, established one. If a small plant loses all its leaves, it might simply run out of fuel before it can push out new growth. Serious practitioners often keep multiple “backup” rhizomes from divisions just in case one fails to wake up from dormancy.
Practical Tips and Best Practices
Over the years, I’ve picked up a few “pro” tricks that can make the difference between a plant that survives and one that actually thrives. One of my favorites is the “Pebble Tray.” Instead of just misting—which only raises humidity for a few minutes—place your pot on a tray filled with pebbles and water. As the water evaporates, it creates a constant “micro-bubble” of moist air right around the foliage.
- Check the Knuckle: Never water on a schedule. Stick your finger into the soil up to the first knuckle. If it’s dry, water. If it’s damp, wait.
- The Room Temp Rule: Always water with room-temperature water. Cold water can shock the tropical roots and cause leaf spotting.
- Dust the Leaves: Once your new leaves arrive, wipe them down once a week with a damp cloth. Dust blocks light and makes the plant work harder for its food.
- Flush the Soil: Every few months, water the plant until water runs freely out the bottom for a full minute. This washes away any salt or mineral buildup from fertilizers.
Advanced Considerations: Seasonal Dormancy
For those of you who want to go deeper, it is important to realize that Calatheas have their own internal clocks. In many parts of the world, growth slows down naturally during the shorter, cooler days of winter. During this time, the plant needs less water and zero fertilizer. If you try to “force” growth with heavy feeding in the winter, you’ll likely just burn the roots.
I’ve also noticed that some varieties, like the Calathea zebrina or the White Fusion, are more prone to seasonal “sulking” than others. If your plant looks a bit thin in January, don’t panic. As long as the stems aren’t collapsing, just pull back on the watering and wait for the spring sun. This “rest” period is actually healthy and helps the plant produce a massive flush of growth once the temperatures rise again.
A Realistic Scenario: The “Holiday Crisis”
Let’s look at a common situation. You go away for a ten-day winter vacation and forget to turn up the humidifier. You come home to a Calathea Ornata that is 100% brown and crispy. The soil is bone dry. Most people would see this as a goner. But here is the recovery plan:
First, don’t drench it immediately. Give it a “gentle sip” of distilled water to rehydrate the soil slowly. Trim the dead leaves as discussed. Then, perform a “bottom watering” by sitting the pot in an inch of water for 30 minutes to ensure the core of the root ball is moist. Bag it up, put it in a warm corner, and walk away. I’ve seen this exact scenario result in a full, 2-foot (60 cm) tall plant by the end of the following summer. It just takes the courage to look past the brown bits.
Final Thoughts
Gardening is often a lesson in faith. We spend so much of our time looking at what is above the surface—the patterns, the colors, the “perfection”—that we forget the real work is happening in the dark. A Calathea that has lost its leaves is not a failure. It is a plant that is waiting for a better tomorrow. When you learn to see the potential in a firm rhizome, you stop being a consumer of plants and start being a true steward of nature.
I encourage you to give that “dead” plant one more chance. Treat the soil like a sanctuary and the humidity like a warm hug. You might be surprised at how much life is tucked away in that little pot of dirt. Once you’ve mastered the revival of a Calathea, you’ll find that you have a lot more patience for the other “struggling” parts of your garden—and maybe even your life.
If you find success here, you might want to explore the world of soil health and composting next. Understanding how microbes interact with those rhizomes can take your indoor jungle from surviving to truly thriving. Happy planting, and remember: as long as the root is firm, the story isn’t over yet.