
Most people see a sticky lawn chore, but the master gardener sees a high-potency potassium battery. That ‘mess’ under your plum tree is actually a concentrated source of potassium and sugar that your soil is craving. Instead of bagging it for the landfill, learn how to turn fallen fruit into a high-speed microbial engine for next year’s harvest.
Working the soil for decades teaches you that nature rarely wastes a single drop of energy. When those plums hit the grass, they are carrying months of gathered sunlight and minerals back to the earth. Most folks worry about the wasps or the sticky soles of their shoes, but if you look closer, you will see a biological goldmine.
I have spent many late August afternoons watching the ground under my stone fruit trees. Over time, I realized that the trees were trying to feed themselves. By understanding how to manage this windfall, you can stop spending money on bags of potash and start using the fuel already sitting in your backyard.
How To Use Fallen Plums As Fertilizer
Using fallen plums as fertilizer is the practice of recycling the nutrients stored in unharvested or damaged fruit back into the garden ecosystem. In the world of an experienced gardener, this is often the difference between a garden that struggles and one that thrives on its own internal momentum.
Fallen plums are essentially “packaged” nutrition. They contain high levels of potassium, which is the primary driver of fruit size and disease resistance in plants. When a plum tree grows, it pulls potassium, phosphorus, and trace minerals like calcium and magnesium from the deep soil. When the fruit falls and decomposes, it returns those exact elements to the topsoil where they can be recycled.
In real-world terms, gardeners use this windfall in several ways. Some bury it in trenches to feed heavy feeders like tomatoes or pumpkins. Others ferment the fruit into a liquid “tea” that acts as a fast-acting foliar spray. In a permaculture setting, this is part of a “closed-loop” system where nothing leaves the property except the fruit you eat.
It is important to visualize the soil not as a pile of dirt, but as a living digestive system. Just as you wouldn’t eat a raw steak without a bit of preparation, the soil prefers its “plum fuel” to be managed so it doesn’t attract the wrong kind of attention from pests or pathogens.
The Biological Engine: How It Works
The process of turning a plum into plant food is driven by a massive surge in microbial activity. When a plum begins to soften on the ground, its natural sugars—mostly glucose and fructose—leak into the surrounding soil. This is like ringing a dinner bell for local bacteria and fungi.
As these microbes feast on the sugars, they multiply at an exponential rate. This microbial bloom does more than just break down the fruit; it actually helps “unlock” other minerals already present in your soil. The organic acids found in plums, such as malic and citric acid, can help lower the pH of the immediate area slightly, making nutrients like phosphorus more bio-available to plant roots.
Following the microbes come the earthworms. Worms are not necessarily eating the fruit itself; they are drawn to the explosion of bacteria and fungi on the fruit’s surface. As they move toward the feast, they create “worm highways”—tunnels that improve soil aeration and water infiltration. Their castings, left behind in the fruit zone, are far richer in available nitrogen and potassium than the original fruit was.
Methods for Transforming Windfalls into Fuel
There are several ways to handle fallen fruit depending on your patience and the needs of your garden. Each method has its own set of advantages for soil health and nutrient delivery.
The Trench Composting Method
This is perhaps the simplest way to get the job done. It involves digging a trench about 12 to 18 inches (30 to 45 cm) deep and as wide as your shovel. Place a 6-inch (15 cm) layer of fallen plums into the bottom.
To balance the high-sugar “green” material of the plums, I always recommend adding a layer of “browns,” such as shredded autumn leaves or straw. This prevents the fruit from becoming a slimy, anaerobic mess. Cover the trench with the soil you removed and tamp it down. Within six months, the fruit will have completely vanished, replaced by a vein of dark, nutrient-rich humus.
Fermented Fruit Juice (FFJ)
For those who want a liquid fertilizer that works within days rather than months, fermentation is the answer. This technique, often used in Korean Natural Farming, extracts the nutrients through osmosis.
Mix equal parts by weight of chopped plums and brown sugar in a glass jar or plastic bucket. The sugar draws out the juice and feeds the beneficial microbes. Cover the container with a breathable cloth and let it sit in a dark spot for 7 to 14 days. You will know it is ready when it has a pleasant, vinegary-sweet smell. Strain the liquid and dilute it at a ratio of 1 part juice to 500 parts water for a soil drench, or 1 to 1000 for a foliar spray.
The “Pit and Drop” Strategy
If you have a large orchard and limited time, you can use a post-hole digger to create “fertility pockets” around the drip line of your trees. Dig a hole 18 inches (45 cm) deep, drop in a handful of plums, and cover them back up. This keeps the nutrients right where the tree needs them for next year’s crop without creating a messy surface that attracts flies.
Benefits of Using Plum Windfalls
The most obvious benefit is the zero-cost potassium boost. Commercial fertilizers can be expensive, and they often lack the trace minerals and organic matter found in whole fruit.
- Potassium for Flowering: Plums are high in potassium, which strengthens plant stems and regulates water movement. This is critical for plants like tomatoes, peppers, and roses.
- Microbial Diversity: The sugars in plums support a wide variety of soil life that you simply don’t get from synthetic pellets.
- Improved Soil Structure: The decomposition process adds organic matter, which helps sandy soils hold onto water and heavy clay soils become more friable.
- Worm Attraction: Nothing brings worms into a garden bed faster than the scent of fermenting fruit buried just beneath the surface.
Challenges and Common Mistakes
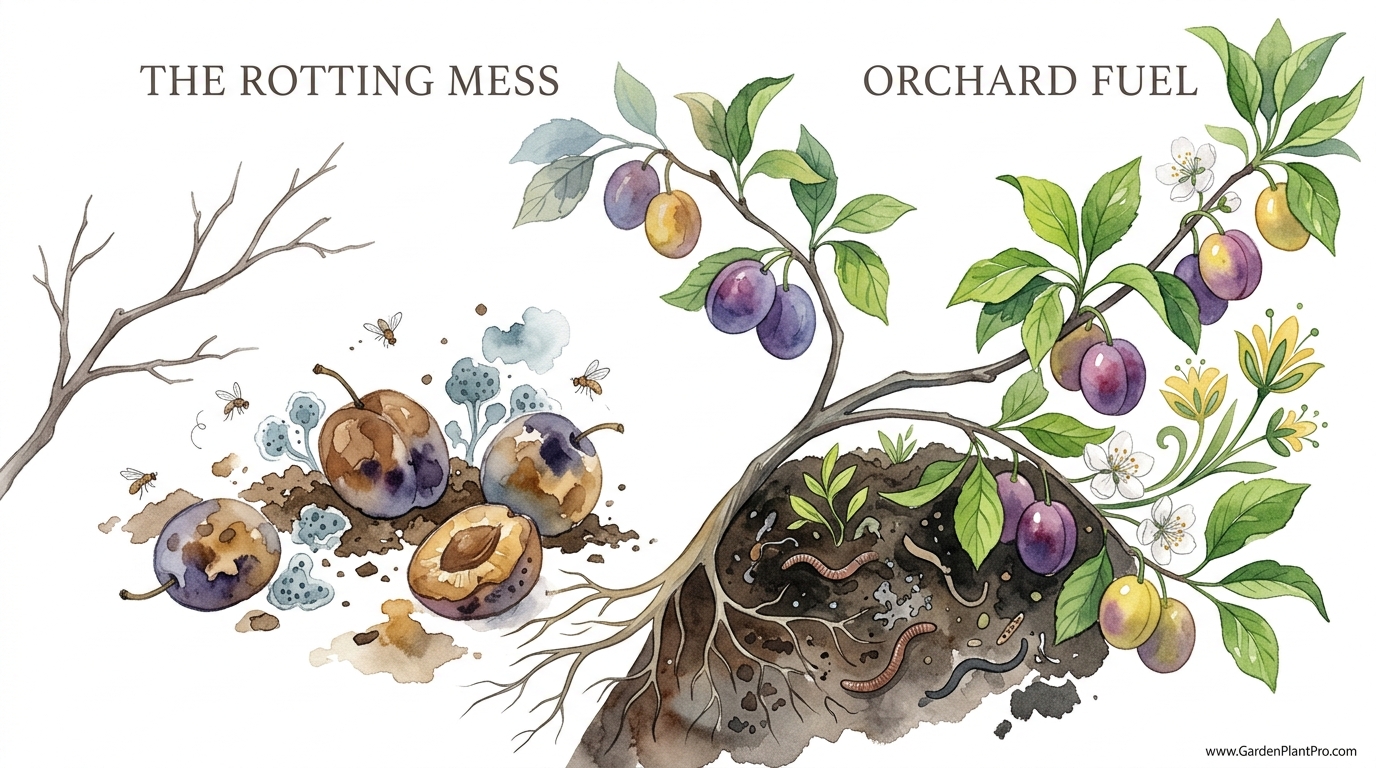
The biggest mistake gardeners make is leaving the fruit to rot directly on the surface under the parent tree. While this is “natural,” it often invites the one thing no orchardist wants: Brown Rot (Monilinia fructicola).
Brown rot is a fungal disease that can devastate stone fruit crops. If you leave infected plums on the ground, the fungal spores can overwinter in the soil or in “mummy fruit” that stays on the branch. The following spring, wind and rain splash these spores back onto your blossoms, starting the cycle of destruction all over again.
DIY PROJECT: Collect rainwater no matter where you live...

This DIY project is the best way to legally collect rainwater NO MATTER where you live. Get chlorine-free water, cut down on your water bills, and have enough for an emergency situation or to water your garden. Read More Here...
Another challenge is the “pest party.” Unmanaged piles of rotting plums will attract wasps, yellow jackets, fruit flies, and even rodents or larger wildlife like raccoons and deer. This is why burying the fruit is almost always better than leaving it on top. If you bury it at least 8 to 12 inches (20 to 30 cm) deep, the smell is contained, and the pests won’t find it.
Limitations: When Not to Use Plums
Not every fallen plum should be used as fertilizer. If a tree is heavily infested with pests like the plum curculio or codling moth, burying the fruit might just provide a safe nursery for the larvae to pupate in the soil. In these cases, it is better to feed the fruit to chickens—who will eat the larvae—or to hot-compost the fruit in a pile that reaches at least 140°F (60°C) to kill the pests.
Additionally, avoid using plums that are heavily covered in chemical pesticides or fungicides. These residues can harm the very soil microbes you are trying to encourage. If you have recently sprayed your trees with a synthetic product, wait for the recommended “pre-harvest interval” before using the windfalls in your soil.
Comparison: Surface Rotting vs. Managed Fueling
| Factor | Surface Rotting (The Mess) | Managed Fueling (The Strategy) |
|---|---|---|
| Nutrient Efficiency | Low (Leaching and evaporation) | High (Directly into the root zone) |
| Pest Attraction | High (Wasps, flies, rodents) | Minimal (Scent is buried) |
| Disease Risk | High (Spreads Brown Rot) | Low (Microbes break down pathogens) |
| Labor Level | Zero | Moderate (Digging required) |
Practical Tips and Best Practices
If you are ready to start using your plums, keep these veteran tips in mind. First, always remove the pits if you are using the plums in a small garden bed or a vegetable patch. Plum pits are slow to break down and can be a nuisance when you are trying to hoe or plant in the spring.
Second, pay attention to the spacing. When burying fruit near existing plants, stay at least 10 inches (25 cm) away from the main stem. The initial fermentation process can be quite acidic and might stress young roots if it is too close. Give the microbes a few weeks to stabilize the area before planting directly on top of a buried trench.
Third, use the seasonal timing to your advantage. I like to bury my plums in the late summer or early autumn. This gives the soil life all winter to process the material. By the time the ground warms up in the spring, the “potassium battery” is fully charged and ready for your spring seedlings.
Advanced Considerations: The Vinegar Extraction
For the gardener who wants to wring every last molecule of value out of their windfalls, consider vinegar extraction. After you have fermented your plums for juice, you can soak the remaining solids in apple cider vinegar for two weeks.
The acetic acid in the vinegar is incredibly efficient at pulling calcium and other minerals out of the fruit skins and any missed pit fragments. This creates a secondary liquid amendment that is particularly good for acid-loving plants like blueberries or hydrangeas. It also acts as a mild pest repellent when diluted and sprayed on foliage.
Scenario: The “Tomato Booster” Trench
Imagine you have a row of tomato plants planned for next year. This August, you collect three buckets of fallen plums. You dig a trench along your future tomato row, bury the plums with a few handfuls of wood ash (for even more potassium) and some straw.
By next May, that soil will be teeming with earthworms. When you transplant your tomatoes, they will find a “well” of nutrients exactly where they need them. You will likely see thicker stems, darker leaves, and fruit that tastes sweeter because of the high sugar and mineral content provided by those “messy” plums.
Final Thoughts
Turning fallen fruit into fertilizer is one of those simple shifts in perspective that turns a gardener into a steward of the land. It is about moving away from the “bag and drag” mentality and toward a way of growing that respects the natural cycles of your backyard.
Those sticky plums are not a problem to be solved; they are a gift from the tree to the soil. When you take the time to bury them or ferment them, you are participating in a conversation between the plants and the microbes that has been going on for millions of years.
I encourage you to experiment this season. Try one trench, or perhaps one jar of fermented juice. Once you see the explosion of life that follows, you will never look at a fallen plum as a “mess” ever again. You will see it for exactly what it is: the best fertilizer money can’t buy.