
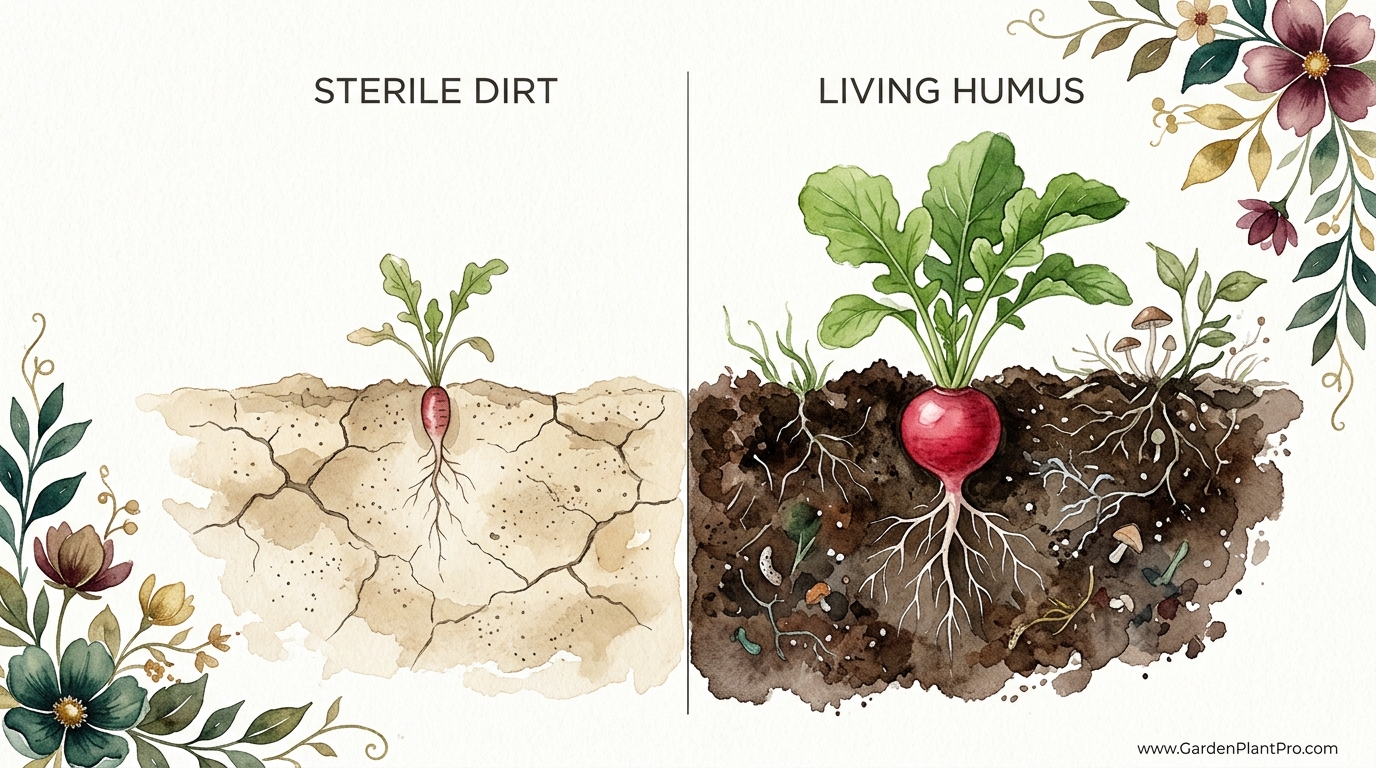
Is your soil a biological graveyard or a high-speed engine for 25-day harvests? Most gardeners think ‘dirt is dirt,’ but your radishes know the difference. When you plant in sterile, bagged mixes, you are putting your seeds in a desert on life support. Switch to living, microbe-rich humus and watch your harvest time drop while flavor explodes. Here is how the ‘underground economy’ of your garden creates the crunchiest, sweetest roots you have ever tasted.
I have spent nearly forty years watching the seasons turn from my back porch, and if there is one thing I have learned, it is that radishes are the “truth-tellers” of the garden. They grow so fast that they reflect exactly what is happening in your soil in real-time. If your soil is hard, the radish will be stunted; if it is too hot, the radish will be bitter; but if your soil is alive, that radish will be a masterpiece.
The secret isn’t a “blue liquid” fertilizer or a fancy gadget. It is the transition from thinking about “dirt” as a substrate to seeing “humus” as a living ecosystem. When we talk about growing bigger radishes faster, we are really talking about how to manage the biology of the top six inches (15 cm) of your garden bed. Let me walk you through the lessons I have picked up over the decades.
How To Grow Bigger Radishes Faster
Growing a radish that is both large and fast-maturing is a balancing act of physics and biology. In the gardening world, radishes (Raphanus sativus) are often called the “instant gratification” crop because varieties like ‘Cherry Belle’ or ‘French Breakfast’ can go from seed to table in as little as 22 to 28 days. However, achieving that “bigger” part without losing the “faster” part requires specific conditions.
To grow a large, crisp radish quickly, the plant needs to expand its root without resistance. This is why “tilth”—the physical condition of the soil—is so critical. If the soil is compacted or “sterile,” the plant spends too much energy trying to push through the earth and not enough energy storing sugars in the bulb. In a living humus system, the soil is held together by microbial glues (glomalin) that create tiny air pockets, making the soil feel like a chocolate sponge cake. This allows the radish to swell effortlessly.
Real-world radish success happens when you match the variety to your specific soil temperature and texture. For example, if you have heavy clay, you might struggle with round radishes, but a long, tapered ‘White Icicle’ or a ‘Daikon’ might thrive because they are built to drill deep. But for the classic backyard “cruncher,” it all starts with the life in your soil.
The Underground Economy: How Living Soil Works
When you use a sterile, bagged potting mix, you are essentially providing a “dead” house with a few vitamins added. The plant has to do all the work. In contrast, living humus is a bustling marketplace. Radish roots exude sugars and proteins into the soil to “feed” beneficial bacteria and fungi. In exchange, these microbes break down organic matter into a form the radish can drink up instantly.
This “underground economy” is what allows a radish to mature in 25 days instead of 35. When the nutrient exchange is efficient, the plant doesn’t experience “growth stalls.” Common pitfalls often involve a lack of this biological activity, leading to roots that are small, “woody,” or excessively spicy because the plant was stressed during its short life.
To kickstart this process, you need to think about soil health rather than just “feeding the plant.” Adding aged compost or leaf mold introduces the microbes that do the heavy lifting. I always tell my neighbors: “Stop feeding the radishes and start feeding the soil.”
The Role of Tilth and Drainage
Radishes have very fine, shallow root systems that spread horizontally. If the soil forms a hard crust—a common problem with low-organic-matter dirt—the seedling will struggle to emerge, and the root will become misshapen. You want a “friable” soil, which means if you squeeze a handful of damp soil, it should hold its shape but crumble the moment you poke it with a finger.
- Ideal pH: Aim for a range of 6.0 to 7.0 for optimal nutrient uptake.
- Texture: Sandy loam is the gold standard for radishes.
- Depth: Even for small spring radishes, loosen the soil to at least 6 inches (15 cm). For Daikons, you’ll need 12 to 18 inches (30–45 cm) of loose earth.
Steps to a 25-Day Harvest
Achieving a lightning-fast harvest isn’t about luck; it’s about a checklist. I follow a “sprint” mentality with radishes. Since they are in the ground for such a short time, every day counts. One day of drought or one day of extreme heat can ruin the flavor of the entire batch.
Step 1: Timing the Temperature
Radishes are cool-season athletes. They perform best when soil temperatures are between 50°F and 65°F (10°C to 18°C). If you plant when it is too cold, they will sit dormant and the skins will toughen. If it is too hot—above 70°F (21°C)—the plant will “bolt,” sending up a flower stalk and making the root woody and bitter. In the North, start 3–4 weeks before the last frost; in the South, focus on autumn plantings.
Step 2: Sowing for Success
Plant your seeds about 1/2 inch (1.25 cm) deep. If you plant them too shallow, the “shoulder” of the radish will be exposed to the sun and become green and tough. If you plant them too deep, the energy required to reach the surface will delay your harvest. Space them about 1 inch (2.5 cm) apart initially. I like to drop two seeds every inch and then thin the weaker one later.
Step 3: The Critical “Thinning” Phase
Overcrowding is the number one reason gardeners get “all leaves and no roots.” About a week after they sprout, when they are 1–2 inches (2.5–5 cm) tall, you must thin them. For standard radishes, leave 2–3 inches (5–7.5 cm) between plants. This gives the bulb room to swell without competing for water or light. Don’t throw those thinnings away—they are delicious microgreens for your salad!
Step 4: Consistent Hydration
Radishes need “slow and low” watering. They require about 1 inch (2.5 cm) of water per week, but it needs to be consistent. If the soil dries out and then you drench it, the sudden intake of water will cause the radish to swell faster than the skin can grow, resulting in cracking. I find that a light mulch of straw or dried grass clippings helps keep the moisture levels even and the soil temperature cool.
The Benefits of Living Humus
Choosing living humus over sterile dirt provides more than just speed. The quality of the final product is vastly different. Because the microbes are unlocking trace minerals like boron and sulfur in a balanced way, the radish develops a complex flavor—peppery but with a sweet finish—rather than just being “hot.”
Furthermore, living soil has a higher “cation exchange capacity,” which is a fancy way of saying it holds onto nutrients better. In a bagged mix, the nutrients often wash out the bottom of the pot every time you water. In a humus-rich bed, the soil acts like a battery, storing energy and releasing it as the plant asks for it. This leads to roots that are nutrient-dense and packed with Vitamin C and antioxidants.
Challenges and Common Mistakes
Even seasoned gardeners trip up with radishes. The most frequent error I see is the “Nitrogen Trap.” People see their radishes look a bit pale and they hit them with a high-nitrogen fertilizer. Within days, they have beautiful, lush, 10-inch (25 cm) leaves—but when they pull the plant up, there is nothing but a skinny little “rat tail” root at the bottom.
Common Pitfalls Include:
DIY PROJECT: Collect rainwater no matter where you live...

This DIY project is the best way to legally collect rainwater NO MATTER where you live. Get chlorine-free water, cut down on your water bills, and have enough for an emergency situation or to water your garden. Read More Here...
- Excessive Nitrogen: Nitrogen encourages leaf growth at the expense of root development. Use a balanced 5-5-5 or just plain aged compost.
- Waiting Too Long: A radish that is ready on Day 25 can be a “woody bomb” by Day 30. Harvest as soon as the bulb is about 1 inch (2.5 cm) in diameter.
- Heat Stress: If a heatwave hits, the radish thinks its life is ending and rushes to make seeds. This is “bolting.” Provide shade cloth if temperatures spike unexpectedly.
- Compact Soil: If you can’t push your pinky finger into the soil easily, your radishes will struggle to grow round.
Limitations: When Speed Isn’t Possible
It is important to be realistic. While we all want 25-day harvests, nature sometimes has other plans. If you are growing “Winter Radishes” like ‘Black Spanish’ or ‘Daikon,’ you are looking at a 50 to 70-day window. These varieties are built for size and storage, not speed. They need the shorter days of late summer and fall to develop their massive root systems.
Additionally, if your garden is in a heavy clay region, “faster” might not be an option without significant soil amendment. You can’t rush physics. In these cases, focus on garden planning by building raised beds filled with a mix of 75% compost and 25% coarse sand or vermiculite to create the drainage these roots crave.
Comparing Soil Environments
To help you visualize why living humus is superior for root crops, look at how different environments impact the growth cycle of a standard spring radish.
| Feature | Sterile Bagged Mix | Living Humus (Active Soil) |
|---|---|---|
| Nutrient Delivery | Pulsed (Fertilizer dependent) | Constant (Microbe regulated) |
| Water Retention | Fast-drying, prone to crusting | Sponge-like, stable moisture |
| Flavor Profile | Often one-dimensional (hot) | Complex, sweet-peppery balance |
| Speed to Harvest | 30–40 Days | 22–28 Days |
| Pest Resistance | Low (Plants are stressed) | High (Systemic immunity) |
Practical Tips and Best Practices
If you want to apply this to your garden today, here are the “gold nuggets” of advice I give to anyone starting their first row of radishes. These adjustments can turn a mediocre harvest into a trophy-winning one.
- Succession Planting: Don’t plant all your seeds at once. Plant a small 3-foot (1-meter) section every 7 to 10 days. This ensures you have a continuous supply of young, tender radishes instead of 50 radishes that all go woody at the same time.
- The “Finger Test”: Every morning, poke your finger into the soil. It should feel like a wrung-out sponge. If it feels dusty, water immediately. If it feels muddy, hold off.
- Morning Harvest: Always harvest your radishes in the early morning before the sun hits the leaves. The roots are most turgid (crisp) at dawn. If you harvest in the heat of the afternoon, they will be limp.
- Pest Barriers: Use a lightweight floating row cover from the moment you sow. This is the only reliable way to stop flea beetles from eating the leaves and root maggots from tunneling into your beautiful bulbs.
- Potassium Power: If your soil test shows low potassium, add a bit of wood ash or greensand. Potassium is the engine of root expansion.
Advanced Considerations: Brix and Biochar
For the serious practitioner, we can look at “Brix levels”—a measurement of the sugar content in the plant’s sap. High-Brix radishes are not only sweeter, but they are also naturally resistant to pests. To achieve high Brix, you need to ensure your soil health includes a diverse range of trace minerals. Adding a dusting of rock dust or kelp meal can provide the micronutrients that standard fertilizers miss.
Another advanced technique is the use of biochar. Biochar acts like a “microbe hotel,” providing a permanent structure for beneficial fungi to live in. When mixed into your humus, it helps maintain that “chocolate sponge cake” texture year after year, reducing the need for tilling and preserving the delicate fungal networks that help radishes grow bigger and faster.
The “Neighbor’s Success” Scenario
I remember a neighbor, let’s call him Jim, who was frustrated because his radishes were always “all tops and no bottoms.” He was using a standard 10-10-10 garden fertilizer and watering whenever he remembered. His soil was hard-packed dirt that hadn’t seen a worm in years.
We spent one Saturday afternoon amending a small 4×4 foot (1.2×1.2 m) area. We didn’t use any chemicals. Instead, we dug in two wheelbarrows of aged horse manure and a bag of coarse builder’s sand. We loosened the earth down to 10 inches (25 cm) and covered the seeds with a light sifting of compost.
Jim thinned them religiously at day seven. He set a timer on his phone to water for five minutes every single morning at 7:00 AM. On Day 24, he pulled a ‘Cherry Belle’ that was perfectly round, 1.25 inches (3 cm) across, and so crisp it snapped like a fresh carrot. He didn’t just grow a radish; he built a biological engine. That is the power of living humus.
Final Thoughts
Growing the perfect radish is one of the most rewarding skills you can master because it teaches you everything you need to know about composting, irrigation methods, and pest management in a very short window. Once you see the difference between a radish grown in sterile dirt and one grown in living humus, you will never go back to “bagged-mix gardening.”
Remember that you are a steward of the soil first and a gardener second. If you take care of the “underground economy,” the radishes will take care of themselves. Experiment with different varieties, keep your moisture levels steady, and don’t be afraid to pull them early.
I encourage you to go out this weekend, grab a handful of your soil, and ask yourself: is this a graveyard or an engine? If it’s the former, a little compost and a lot of love can change everything by the time your next 25-day cycle is through. Happy planting!