
One of these dies the moment you forget to water it; the other hasn’t been watered by a human in three years. We’ve been conditioned to treat sage like a disposable grocery item that wilts in a week. But true sage is a woody survivor, a biological fortress designed for decades of harvest. Most gardeners are stuck in a cycle of ‘Fragility’—buying greenhouse-grown plants that can’t handle real wind or sun. Learn how to shift to ‘Resilience’ by hardening your stock and building the drainage a sage plant actually craves.
I’ve sat on this porch for thirty years watching neighbors plant sage in rich, black potting soil only to see it turn to mush by July. They treat it like lettuce, but sage is more like a stubborn old oak in a small body. If you want a sage bush that outlives your mortgage, you have to stop pampering it and start respecting its history as a Mediterranean cliff-dweller.
How To Make Sage Plants Last For Decades
Making sage last for decades is less about what you give the plant and more about what you refuse to give it. In its native home among the rocky hills of the Mediterranean, Salvia officinalis survives on grit, sun, and very little else. When we bring it into a backyard garden, we often kill it with kindness—too much water, too much fertilizer, and soil that stays damp for far too long.
To achieve true longevity, you must view your sage as a Woody Warrior. This means transitioning it from a soft, greenhouse-pampered state into a rugged, sun-baked perennial. A sage plant that has been properly hardened can survive temperatures down to -10°F (-23°C) and can withstand weeks of bone-dry summer heat. The goal is to build a root system so deep and a stem so sturdy that the plant becomes a permanent fixture of your landscape rather than a seasonal guest.
The secret lies in the structure. Sage is a subshrub, meaning it develops a woody base over time. If left unmanaged, this wood becomes brittle and unproductive. However, with the right drainage and a strategic pruning schedule, that woody base becomes the foundation for a plant that yields fresh, aromatic leaves for twenty years or more.
The Architecture of Resilience: Drainage and Soil
If your soil feels like a wet sponge after a rainstorm, your sage is already on borrowed time. These plants do not tolerate “wet feet.” Root rot is the number one killer of sage, often happening in the dead of winter when the plant is dormant and sitting in cold, soggy earth.
To build a resilient sage bed, aim for a soil pH between 6.0 and 7.0. While sage can tolerate slightly alkaline conditions, it struggles in highly acidic soil. If you are dealing with heavy clay, do not just add sand; you will accidentally create something resembling concrete. Instead, incorporate coarse grit, perlite, or crushed lava rock to create air pockets.
Gardeners often find success by planting sage on a slight mound or a “berm.” Raising the crown of the plant even 3 to 5 inches (7.5 to 12.5 cm) above the surrounding soil level allows gravity to pull excess water away from the sensitive root collar. This simple elevation change can be the difference between a plant that rots in a wet spring and one that thrives.
Hardening Your Stock: From Greenhouse to Garden
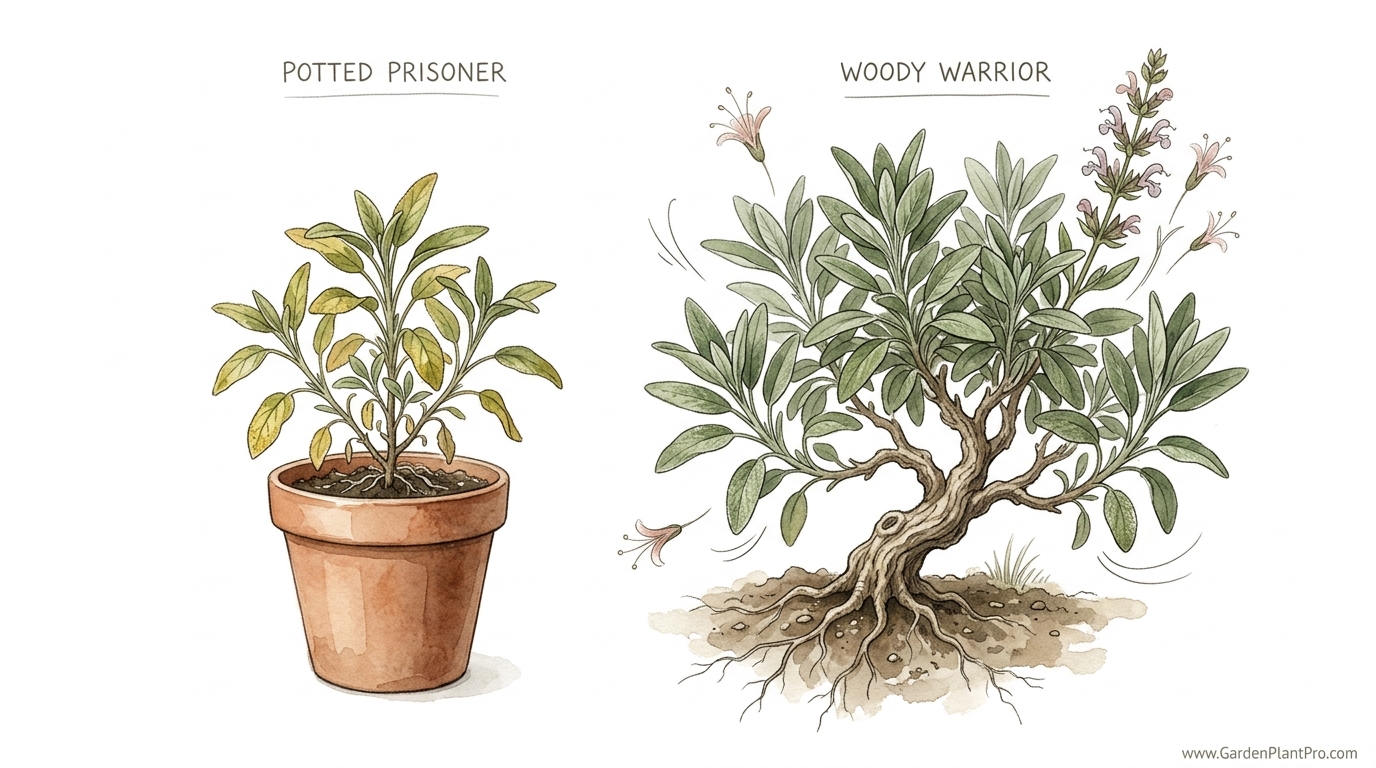
The “Fragility” cycle starts at the garden center. Most sage plants sold in plastic 4-inch (10 cm) pots have lived their entire lives in a climate-controlled greenhouse. Their leaves are thin, their stems are watery, and their roots are accustomed to a daily drenching.
Shifting to “Resilience” requires a 10-day hardening-off period. Start by placing your new plants in a sheltered, shady spot for just two hours a day. Gradually increase their exposure to direct sunlight and wind over the next week. This process triggers the plant to thicken its leaf cuticles and strengthen its cell walls. By the time it hits the ground, it should be a Woody Warrior ready for the elements, not a Potted Prisoner shocked by the first gust of wind.
Pruning for Longevity: The Three-Season Strategy
Most people are afraid to cut their sage. They see the woody stems and think they are fragile. In reality, pruning is the only way to prevent the plant from becoming a “rangy” mess that splits open under the weight of snow or heavy rain.
The Early Spring Rejuvenation
As soon as you see the first tiny green nubs of new growth appearing at the base of the plant in spring, it is time for the big cut. You can safely remove up to one-third of the woody growth. Look for a healthy set of leaves and cut just above them. This forces the plant to send energy into new, flexible stems rather than struggling to push sap through old, tired wood.
The Mid-Summer Tidy
After your sage finishes flowering—those beautiful purple or blue spikes that the bees love—give it a light haircut. Snip off the spent flower stalks and about 2 inches (5 cm) of the leafy tips. This prevents the plant from putting all its energy into seed production and keeps the foliage dense and aromatic.
The Late Summer Cutoff
Stop pruning at least two months before your first expected frost. In many regions, this means putting the shears away by late August or early September. Any new growth stimulated by pruning late in the season will be too tender to survive the winter. You want those final sets of leaves to “harden” and protect the woody core during the cold months.
Benefits of a Multi-Decade Sage Plant
Maintaining a long-term sage plant offers rewards that go far beyond a few leaves for a Thanksgiving turkey. As the plant matures, its essential oils become more concentrated, leading to a much deeper, more complex flavor and aroma.
- Deep Root Systems: An established sage plant can reach deep into the subsoil to find minerals and moisture, making it incredibly drought-resistant.
- Pollinator Support: Older, larger bushes produce hundreds of flower spikes, acting as a primary food source for local bees and butterflies.
- Natural Pest Repellent: The strong scent of a mature sage bush helps mask the smell of nearby vegetables, deterring pests like cabbage moths and carrot flies.
- Economic Savings: Instead of buying a new $5 plant every year, a one-time investment provides a lifetime of harvests.
Challenges and Common Mistakes
The most frequent error I see is over-fertilizing. Sage is not a heavy feeder. If you give it high-nitrogen fertilizer, it will grow incredibly fast, but that growth will be “soft.” Soft growth has less flavor, is more attractive to aphids, and is the first thing to die when the temperature drops. A simple shovelful of compost in the spring is all the food a healthy sage plant ever needs.
Another common pitfall is overhead watering. Sage leaves are covered in tiny hairs (trichomes) that trap moisture. If you spray the plant from above in the evening, that water sits on the leaves all night, inviting powdery mildew. Always water at the base of the plant, preferably in the early morning so any accidental splashes can evaporate in the sun.
When This May Not Be Ideal
While sage is a survivor, it isn’t a miracle worker. In regions with extreme tropical humidity, such as the coastal South or parts of Southeast Asia, sage often struggles to live more than a year or two. The constant moisture in the air prevents the leaves from drying out, leading to fungal issues that eventually overcome the plant’s defenses.
Similarly, if your garden is in deep, permanent shade, sage will never become a Woody Warrior. It will grow “leggy” as it reaches for the sun, and the lack of light will prevent it from developing the strong woody structure it needs to survive the winter. Sage needs a minimum of 6 to 8 hours of direct sunlight to thrive long-term.
DIY PROJECT: Collect rainwater no matter where you live...

This DIY project is the best way to legally collect rainwater NO MATTER where you live. Get chlorine-free water, cut down on your water bills, and have enough for an emergency situation or to water your garden. Read More Here...
Practical Tips for Immediate Application
- Use Terra Cotta: If you must grow sage in a pot, use unglazed terra cotta. The porous clay allows the soil to breathe and helps excess moisture evaporate from the sides of the pot.
- Mulch with Stone: Instead of wood chips, which hold moisture, use pea gravel or small river rocks around the base of your sage. This reflects heat back up into the plant and keeps the “neck” of the plant dry.
- Harvest the Tips: Regular harvesting of the top 3 inches (7.5 cm) of growth acts as a form of “pinching,” which encourages the plant to grow bushier and prevents it from becoming top-heavy.
Advanced Considerations for Serious Practitioners
For those looking to scale their sage production or ensure the survival of a specific heirloom variety, consider layering. Sage has a natural tendency to root wherever a branch touches the ground. You can “force” this by pinning a low-growing branch to the soil and covering it with a little dirt. Within a season, you’ll have a genetically identical clone with its own root system, providing a “backup” should the main plant ever succumb to old age or accidental damage.
Think also about the internal microclimates of your garden. Planting sage near a south-facing brick wall can provide a “heat sink” that protects the plant during extreme winter freezes. The thermal mass of the wall absorbs sun during the day and radiates it back at night, potentially extending your sage’s life by several years in colder zones.
Example Scenario: The Resurrection of a Woody Shrub
A few years ago, a neighbor showed me a sage plant that looked like a bunch of dead sticks with a few green tufts at the very top. It was about seven years old and had never been pruned. Most people would have ripped it out.
Instead, we waited for early spring. We cut back the dead-looking wood to just above the lowest visible green buds, leaving a “skeleton” about 8 inches (20 cm) high. We cleared away the old bark mulch and replaced it with a 1-inch (2.5 cm) layer of coarse grit. By June, that “dead” plant had exploded with new, vigorous growth. By the following year, it was a lush, 2-foot (60 cm) wide ball of silver-green leaves. It didn’t need a replacement; it just needed a return to its Woody Warrior roots.
Final Thoughts
Shifting from a “Fragility” mindset to one of “Resilience” changes the way you look at your entire garden. When you stop seeing sage as a delicate herb and start seeing it as a rugged survivor, you begin to understand the deeper rhythms of soil health and plant biology. You stop fighting the weather and start working with the plant’s natural defenses.
Take a look at your current herb setup. Is it a collection of Potted Prisoners waiting for their next drink, or a line of Woody Warriors standing guard over your soil? Start by improving your drainage and hardening off your next round of plants. With a little patience and a sharp pair of shears, you can build a garden that doesn’t just survive the season but thrives for decades.
As you master the art of sage, you might find yourself curious about other ways to build a self-sustaining landscape. Exploring topics like irrigation methods that mimic natural rainfall or the benefits of composting for long-term soil structure can further enhance your journey toward a truly resilient garden. Your sage is waiting to show you what it can do; you just have to give it the right ground to stand on.