
Are you wasting your Chinese Evergreen’s potential as a self-replicating indoor forest? You spent $30 on a single Chinese Evergreen, but you could have had fifty by now. Most owners use this plant for a ‘pop of color,’ but the pros treat it as a resource factory. By learning where to snip and how to trigger the ‘mother plant’ response, you can turn one purchase into a lifetime of free gifts and air purification. Stop buying, start multiplying.
I’ve sat on my porch for thirty years watching the seasons turn, and if there is one thing I’ve learned about the Aglaonema—what most of us call the Chinese Evergreen—it is that this plant is a giver. It doesn’t just sit there like a decorative object; it is a living system waiting for you to tap into its potential. If you treat it like a piece of furniture, it will grow slowly and eventually get leggy. If you treat it as a resource factory, you’ll never have to buy another houseplant again.
Most folks are intimidated by the idea of cutting into a plant they paid good money for. I get it. It feels like you’re risking the life of a beautiful friend. But in my garden, and in my living room, the “mother plant” response is a real phenomenon. When you take a careful cutting or divide a crowded pot, you aren’t just getting a new plant; you’re actually telling the original plant to wake up and produce more. It’s a conversation between you and the soil.
Sharing a rooted cutting with a neighbor is one of life’s simple pleasures. It’s a piece of your home growing in theirs. Over the decades, I’ve found that Chinese Evergreens are some of the most forgiving partners for this. They aren’t finicky like some of those high-strung tropicals. They have a certain grit to them. Let’s walk through how you can stop being a consumer and start being a producer.
Propagating Chinese Evergreens For Beginners
Propagating a Chinese Evergreen is the simple act of taking a piece of an existing plant and encouraging it to grow its own roots. In the real world, these plants are native to the humid, shaded floors of tropical forests in Asia and New Guinea. They are used to spreading out and claiming territory. When a branch falls or a cluster gets too heavy, they naturally find ways to start anew. We are just mimicking that natural urge in a controlled environment.
Think of propagation like baking bread from a starter. You don’t need a whole new set of ingredients every time; you just need a healthy piece of what you already have. For the Aglaonema, this usually happens through stem cuttings or division. Cuttings involve taking a piece of the stalk, while division involves separating the plant at the root level where it has already started “pupping” or sending out new shoots.
Beginners often worry about the “right” time to do this. While you can technically propagate year-round indoors, I’ve found that doing it in the spring or early summer gives the best results. The natural increase in light and warmth acts like a tailwind for those new roots. If you try it in the dead of winter, the plant is in a bit of a slumber, and you might find yourself waiting months for any sign of life. Patience is a gardener’s best tool, but timing makes the job a lot easier.
The beauty of the Chinese Evergreen is its variety. You might have a ‘Silver Bay’ with those wide, metallic leaves, or a ‘Red Valentine’ with splashes of hot pink. The rules are mostly the same across the board, though I’ve noticed the darker green varieties tend to root a bit faster than the highly variegated ones. The more green a leaf has, the more “fuel” it can produce from the sun to power that root growth.
How the Propagation Process Works Step-by-Step
Success in propagation comes down to understanding the anatomy of the stem. You need to look for the node. A node is that little bump or ring on the stem where a leaf once grew or is currently growing. This is the command center of the plant. It contains the specialized cells—meristematic tissue—that can decide to become a root instead of a leaf. Without a node, a cutting is just a dying stick.
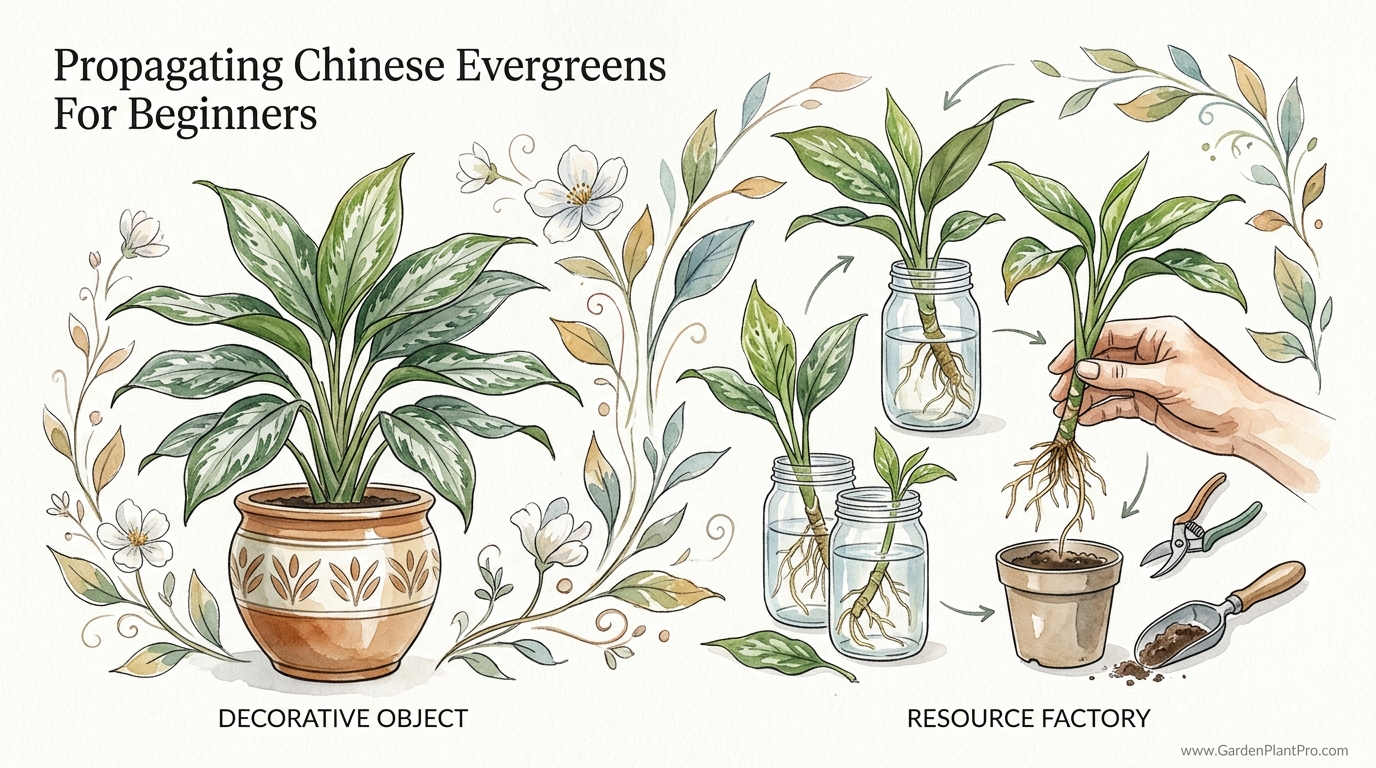
The Water Method: The Visual Approach
Water propagation is great for beginners because you can see the magic happening. Use a clean glass jar and fill it with room-temperature water. I prefer using rainwater or filtered water, as these plants can sometimes be sensitive to the chlorine in city tap water. If you must use tap, let it sit out for 24 hours so the chemicals can dissipate.
- Identify a healthy stem that is at least 6 inches (15 cm) long.
- Look for a spot about 1/4 inch (6 mm) below a node.
- Use a sterilized, sharp knife or shears to make a clean, diagonal cut. A diagonal cut provides more surface area for the plant to drink.
- Remove the bottom leaves so no foliage is submerged in the water. Leaves underwater will rot and foul the environment.
- Place the cutting in your jar and put it in a spot with bright, indirect light. Never put it in direct afternoon sun, or you’ll cook the cutting.
Change the water every 5 to 7 days. This keeps oxygen levels high and prevents bacteria from moving in. You should see little white nubs appearing in 2 to 4 weeks. Once those roots are about 2 inches (5 cm) long, they are ready to move into a pot with soil.
The Soil Method: The Direct Approach
Some folks prefer going straight into the dirt. This creates “soil roots” which are often tougher and more resilient than “water roots.” Water roots are thin and fragile; transitioning them to soil can sometimes cause transplant shock. By starting in soil, the plant skips that awkward middle phase.
Mix up a light, airy medium. I like a 50/50 blend of peat moss or coco coir and perlite. You want something that stays moist but doesn’t feel like a wet sponge. Poke a hole in the soil with a pencil, dip your cutting in a little bit of rooting hormone if you have it (though it’s not strictly necessary), and tuck it in. Firm the soil around the stem so it doesn’t wobble. A wobbly cutting is a failing cutting.
The Division Method: Instant Gratification
If you have an old, bushy plant that is practically bursting out of its pot, division is your best bet. This is the most reliable method because the new “babies” already have their own root systems. You simply take the plant out of its pot and gently tease the root ball apart. Look for natural separations where a new shoot has its own set of roots and leaves.
Sometimes the roots are tangled like a mess of old fishing line. Don’t be afraid to use a clean knife to slice through the connection between the mother and the pup. As long as both pieces have plenty of roots, they will recover just fine. Pot them up in their own containers immediately and give them a good drink to settle the soil around the roots.
The Practical Benefits of Multiplying Your Plants
One of the biggest advantages is the financial side. A mature ‘Red Valentine’ or ‘Pictum Tricolor’ can cost a pretty penny at the nursery. By propagating, you turn that $30 investment into an endless supply. In my house, we haven’t bought a host gift for a dinner party in years. A beautifully potted Aglaonema cutting is worth more than a bottle of wine because it keeps on living.
Beyond the money, there is the health of the original plant. Over time, Chinese Evergreens can get “leggy”—meaning the stems grow long and bare at the bottom with just a tuft of leaves at the top. Pruning these stems for cuttings forces the mother plant to activate dormant buds lower down. This results in a bushier, fuller, and more youthful-looking specimen. It’s like a rejuvenating spa treatment for your greenery.
Air purification is another measurable benefit. The NASA Clean Air Study famously highlighted Aglaonemas for their ability to filter indoor toxins like benzene and formaldehyde. One plant in a room is a start, but five or six plants create a functional bio-filter. By multiplying your collection, you are literally making the air in your home easier to breathe.
Challenges and Common Pitfalls to Avoid
The most common mistake I see is “drowning” the plant. While we want the soil to be moist during propagation, we don’t want it soggy. If the soil smells like a swamp or feels slimy, you are inviting Pythium—better known as root rot. This fungus eats away at the tender new roots before they have a chance to establish. Always use a pot with drainage holes. If your favorite decorative pot doesn’t have a hole, keep the plant in a plastic nursery liner inside the fancy pot.
DIY PROJECT: Collect rainwater no matter where you live...

This DIY project is the best way to legally collect rainwater NO MATTER where you live. Get chlorine-free water, cut down on your water bills, and have enough for an emergency situation or to water your garden. Read More Here...
Dirty tools are another silent killer. Every time you cut a plant, you’re creating an open wound. If your shears have old sap or dirt on them, you could be introducing bacteria or viruses directly into the plant’s “bloodstream.” Wipe your blades down with rubbing alcohol or a quick flame before every session. It’s a five-second habit that saves lives.
Temperature swings can also cause trouble. These plants hate cold drafts. If you place your propagation jars near a drafty window in the winter or right under an air conditioning vent, the cold will shock the tissues and stop growth in its tracks. Aim for a consistent temperature between 18°C and 27°C (65°F to 80°F). If you’re comfortable in a t-shirt, your plant is probably comfortable too.
Limitations and When Propagation Might Not Work
Realistic expectations are important. You cannot propagate a Chinese Evergreen from a single leaf. Unlike a succulent or a Sansevieria, a leaf without a piece of the stem (and a node) will simply sit in water and eventually rot. It lacks the “blueprints” to build a new plant from scratch.
Seasonal limitations are real. If your house is dark and cold during the winter months, your success rate will plumet. The plant’s metabolism slows down significantly when the days get shorter. While you can use grow lights and heat mats to trick the plant, the average gardener is better off waiting for the natural vigor of spring.
Variegation can be tricky too. Sometimes, a cutting from a highly colorful plant will “revert” to plain green if it doesn’t get enough light during its rooting phase. The plant is trying to survive, and green chlorophyll is more efficient at making energy than the pink or white patches. To keep those beautiful patterns, you must provide strong, consistent, indirect light during the entire process.
Comparison of Propagation Methods
Not all methods are created equal. Depending on your goals—whether you want volume, speed, or ease—you might choose one over the other. Here is how they stack up in my experience:
| Feature | Division | Stem Cutting (Soil) | Stem Cutting (Water) |
|---|---|---|---|
| Difficulty Level | Easy | Moderate | Very Easy |
| Success Rate | 95-100% | 85-90% | 70-80% |
| Speed to New Plant | Instant | 4-8 Weeks | 6-10 Weeks |
| Risk to Mother Plant | Low | Moderate | Low |
Practical Tips and Best Practices
One of my favorite “old-timer” tricks is using cinnamon. If you’ve just taken a cutting, dust the raw end of the mother plant’s stem with a little bit of ground cinnamon. It acts as a natural fungicide and helps the wound “callous” over without rotting. It’s a simple kitchen staple that works wonders in the garden.
Humidity is your best friend when rooting in soil. Since the cutting has no roots yet, it can’t pull water from the dirt very well. It loses moisture through its leaves. To prevent wilting, you can create a “mini-greenhouse” by placing a clear plastic bag over the pot. Use a couple of chopsticks to keep the bag from touching the leaves. This traps the moisture inside and keeps the plant hydrated while it works on its roots.
- Always choose the healthiest stems. If a stem is yellowing or looks limp, it’s a poor candidate for a new plant.
- Use small pots for new cuttings. A big pot holds too much water, which can lead to rot before the tiny roots can use it all.
- Label your pots. If you have several varieties, it’s easy to forget which is which before the new leaves unfurl.
- Avoid fertilizing new cuttings. Wait until you see significant new leaf growth, usually 2 to 3 months, before giving them any “food.”
Advanced Considerations for the Serious Practitioner
For those who want to go beyond the basics, air layering is a technique that offers nearly a 100% success rate for leggy, woody stems. This involves wounding the stem while it is still attached to the mother plant. You wrap the wound in damp sphagnum moss and seal it with plastic wrap. Because the “cutting” is still receiving nutrients from the parent’s root system, it isn’t under any stress. Once you see roots filling the plastic wrap, you simply snip it off and pot it up.
Consider the chemistry of your water. Some serious growers use a bit of willow water—water in which willow branches have been soaked—to stimulate growth. Willows are naturally high in indolebutyric acid, a powerful rooting hormone. It’s an organic way to speed up the process without buying synthetic powders.
Substrate choice can also be optimized. While a standard mix works, adding a bit of horticultural charcoal can help keep the soil “sweet” by absorbing impurities and preventing fungal buildup. If you are propagating rare cultivars like the ‘Pictum Tricolor’, these small adjustments in soil health can make a massive difference in the vigor of the offspring.
Real-World Scenario: Rehabilitating a “Leggy” Silver Bay
Let’s look at a common situation. You have a three-year-old ‘Silver Bay’ that has grown 2 feet (60 cm) tall. The bottom 12 inches (30 cm) of the stalks are bare, and the whole thing looks a bit like a palm tree. It’s top-heavy and keeps leaning over.
In this scenario, I would take three or four “head cuttings” from the top. Each cutting would be about 6 inches (15 cm) long. I’d root these in water on the kitchen windowsill. Then, I would cut the remaining bare stalks back to about 3 inches (7.5 cm) above the soil line. It looks drastic—like you’ve ruined the plant—but trust the process.
Within a month, the original base will start pushing out multiple new shoots from those bottom nodes. Meanwhile, your top cuttings will be growing a lush new root system. In two months, you can plant those rooted cuttings back into the base of the original pot. What was once a spindly, ugly plant is now a thick, multi-stemmed “forest” of Silver Bay. You haven’t just saved the plant; you’ve improved it.
Final Thoughts
Propagating your Chinese Evergreen is more than just a way to save a few dollars. It is an entry point into understanding the lifecycle of your indoor garden. Once you see those first white roots poking out of a stem, the way you look at plants changes. They stop being disposable decor and start being part of a living, breathing cycle that you manage.
Don’t be afraid to fail. Even the most experienced gardeners lose a cutting now and then. Maybe the water got too cold, or maybe the soil stayed too wet. Each failure is just a lesson in what that specific variety needs. The more you experiment with different methods—water, soil, or division—the more “green” your thumb will become.
Start small with a single cutting from a common variety like ‘Maria’ or ‘Emerald Beauty’. Once you get your feet wet, you’ll find yourself looking at every plant in your house and wondering, “How many of these could I have by next year?” It’s a rewarding, addictive hobby that fills your home with life and gives you plenty of gifts to share with the people you care about. Happy planting.

Do you have some charcoal in your house right now? We call charcoal a “miracle leftover” for anyone who wants to be a little more self-sufficient and cut costs. That’s because it can help you with so many different things around the house and garden. You can even use it to make an energy-free fridge. Read More Here...