
Most people toss sprouted garlic in the bin, but that green ‘flaw’ is actually a high-octane engine waiting to explode into a massive harvest. We’ve all been there: you reach for a clove only to find a long green tail sticking out. Most see a kitchen failure, but a master gardener sees a pre-started head start. While others wait weeks for dormant cloves to wake up in the cold ground, your ‘nuisance’ is already halfway to a harvest. Here is how to turn kitchen waste into a garlic goldmine.
Garlic is one of the most resilient plants in the backyard garden. It doesn’t ask for much, but it gives back in spades. When you see that green shoot, the clove has already decided it is time to grow. It is using the energy stored in the starchy bulb to push out its first leaves. If you leave it on the counter, it will eventually shrivel and die, but if you put it in the soil, you are giving it a second life.
Speaking as someone who has grown garlic for decades, I can tell you that some of my best “emergency” crops came from a handful of forgotten cloves in the pantry. You don’t always need to buy fancy “seed garlic” from a catalog to get a decent haul. While there are some differences in bulb size, the satisfaction of turning “trash” into a year’s worth of seasoning is hard to beat. Let’s get our hands dirty and talk about how to do this right.
How To Plant Sprouted Garlic Cloves For Massive Yields
Planting sprouted garlic is the process of taking a clove that has already broken dormancy and placing it into the soil to complete its lifecycle. In the gardening world, we often talk about “dormancy,” which is just a fancy way of saying the plant is sleeping. Most garlic needs a period of cold to wake up, but sprouted garlic has already skipped that snooze button. It is awake, alert, and ready to put down roots.
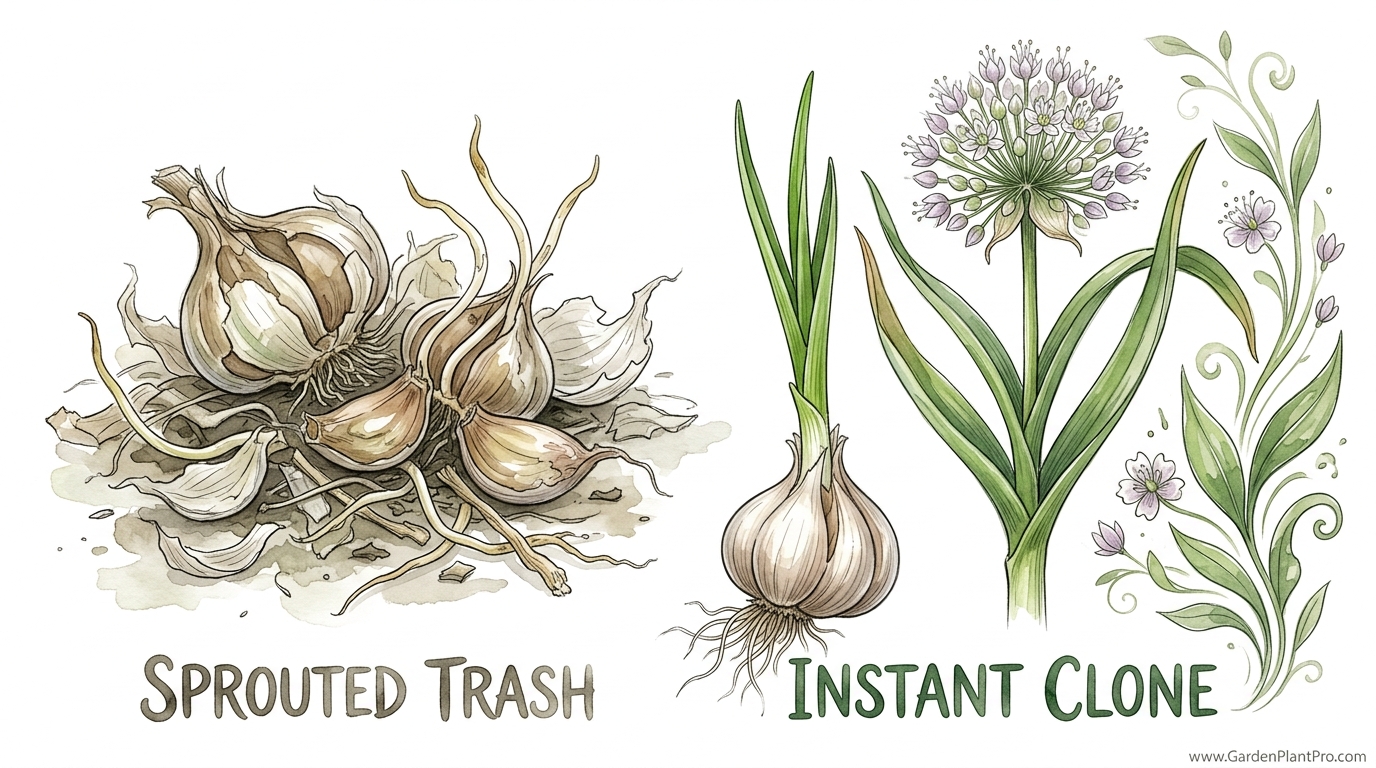
Think of a sprouted clove as an “instant clone.” Unlike a seed that has to germinate, this clove is an exact genetic copy of the parent plant. If that garlic was delicious and spicy in your pasta, the new head it grows will be exactly the same. We use this method primarily in the spring when we’ve missed the traditional fall planting window, or simply to save money and reduce waste.
In real-world terms, this is the ultimate “low-risk, high-reward” garden project. You aren’t out any money because you were going to throw the garlic away anyway. If you have a square foot of dirt or even a deep pot on the porch, you have everything you need. The result is often a slightly smaller bulb than a fall-planted one, but the flavor is just as intense, and the greens (scallion-like shoots) are a gourmet treat in their own right.
Preparing Your Soil: The Secret to Big Bulbs
Garlic is a heavy feeder. It doesn’t just sit in the dirt; it eats. To get massive yields, you need soil that is rich, loose, and well-draining. If your soil is as hard as a brick, the bulb won’t have the strength to push outward and get big. You want a “sandy loam” consistency if possible. This means the soil is a mix of sand, silt, and a little clay, but mostly it should feel like chocolate cake crumbs.
Before the cloves ever touch the ground, I like to work in about 2 to 3 inches (5 to 7.5 cm) of well-rotted compost. Compost provides the nitrogen the plant needs to build those green leaves. Remember, every leaf above ground represents a layer of protective skin on the bulb below ground. More leaves usually mean a bigger, healthier bulb. If you have aged manure, that’s even better. Just make sure it isn’t “hot” or fresh, as the high ammonia can burn the tender new roots of your sprouted cloves.
Drainage is the next big hurdle. Garlic hates “wet feet.” If the cloves sit in soggy soil for too long, they will rot before they can even get established. If your garden has heavy clay that stays wet after a rain, consider planting in a raised bed. Even a small mound of soil, about 6 inches (15 cm) high, can provide enough drainage to keep your crop safe from fungal issues and rot.
Step-by-Step: Planting the Sprouted Cloves
The actual act of planting is simple, but there are a few rules you can’t break if you want success. First, be incredibly gentle with that green sprout. If you snap the sprout off, the clove has to spend double the energy to start over, and it might not have enough “fuel” left in the tank to make it. Treat it like a delicate seedling rather than a tough bulb.
Separate the cloves carefully from the main head. Keep the papery skins on as much as possible. This “wrapper” acts like a raincoat, protecting the clove from soil-borne diseases. I’ve seen folks peel their garlic before planting, but that is a mistake. Leave the clothes on the garlic; it needs them for the long haul in the dirt.
- Orientation: Always plant with the green sprout facing the sky and the flat “basal plate” (where the roots come out) facing down. Even if the sprout is curled or bent from being in the pantry, it will straighten itself out once it hits the light.
- Depth: For sprouted garlic planted in the spring, you don’t need to go as deep as fall plantings. Aim for about 1 to 2 inches (2.5 to 5 cm) of soil over the top of the clove. The tip of the green sprout can even stick out of the soil slightly if it’s already long.
- Spacing: Give them elbow room. Space your cloves 4 to 6 inches (10 to 15 cm) apart. If you crowd them, they will compete for nutrients, and you’ll end up with a bunch of tiny “golf ball” sized heads instead of the “softball” winners we’re after.
The Chilling Factor: Understanding Vernalization
This is where many beginners get tripped up. Garlic, especially the “hardneck” varieties common in colder climates, needs a period of cold (usually below 40°F or 4°C) for about 6 to 8 weeks. This process is called vernalization. It tells the plant to stop just making leaves and start dividing into individual cloves. Without this cold snap, your garlic might grow into one solid, round bulb—what we call a “round” or “solo” garlic.
If you find your sprouted garlic in the spring and your winter is already over, you might want to “trick” it. If the cloves haven’t been in a cold pantry or fridge, they might benefit from a few weeks in the crisper drawer before they go into the ground. However, if they are already sprouting in your kitchen, they’ve usually had enough environmental stress to trigger the bulbing process. Just get them in the dirt as soon as the soil can be worked.
For gardeners in warmer climates (Zones 9 and 10), vernalization is the biggest challenge. You may need to choose “softneck” varieties, which are less picky about the cold. Grocery store garlic is almost always a softneck variety (like Silverskin or California Late), which is lucky for us because these types are much more forgiving of a shorter, warmer growing season.
Benefits of Planting Sprouted Kitchen Garlic
The most obvious benefit is the cost. A single head of organic garlic at the store might cost a dollar, and it contains 10 to 15 cloves. That is 15 potential plants for the price of one. Compared to buying “certified seed garlic,” which can cost $20 to $30 per pound plus shipping, the savings are massive. For a hobby gardener, the “sprouted trash” method is the ultimate way to fill a garden bed on a budget.
Another advantage is the “Green Garlic” harvest. Because sprouted garlic is already growing, it produces edible greens very quickly. You can snip these like chives and use them in salads, stir-fries, or pestos. They have a mild, sweet garlic flavor that is far superior to anything you can buy. Even if the bulb doesn’t grow to a massive size, the value of the greens alone makes the effort worthwhile.
Finally, there is the environmental factor. Reusing kitchen scraps is the purest form of composting. Instead of the energy going back into the compost pile to be broken down, it is being channeled directly into new food. It short-circuits the waste cycle and puts you in a mindset of “abundance from nothing,” which is the hallmark of an experienced gardener.
Challenges and Common Mistakes
The biggest mistake I see is people waiting too long. Once that sprout is an inch long, the clock is ticking. The clove is a battery, and the sprout is the lightbulb. If you leave the light on too long without “recharging” it in the soil, the battery goes dead. If the clove feels soft, hollow, or shriveled, it’s likely too far gone. You want firm cloves with vibrant green tips.
Another pitfall is using garlic that has been treated with growth inhibitors. Many conventional garlic heads at the grocery store (especially those imported from overseas) are sprayed with chemicals to stop them from sprouting. This is why you’ll sometimes see a garlic head sit in your pantry for six months and never turn green. If your garlic *is* sprouting, it’s actually a good sign—it means it’s “clean” enough to grow. To be safe, try to use organic or locally grown garlic from a farmer’s market.
DIY PROJECT: Collect rainwater no matter where you live...

This DIY project is the best way to legally collect rainwater NO MATTER where you live. Get chlorine-free water, cut down on your water bills, and have enough for an emergency situation or to water your garden. Read More Here...
Over-watering is the silent killer. It’s tempting to douse the new plants every day, but garlic prefers a “deep soak and then dry out” routine. If the soil stays constantly muddy, the outer skins of the bulb will start to decompose, inviting fungus and pests like onion maggots. Stick your finger an inch into the soil; if it feels damp, leave the hose alone.
Limitations: When This May Not Be Ideal
It is important to manage expectations. Sprouted garlic from the store is rarely going to produce those massive, award-winning heads you see at the county fair. Professional seed garlic is screened for size and vigor. Kitchen garlic is bred for shelf life and transport. You are starting with “B-grade” genetics, so don’t be disappointed if your harvest is more modest.
Diseases are also a concern. Certified seed garlic is tested for things like “white rot” or “garlic bloat nematode.” Kitchen garlic has no such guarantee. If you plant store-bought cloves in your main garden bed and they happen to carry a soil pathogen, you could potentially infect that soil for years. If you are worried, plant your “scraps” in a dedicated container or a separate corner of the yard until you know they are healthy.
| Feature | Sprouted Kitchen Garlic | Certified Seed Garlic |
|---|---|---|
| Cost | Near Zero (Recycled) | High ($15-$30 per lb) |
| Disease Risk | Higher (Unchecked) | Very Low (Laboratory Tested) |
| Yield Potential | Medium to Small Bulbs | Large to Jumbo Bulbs |
| Variety Choice | Limited (Usually Softneck) | Hundreds of Heritage Varieties |
Maintenance and Long-Term Care
Once your garlic is in the ground, the work isn’t over. For the first few months, weeding is your top priority. Garlic is a terrible competitor. It has narrow, upright leaves that don’t shade the ground, so weeds can easily move in and steal all the nutrients. I like to use a thick layer of straw mulch—about 3 to 4 inches (7.5 to 10 cm) deep. This keeps the weeds down and keeps the soil moisture consistent.
As the weather warms up, you’ll want to watch for “scapes” if you happen to be growing a hardneck variety. A scape is a curly, leafless flower stalk that grows from the center of the plant. If you let it grow, the plant will put all its energy into making “bulbils” (tiny seeds) at the top. To get a massive bulb, you must cut that scape off as soon as it starts to curl. Don’t throw it away, though! Scapes are a delicacy and taste like a cross between asparagus and garlic.
Feeding your garlic in the spring is crucial. When the green shoots are about 6 inches (15 cm) tall, I like to give them a “side dressing” of organic nitrogen. This can be blood meal, fish emulsion, or a simple compost tea. Stop fertilizing once the weather gets hot and the plant starts to focus on building the bulb (usually late May or June in the Northern Hemisphere). Adding nitrogen too late in the season can actually delay bulb formation.
Advanced Considerations: Saving Your Own Seed
The most powerful thing you can do as a gardener is to stop buying seed altogether. If you plant sprouted garlic and it does well in your specific soil and microclimate, save the biggest, healthiest bulbs from your harvest. By replanting your own cloves year after year, you are essentially performing “citizen science.” You are selecting for garlic that loves *your* backyard.
When you save your own seed, you ensure that the garlic is already acclimated to your local pests and weather patterns. This is how “heritage” varieties are born. I have a strain of garlic in my garden that I’ve been replanting for fifteen years. It started as a random sprouted clove, but now it’s more reliable than anything I can buy from a store. It “knows” my soil, and it knows my garden.
Example Scenario: The Spring Rescue
Let’s look at a practical example. Imagine it’s mid-March in a temperate zone. You find a forgotten bag of organic garlic in the back of the pantry. Out of the 5 heads, 3 have long green sprouts. You separate them and find 24 viable cloves. You prep a 2×4 foot (60×120 cm) raised bed with fresh compost and plant the cloves 4 inches (10 cm) apart in rows.
By April, you have a lush mini-forest of green shoots. You harvest 6 of them early as “green garlic” for a spring risotto. The remaining 18 plants grow through the summer. By mid-July, the lower leaves turn brown. You harvest 18 bulbs. Even if they are medium-sized, that is roughly 2 pounds (0.9 kg) of fresh garlic. You’ve turned a $3 bag of “waste” into a harvest that would cost $30 at the local market, and you still have the best bulbs to replant in the fall.
Final Thoughts
Gardening is often presented as a series of rigid rules and expensive inputs, but the reality is much more flexible. Planting sprouted garlic is a reminder that nature wants to grow. That green shoot isn’t a sign of rot; it’s a sign of ambition. By leaning into the plant’s natural desire to survive, you can create a productive and beautiful garden from the very things most people throw away.
Don’t be afraid to experiment. Use that corner of the yard where nothing else grows, or tuck a few cloves into your flower beds. Garlic is a great companion plant and can even help deter certain pests from your roses or tomatoes. The more you work with the soil, the more you’ll realize that “mistakes” like sprouted garlic are often just opportunities in disguise.
Take what you’ve learned here and apply it to your own space. Whether you’re a seasoned pro or a complete beginner, there is something deeply satisfying about pulling a plump, papery bulb out of the earth and knowing exactly where it came from. Happy planting, neighbor—I think you’re going to be surprised by just how much gold you can find in your kitchen bin.