
Is your radicchio a bitter mess because you skipped the one ‘ordering’ step that turns a weed into a gourmet delicacy? Most gardeners give up on radicchio because it grows like a wild, bitter mess. But the secret to those $10 gourmet heads isn’t just the soil—it’s the strategy. Learn why ‘ordering’ your crop through simple tying is the difference between a bitter salad disaster and a crisp, ruby-red masterpiece.
Whenever I lean over the garden fence to talk shop with a neighbor, the conversation inevitably turns to the “difficult” crops. Radicchio usually sits at the top of that list. Most folks treat it like lettuce, expecting it to just grow into a perfect little ball of crimson. When it ends up looking like a loose, green dandelion with the flavor of a copper penny, they swear off it for good.
Growing this Italian treasure isn’t actually hard, but it is specific. It requires a shift in how you view the plant’s lifecycle. You aren’t just growing a vegetable; you are managing a process called “ordering” or, as the Italians call it, imbianchimento. This process of light exclusion is what transforms a bitter, leafy weed into the tight, sweet, and crunchy head you see in high-end markets.
The Mystery of the Bitter Weed: What is Radicchio?
Radicchio is a member of the chicory family, specifically Cichorium intybus. If you’ve ever seen the blue-flowered weeds growing along a dusty roadside, you’ve seen the wild ancestor of this gourmet crop. Because of this heritage, radicchio is naturally predisposed to bitterness and loose, sprawling growth. The plant produces chemical compounds called sesquiterpene lactones, which act as a defense mechanism against herbivores.
Left to its own devices in the garden, a radicchio plant will often produce a large, green rosette of leaves. These leaves are thick, tough, and intensely bitter. The “head” we want is actually the heart of the plant, protected from the sun and developed through specific environmental stresses and human intervention. Understanding that you are essentially “taming” a wild perennial is the first step toward success.
In its native Italy, particularly the Veneto region, different towns have their own protected varieties. From the round, cabbage-like heads of Chioggia to the long, elegant spears of Treviso, each one requires a slightly different touch. However, the one constant is the need for light exclusion to “blanch” the leaves, turning them from photosynthesizing green to vibrant ruby and white.
Choosing the Right Variety for Your Strategy
Before you even put a seed in the ground, you have to know what kind of “finish” you want. Not all radicchio is created equal, and some varieties are bred to “self-head” more easily than others. If you choose the wrong variety for your climate or your level of patience, you’re fighting an uphill battle from day one.
Rosso di Chioggia is the most common variety found in home gardens. It looks like a small, purple cabbage. These are generally “precoce” (early) types that can form heads without too much fuss, but even they benefit from the tying technique to ensure a tight, crisp heart. They typically mature in about 60 to 65 days.
Rosso di Treviso comes in two distinct forms: Precoce and Tardivo. The Precoce type is elongated and can be tied in the field. The Tardivo type is the “King of Radicchio” and requires a complex water-forcing process after being dug up from the soil. If you are a beginner, start with the Precoce types or the Chioggia types.
Castelfranco is a stunning, cream-colored variety with red speckles. It is often referred to as the “winter rose.” This variety is much milder and more lettuce-like, but it still requires a degree of light exclusion to develop that beautiful creamy base color. Knowing these differences helps you plan your garden space and your autumn workload accordingly.
Timing: The Secret Ingredient
Radicchio is a cool-season crop through and through. Attempting to grow a heading radicchio in the heat of summer is a recipe for bolting and extreme bitterness. For most gardeners, the sweet spot for sowing is mid-summer—typically late June or July in the Northern Hemisphere. This allows the plant to grow its large “green” phase during the warm days and begin its heading and color transformation as the nights cool down.
Ideally, you want your radicchio to be nearing maturity just as the first light frosts hit. A bit of cold weather actually helps the plant convert starches into sugars, mellowing out the bitterness. If you live in a region with very harsh winters, you may need to use cold frames or heavy mulch to protect the plants so they have enough time to finish their heading process.
Sowing too early leads to plants that want to flower before they head. Sowing too late means the plant might not have the energy to form a dense heart before the deep freeze sets in. Aiming for a harvest date that is roughly 2 to 4 weeks after your first expected frost is a solid rule of thumb for most temperate climates.
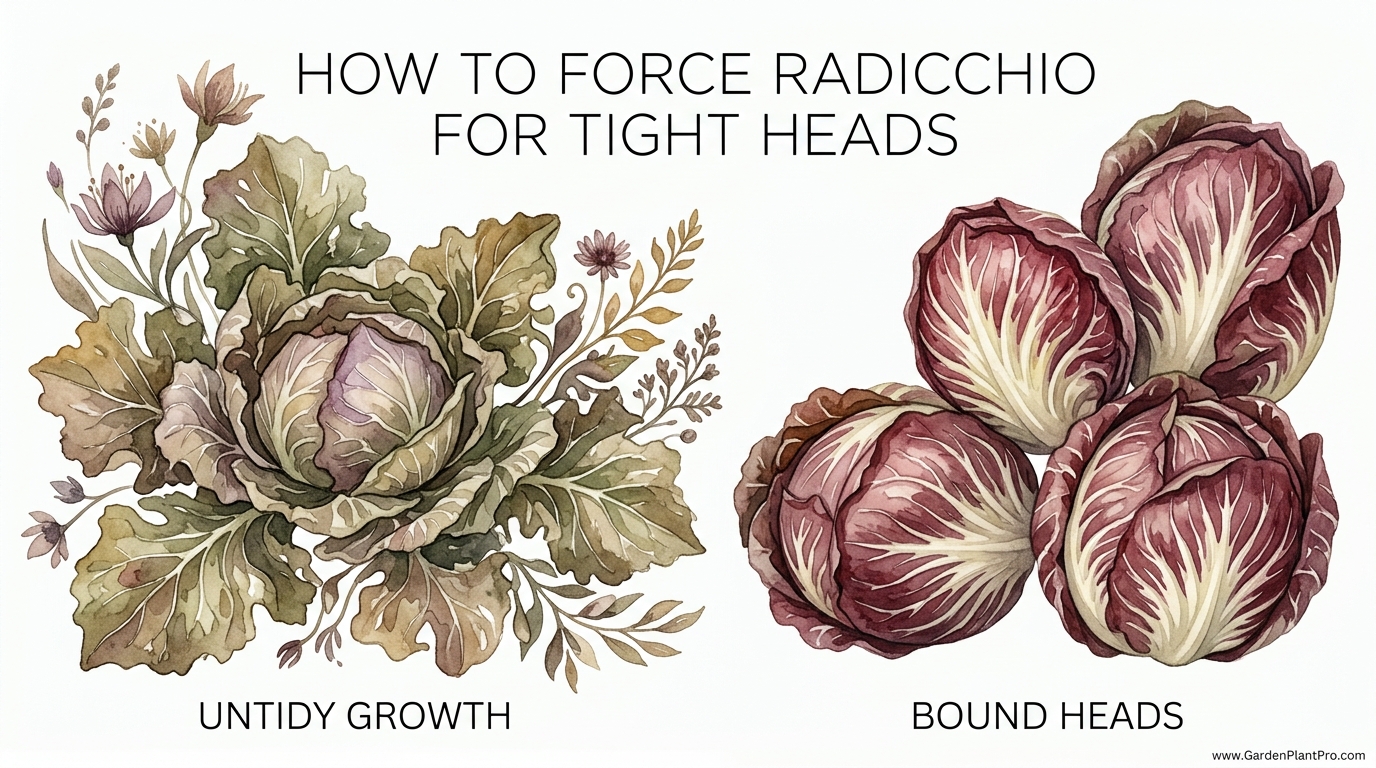
How To Force Radicchio For Tight Heads
Forcing radicchio, also known as blanching or “ordering” the crop, is the act of excluding light from the center of the plant. This prevents the inner leaves from producing chlorophyll. Without chlorophyll, the leaves remain pale (white) and the anthocyanins (the red pigments) become much more pronounced. More importantly, this process softens the texture and reduces the intense bitterness of the heart.
There are two primary ways to achieve this: in-field tying and post-harvest forcing. In-field tying is the most practical method for the backyard gardener. It involves gathering the large, outer green leaves and binding them together at the top to create a “dark room” for the developing heart inside. This is usually done 2 to 3 weeks before you intend to harvest.
Post-harvest forcing is a bit more advanced. This involves digging up the plant with its taproot intact, trimming the foliage, and placing the root in a dark, cool environment (like a bucket of water or moist sand in a basement). This “tricks” the root into sending up new, tender growth in total darkness. This is how the most expensive “Tardivo” styles are produced. It requires more effort but results in the highest-quality gourmet heads imaginable.
Both methods serve the same purpose: they “order” the growth. Instead of a messy, sprawling plant, you force the energy of the plant into a tight, protected center. This protection keeps the inner leaves crisp and succulent, shielded from the wind, sun, and even light frosts that might otherwise damage the delicate heart.
Step-by-Step: The Tying Method (Imbianchimento)
If you have a row of radicchio that looks like a bunch of loose weeds, don’t panic. Around late October or November (depending on your zone), when the plants are full-sized but the centers haven’t quite “balled up,” it’s time to get to work. Make sure the plants are dry before you begin; tying up wet leaves is an invitation for rot.
- Gather the Leaves: Gently lift the large outer leaves of a single plant and pull them upward. You are essentially forming a “tepee” or a “pod” with the leaves.
- Secure with Twine: Use a piece of soft garden twine or a thick rubber band to tie the tips of the leaves together. You want it snug enough to keep light out, but not so tight that you crush the leaves or prevent air from circulating.
- The “Cravat” Technique: Some gardeners prefer to tie the plant in two places—once near the middle and once at the top. This creates a more stable “cocoon” for the heart.
- Wait and Watch: Leave the plants tied for 14 to 21 days. During this time, the inner leaves will grow in the dark. They will be shielded from the sun’s rays, which would otherwise make them tough and green.
When you are ready to harvest, you simply cut the plant at the base, untie the twine, and peel away the outer green leaves. Like magic, you will find a bright, firm, ruby-red head inside. The outer leaves have sacrificed themselves to protect the gourmet treasure within. These outer leaves can be composted or used in soups if they aren’t too damaged, though most folks find them too bitter for fresh eating.
DIY PROJECT: Collect rainwater no matter where you live...

This DIY project is the best way to legally collect rainwater NO MATTER where you live. Get chlorine-free water, cut down on your water bills, and have enough for an emergency situation or to water your garden. Read More Here...
The Advanced Forcing Technique: Water Forcing
For those who want to experience the true “King of Radicchio,” the water-forcing method used for Treviso Tardivo is the way to go. This isn’t just gardening; it’s practically a laboratory experiment. You wait until the plants have experienced at least two or three good frosts in the field. The leaves will look terrible—wilted, brown, and seemingly dead.
At this point, you dig up the entire plant, making sure to keep as much of the long taproot as possible. Trim the messy outer leaves back until you have a small, tight “stub” about 2 to 3 inches (5-7 cm) long. Clean the soil off the roots. Then, place these roots upright in a container with about 2 inches (5 cm) of cool, fresh water. The water should touch only the roots, not the “neck” of the plant.
Place this container in a completely dark room, like a basement or a garage, where the temperature stays between 50°F and 60°F (10°C to 15°C). Change the water every couple of days to keep it fresh. Within two to three weeks, new leaves will begin to sprout from the center of the root. Because there is no light, these leaves will be stunningly white with deep red tips, and they will curl elegantly. This is the pinnacle of radicchio flavor—sweet, crunchy, and almost entirely devoid of the harsh bitterness found in field-grown crops.
Environmental Factors and Soil Health
While forcing is the “ordering” step, the foundation of a good head starts in the soil. Radicchio is a heavy feeder, but it’s picky about how it gets its nutrients. Too much nitrogen, especially late in the season, can lead to loose heads and increased bitterness. It also makes the leaves more susceptible to rot once you tie them up.
Preparing your bed with well-aged compost is usually enough. Radicchio thrives in soil with a pH between 6.5 and 7.5. If your soil is too acidic, you might see “tip burn” on the inner leaves, which is often a sign of calcium deficiency. In fact, many serious chicory growers will amend their soil with a bit of gypsum or lime to ensure calcium is readily available, which helps build strong cell walls in those tight heads.
Water management is equally critical. Chicories have a deep taproot, but the heading process requires consistent moisture in the upper layers of the soil. If the plant undergoes drought stress, it will immediately produce more of those bitter compounds. Aim for about 1 to 1.5 inches (2.5 to 3.8 cm) of water per week. When you get closer to the forcing stage, ensure the ground is well-hydrated, but try to keep the foliage itself as dry as possible to prevent mold.
Benefits of Forcing and Tying
The most obvious benefit of forcing is the flavor transformation. By excluding light, you stop the production of the most intense bitter compounds. You are essentially “bleaching” the plant. This makes the radicchio palatable even for those who usually find chicory too aggressive. It brings out a subtle nuttiness and a sweetness that is hidden under the bitterness.
Another benefit is texture. Forced heads are incredibly crisp. Because the leaves grow in a protected, humid environment (inside the tied “pod”), they don’t develop the leathery skin that sun-exposed leaves do. This makes them much more enjoyable in a raw salad. The ribs of the leaves become succulent rather than woody.
Finally, there is the aesthetic value. If you’ve ever tried to present a salad with loose, muddy-green radicchio leaves, you know it’s not particularly appetizing. A forced head provides those iconic, high-contrast colors—vivid burgundy and bright white. It turns a simple meal into a gourmet experience. It also extends your harvest season, allowing you to have fresh greens well into the winter months when everything else in the garden has gone dormant.
Challenges and Common Mistakes
The biggest challenge when tying radicchio is rot. When you bundle those leaves together, you are creating a high-humidity environment. If moisture gets trapped inside—either from rain or from evening watering—it can lead to Botrytis or “bottom rot.” Once rot starts, it can destroy the heart of the plant in just a few days. Always tie your plants on a dry, sunny afternoon and ensure they have good air circulation.
Slugs and snails are another major headache. These pests love the cool, dark, moist interior of a tied radicchio plant. It’s like a five-star hotel for them. I’ve opened many a beautiful-looking head only to find it riddled with slug holes. To avoid this, use organic slug bait around the base of the plants a few days before you tie them, or use copper tape if you are growing in containers.
Another common error is harvesting too early. It takes time for the plant to reorganize its energy and grow those blanched inner leaves. If you untie the plant after only a week, you’ll likely find it hasn’t changed much. Be patient. Give it at least 14 days, and ideally 21, to see the full transformation. Conversely, don’t leave them tied for too long (over a month), as the risk of rot increases significantly the longer they stay bound.
Comparison: Field-Heading vs. Forced Radicchio
| Feature | Field-Heading (Natural) | Tied/Forced (Gourmet) |
|---|---|---|
| Flavor | Intensely bitter, herbal | Mild, bittersweet, nutty |
| Texture | Chewy, sometimes leathery | Crisp, succulent, tender |
| Color | Dark green with red streaks | Deep ruby-red and snow-white |
| Effort | Low – “set and forget” | Moderate – requires timing/tying |
| Shelf Life | Short – leaves wilt quickly | Long – dense heads store well |
Practical Tips for a Better Harvest
When you are out in the patch, carry a pair of sharp scissors and a bundle of precut twine. Cutting the twine beforehand saves a lot of fumbling. I also recommend checking on your tied plants every few days. Gently feel the “pod”—if it feels mushy or if you see a lot of aphids congregating at the top, it might be time to harvest early and save what you can.
- Mulching: Use a thick layer of straw or dried leaves around the base of the plants. This keeps the soil temperature stable and prevents mud from splashing up into your tied heads during rain.
- Cold Protection: If a deep freeze (below 25°F / -4°C) is predicted, throw a heavy frost blanket over your tied row. While radicchio likes cold, a hard freeze can turn the outer leaves to mush, making the “unwrapping” process very messy.
- Post-Harvest Grooming: When you cut the head, don’t be afraid to peel away several layers. Sometimes you have to remove four or five leaves to find that perfect, unblemished heart. Don’t think of it as waste; think of it as uncovering a gem.
- Storage: A properly forced and cleaned head of radicchio will stay fresh in your refrigerator’s crisper drawer for up to three weeks. Keep it wrapped in a damp paper towel inside a perforated plastic bag for the best results.
Advanced Considerations: Minerals and Genetics
Serious radicchio aficionados often look beyond just water and light. Some research suggests that the boron levels in your soil can affect how tightly a head forms. If you consistently struggle with loose centers despite tying, it might be worth a soil test to check your micronutrient levels. A tiny amount of seaweed extract can often provide these trace minerals.
Furthermore, pay attention to the specific “slotting” of your seeds. Italian seed companies often sell the same variety with different maturity dates—early, mid, and late. Using a “late” variety for a “early” harvest slot will result in a plant that never wants to head up. Always match your variety’s maturity days to your local frost schedule. If you have a short growing season, look for varieties with 55-60 day maturity windows.
Lastly, consider the “cut-back” method for perennial management. If you have a variety that is hardy in your zone, you can harvest the head by cutting just above the soil line, leaving the root in the ground. If you mulch the crown well, it will often send up a second, smaller “mini-radicchio” in the spring. These spring sprouts are often naturally blanched by the mulch and are a wonderful early-season treat.
Example Scenario: The Late October Tying Session
Let’s look at a practical example. Imagine it’s October 20th. You have 20 plants of Rosso di Treviso Precoce. The weather is starting to turn crisp, with nights dipping into the 40s°F (5°C). The plants look like large, green Romaine lettuces, but you can see a slight red blush starting in the center.

Do you have some charcoal in your house right now? We call charcoal a “miracle leftover” for anyone who wants to be a little more self-sufficient and cut costs. That’s because it can help you with so many different things around the house and garden. You can even use it to make an energy-free fridge. Read More Here...
You wait for a sunny Tuesday afternoon when the dew has fully evaporated. You spend an hour gathering the leaves and tying each one with a simple slipknot of twine. You notice two plants have some slug damage, so you apply a handful of iron-phosphate granules around the base of the row. Three weeks later, on November 10th, after two light frosts have passed, you harvest five heads for a dinner party. You peel away the tough green exteriors to find five perfect, 8-inch (20 cm) long spears of ruby-red radicchio. You’ve just turned about $2 worth of seed into $50 worth of gourmet produce.
Final Thoughts
Growing radicchio is a journey from the wild to the refined. It requires us to be more than just observers; we have to be active participants in the plant’s development. By taking that extra step to “order” your crop through tying or forcing, you move beyond the frustration of bitter, green leaves and into the realm of true culinary excellence.
Don’t be discouraged if your first few heads aren’t perfect. Rot, pests, and timing are all part of the learning curve. Each season, you’ll get a better feel for your local climate and how the plants respond to your touch. There is a deep satisfaction in “unwrapping” a head of radicchio you’ve forced yourself—it’s like a gift from the garden that you helped create.
Next time you’re planning your autumn garden, leave a little room for some Italian chicory. Whether you choose the simple tying method or the advanced water-forcing technique, you’ll find that the results are well worth the effort. It’s the difference between growing a weed and cultivating a masterpiece. Happy gardening!