
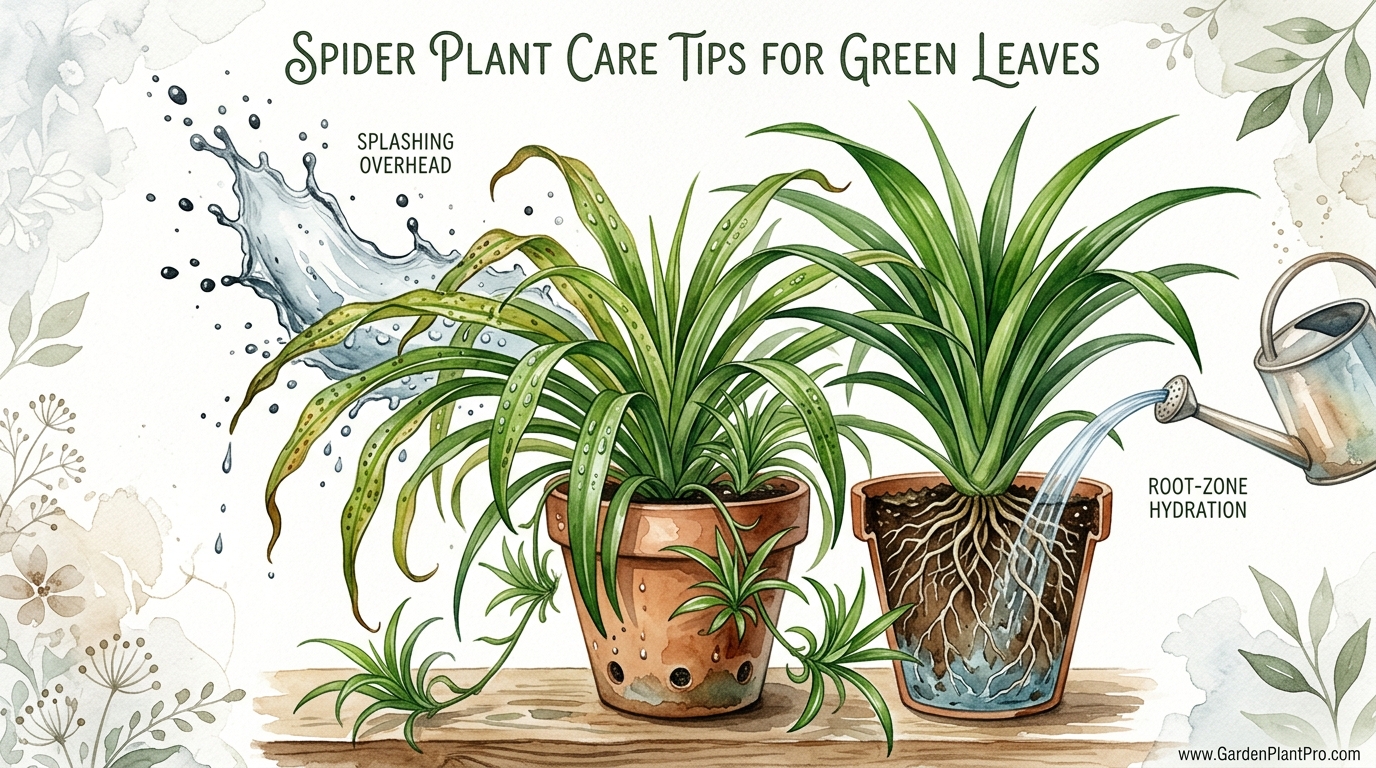
If you’re watering your spider plant from the top, you might be accidentally slowly killing it. It’s the most common mystery in indoor gardening: why do spider plants get those crispy brown tips? It isn’t just about ‘under-watering.’ It’s about the difference between standard splashing and precision hydration that avoids leaf rot and mineral buildup.
I’ve spent forty years with my hands in the dirt, and if there’s one thing I’ve learned, it’s that plants don’t just need water—they need the right *kind* of hydration in the right *place*. My grandmother used to keep a massive spider plant on her porch, a glorious fountain of green and white that never seemed to have a single brown edge. Her secret wasn’t a magic potion; it was a simple change in how she delivered moisture to the roots.
When we talk about the *Chlorophytum comosum*, or the humble spider plant, we’re dealing with a survivor. These plants are native to the tropical and southern parts of Africa, where they’ve evolved to handle periods of feast and famine. But just because they can survive neglect doesn’t mean they thrive under poor watering habits. If you’ve been frustrated by foliage that looks like it’s been singed by a lighter, pull up a chair. We’re going to walk through the “over-the-fence” wisdom of root-zone hydration and how to keep those leaves pristine.
Spider Plant Care Tips For Green Leaves
To understand how to keep a spider plant green, you first have to understand what it’s doing under the soil. Unlike many houseplants with spindly, hair-like roots, the spider plant grows thick, fleshy white tubers. Think of these like underground water tanks. They are designed to store moisture for a rainy day—or for when a busy gardener forgets to water for a week.
This tuberous root system is the plant’s greatest strength and its primary weakness. Because it stores so much water, the plant is incredibly susceptible to root rot if the soil stays soggy for too long. When we talk about “green leaves,” we aren’t just talking about the color; we’re talking about the turgidity and health of the leaf tissue. Green leaves are a sign that the plant is successfully transporting water from those underground tanks all the way to the very tips of its long, arching blades.
In the real world, gardeners use the spider plant because it’s a “tell” plant. It tells you exactly what it needs. When it’s thirsty, the leaves turn a pale, dusty green. When it’s happy, they are vibrant and glossy. But those brown tips? That’s the plant’s way of shouting that something is wrong with the chemical balance or the delivery system of its water. It’s usually a buildup of salts or a reaction to fluoride and chlorine found in city water.
How Precision Hydration Works: The Root-Zone Method
The most effective way to water a spider plant is through a method called bottom watering, or what I like to call “root-zone hydration.” Instead of pouring water over the top of the plant—which often results in water sitting in the “crown” (the center where the leaves emerge)—you let the plant drink from the bottom up.
This works through a process called capillary action. Imagine a sponge touching a puddle of water; the water naturally climbs up into the sponge. Soil does the same thing. By placing the pot in a shallow basin of water, the soil pulls the moisture upward directly to the roots without ever getting the foliage wet. This is crucial because the crown of a spider plant is very sensitive. If water sits in those tight leaf crevices for too long, it creates a breeding ground for fungus and rot.
Here is the step-by-step process I’ve used for decades:
- Find a basin, sink, or deep tray and fill it with about 1 to 2 inches (2.5 to 5 cm) of room-temperature water.
- Place your spider plant pot (which must have drainage holes!) into the water.
- Leave it there for about 15 to 30 minutes. You’ll actually see the top of the soil start to look slightly damp as the water makes its way up.
- Once the top feel moist, take the pot out and let it drain thoroughly in the sink for another 10 minutes. Never leave it sitting in a saucer of water indefinitely.
This method ensures that the entire root ball is saturated evenly. Top watering often creates “dry channels” where the water runs straight down the sides of the pot and out the bottom, leaving the center of the roots bone-dry. Root-zone hydration eliminates this problem entirely.
The Chemical Culprit: Fluoride and Chlorine
If you’re doing everything right and still seeing brown tips, we need to talk about your tap water. Most municipal water systems add fluoride to help our teeth and chlorine to kill bacteria. While these are great for humans, spider plants are exceptionally sensitive to them.
Fluoride is a cumulative toxin for spider plants. The plant absorbs it through the roots, and since the water travels to the ends of the leaves to evaporate, the fluoride gets left behind. Over time, the concentration of fluoride at the leaf tips reaches a toxic level, killing the tissue and turning it brown and crispy. This isn’t a sign of a dying plant; it’s a sign of a poisoned one.
To fix this, I always recommend using rainwater or distilled water. If you can’t do that, try using a carbon filter (like a Brita) to remove the chlorine. Note that most filters don’t remove fluoride, so if your city fluoridates the water, rainwater is your best bet. If you must use tap water, let it sit out in an open jug for 24 hours. This allows the chlorine to dissipate as a gas, though the fluoride will unfortunately remain.
Benefits of Moving Away from Overhead Splashing
When you stop splashing water from above, you’ll notice a few immediate improvements in your garden. First, you drastically reduce the risk of leaf spot diseases. Many fungal spores need a film of water on a leaf to germinate. By keeping the leaves dry, you’re practicing “cultural control,” which is a fancy way of saying you’re making the environment inhospitable for pests and diseases.
Second, you’ll see fewer fungus gnats. These annoying little flies lay their eggs in the top inch (2.5 cm) of moist soil. When you top-water, that top layer stays wet for a long time. With bottom watering, the surface of the soil stays drier for longer, making it a much less attractive nursery for gnats.
Finally, bottom watering encourages the roots to grow downward. In any garden planning or plant care routine, you want deep, robust roots. When water is only available at the top, roots tend to stay near the surface. When they have to “reach” for moisture coming from below, they grow stronger and deeper, making the plant more resilient to the occasional forgotten watering.
Challenges and Common Mistakes
The biggest pitfall I see with bottom watering is “The Soak and Forget.” I’ve seen neighbors leave their plants in a tub of water for three days. By the time they remember, the roots have effectively drowned. Roots need oxygen just as much as they need water. If you leave a plant submerged, you’re essentially suffocating it.
Another mistake is neglecting to “flush” the soil. While bottom watering is great for hydration, it doesn’t wash away the natural salts that build up from fertilizers. Every 4 or 5 waterings, you *should* water from the top—ideally with distilled water or rainwater—and let it run freely through the drainage holes. This “flushing” clears out the mineral buildup that causes that white, crusty layer on the soil surface.
Environmental Factors and Climate Considerations
Your watering schedule isn’t a calendar event; it’s a response to the environment. In the heat of summer, when temperatures are between 75°F and 85°F (24°C to 29°C), your spider plant might need a soak every 5 to 7 days. In the winter, when the plant goes semi-dormant and growth slows, you might only need to water once every two or three weeks.
DIY PROJECT: Collect rainwater no matter where you live...

This DIY project is the best way to legally collect rainwater NO MATTER where you live. Get chlorine-free water, cut down on your water bills, and have enough for an emergency situation or to water your garden. Read More Here...
Humidity also plays a massive role. If your home is dry (below 40% humidity), the moisture will evaporate from the leaf tips faster than the roots can replace it. This leads to mechanical browning—tissue death from simple dehydration. If you live in a dry climate or use a heater in the winter, consider grouping your plants together or using a tray of pebbles and water to boost the local humidity to around 50% or 60%.
Maintenance and Long-Term Care
Spider plants are incredibly fast growers. Those thick roots we talked about will eventually fill the entire pot. When a plant becomes “root-bound,” there’s very little soil left to hold onto moisture. If you find yourself needing to water every two days, it’s time to check the roots.
I like to repot my spider plants every spring. Use a well-draining soil mix—I usually go with two parts potting soil, one part perlite, and one part coco coir. This ensures the roots get plenty of air. While you’re at it, you can prune off any “pups” (the baby spiderettes) to save the mother plant’s energy. If you leave fifty babies hanging off a single plant, it has to work fifty times harder to stay hydrated.
Optional Comparison: Top Watering vs. Bottom Watering
To help you decide which method to use and when, I’ve put together this quick reference table based on my experience in the greenhouse.
| Feature | Top Watering | Bottom Watering |
|---|---|---|
| Speed | Fast (1-2 minutes) | Slow (20-30 minutes) |
| Soil Saturation | Often leaves dry spots | Perfectly even |
| Mineral Removal | Excellent (Flushes salts) | None (Salts stay in soil) |
| Pest Prevention | Low (Keeps topsoil wet) | High (Drier topsoil) |
| Risk of Crown Rot | Moderate to High | Very Low |
Advanced Considerations for Serious Practitioners
If you want to take your spider plant game to the professional level, you need to look at soil pH. Spider plants prefer a slightly acidic to neutral pH (between 6.0 and 7.0). If your soil becomes too alkaline (which often happens if you use hard tap water), the plant can’t absorb certain micronutrients like iron or magnesium. This can lead to yellowing between the veins of the leaves, a condition called chlorosis.
You might also want to look into composting and mulching techniques. While we don’t usually “mulch” indoor plants, a thin layer of decorative pebbles can help keep the soil moisture from evaporating too quickly. For nutrients, avoid heavy chemical fertilizers. I prefer a half-strength organic liquid seaweed or fish emulsion during the growing season. Too much nitrogen can actually discourage the plant from producing its iconic babies.
Example Scenario: Rescuing a “Crispy” Plant
Imagine a neighbor brings you a spider plant that looks like a brown haystack. The soil is so dry it has pulled away from the sides of the pot and feels like a brick. If you top-watered this plant, the water would just run through the gap between the soil and the pot without soaking in—this is called “hydrophobic” soil.
The rescue mission is a perfect application for root-zone hydration. Submerge the pot in a bucket of rainwater up to its rim (but don’t let water spill into the crown). Leave it for an hour. The soil will slowly rehydrate and expand. After an hour, pull it out and let it drain. Prune away the dead brown tips with sharp, sterilized scissors, following the natural V-shape of the leaf. Within two weeks of switching to bottom watering with rainwater, you’ll see new, vibrant green growth emerging from the center.
Final Thoughts
Gardening is a conversation between you and the earth, even if that earth is just in a 6-inch (15 cm) plastic pot on your windowsill. If you take the time to listen to what your spider plant is telling you, you can solve almost any problem. Moving away from messy overhead splashing and toward a more thoughtful, root-focused hydration method is the single biggest step you can take toward a healthier indoor garden.
Don’t be afraid to experiment. Try bottom watering for a month and see how the plant responds. If the leaves look perkier and the brown tips stop advancing, you’ve found the rhythm your plant has been looking for. Remember, there’s no such thing as a “black thumb”—there are only gardeners who haven’t yet learned to speak the language of their plants.
Once you’ve mastered the spider plant, you might find yourself wanting to dive deeper into soil health or maybe even pest management. Each plant you grow is a lesson, and the lessons I’ve learned from the spider plant have helped me with everything from delicate ferns to robust vegetable gardens. Happy growing, neighbor.