
We traded 500 years of butter-sugar flavor for a root that simply looks good in a plastic bag. Before the age of industrial farming, parsnips were the dessert of the vegetable garden. They were left in the frozen ground to turn starch into pure sugar. Modern hybrids? They are bred for a long truck ride and a uniform shape, not for your taste buds. Discover why growing ‘Legacy’ roots is the only way to experience that legendary roasted sweetness again.
If you have only ever tasted a parsnip from a grocery store shelf, you haven’t actually tasted a parsnip. Those woody, somewhat bitter roots have been sitting in cold storage for months, stripped of the very thing that makes them special: their ability to caramelize into something resembling a nutty custard. When you grow your own, you reclaim a flavor profile that sustained generations before cane sugar was a household staple.
Gardening is often about patience, and the parsnip is the ultimate teacher. It demands a long season, sometimes taking up to 120 days to reach maturity, and then it asks you to wait even longer—until the first hard frost hits. This is where the magic happens. The cold triggers a biological response in the root, converting complex starches into simple sugars to prevent the plant’s cells from freezing. As a result, a frost-kissed parsnip is exponentially sweeter than one pulled in late summer.
Successful parsnip growing is a badge of honor for the backyard gardener. It requires a deep understanding of soil structure and a willingness to coax life from seeds that are notoriously finicky about germination. But the reward is a harvest that lasts all winter, providing a steady supply of high-calorie, nutrient-dense food when the rest of the garden is sleeping under a blanket of snow.
Best Tasting Parsnip Varieties To Grow
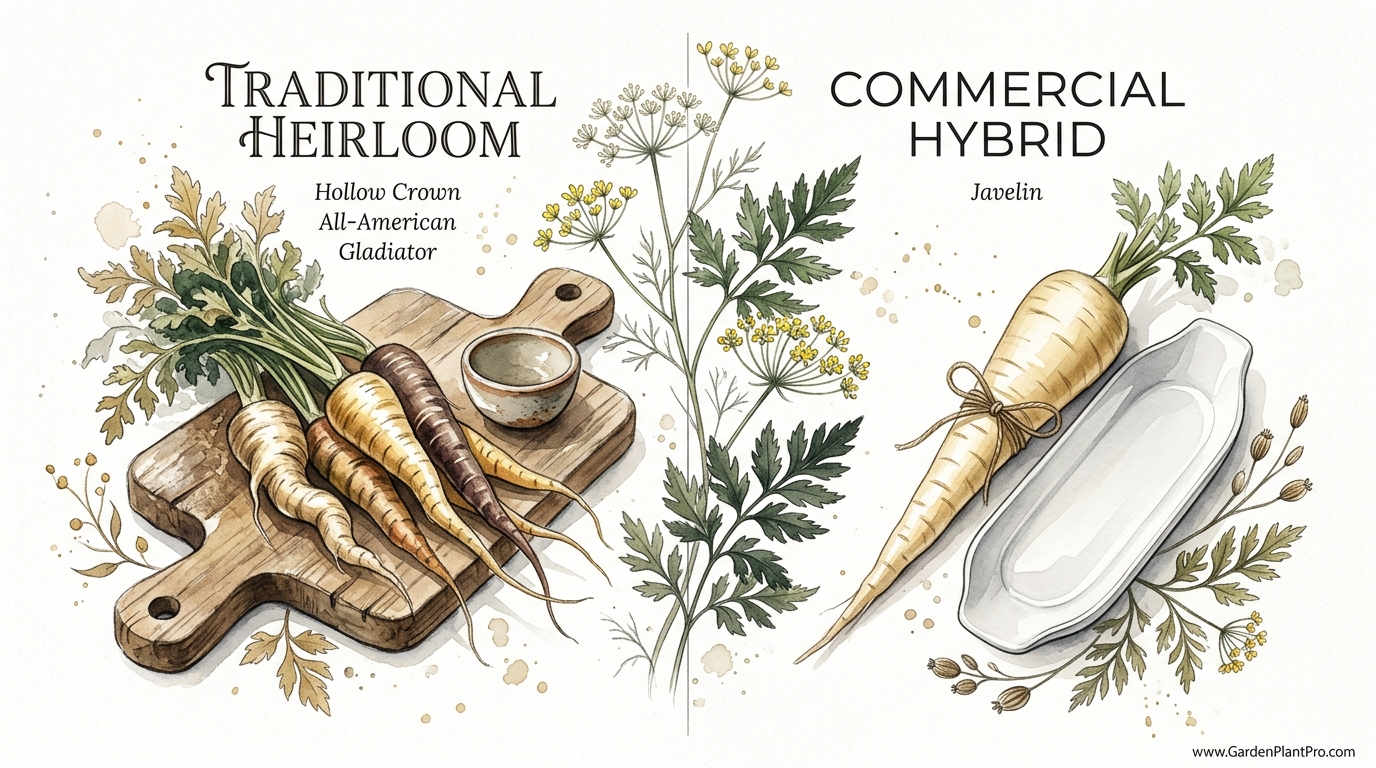
Choosing the right variety is the most critical decision you will make in the parsnip patch. While commercial growers prioritize “Javelin” or “Albion” for their uniform shape and white skin, the home gardener has the luxury of choosing based on depth of flavor and historical resilience. Heirlooms often carry a complexity that modern hybrids lack, though some newer crosses have managed to bridge the gap between disease resistance and culinary excellence.
1. Hollow Crown (The 1820s Classic)
Dating back to the early 19th century, Hollow Crown is the gold standard for heirloom enthusiasts. It produces long, tapered roots that can reach 12–15 inches (30–38 cm) in length. The name comes from the characteristic sunken top where the leaves attach. It is celebrated for its fine-grained, white flesh and a sweetness that becomes almost honey-like after a few weeks of freezing temperatures. Because of its length, it requires very deep, stone-free soil to prevent forking.
2. The Student (Best for Flavor)
Developed in the 1850s by Professor James Buckman at the Royal Agricultural College in England, this variety was selected specifically from wild parsnip populations for its superior eating quality. It is slightly shorter and more wedge-shaped than Hollow Crown, usually reaching about 10 inches (25 cm). Many veteran gardeners consider “The Student” to have the most complex, nutty flavor of any variety available today. Its shorter stature also makes it a better choice for those with slightly heavier or shallower soils.
3. Tender and True (The Award Winner)
A perennial favorite in the UK and a former recipient of the RHS Award of Garden Merit, Tender and True is known for its exceptionally smooth skin and nearly coreless interior. This makes it incredibly tender when roasted or mashed. It has a high resistance to canker, a common fungal disease that can ruin the shoulders of the root. If you want a variety that looks as good as it tastes, this is the one to beat.
4. Gladiator F1 (The Hybrid Exception)
While I often lean toward heirlooms, Gladiator F1 is a hybrid that deserves a spot in any garden. It was bred to handle less-than-perfect conditions, offering vigorous growth and excellent resistance to canker. It retains a respectable level of sweetness and produces very uniform, large roots. If you are a beginner or have struggled with soil-borne diseases in the past, Gladiator is a reliable “insurance policy” for your harvest.
5. Harris Model (The American Heirloom)
Harris Model is a dependable American variety prized for its brilliant white flesh and smooth skin. It is somewhat faster to mature than the British giants, often ready in about 100 days. It lacks the intense, wild-nutty profile of “The Student,” but it makes up for it with a clean, crisp sweetness that is perfect for parsnip cakes or delicate purées.
6. Kral Russian (For Heavy Soil)
If your garden soil feels more like a brickyard than a garden, Kral Russian is your best bet. Unlike most parsnips which are long and tapered, this heirloom produces a bulbous, beet-like root. This shape allows it to expand outward rather than struggling to push deep into compacted subsoil. It is incredibly cold-hardy and maintains a sweet, earthy flavor even in the harshest climates.
The Science of the “Frost-Kissed” Root
Understanding why parsnips need the cold is the key to timing your harvest. Inside the root, the plant stores energy in the form of starch. When temperatures drop toward 32°F (0°C) and below, the plant’s metabolism shifts. To lower the freezing point of the water within its cells—a natural antifreeze mechanism—it breaks down those starches into sucrose.
This process takes time. A single night of frost isn’t enough to transform the crop. For the best tasting parsnip varieties to grow, you want the roots to experience at least two to four weeks of temperatures consistently dipping into the 30s and 40s (0-5°C). In many regions, the sweetest roots are those dug up in late winter or even early spring, just before the ground thaws completely and the plant begins its second year of growth.
The Art of Parsnip Germination
If you can get parsnips to sprout, you have already won half the battle. They are notoriously difficult because the seeds have a very short shelf life—often losing half their viability in just one year. Always buy fresh seed every single spring and discard what you didn’t use from the previous season.
The Board Method
Parsnip seeds are slow, often taking 21 to 28 days to emerge. During this month-long wait, the soil surface can dry out or form a hard crust that the delicate seedlings cannot penetrate. Many experienced gardeners use “The Board Method.” After sowing the seeds and watering them in, place a scrap piece of lumber (like a 2×4) directly over the row. This keeps the soil underneath dark, cool, and perfectly moist. You must check under the board every day after the second week; the moment you see the first white loops of green, remove the board immediately.
The Radish Marker Trick
Because parsnips take so long to show their faces, it is easy to forget exactly where you planted them and accidentally hoe them up while weeding. To prevent this, sow a few radish seeds in the same row as your parsnips. Radishes germinate in 3 to 5 days. They act as “row markers,” showing you exactly where the parsnips are while providing a quick harvest you can pull out just as the parsnips are beginning to grow.
Preparing the Perfect Seedbed
A parsnip’s shape is a direct reflection of the soil it grew in. If the root hits a rock, it will fork. If it hits a layer of hard clay, it will stunt. If it hits fresh manure, it will grow multiple “legs” as it seeks out pockets of nutrients. To get those long, straight “Legacy” roots, you need to prepare the ground deeply.
- Depth: Loosen the soil to at least 12–15 inches (30–38 cm). If you are growing “Hollow Crown,” 18 inches (45 cm) is even better.
- Texture: Incorporate well-rotted compost, but avoid fresh manure. The ideal soil is a sandy loam that offers little resistance.
- pH Level: Parsnips prefer a slightly acidic to neutral soil, ideally between 6.0 and 7.0. If your soil is too acidic, the growth may be sluggish.
- The “Core” Method: For competitive-style straight roots, some gardeners use a crowbar to make a deep, cone-shaped hole, then fill that hole with a sifted mix of potting soil and sand before planting the seeds at the top.
Maintenance and Long-Term Care
Once established, parsnips are relatively low-maintenance, but they do have a few specific needs that can make or break the quality of the final root. They are not “set and forget” crops if you want the highest sugar content and tenderest texture.
Watering is the most critical aspect of mid-season care. Parsnips need consistent moisture to develop a smooth, crack-free skin. Inconsistent watering—periods of drought followed by heavy rain—causes the roots to expand too quickly, leading to deep longitudinal cracks that can invite rot. Aim for 1 inch (2.5 cm) of water per week, either through rain or deep, slow irrigation.
DIY PROJECT: Collect rainwater no matter where you live...

This DIY project is the best way to legally collect rainwater NO MATTER where you live. Get chlorine-free water, cut down on your water bills, and have enough for an emergency situation or to water your garden. Read More Here...
Mulching is your best friend in the parsnip patch. A thick layer of straw or shredded leaves helps regulate soil temperature and moisture. Perhaps more importantly, it suppresses weeds. Because parsnips are slow to grow their “shoulders” and canopy, they are easily out-competed by aggressive summer weeds like pigweed or crabgrass in the first 60 days.
Challenges and Common Mistakes
Even the best tasting parsnip varieties to grow can fall victim to pests and diseases if you aren’t vigilant. The two most common enemies are the Carrot Rust Fly and Parsnip Canker.
Carrot Rust Fly
This tiny fly lays eggs in the soil near the base of the plant. The larvae then burrow into the roots, leaving unsightly rusty-brown tunnels. To combat this, use a fine mesh row cover (insect netting) from the moment you remove your germination boards. Avoid thinning your parsnips on a still, sunny day; the scent of bruised foliage attracts the flies from miles away. It is better to thin on a windy evening when the flies are less active.
Parsnip Canker
This is a fungal or bacterial infection that causes orange or black rot on the shoulders of the parsnip. It is usually exacerbated by poor drainage or mechanical damage to the root. To prevent it, ensure your soil is well-draining and try to avoid “hilling” soil over the crowns if it is overly wet. Choosing resistant varieties like “Gladiator” or “Tender and True” is the most effective defense.
Parsnip Burn (Photodermatitis)
This is a danger to the gardener, not the plant. Parsnip leaves contain furanocoumarins, which can cause severe skin blistering when exposed to sunlight (UV rays). Always wear long sleeves and gloves when working in a mature parsnip patch on a sunny day. If you get the sap on your skin, wash it off immediately and keep that area out of the sun for 48 hours.
Heirloom vs. Hybrid Parsnips
Deciding between an heirloom and a hybrid often comes down to your garden’s specific challenges and your own palate. Here is how they generally compare across several key metrics.
| Feature | Heirloom (e.g., The Student) | Hybrid (e.g., Gladiator F1) |
|---|---|---|
| Flavor Profile | Complex, nutty, high sugar potential. | Clean, mild, consistent sweetness. |
| Disease Resistance | Variable; relies on healthy soil. | High; specifically bred for canker resistance. |
| Uniformity | Varies in shape and size. | Highly uniform; easy to peel and process. |
| Seed Viability | Can save your own seeds (2nd year). | Must buy new seeds every year. |
| Vigor | Can be slow to start. | Usually germinates more reliably. |
Practical Tips for a Better Harvest
Applying these small adjustments can significantly improve your success rate with this tricky crop. These are the lessons learned from decades of trial and error in the backyard garden.
- Pre-sprout on Paper Towels: If you struggle with germination, place seeds between damp paper towels in a plastic bag for 5–7 days before planting. Once you see a tiny white “tail” emerge, carefully place the seed in the garden.
- Sow Thickly: Because germination rates are low, sow three seeds for every one plant you eventually want. You can always snip the extras off with scissors (don’t pull them, as you’ll disturb the remaining root).
- Temperature Control: Do not sow too early. Parsnip seeds will rot in cold, waterlogged soil. Wait until the soil temperature reaches at least 50°F (10°C).
- The “Sand Capping” Technique: Cover your seeds with a 1/2 inch (1.25 cm) of fine sand or vermiculite rather than garden soil. This prevents the “crusting” that traps seedlings underground.
- Winter Storage: In most climates (Zones 5-7), you can simply leave parsnips in the ground all winter. Cover them with 6–10 inches (15–25 cm) of straw to prevent the ground from freezing solid, allowing you to dig them up even in January.
Example Scenario: The “Long Season” Strategy
Imagine a gardener in a temperate region like the Pacific Northwest or Central Europe. They sow their “Student” parsnip seeds in late April. By June, the plants have established a healthy canopy. Throughout the heat of August, the gardener ensures the soil stays moist with a drip irrigation system and a thick mulch of grass clippings.
In October, the first light frost arrives. Instead of harvesting, the gardener waits. November brings several hard freezes. By December, the gardener lifts a few roots for a holiday roast. These parsnips, having spent eight months in the ground and six weeks in the cold, are so sweet they require no honey or glaze—they caramelize in their own sugars at 400°F (200°C), turning a deep golden brown with a texture like bone marrow.
Advanced Considerations: Saving Your Own Seed
For the serious practitioner, saving parsnip seed is a two-year commitment. Since parsnips are biennials, they will not flower in their first year. You must leave a few of your best-looking, healthiest roots in the ground over winter. In the spring, these roots will send up a tall, hollow flower stalk that can reach 5 feet (1.5 meters) in height.
The yellow, umbrella-like flowers (umbels) will attract a massive variety of beneficial insects and pollinators. Once the seeds turn brown and dry on the stalk, they can be harvested. However, be aware that parsnips cross-pollinate easily with wild parsnip (a common weed). If wild parsnips are growing within a half-mile of your garden, your saved seeds may revert to a small, woody, and potentially toxic wild form.
Final Thoughts
Growing the best tasting parsnip varieties is an act of rebellion against the blandness of modern produce. It is a commitment to the slow food movement, requiring you to wait through three seasons for a single bite of perfection. By choosing varieties like “Hollow Crown” or “The Student” and respecting the biological need for a winter chill, you are preserving a culinary tradition that nearly vanished with the arrival of the supermarket.
The journey from a temperamental, paper-thin seed to a massive, sugar-laden winter root is one of the most rewarding experiences in the garden. It teaches you to watch the weather, to feel the texture of your soil, and to appreciate the quiet magic that happens beneath the frost line. Whether you roast them to a crisp or mash them with plenty of butter, these roots will change the way you think about winter eating.
Start small, be patient with the germination process, and don’t be afraid to leave your harvest in the ground until the snow flies. Once you’ve tasted a true “Legacy” parsnip, you’ll never look at those plastic bags in the grocery store the same way again. If you find success here, you might also enjoy exploring other cold-hardy staples like rutabagas, salsify, or winter leeks to round out your four-season garden plan.