
Sunlight is the best disinfectant, but is it reaching the heart of your lime tree? Most gardeners are afraid to cut their lime trees. The result? A chaotic thicket where pests hide and mold thrives. By bringing order to the canopy, you’re not just cutting—you’re opening a solar-powered factory for the sweetest, juiciest limes you’ve ever tasted. Stop growing leaves and start growing fruit.
Working with citrus for several decades has taught me that a lime tree is much like a stubborn student. It wants to go its own way, usually straight up or into a tangled mess of thorns. If you leave it to its own devices, you’ll end up with a tree that looks lush from the outside but is hollow and unproductive on the inside. I have seen countless backyard orchards where the fruit only grows on the very tips of the branches, hanging just out of reach while the interior of the tree remains a dark, unproductive void.
When we talk about pruning, we aren’t just talking about making a tree look “neat.” We are talking about energy management. Every leaf and branch requires the tree to pump water and nutrients. If those parts aren’t contributing to fruit production or the tree’s overall health, they are essentially “energy thieves.” My goal today is to show you how to turn that energy around and focus it exactly where you want it: into those heavy, juice-filled limes.
How To Prune Lime Trees For Higher Yield
Pruning for yield is the practice of selectively removing specific parts of the lime tree to improve light penetration, air circulation, and structural integrity. In the world of citrus, yield is directly tied to how much sunlight can reach the “fruiting wood.” Unlike some other fruit trees that produce on old wood, lime trees often fruit on the current season’s growth. This means we need a constant supply of healthy, sun-drenched new shoots.
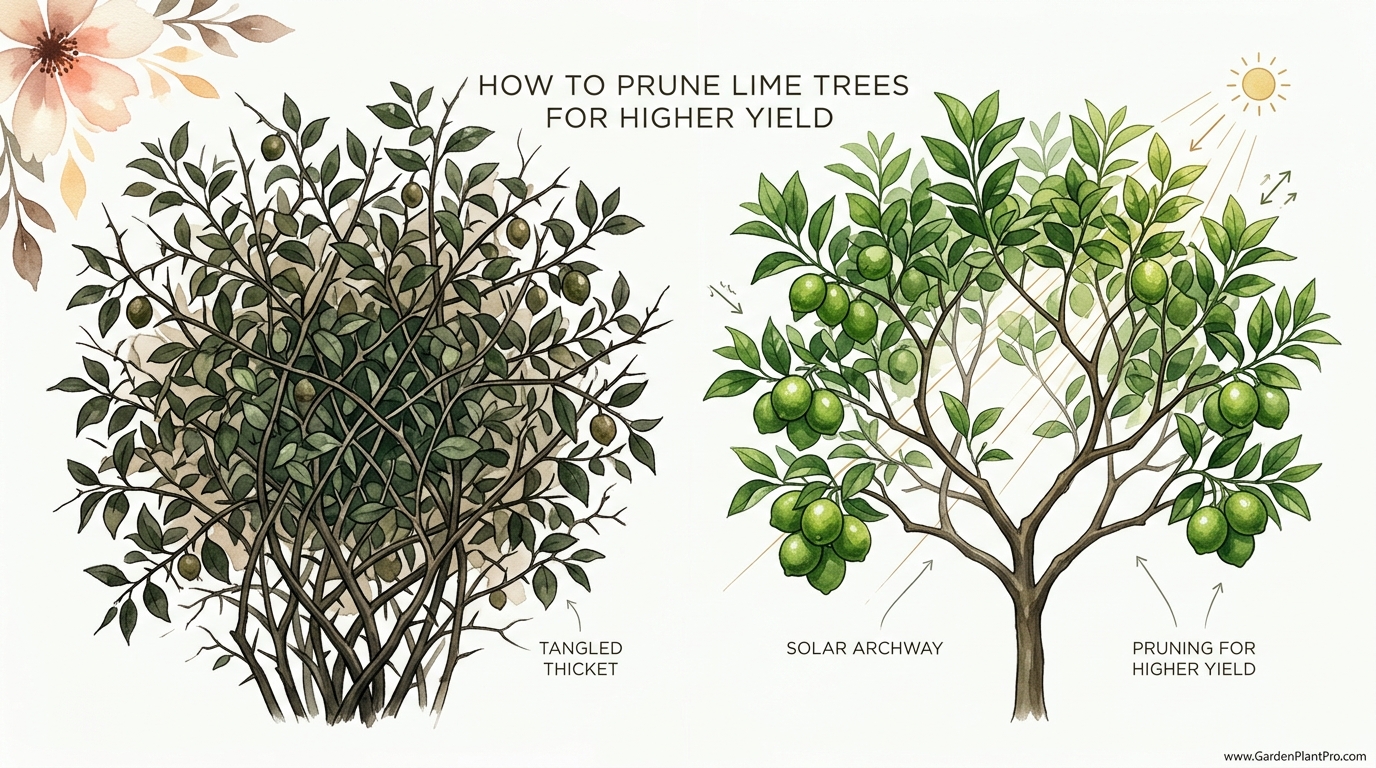
A well-pruned lime tree should ideally look like a **Solar Archway** rather than a **Tangled Thicket**. In a thicket, the leaves on the outside shade the leaves on the inside. This creates a “dead zone” in the center of the tree where no fruit can grow because there isn’t enough light to trigger flower bud formation. By opening up the canopy, you ensure that every branch has a “job” and the resources to do it.
In real-world terms, this process involves four main goals:
- Light Access: Ensuring at least 30% to 50% of the interior canopy receives sunlight to stimulate fruiting buds.
- Air Flow: Reducing humidity inside the canopy to prevent fungal diseases like sooty mold or melanose.
- Pest Management: Removing the dense “hiding spots” where scale, aphids, and citrus gall wasps thrive.
- Size Control: Keeping the tree at a “pedestrian height” (usually under 8 feet or 2.5 meters) so you can harvest without a ladder.
The Logic of the Cut: How It Works
Understanding the biology of your lime tree makes the pruning process much less intimidating. When you cut a branch, you aren’t just shortening it; you are changing the way hormones move through the plant. The most important of these are auxins, which are produced at the tips of branches. These hormones tell the buds further down the branch to stay “asleep.” When you remove the tip (a heading cut), you stop that signal, and the lower buds wake up and start growing.
Thinning Cuts vs. Heading Cuts
Thinning cuts are your best friend for yield. A thinning cut removes an entire branch back to its point of origin—either the main trunk or a larger side branch. These cuts don’t stimulate a “flush” of messy new growth at the site of the cut. Instead, they open “windows” for light to enter.
Heading cuts involve cutting a branch somewhere in the middle, usually just above a bud. These are used primarily for shaping young trees or keeping a mature tree at a certain height. Be careful with these on mature trees, as they often result in a “broom” of many small, weak branches that just add more shade.
The “Four Ds” of Pruning
I always tell my neighbors to start with the “Four Ds.” You don’t even need to think about the “art” of pruning until these are gone:
- Dead: Brittle, brown wood that snaps easily. It serves no purpose and can harbor disease.
- Damaged: Branches with torn bark or those broken by wind or heavy fruit loads.
- Diseased: Look for “galls” (swelling from wasps), cankers, or wood with strange discoloration.
- Deranged (or Crossing): Branches that grow inward toward the trunk or rub against each other. Rubbing bark creates wounds that invite infections.
Step-by-Step Technique for Higher Yield
Before you grab your shears, make sure you are working at the right time. For most regions, the ideal window is **late winter to early spring**, just before the “spring flush” of new growth begins. If you live in a frost-prone area, wait until the threat of the last frost has passed (usually when temperatures stay reliably above 55°F or 13°C).
1. Prepare Your Tools
Cleanliness is non-negotiable. I use a solution of 70% isopropyl alcohol or a 1:10 bleach-to-water ratio to sanitize my blades. This prevents the spread of pathogens like *Citrus exocortis*. Use bypass pruners for small twigs, loppers for branches up to 2 inches (5 cm), and a sharp folding saw for anything larger.
2. Lift the Skirt
Start at the bottom. “Skirt lifting” involves removing any branches that touch or hang within 2 to 3 feet (0.6 to 1 meter) of the ground. Branches touching the soil are a highway for ants and fungal spores. Lifting the skirt improves airflow and makes it much easier to apply mulch or fertilizer.
3. Clear the Base and Graft Union
Look at the very bottom of the trunk. If you see vigorous, thorny shoots growing from below the “bulge” in the trunk (the graft union), these are suckers from the rootstock. They will never produce the limes you want; they only steal energy. Cut them off flush with the trunk as soon as you see them.
4. Open the Center “Chimney”
Stand back and look into the middle of the tree. If it’s a wall of green, you need to create a “chimney” for light. Identify one or two large, upright branches in the center that are crowding the middle. Remove them entirely using a thinning cut. This allows sunlight to hit the interior wood, which will soon respond by producing “interior fruit”—often the juiciest because they are protected from sunburn.
5. Manage the Height
If your tree is reaching for the power lines, it’s time to bring it down. I prefer to keep my lime trees at a height where I can reach the top fruit with a small step stool. When shortening tall branches, always cut back to a side branch that is at least one-third the diameter of the one you’re removing. This ensures the tree can “heal” the wound effectively.
The Practical Benefits of Pruning
Why go through all this trouble? The results are measurable. A pruned tree doesn’t just look better; it performs better.
| Factor | Unpruned (Tangled Thicket) | Pruned (Solar Archway) |
|---|---|---|
| Fruit Size | Many small, “woody” limes | Larger, thinner-skinned, juicy fruit |
| Pest Pressure | High (scale and aphids love the shade) | Low (sunlight and wind deter pests) |
| Harvest Ease | Requires ladders and long sleeves | Accessible from the ground |
| Tree Longevity | Prone to limb breakage and rot | Strong, balanced structure |
Common Mistakes to Avoid
Even experienced gardeners can get a bit “clippie-happy” and make errors that set the tree back.
Over-pruning: Never remove more than 25% of the canopy in a single year. If a tree has been neglected for a decade, don’t try to fix it all at once. Spread the heavy work over three seasons. Removing too much at once stresses the roots and can lead to a massive flush of “water sprouts”—fast-growing, vertical shoots that produce no fruit.
DIY PROJECT: Collect rainwater no matter where you live...

This DIY project is the best way to legally collect rainwater NO MATTER where you live. Get chlorine-free water, cut down on your water bills, and have enough for an emergency situation or to water your garden. Read More Here...
Leaving Stubs: When you cut a branch, make the cut just outside the “branch collar”—that slightly swollen ring of bark where the branch meets the trunk. If you leave a 2-inch stub, the tree cannot grow over the wound. The stub will rot, providing a direct path for heart-rot fungi to enter the main trunk.
Pruning in Late Fall: In many climates, pruning stimulates new growth. If you prune in October or November (Northern Hemisphere), the tree will put out tender new leaves that will be killed by the first frost. This wastes the tree’s stored sugars and weakens its immune system.
Advanced Considerations: Variety Matters
Not all lime trees are the same, and your pruning approach should reflect the variety you’re growing.
Tahitian (Persian) Limes
These are the heavy hitters. They grow vigorously and can easily reach 15 to 20 feet (4.5 to 6 meters) if left alone. They tend to have a “weeping” habit. For these, focus heavily on skirt lifting and thinning the dense outer “curtain” of leaves to let light into the center.
Key Limes (Mexican Limes)
Key limes are often more “bushy” and incredibly thorny. They produce fruit on almost every branch tip. Because they are so dense, they are highly prone to fungal issues in humid climates. Your main task with a Key lime is thinning the interior to ensure the center isn’t a damp, dark mess.
Makrut (Kaffir) Limes
Since we often grow these for their leaves rather than the fruit, pruning is slightly different. You can be more aggressive with heading cuts to encourage a constant supply of fresh, aromatic “double-leaves.” However, don’t forget to remove the older, woodier interior branches every few years to keep the tree’s vigor up.
Environmental Factors and Aftercare
Pruning is a surgical procedure, and your tree needs “recovery time.” Once you’ve finished your cuts, your job isn’t quite done.
Sunburn Protection: If you’ve removed a large portion of the canopy and exposed previously shaded bark to intense afternoon sun, that bark can literally burn and crack. I recommend painting the exposed trunk and main limbs with a 1:1 mixture of white interior latex paint and water. This acts as a “sunscreen” for the tree.
Fertilization: Wait until you see the first sign of new growth after pruning before you apply a high-quality citrus fertilizer. If you fertilize immediately after a heavy prune, you might trigger an uncontrollable explosion of water sprouts. Let the tree stabilize first.
Hydration: A pruned tree has a smaller “radiator” (fewer leaves) to cool itself, but the wounds need moisture to heal. Ensure your irrigation reaches the “drip line”—the area directly under the outer edge of the canopy—where the most active roots live.
A Real-World Scenario: The “Rescue” Prune
Last year, a neighbor asked me to look at a 15-year-old Tahitian lime. It hadn’t been touched in a decade. It was 12 feet tall, and the center was so dark you could barely see the trunk. The fruit was tiny, hard, and only located at the very top.
We started by removing the “Four Ds.” That alone cleared out about 10% of the mess. Next, we identified three massive “water sprouts” that had turned into secondary trunks in the middle of the tree. We took those out with a pruning saw. Finally, we lifted the skirt so we could actually see the soil.
The neighbor was horrified; the tree looked “naked.” But three months later, the interior of the tree was covered in tiny white blossoms. By the end of the season, she harvested more limes from the lower branches than she had seen in the previous five years combined. The fruit was larger, and the tree looked like it had a new lease on life.
Practical Tips for Success
- Work on a dry day: Pruning in the rain or high humidity allows fungal spores to wash directly into your fresh cuts.
- Angle your cuts: Make heading cuts at a 45-degree angle, sloping away from the bud. This ensures rainwater sheds off the cut rather than sitting on it.
- Check for Gall Wasp: If you see “lumpy” swellings on small branches, prune them out immediately. Don’t compost them—seal them in a plastic bag and leave them in the sun to “cook” the larvae before disposal.
- Observe the “Drip Line”: Most of your tree’s health is underground. After pruning, ensure your mulch is kept at least 6 inches (15 cm) away from the trunk to prevent “collar rot.”
Final Thoughts
Tending to a lime tree is one of the most rewarding parts of gardening. There is a specific kind of nostalgia in standing under a well-maintained canopy, the air thick with the scent of citrus blossoms, knowing that your hands shaped that growth. Pruning isn’t an act of destruction; it is an act of partnership. You are providing the structure, and the tree is providing the life.
Don’t be paralyzed by the fear of making a “wrong” cut. These trees are remarkably resilient. As long as you follow the basic principles of light, air, and sanitation, your lime tree will reward you. Start small, observe how the tree responds over a season, and you’ll soon develop the “eye” for where the next window of light needs to be opened.
Take your shears out this weekend. Give your tree the breath of fresh air it’s been waiting for. Before long, you’ll be the neighbor with the basket full of limes, sharing the bounty of a tree that’s finally reached its full, sunny potential.