
Stop paying for seeds every year: one single plant can produce a lifetime supply of Swiss Chard for zero dollars. Are you stuck in the cycle of buying new chard starts every spring? Most gardeners pull their chard as soon as it starts to bolt, but that is exactly when the magic happens. By letting just one plant go to seed, you create a natural seed bank that adapts to your specific soil and climate. You will never have to buy a packet of chard seeds again. Here is how to turn one plant into a decade of food.
When I first started gardening, I used to treat Swiss Chard like a one-and-done crop. I would plant my rows in the spring, harvest all summer, and then yank the roots out when the first hard frost hit. I was throwing away thousands of potential plants every single year. It took a particularly mild winter and a forgotten corner of the garden to teach me that these plants are actually waiting for their second act.
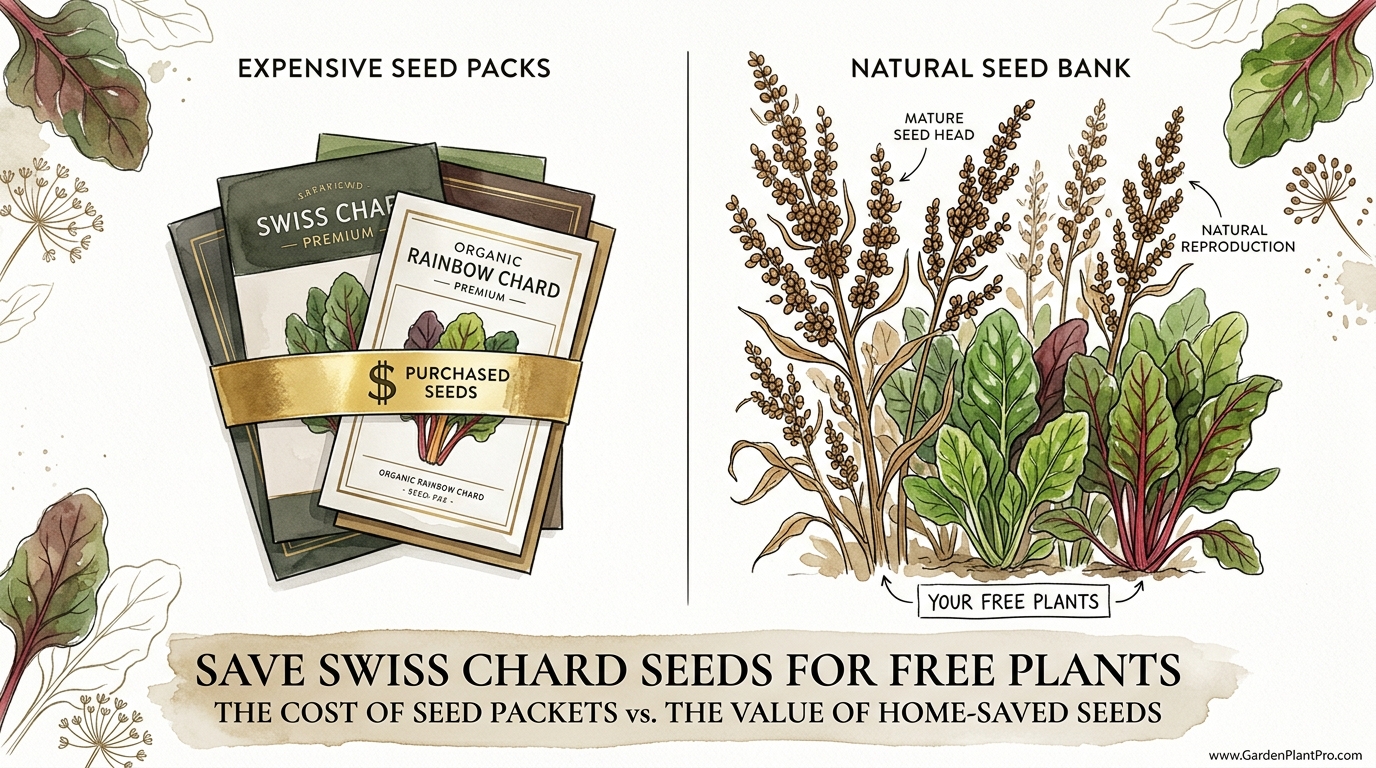
Chard is a resilient biennial, meaning it lives for two years. In the first year, it gives you those thick, crunchy stems and earthy leaves. In the second year, it transforms into a towering seed factory. If you have been relying on expensive seed packs every season, it is time to shift your focus to a natural seed bank that costs nothing and produces more than you could ever use.
Save Swiss Chard Seeds For Free Plants
Swiss Chard (Beta vulgaris) is a leafy green that belongs to the same family as beets and spinach. While we usually grow it for its colorful stalks, its biological goal is to survive a winter and produce seeds the following spring. Saving seeds from this plant is a way of closing the loop in your garden. Instead of being a consumer who buys a packet of 25 seeds for $4.00, you become a producer who harvests 5,000 seeds from a single plant.
This practice exists because chard is incredibly efficient at reproduction. It is a wind-pollinated plant, which means it does not need bees or butterflies to make seeds; it just needs a breeze. Real-world gardeners use this method to develop “landrace” varieties—plants that have survived the specific pests and weather patterns of their own backyard. When you save seeds from the strongest plant in your garden, you are essentially breeding a “super chard” that is tailor-made for your soil.
Think of a Swiss Chard seed as a small, knobby time capsule. Unlike a tomato seed which contains one plant, a chard “seed” is actually a fruit cluster. Inside that one brown, bumpy pod are usually 2 to 5 actual seeds. This is why when you plant one chard seed, you often see a little huddle of sprouts coming up in the same spot.
How to Save Swiss Chard Seeds Step-by-Step
The process of saving chard seeds requires patience because you have to work with the plant’s internal clock. You cannot rush a biennial; it needs to experience the seasons to know it is time to reproduce.
Step 1: The First Year of Growth
Plant your chard as you normally would in early spring or late summer. You can harvest leaves from these plants all through their first season. In fact, light harvesting actually encourages the plant to stay healthy. The key is to select at least five to ten of your healthiest, most vibrant plants and mark them as your “seed mothers.” Do not pull these out in the fall.
Step 2: Vernalization (The Big Chill)
Swiss Chard needs a period of cold to trigger its flowering stage. This is called vernalization. The plant needs roughly 10 weeks of temperatures below 40°F (4°C) to flip its biological switch from “leaf mode” to “seed mode.” In regions where winters are mild—usually USDA Zone 7 or higher—the plants can stay in the ground with a simple 4-inch (10 cm) layer of straw mulch over the crown.
In colder climates (Zone 6 and below), the roots might freeze and rot if left in the mud. In these areas, experienced gardeners dig up the roots in late fall, trim the leaves to about 2 inches (5 cm), and store them in a bucket of damp sand in a cool cellar or garage. As long as the temperature stays just above freezing, the roots will survive. You simply replant them in the garden once the soil thaws in the spring.
Step 3: The Bolting Phase
In the second spring, the plant will stop growing new tender leaves and start sending up a thick, central stalk. This is called bolting. The stalk can reach heights of 4 to 6 feet (1.2 to 1.8 meters). At this stage, the leaves become bitter and tough because the plant is sending all its energy upward. You will see small, green-yellow flowers clustered along the branches of the stalk.
Step 4: Monitoring for Maturity
The flowers will eventually fade, and small green clusters will form in their place. Over the next few weeks, these clusters will turn from green to tan, and finally to a dark, woody brown. You want to wait until at least two-thirds of the seeds on the stalk are brown and feel dry to the touch. If you harvest too early, the seeds won’t be mature enough to germinate; if you wait too long, birds might eat them or a heavy rain might cause them to rot.
Step 5: The Harvest and Dry
Once the stalks are mostly brown, cut the entire stalk at the base. I like to do this on a dry, sunny afternoon. Take the stalks indoors or into a dry shed and hang them upside down or lay them on a screen for 7 to 14 days. This “curing” period ensures that any lingering moisture in the stems is drawn out, which prevents mold during storage.
Step 6: Threshing and Cleaning
To remove the seeds, put on a pair of leather gloves and simply run your hand down the length of the dry stalk over a large bucket. The seeds should pop off easily. You will be left with a mix of seeds and bits of dry leaf or stem (called chaff). You can clean this by gently pouring the seeds from one bucket to another in front of a small fan. The wind will blow away the light chaff, leaving the heavy, clean seeds in the bottom bucket.
Benefits of Saving Your Own Chard Seeds
The most obvious benefit is the financial savings. A single well-grown chard plant can produce enough seed to fill fifty commercial packets. If you are a gardener on a budget, this is the single best way to reduce your overhead. Beyond the money, there are deep biological advantages to this approach.
* Climate Adaptation: Every time you save seeds from a plant that survived a specific drought or a late frost, you are selecting for those traits. Over five years, your chard will become noticeably more resilient than anything you can buy in a store.
* High Germination Rates: Freshly harvested seeds often have much higher success rates than seeds that have been sitting in a warehouse or on a retail shelf for months.
* Abundance for Sharing: You will have so many seeds that you can easily participate in seed swaps or give them away to neighbors. It turns your garden into a source of community wealth.
* Genetic Security: Commercial seed companies often discontinue varieties. By saving your own, you ensure that your favorite rainbow-stemmed or giant-leafed variety never goes extinct.
Challenges and Common Mistakes
While the process is straightforward, there are a few places where things can go wrong. Understanding these pitfalls will save you a lot of frustration in the second year.
Cross-Pollination: This is the biggest hurdle. Swiss Chard is the same species as beets, sugar beets, and mangelwurzel. Because it is wind-pollinated, the pollen can travel over 800 feet (240 meters) or even up to a mile in open areas. If you are growing chard for seed and your neighbor is growing beets for seed at the same time, you might end up with “Chard-Beets”—a plant with a weird, woody root and mediocre leaves. To avoid this, only let one variety of the Beta vulgaris family flower at a time.
Harvesting Too Early: It is tempting to cut the stalks as soon as they start looking messy. However, the seeds need that final “browning” phase on the plant to fully develop the embryo inside. If the seeds are still green when you strip them off, they will likely shrivel up and fail to grow next spring.
DIY PROJECT: Collect rainwater no matter where you live...

This DIY project is the best way to legally collect rainwater NO MATTER where you live. Get chlorine-free water, cut down on your water bills, and have enough for an emergency situation or to water your garden. Read More Here...
Poor Storage Conditions: Moisture is the enemy of a seed bank. If you put your seeds in a plastic bag before they are 100% dry, they will grow mold within weeks. Always use paper envelopes for the first month of storage to allow for any residual respiration.
Limitations: When Seed Saving Might Not Work
There are some situations where saving chard seeds is more trouble than it is worth. If you live in a strictly tropical climate where the temperature never drops below 50°F (10°C), your chard may never receive the vernalization signal it needs to bolt. In these regions, the plant might simply grow as a perennial for a few years until it eventually peters out without ever flowering.
Similarly, if you are growing F1 Hybrid varieties (often labeled as such on the original packet), the seeds you save will not grow “true to type.” This means the offspring might look nothing like the parent plant—some might have thin stems, some might be prone to disease, and some might lack the color you loved. For successful seed saving, it is best to start with Open-Pollinated or Heirloom varieties like Fordhook Giant, Lucullus, or Five Color Silverbeet.
Comparison: Home-Saved vs. Store-Bought Seeds
| Feature | Store-Bought Seeds | Home-Saved Seeds |
|---|---|---|
| Cost | $3.00 – $6.00 per packet | $0.00 (Free) |
| Quantity | 25 – 100 seeds | 2,000 – 10,000+ seeds |
| Adaptability | General (grown for all regions) | High (local climate optimized) |
| Effort | Minimal (purchase and plant) | Moderate (requires 2 years) |
| Purity | Guaranteed by the company | Depends on isolation distance |
Practical Tips for Success
Maintaining a healthy seed bank requires a bit of garden management. Here are the best practices I’ve picked up over the years:
* Staking is Mandatory: A flowering chard plant is a giant sail. Summer winds or heavy thunderstorms will snap the stalks or pull the whole plant out of the ground once the seeds get heavy. Drive a sturdy T-post or wooden stake into the ground and tie the central stalk to it early in the second year.
* Population Size Matters: For the best genetic health, try to save seeds from at least 5 to 10 different plants. If you only save from one single plant every year, you might eventually see “inbreeding depression,” where the plants become smaller and less vigorous over many generations.
* Watch for Aphids: Aphids love the succulent new growth on seed stalks. If you see a colony forming, blast them off with a sharp stream of water. Don’t use heavy oils or soaps once the flowers are open, as you don’t want to interfere with the light pollen movement.
* Label Everything: It sounds obvious, but a jar of brown seeds looks exactly like another jar of brown seeds. Write the variety and the year of harvest on your storage container immediately.
Advanced Considerations: Genetic Diversity
If you want to take your seed saving to the next level, start practicing roguing. This is the process of removing any plants that don’t meet your standards. If you have a row of “Bright Lights” chard and one plant has dull, thin stems or starts bolting much earlier than the others, pull it out before it flowers. By removing the “weak links,” you ensure that only the best genetics are passed on to your future crops.
For those interested in long-term preservation, Swiss Chard seeds can stay viable for 5 to 6 years if stored in a cool, dark, and dry place. I recommend using a glass jar with a small silica gel packet inside. Store the jar in a basement or the back of a closet where temperatures are stable. Some practitioners even freeze their seeds for decade-long storage, but for a standard backyard rotation, a simple cool shelf is more than enough.
An Example Scenario
Imagine you plant a small 4×8 foot (1.2 x 2.4 meter) bed of “Fordhook Giant” chard this spring. You harvest leaves for your family all summer long. In November, you mulch the bed with straw. Next April, five of those plants start growing tall. By July, those five plants have produced a massive cloud of seeds.
You harvest them and end up with two quart-sized mason jars full of seed. That is enough to plant a half-acre of chard, or to keep your small backyard bed going for the next fifteen years. You can take a handful of those seeds to your local library’s seed bank or trade them for tomato seeds at a local garden club. You have moved from being a buyer to being a steward of a specific plant lineage.
Final Thoughts
The transition from a consumer gardener to a seed saver is one of the most rewarding steps you can take. It connects you to the ancient rhythm of agriculture and gives you a level of food security that a trip to the local big-box store can never provide. Swiss Chard is the perfect “entry-level” biennial because it is so hardy and prolific.
Do not be afraid of the “messy” look of a bolting plant. That brown, towering stalk is a sign of abundance. By following these steps, you are not just growing a meal; you are ensuring that your garden remains productive for a decade or more.
Start by leaving just two or three plants in the ground this coming winter. Watch how they change in the spring, and enjoy the feeling of running your hands down a seed-heavy stalk. Once you have your first jar of “homegrown” seeds, you will likely never look at a commercial seed display the same way again. Experiment with different varieties and see which ones thrive best in your unique little patch of earth.