
Your Jade plant is hiding an infinite supply of free gifts inside its leaves – stop letting that biological gold go to waste. Stop looking at your Jade as a single ornament. It is a self-replicating resource! One single leaf can become a new plant for a friend, a neighbor, or a new room in your house. Learn how to master the ‘leaf-drop’ method and never buy a houseplant gift again.
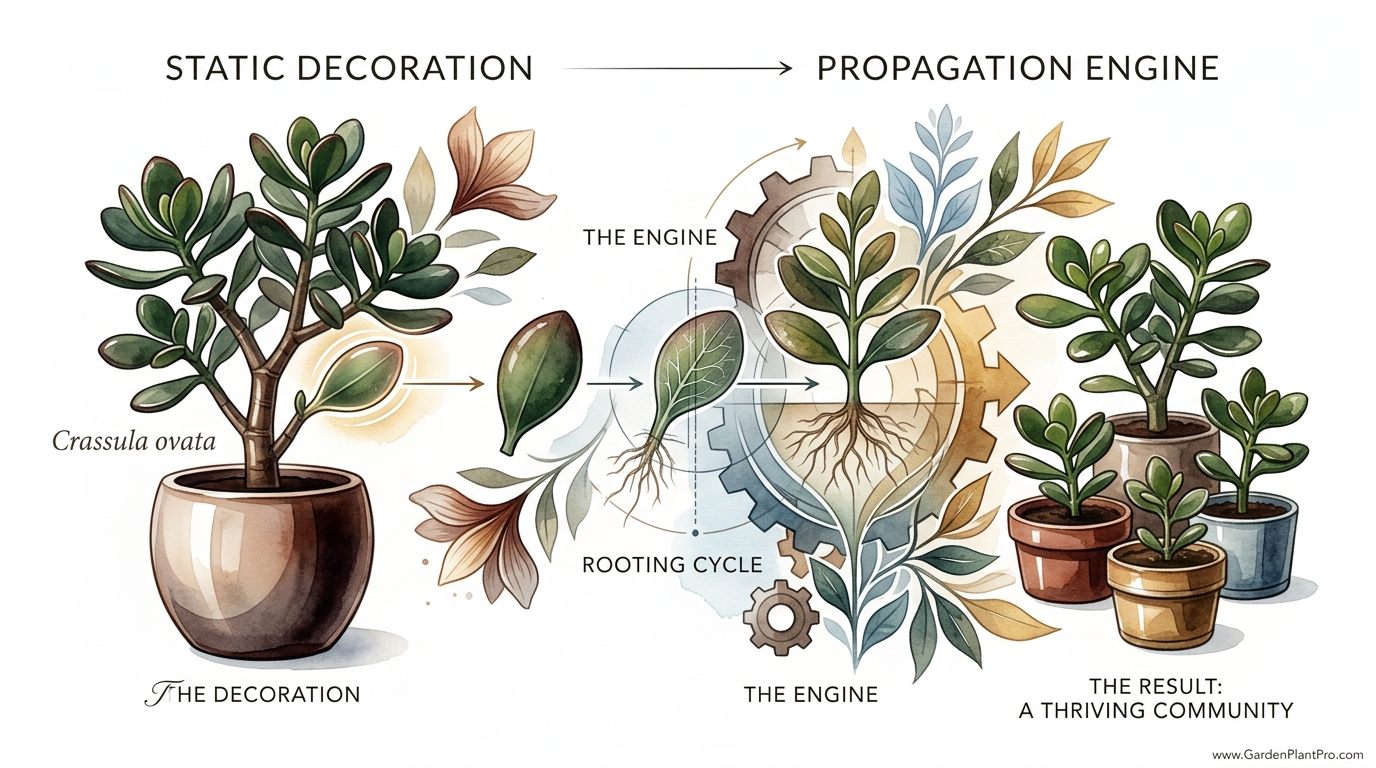
I have been growing Jade plants, or Crassula ovata, for over thirty years now. There is something truly special about a plant that rewards you for simply being a bit clumsy or doing a little pruning. Most folks treat their Jade as a static piece of furniture, but in my garden, I see every pot as a PROPAGATION ENGINE.
If a leaf falls off while you are dusting or if you decide to trim back a leggy branch, you are holding the building blocks of a brand-new tree. It is one of nature’s most generous tricks. You do not need a laboratory or fancy chemicals to make it happen, just a bit of patience and some honest-to-goodness dirt.
Sharing these plants has become a bit of a tradition in my neighborhood. I have seen tiny leaves I started on my windowsill grow into three-foot (0.9-meter) bushes in my friends’ living rooms. It is a slow process, but there is a deep satisfaction in watching a single, plump leaf sprout roots and eventually turn into a woody, resilient tree that can live for decades.
How To Propagate Jade Plants From Leaves
Propagating a Jade plant from a leaf is the process of taking a single, healthy leaf and encouraging it to grow its own root system and eventually a brand-new stem. In the wild, these plants live in rocky, arid regions of South Africa. When a leaf is knocked off by a passing animal or a heavy wind, it sits on the dry ground, callouses over to protect itself, and then sends out tiny roots to find moisture. We are simply mimicking that survival instinct in our own homes.
This method is distinct from stem propagation because it requires almost no “sacrifice” from the mother plant. While a stem cutting involves removing a whole branch, leaf propagation only requires a single leaf. This makes it the ideal choice for gardeners who have a young or small Jade and do not want to ruin its shape by cutting off large pieces. It is the ultimate “low-impact” gardening technique.
In the real world, this is often called the ‘leaf-drop’ method. It is why you will sometimes find “accidental” baby Jades growing at the base of a larger plant in a nursery. A leaf fell, the conditions were just right, and nature took over. When we do this intentionally, we are just giving the plant a helping hand to ensure a higher success rate.
The Step-by-Step Guide to Success
Success with Jade leaves depends on how you treat them in the first 72 hours. If you rush the process, you will likely end up with a mushy, rotten leaf. If you take your time, you will see the magic happen. Here is exactly how I do it on my potting bench.
1. Selecting the Right Material
Choose a leaf that is plump, firm, and deep green. Avoid any leaves that are yellowing, shriveled, or have brown spots. The leaf needs to have enough stored water and energy to survive for several weeks without any roots of its own. I find that leaves from the middle of a branch usually work best—they are mature but still full of vigor.
2. The Clean Break
This is the most important part. You must get the entire leaf, including the base where it attaches to the stem. Do not use scissors; instead, gently grasp the leaf and twist it slightly until it “pops” off. You should see a clean, U-shaped base on the leaf. If the leaf tears or leaves a piece behind on the stem, it likely will not grow roots because the specialized cells needed for growth are located right at that attachment point.
3. The Callousing Period
Place your leaves on a dry paper towel or a clean tray in a spot with bright, indirect light. Leave them there for 3 to 7 days. During this time, the “wound” where the leaf was attached will dry out and form a hard, callous-like skin. This is vital. If you put a “wet” leaf directly onto moist soil, bacteria will enter the wound and cause it to rot within days. I usually wait until the end looks like a tiny piece of parchment paper.
4. Choosing the Right Soil
Jade plants hate “wet feet.” Use a dedicated succulent or cactus mix. If you are making your own, I recommend a mix of two parts potting soil to one part perlite or coarse sand. This ensures that water drains away quickly. Avoid heavy garden soil or standard potting mixes that hold onto moisture like a sponge.
5. Placement and “Planting”
There are two ways to do this. You can lay the leaf flat on top of the soil, or you can gently poke the calloused end into the soil at a 45-degree angle. I prefer laying them flat. It allows the new roots to find their way into the dirt naturally while keeping the leaf itself away from excess moisture. I usually place 5 or 6 leaves in a single 4-inch (10-cm) pot to save space.
The Biology Behind the Magic
You might wonder how a simple leaf can grow an entire plant. Succulents like the Jade have what scientists call totipotent cells at the base of the leaf. These are cells that have the ability to transform into any other kind of cell the plant needs—roots, stems, or new leaves. When the leaf is separated from the mother plant, these cells receive a hormonal signal to start building a new survival system.
The leaf acts as a battery. It contains all the water and nutrients the new plantlet needs for its first few months of life. This is why you should never pull the “mother leaf” off the baby plant, even when it starts to look shriveled and ugly. The baby is literally drinking the life out of that old leaf until it is strong enough to feed itself through its own roots.
Benefits of Leaf Propagation
The most obvious benefit is the infinite supply of plants. If you have a mature Jade, you have hundreds of potential gifts sitting on its branches. I have used leaf-grown Jades as wedding favors, stocking stuffers, and “welcome to the neighborhood” tokens. Because they are so easy to grow in bulk, you can start a dozen at a time in a single tray.
Another advantage is the ability to create Bonsai-style starts. When a Jade grows from a single leaf, it often develops a very thick, sturdy base right from the beginning. This gives you much more control over the eventual shape of the “trunk” than you would get from a long, leggy stem cutting. It is the preferred method for folks who want to grow miniature, tree-like specimens.
- Cost-Effective: You never have to buy a new Jade plant again.
- Low Stress: Removing a leaf causes almost zero stress to the parent plant.
- Quantity: You can produce a “forest” of Jades from just one pruning session.
- Educational: It is a wonderful way to show children how plants grow and survive.
Challenges and Common Mistakes
The number one mistake I see people make is overwatering. It is a natural instinct to want to “help” a new plant by giving it water, but with Jade leaves, that is often a death sentence. Until you see actual roots, the leaf has no way to take up water. Any moisture in the soil is just sitting there, waiting to breed fungus and rot the leaf.
Another common pitfall is using incomplete leaves. If you look at the base of the leaf you removed and it looks jagged or torn, it likely will not work. Those specialized growth cells are very specifically located at the very tip of the leaf base. If you lose that “point,” you lose the ability to grow roots. This is why the “twist and pop” method is better than cutting with a knife.
DIY PROJECT: Collect rainwater no matter where you live...

This DIY project is the best way to legally collect rainwater NO MATTER where you live. Get chlorine-free water, cut down on your water bills, and have enough for an emergency situation or to water your garden. Read More Here...
Finally, watch out for light levels. If you put your leaves in direct, scorching afternoon sun, they will literally cook. They will turn brown, shrivel up, and die before they have a chance to root. On the flip side, if they are in a dark corner, they will sit there for months doing absolutely nothing. Aim for bright, filtered light—like what you would find under a porch or near a sheer-curtained window.
Limitations of the Leaf Method
While leaf propagation is rewarding, it is not the fastest way to get a big plant. If you want a 12-inch (30-cm) plant by next year, you are better off with a stem cutting. A leaf cutting can take 6 months to even look like a “real” plant, and up to two years to reach a size where it could be considered a standard houseplant. It is a game of patience.
There is also a slightly lower success rate compared to stem cuttings. In my experience, about 70% to 80% of leaves will successfully root, whereas nearly 100% of healthy stem cuttings will take. Sometimes a leaf just “gives up” and shrivels away. This is why I always recommend starting more leaves than you actually think you need.
Comparison: Leaf vs. Stem Propagation
Deciding which method to use depends on your goals. If you want a big plant fast, go with a stem. If you want many plants or are a patient gardener, go with the leaf. Here is a quick breakdown of how they compare:
| Factor | Leaf Propagation | Stem Propagation |
|---|---|---|
| Speed of Growth | Very Slow (Months to Years) | Fast (Weeks to Months) |
| Success Rate | Moderate (70-80%) | High (90-100%) |
| Quantity Produced | Potentially dozens from one plant | Limited by number of branches |
| Impact on Mother Plant | Minimal/None | Moderate (Changes the shape) |
| Ideal For | Gifts, Bonsai, many plants | Quick replacement, large specimens |
Practical Tips and Best Practices
One trick I have learned over the years is the “Neglect Method.” Once you have placed your calloused leaves on the soil, try to ignore them for at least two weeks. Do not lift them up to “check for roots.” Every time you move the leaf, you risk breaking the tiny, hair-like root fibers that are just starting to explore the soil. Let them be.
Regarding temperature, Jade leaves root best when the air is between 65°F and 75°F (18°C to 24°C). If your house is very cold in the winter, the leaves might just go dormant and sit there for months. I have had good luck placing my propagation trays on top of the refrigerator, where the gentle heat from the compressor keeps the soil just a tiny bit warmer than the rest of the room.
When it comes to watering, I wait until I see roots. Once I see those tiny pink or white threads digging into the dirt, I will use a spray bottle to mist the soil surface once every few days. You want the soil to be slightly damp for an hour or so, then dry out completely. Remember, the baby plant is still getting most of its water from the mother leaf, so you do not need to drench the pot.
Advanced Considerations
For those of you who want to take this to the next level, you can experiment with rooting hormones. While Jades usually root fine on their own, dipping the calloused end into a bit of rooting powder can speed up the process by a week or two. It also helps provide some antifungal protection to the wound.
If you are growing variegated varieties like ‘Lemon & Lime’ or ‘Tricolor’, be aware that they can be much more finicky. These varieties have less chlorophyll (the green stuff that makes energy), so they grow slower and are more prone to rot. I find these benefit from even more light than the standard green Jade, but even less water.
Also, consider the container material. I prefer using shallow terracotta trays for propagation. Terracotta is porous, meaning it breathes and helps excess moisture evaporate. Plastic trays can trap water at the bottom, which is exactly what we want to avoid. If you use plastic, make sure there are plenty of drainage holes.
Real-World Example: The “Gift Forest”
Last spring, I decided to prune my 10-year-old Jade that had grown a bit too wide for its shelf. Instead of tossing the “waste,” I took about 40 leaves. I let them callous on a tray for 5 days, then I filled a large, shallow wooden box with a mix of sand and peat moss. I laid all 40 leaves in neat rows, like soldiers.
By early summer, about 32 of those leaves had tiny pink roots. By autumn, I had 30 little “rosettes” about an inch (2.5 cm) wide. I spent a Saturday afternoon potting them into individual 2-inch (5-cm) ceramic pots. Total cost? About ten dollars for the pots and some soil. Those 30 plants became Christmas gifts for my entire extended family. Every one of them is now a thriving little tree in a different home.
Final Thoughts
Propagating Jade plants from leaves is more than just a gardening task; it is a lesson in patience and the incredible resilience of nature. It turns a simple hobby into a way to share life with the people around you. Once you get the hang of the “twist, callous, and wait” rhythm, you will find yourself scanning every succulent you see for potential new starts.
Do not be discouraged if your first few tries end in shriveled leaves or a bit of rot. Gardening is all about learning from the soil and the seasons. Every failed leaf is just a lesson on what to do differently next time. Whether you want to fill your house with greenery or start a new tradition of handmade gifts, the Jade plant is your best partner in the journey.
Give it a try this weekend. Take a leaf, set it aside, and watch the tiny miracle of life unfold on your windowsill. Before you know it, you will be the neighbor over the fence, passing along a bit of your own garden’s “gold” to someone else.