
Why pay for a plastic box of wilted greens when you can grow a 24/7 ‘living pharmacy’ for just pennies per harvest? Most people view sprouts as a luxury item found only in the expensive organic aisle. In reality, they are the ultimate entry point for self-sufficiency. Shifting from a consumer who pays for plastic and logistics to a producer who grows on their own counter, you gain 10x the nutrients for 1% of the cost. Stop buying dead greens and start growing a living inheritance.
I remember sitting in my kitchen thirty years ago, watching the snow pile up against the window glass. Fresh greens were a memory of summer, and the grocery store was miles away. That was when I first started experimenting with a simple quart jar and a handful of mung beans. What I discovered changed the way I looked at my pantry forever. You do not need an acre of land or a fancy greenhouse to produce high-quality food; you simply need a little bit of space on your countertop and a regular rhythm of care.
Sprouting is essentially the process of waking up a dormant seed and tricking it into releasing its concentrated energy. Every seed is a biological miracle waiting to happen. Inside that hard shell lies everything a plant needs to survive its first week of life. When you add water and the right temperature, the seed undergoes a chemical transformation that shatters its starch and anti-nutrients, replacing them with a surge of enzymes and vitamins. It is gardening in its most distilled, rapid, and potent form.
Working with these tiny plants offers a unique perspective on living food. Most of what we find in the supermarket is technically dying from the moment it is harvested. A head of lettuce loses a significant percentage of its Vitamin C within days of being cut. Sprouts, however, are eaten while they are still growing. This ensures you are consuming the peak of their nutritional vitality, a luxury that even the most expensive organic markets cannot consistently provide.
The Economic Benefits Of Growing Sprouts At Home
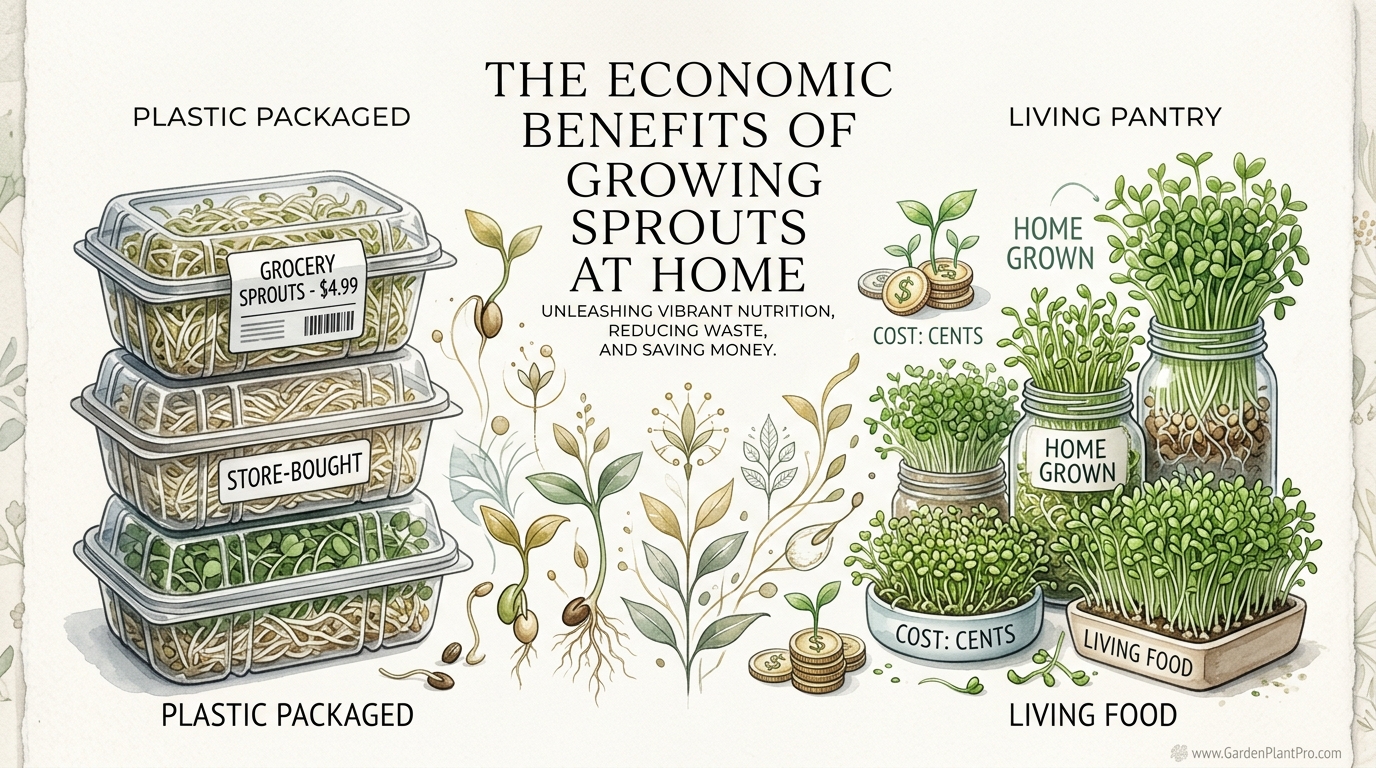
The financial math of sprouting is one of the few areas in modern life where you can actually beat the system. When you walk into a high-end grocery store, you might see a 4-ounce (113-gram) plastic container of alfalfa or broccoli sprouts priced at $5.00 or more. This equates to paying roughly $20.00 per pound for a product that is mostly water and air. Shifting to home production reveals the massive markup that consumers pay for the convenience of plastic packaging and refrigerated logistics.
Bulk seeds are the secret to this economic transformation. A single pound (454 grams) of high-quality, organic sprouting seeds can cost between $15.00 and $25.00 depending on the variety. Because these seeds expand significantly during the sprouting process, that one pound of seed can yield anywhere from 10 to 15 pounds (4.5 to 6.8 kilograms) of fresh sprouts. Instead of paying $20.00 a pound at the store, you are suddenly producing your own “living pharmacy” for roughly $1.50 to $2.50 per pound. The savings are not just marginal; they are exponential.
Equipment costs are similarly negligible. While there are beautiful tiered sprouting towers and automated machines available, a simple wide-mouth Mason jar and a mesh lid work just as well. Most experienced gardeners already have these items in their kitchen. There is no need for soil, fertilizers, or expensive grow lights. You are essentially using the plumbing of your home and the ambient temperature of your kitchen to generate a continuous harvest. This low barrier to entry makes sprouting the most accessible form of year-round food production.
Waste reduction provides another hidden economic benefit. How many times have we bought a bag of spinach only to have it turn into a slimy mess at the bottom of the crisper drawer? Growing your own sprouts allows you to produce exactly what you need. If you have a small family, you can start a new tablespoon of seeds every three days. This creates a “staggered harvest” system that ensures you always have fresh greens without the guilt and financial loss of throwing away spoiled food.
How the Sprouting Process Works Step by Step
Success in sprouting depends on four main variables: moisture, air circulation, temperature, and darkness followed by light. Understanding these basics allows you to adjust your technique based on the season or the specific seed variety you are working with. The goal is to keep the seeds hydrated without letting them sit in stagnant water, which is the recipe for rot and mold.
The first step is sanitation. Because sprouts grow in a warm, moist environment that pathogens also enjoy, starting with a clean jar is non-negotiable. I like to wash my jars in the dishwasher on a high-heat cycle or give them a quick soak in a mild vinegar solution. This ensures that you aren’t accidentally culturing wild bacteria alongside your broccoli seeds.
Step 1: The Initial Soak
Most seeds need an initial “wake-up call” in the form of a long soak. For small seeds like alfalfa, clover, or broccoli, 1 to 2 tablespoons in a quart jar is plenty. Fill the jar about three-quarters full with cool, filtered water. Use water that is around 70°F (21°C). If the water is too hot, you can damage the delicate internal structures of the seed; if it is too cold, the germination process will be sluggish. Let the seeds sit for 8 to 12 hours, typically overnight.
Step 2: Rinsing and Draining
Once the soak is complete, drain the water through your mesh lid. Refill the jar with fresh water, give it a gentle swirl to rinse away the initial dust and metabolic byproducts, and drain it again. The angle of the jar is the most critical part of this stage. Prop the jar upside down at a 45-degree angle. This allows excess water to drain out while still permitting air to circulate through the mesh. Stagnant water is the primary cause of failure in home sprouting.
Step 3: The Daily Rhythm
Repeat the rinse and drain process two to three times every day. In warmer weather or higher humidity, you might need to rinse more frequently to keep the seeds cool and fresh. In the first few days, keep the jar in a relatively dark spot on your counter. The seeds don’t need light to germinate; in fact, they often grow better in the dark as they “stretch” to find a light source, leading to longer, crispier sprouts. Shaking the jar gently after a rinse helps spread the seeds out so they aren’t clumped together in a tight mass.
Step 4: Greening and Harvesting
When you see the first tiny yellow leaves appearing—usually around day 4 or 5—you can move the jar into indirect sunlight. This triggers photosynthesis, and the leaves will turn a vibrant green as they develop chlorophyll. Avoid direct, harsh sunlight as the glass jar can act as a greenhouse and cook your delicate sprouts. Once they have reached your desired length, give them a final, thorough rinse. I often put them in a large bowl of water to let the seed hulls float to the top, where they can be skimmed off for a cleaner final product.
The Immense Health Benefits of Living Food
Nutritional density is the primary reason why doctors and health enthusiasts have championed sprouts for decades. When a seed germinates, it is effectively pre-digesting its own nutrients. This process breaks down complex proteins into simple amino acids and converts fats into essential fatty acids. For people with sensitive digestive systems, sprouts are often much easier to tolerate than the mature vegetables or the dry seeds themselves.
Bioavailability increases dramatically during the first five days of growth. Many seeds contain phytates, which are compounds that bind to minerals like zinc, iron, and magnesium, preventing our bodies from absorbing them. The sprouting process activates an enzyme called phytase that breaks these bonds, “freeing” the minerals for our use. This makes sprouts a powerful tool for those looking to improve their mineral intake without relying on synthetic supplements.
Broccoli sprouts deserve special mention for their sulforaphane content. Research from institutions like Johns Hopkins University has shown that 3-day-old broccoli sprouts can contain 10 to 100 times the concentration of glucoraphanin (the precursor to sulforaphane) compared to a mature head of broccoli. Sulforaphane is a potent antioxidant that supports the body’s natural detoxification pathways and has been studied for its potential roles in cardiovascular health and cellular protection.
Vitamins C, K, and A also see a surge during germination. For instance, mung beans see a significant rise in Vitamin C as they sprout, turning a protein-heavy legume into a fresh, vitamin-rich vegetable. This versatility allows you to use sprouts as a base for salads, a crunchy topping for sandwiches, or even a nutrient-boost for morning smoothies. They are essentially a multi-vitamin that you grow in a jar.
Challenges and Common Mistakes to Avoid
Every seasoned gardener has faced a batch of sprouts that went “off.” It is part of the learning curve, but most issues can be traced back to a few simple errors. The most common mistake is overcrowding the jar. It is tempting to put 4 tablespoons of seeds in a single quart jar, but as they expand, they will pack together so tightly that air cannot reach the middle. This creates an anaerobic environment where bacteria thrive and the sprouts die from lack of oxygen.
DIY PROJECT: Collect rainwater no matter where you live...

This DIY project is the best way to legally collect rainwater NO MATTER where you live. Get chlorine-free water, cut down on your water bills, and have enough for an emergency situation or to water your garden. Read More Here...
Temperature control is another frequent hurdle. While seeds need warmth to wake up, a kitchen that is consistently over 80°F (27°C) can cause sprouts to grow too fast and spoil. High heat encourages the growth of mold and slime. If your kitchen is very warm, move your jars to the coolest spot in the room or increase your rinsing frequency to four times a day to keep the internal temperature of the jar regulated.
Confusing root hairs with mold is a classic beginner’s panic. Many sprouts, particularly radish and broccoli, develop fine, white, fuzzy structures along their roots. These are microscopic root hairs used to absorb moisture, and they are perfectly healthy. Mold, on the other hand, will usually be grayish or green, have a slimy texture, and most importantly, it will smell. If your sprouts have a fresh, earthy, or spicy scent, they are fine. If they smell like a damp basement or rot, trust your nose and start over.
Inadequate draining is the final major pitfall. If even a teaspoon of water pools at the bottom of the jar, the seeds at the bottom will literally drown. They will begin to ferment rather than grow, ruining the entire batch. Always ensure your jar is propped up at an angle and give it a good “thump” on your hand after rinsing to dislodge any water trapped in the mesh lid or between the seeds.
Limitations and Safety Considerations
While home sprouting is generally safe, it is important to acknowledge the realistic constraints of the practice. The same conditions that make sprouts grow—warmth and moisture—are exactly what pathogens like Salmonella and E. coli prefer. Because of this, the FDA and other health organizations often suggest that high-risk individuals, such as the elderly, young children, or those with compromised immune systems, should avoid raw sprouts entirely.
Cooking your sprouts is a simple way to mitigate this risk. Mung bean and lentil sprouts are delicious when lightly steamed or added to a quick stir-fry. Heating them to an internal temperature of 165°F (74°C) kills potential bacteria while still retaining much of the fiber and mineral content. If you are serving raw sprouts, ensure you are using seeds specifically labeled for sprouting, as these have been tested for pathogens and haven’t been treated with agricultural chemicals meant for field planting.
Water quality plays a role in the safety of your “living pantry.” If your tap water is heavily chlorinated or comes from an untested well, consider using filtered or spring water for the soaking and rinsing process. Since the sprouts are absorbing this water to build their physical structure, the cleaner the source, the better the final product. Just as you wouldn’t use tainted soil for your soil health in a traditional garden, you shouldn’t use questionable water for your sprouts.
Comparing Sprouts to Microgreens
People often use the terms “sprouts” and “microgreens” interchangeably, but they are actually different stages of a plant’s life and require different growing methods. Understanding these differences helps you decide which method fits your current lifestyle and nutritional goals.
| Feature | Sprouts | Microgreens |
|---|---|---|
| Growing Medium | Water only (no soil) | Soil or fiber mats |
| Growth Time | 3 to 7 days | 10 to 21 days |
| Light Requirement | Minimal/None until end | Moderate to High |
| Parts Eaten | Entire plant (seed, root, shoot) | Stem and leaves only |
| Complexity | Low | Moderate |
Sprouts are the ultimate “convenience food” for the self-sufficient gardener. They require no specialized lighting or soil management, making them ideal for apartment dwellers or those with busy schedules. Microgreens, while more nutrient-dense in certain categories like Vitamin E and carotenoids, require more space and a regular commitment to managing irrigation methods and soil moisture levels. Both have a place in a healthy kitchen, but sprouts are the easier starting point.
Practical Tips for a Successful Harvest
Establishing a “kitchen lab” mindset can make sprouting feel like a natural part of your routine rather than a chore. I like to keep my sprouting jars right next to the kitchen sink. This serves as a visual reminder to rinse them every time I fill my own water glass or wash a dish. Success in the garden often comes down to these small, integrated habits.
- The “Thump” Method: After your final drain, give the jar a firm tap against the palm of your hand. This breaks up the seed clumps and ensures air can reach every single sprout.
- Temperature Buffering: During winter, if your kitchen gets cold at night, wrap your jars in a thick kitchen towel. This holds in the metabolic heat generated by the germinating seeds.
- Hull Removal: To get the longest shelf life, remove as many of the brown seed hulls as possible. Submerging the finished sprouts in a bowl of water and gently swishing them will cause the hulls to float away.
- Dry Storage: Before putting your harvest in the fridge, make sure they are dry. Using a salad spinner or letting them air-dry on a clean towel for an hour prevents them from becoming slimy in refrigeration.
Proper storage can keep your sprouts fresh for up to a week. I find that placing them in a glass container lined with a dry paper towel works best. The towel absorbs any residual moisture while the cold temperature of the fridge slows down the plant’s metabolism. If you find they are drying out too much, you can add a lid, but leave it slightly cracked to allow for gas exchange.
Advanced Strategies for Serious Practitioners
For those who have mastered the basics, there are ways to optimize the nutritional profile and safety of your sprouts even further. One technique involves pH adjustment of the rinse water. Most pathogens struggle to grow in slightly acidic environments. Adding a pinch of citric acid or a teaspoon of apple cider vinegar to your rinse water can help keep the bacterial load down and may even help some seeds germinate faster by softening the seed coat.
Seed sanitation is another area where advanced growers focus. Some practitioners choose to “flash-sanitize” their seeds before the initial soak. This involves dipping the seeds into a solution of 3% hydrogen peroxide for five minutes before rinsing thoroughly and starting the soak. Research indicates this can significantly reduce the risk of seed-borne pathogens without affecting the germination rate of most hardy seeds like broccoli or alfalfa.
Experimenting with seed blends can provide a more balanced nutritional profile and a more interesting flavor. A popular combination is the “Spicy Mix,” which includes alfalfa for bulk, clover for sweetness, and radish or mustard seeds for a peppery kick. Because different seeds have different growth rates, you may need to adjust your harvest time to find the “sweet spot” where all varieties in the mix are at their peak. Learning these nuances is what transforms a casual hobby into a sophisticated part of your garden planning.
A Realistic Example: The 5-Day Broccoli Cycle
Let’s look at a typical scenario for a single person wanting a daily serving of broccoli sprouts. You start on Sunday evening by placing 2 tablespoons of organic broccoli seeds into a quart jar. After an 8-hour soak, you drain them on Monday morning. For the next three days, you rinse them once when you make your morning coffee and once when you prepare dinner.
By Wednesday, the jar is half-full of tiny white roots. By Thursday, the “tails” have grown, and you move the jar to a bright spot on the counter. On Friday morning, you notice the leaves are a deep green. You perform the final rinse, float off the hulls, and dry them. You now have approximately 3 cups (about 250 grams) of fresh, living food. At store prices, this would have cost you nearly $10.00. Your cost? Roughly $0.35 in seeds and a few gallons of water. This is the power of becoming a producer rather than a consumer.
If you want a continuous supply, you simply start a second jar on Wednesday. This “succession planting” ensures that just as you are finishing the first batch, the second is ready for harvest. It is a miniature version of the composting and growth cycles we see in the larger garden, happening right on your laminate countertop.
Final Thoughts
Sprouting is a bridge between the world of the consumer and the world of the gardener. It reminds us that even in the middle of a concrete city or the dead of winter, we have the power to create life and nourishment. It requires very little in terms of equipment but offers a massive return on the small investment of time and attention you provide. Once you taste the difference between a home-grown sprout and a plastic-packaged alternative, it is very difficult to go back.

Do you have some charcoal in your house right now? We call charcoal a “miracle leftover” for anyone who wants to be a little more self-sufficient and cut costs. That’s because it can help you with so many different things around the house and garden. You can even use it to make an energy-free fridge. Read More Here...
The skills you learn in this small-scale environment—observation, sanitation, and the rhythms of nature—are the same skills needed for more complex endeavors like pest management or mulching in a larger backyard plot. Think of your sprouting jars as a training ground for self-sufficiency. They are a constant, living reminder that we are designed to work with the earth, not just buy from it.
Start small, perhaps with a simple bag of mung beans or alfalfa. Watch the seeds wake up, smell the fresh scent of growth in your kitchen, and enjoy the crisp crunch of a harvest that you directed from start to finish. In an increasingly complex world, there is something deeply grounding about a jar of seeds on a windowsill, quietly turning water and air into a living inheritance for your health.