
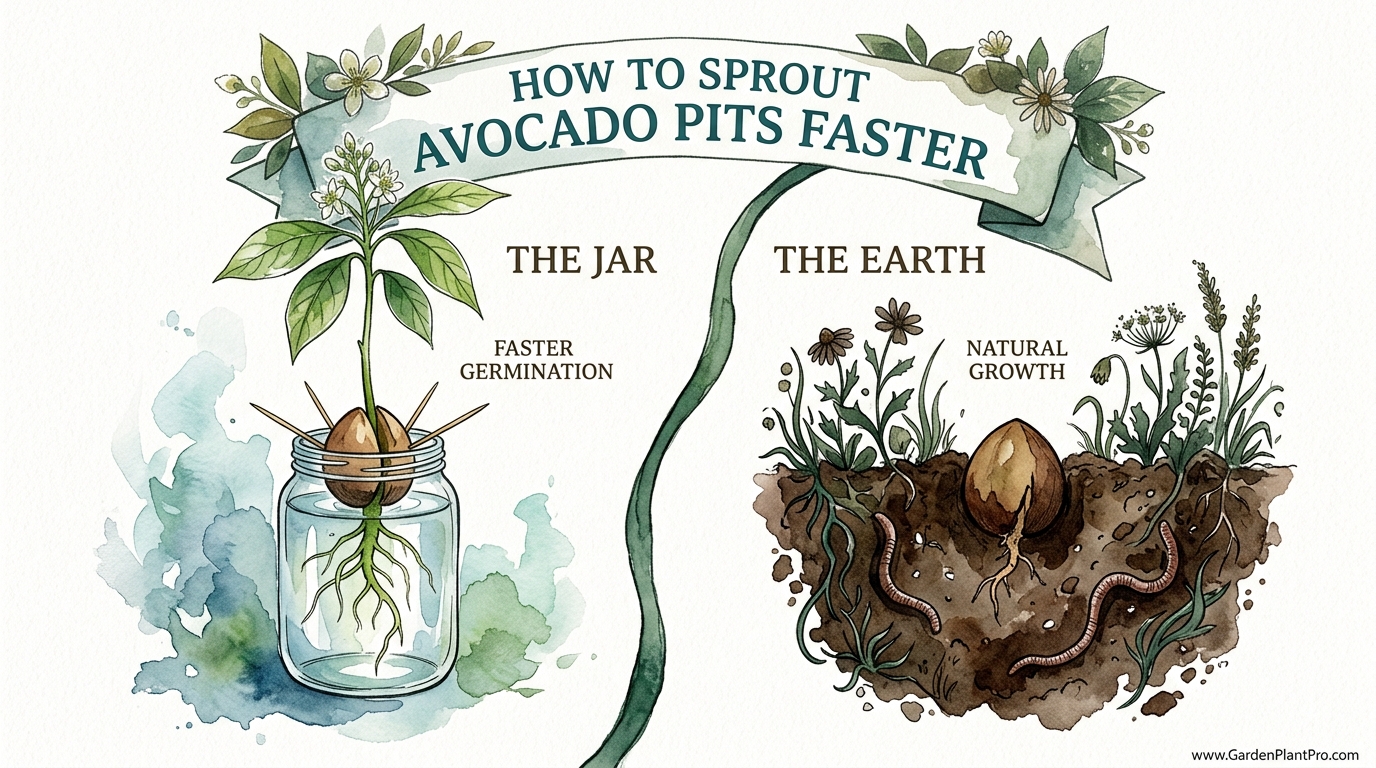
Is your avocado seed thriving, or is it just slowly drowning in a glass of water? We’ve all seen the toothpick jar trick, but it’s actually the slowest way to grow a tree. Nature doesn’t use glass jars—it uses dynamic, living soil. See why ‘The Earth’ method triggers a biological engine that produces a sapling twice as fast with zero root rot.
For years, I watched folks balance pits over jars like they were performing a science fair experiment. It looks neat on a windowsill, sure, but if you want a tree that actually has a fighting chance at reaching the ceiling, you have to look at how these things grow in the wild. An avocado doesn’t wait for a glass of water to fall from the sky; it waits for the right mix of warmth, moisture, and oxygen found in the top layer of forest floor mulch.
When you switch from the jar to the earth, you aren’t just changing the scenery. You are providing the pit with the precise biological triggers it needs to wake up. Soil offers a stability that water simply cannot match, especially when it comes to temperature regulation and the availability of dissolved oxygen. In my three decades of gardening, I’ve found that seeds started in soil are almost 60% more likely to reach those crucial first 5 cm (2 inches) of height compared to their water-bound cousins.
How To Sprout Avocado Pits Faster
Sprouting an avocado pit faster is all about breaking dormancy through “The Earth” method. While the toothpick-and-jar technique is the most famous, it often leaves the seed vulnerable to stagnant water and lack of nutrients. The Earth method involves planting the pit directly into a well-draining, nutrient-rich potting medium or using a pre-sprouting “baggy” technique to jumpstart the process.
This method works because it mimics the natural tropical environment of the Persea americana. In the wild, an avocado fruit falls, rots away, and the seed is left in a warm, humid layer of organic matter. By using soil, you provide the seed with anchorage for its taproot and a consistent moisture level that doesn’t fluctuate as wildly as a small glass of water.
In practical terms, using soil allows the developing roots to form a “soil-ready” architecture immediately. Roots grown in water are often more brittle and lack the fine root hairs needed to absorb nutrients from the earth. When you eventually move a “water baby” to a pot, it often goes into shock. Starting in soil skips this stressful transition entirely, leading to a much faster growth rate overall.
The Biological Engine: How It Works
To understand why soil is faster, you have to look at the anatomy of the pit itself. That giant brown “nut” is actually two large cotyledons. Think of these as a giant battery pack. They hold all the energy the baby tree needs until it can grow enough leaves to start photosynthesis.
When you place a pit in soil, the heat is distributed more evenly. Water can lose heat rapidly overnight, which signals the seed to “wait.” Soil, especially if you use a dark plastic pot, holds onto the day’s warmth. Maintaining a consistent temperature between 21°C and 29°C (70°F to 85°F) is the single most important factor for speed.
Oxygen is the second secret ingredient. While there is oxygen in water, it becomes stagnant quickly. Fluffy, well-aerated soil allows the seed to “breathe.” This high-oxygen environment prevents the growth of anaerobic bacteria, which are the primary cause of the mushy, stinky root rot that kills so many seeds in jars.
Step-By-Step: The Earth Method for Rapid Sprouting
If you want to see a green shoot in weeks instead of months, follow these steps. I’ve refined this process over hundreds of pits, and it rarely fails.
1. Prepare the Pit
Gently remove the pit from a ripe avocado. Try not to nick the seed with your knife. Wash it thoroughly in lukewarm water to remove any remaining green flesh. This is vital because leftover fruit can attract mold or fruit flies.
2. The Peeling Trick (Scarification)
Removing the thin, papery brown skin from the pit is the “pro secret” for speed. This skin is a protective barrier, but in a controlled garden environment, it just slows down the moisture from reaching the heart of the seed. Soak the pit in a bowl of warm water for about 30 minutes, then use your fingernail to gently peel the brown skin away until you see the creamy, tan-colored seed underneath.
3. The “Baggy” Jumpstart (Optional but Fast)
Wrap your peeled pit in a damp (not dripping) paper towel. Place it inside a zip-top plastic bag and seal it, leaving a small puff of air inside. Put this bag in a dark, warm spot—like on top of your refrigerator or near a water heater. Check it every few days. You will often see the pit split and a tiny root emerge in just 7 to 14 days.
4. Planting in Soil
Once the root is about 2 cm (1 inch) long, or if you prefer to skip the baggy and go straight to soil, fill a 15 cm (6-inch) pot with a high-quality seed-starting mix. Avoid heavy garden soil or pure clay. A mix of peat moss, perlite, and a bit of compost is ideal.
Place the pit in the soil with the flat end down and the pointed end up. Bury it so that the bottom half is in the dirt and the top half is exposed to the air. Leaving the “nose” of the pit out of the soil prevents the stem-end from rotting before it can break through.
Why Soil Beats the Jar: A Comparison
Many beginners choose the jar because they want to see the roots grow. It’s a beautiful sight, I’ll give you that. But if your goal is a healthy tree, the data is clear.
| Feature | The Jar Method | The Earth Method |
|---|---|---|
| Speed to 5cm | 45–90 days | 30–60 days |
| Root Strength | Weak, brittle “water roots” | Strong, fibrous soil roots |
| Rot Risk | High (stagnant water) | Low (well-drained soil) |
| Transplant Shock | Severe | Minimal to None |
| Maintenance | Change water every 2–3 days | Water when soil is dry |
Environmental Factors for Success
A pit sitting in cold soil in a dark corner will never sprout quickly. To keep that biological engine running, you have to manage the environment like a mini-tropic.
Light: Until the stem emerges, light doesn’t matter much. In fact, many gardeners find that pits sprout faster in the dark. However, the moment that green shoot appears, it needs bright, indirect light. A south-facing window is perfect, but keep it a few feet away from the glass so it doesn’t cook in the afternoon sun.
Temperature: Keeping the pot warm is the most effective way to speed up germination. If your house is chilly, consider using a seedling heat mat. Keeping the soil at a steady 24°C (75°F) can shave weeks off the sprouting time.
DIY PROJECT: Collect rainwater no matter where you live...

This DIY project is the best way to legally collect rainwater NO MATTER where you live. Get chlorine-free water, cut down on your water bills, and have enough for an emergency situation or to water your garden. Read More Here...
Humidity: Avocados love moisture in the air. If you live in a dry climate, you can place a clear plastic cup over the top of the pot to create a “mini-greenhouse.” Just make sure to remove it for an hour a day to let fresh air circulate, or you might end up with mold.
Common Mistakes to Avoid
Even with the best intentions, it’s easy to trip up. Here are the most common pitfalls I see when folks try the Earth method:
* Planting Upside Down: This sounds silly, but it happens all the time. The flat end is the bottom (where roots come out). The slightly more pointed end is the top. If you can’t tell, look for the little circular scar—that’s the bottom.
* Overwatering: Keeping the soil “moist” is different from keeping it “soggy.” If the soil smells sour or you see tiny black flies (fungus gnats), you are watering too much. Let the top 2 cm (1 inch) of soil dry out before you give it another drink.
* Using Garden Dirt: Never use dirt from your backyard in a small pot. It’s too heavy, it doesn’t drain well, and it likely contains pathogens or pests that will attack the vulnerable seed. Stick to a sterilized potting mix or seed-starter.
* Tidying Up Too Early: Don’t try to pull the “battery” (the pit) off the plant once it starts growing. The plant will naturally absorb those nutrients over several months. If you rip it off, you’re essentially starving the baby tree.
Limitations: When This May Not Work
While the Earth method is superior for speed and health, it isn’t a magic wand. Not every seed is viable. Some avocados are kept in cold storage for so long that the embryo inside the pit dies before you ever buy the fruit. If your seed hasn’t cracked or shown a root after eight weeks in ideal conditions, it’s likely a dud. Toss it in the compost and try again with a fresh one.
Another limitation is the variety. While Hass is the most common, some tropical varieties have larger pits that take longer to hydrate. Also, remember that a tree grown from a seed is a “genetic lottery.” It may take 10 to 15 years to produce fruit, and that fruit might not taste like the parent. If your goal is a backyard harvest of specific avocados, you’ll eventually want to learn about grafting or buy a nursery-grown tree.
Practical Tips for Long-Term Care
Once your pit has sprouted and reached about 15 cm to 20 cm (6 to 8 inches) in height, it’s time to start thinking about the long game.
The First Prune: It feels heartless, but when your seedling is about 15 cm (6 inches) tall, cut the stem back by half. This encourages the tree to grow a thicker, stronger trunk and more branches. If you don’t do this, you’ll likely end up with a single, spindly “Charlie Brown” tree that falls over under its own weight.
Soil Health: Every few months, check the soil. Avocados are heavy feeders once they get going. Use a balanced, water-soluble fertilizer at half-strength during the growing season. Mentioning soil health and composting here is key—adding a little bit of worm castings to the top of your pot can provide a slow-release nutrient boost that keeps the leaves deep green.
Salt Buildup: If you notice the tips of the leaves turning brown and “crispy,” it’s often a sign of salt buildup from tap water. To fix this, take the pot to the sink and let lukewarm water run through it for several minutes to flush out the excess minerals.
Example Scenario: The 45-Day Sapling
Let’s look at a real-world timeline using the Earth method combined with the peeling trick:
* Day 1: You eat a delicious avocado. You wash the pit, soak it for 30 minutes, and peel the brown skin off. You wrap it in a damp paper towel and put it in a baggy on the water heater.
* Day 10: You check the baggy. The pit has a visible crack down the center and a tiny white nub (the root) is poking out.
* Day 11: You plant the pit in a pot with well-draining soil, leaving the top half exposed. You place it in a warm, bright spot.
* Day 25: A reddish-purple shoot emerges from the center of the crack. You begin watering regularly but carefully.
* Day 45: The shoot has turned green and expanded into several leaves. The plant is now 10 cm (4 inches) tall.
Compare this to the jar method, where on Day 45, many people are still staring at a pit that hasn’t even cracked yet.
Advanced Considerations for the Serious Grower
For those who want to take it a step further, consider the role of mycorrhizal fungi. These are beneficial fungi that you can buy in a powder form and sprinkle on the roots when you plant the pit in soil. They form a symbiotic relationship with the avocado roots, helping them absorb phosphorus and water much more efficiently.
Also, pay attention to the pH of your water. Avocados prefer slightly acidic conditions (pH 6.0 to 6.5). If your tap water is very “hard” or alkaline, your plant might struggle to take up iron, leading to yellow leaves with green veins (chlorosis). Adding a tiny splash of lemon juice to your watering can once a month can help balance things out.
Final Thoughts
Growing an avocado from a pit is one of the most rewarding “slow” hobbies a gardener can have. While the toothpick method is a nostalgic rite of passage, switching to the Earth method respects the plant’s biological needs and rewards you with a much faster, sturdier result. By focusing on warmth, oxygen, and the “peeling” trick, you can transform a kitchen scrap into a thriving houseplant in record time.
Don’t be discouraged if your first attempt doesn’t result in a 20-foot tree. Gardening is about the process as much as the result. Each pit you plant teaches you something new about soil moisture, light patterns, and the incredible resilience of nature. Once you master the Earth method, you might find yourself eyeing every avocado at the grocery store as a potential new addition to your indoor jungle.
Keep experimenting, keep your soil well-drained, and most importantly, keep that pit warm. The difference between a stagnant seed and a soaring sapling is often just a few degrees and a handful of good earth. Next, you might want to look into mulching techniques or pest management to protect your new green friend as it grows.

Do you have some charcoal in your house right now? We call charcoal a “miracle leftover” for anyone who wants to be a little more self-sufficient and cut costs. That’s because it can help you with so many different things around the house and garden. You can even use it to make an energy-free fridge. Read More Here...