
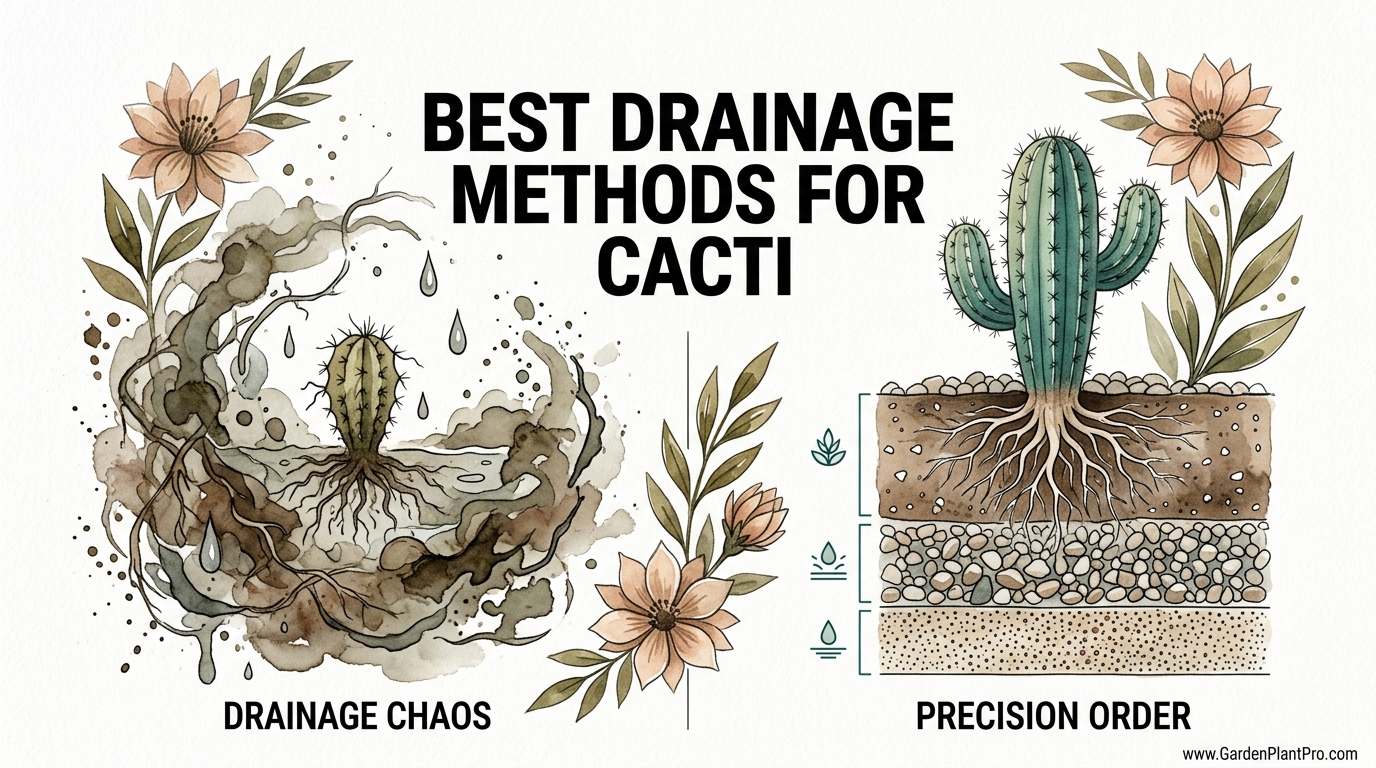
Most beginners think a layer of rocks at the bottom of a pot helps drainage, but it actually creates a ‘perched water table’ that drowns your cactus. Stop putting rocks in the bottom of your pots! This ‘old school’ advice creates a stagnant zone where water can’t escape, leading to guaranteed root rot. Real cactus health starts with a clear exit strategy for every drop of water you provide. Here is the anatomical breakdown of a pot that actually breathes.
I have spent years watching folks do the exact same thing: they buy a beautiful new prickly pear or a rare Ariocarpus, find a fancy pot, and then dump a handful of gravel into the bottom. They think they are doing the plant a favor. They think those rocks are creating a “drainage layer.” I’ve seen those same plants come back to me months later, mushy and black at the base, while the owners scratch their heads in confusion because they “hardly ever watered it.”
The truth is that water doesn’t work the way we think it does inside a container. It follows the laws of physics, specifically capillary action and gravity. When you mix different textures—like fine soil on top of coarse rocks—you create a physical barrier that holds water back rather than letting it go. If you want your cactus to thrive for decades, you have to stop thinking about layers and start thinking about the entire soil column.
Best Drainage Methods For Cacti
The most effective drainage method for cacti is a uniform, gritty soil mixture paired with a pot that has unobstructed drainage holes. Instead of trying to create a “reservoir” at the bottom, you want the entire environment within the pot to be porous. This allows water to move through the soil quickly and, more importantly, allows air to follow it down to the roots. Roots need oxygen just as much as they need water, and a soggy bottom is an oxygen-free zone.
In the real world, desert cacti live in mineral-heavy environments. They grow in cracks between rocks, in sandy washes, or on rocky slopes where rainwater disappears as fast as it arrives. When we put them in a pot, we are trying to mimic that “fast-in, fast-out” moisture cycle. The goal is to have water begin dripping from the bottom of the pot within seconds of you pouring it on top. If it takes minutes for water to emerge, your drainage is too slow.
Practical application involves using mineral amendments throughout the soil. Instead of a layer of rocks at the bottom, we mix those “rocks”—in the form of pumice, perlite, or poultry grit—directly into the soil. This ensures that there are millions of tiny air pockets from the top of the pot all the way to the bottom. It turns the entire pot into a drainage system rather than relying on a single exit point.
How the Perched Water Table Works
To understand why the rock layer fails, you have to understand the perched water table. Soil acts like a sponge. If you take a sponge, soak it, and hold it horizontally, it stays very wet. If you turn it vertically, water drips out of the bottom until the top half is relatively dry, but the bottom half remains saturated. This saturated layer at the bottom is the “water table.”
When you add a layer of rocks to the bottom of a pot, you aren’t removing that saturated layer; you are simply moving it higher up in the pot. The water will not move from the fine-textured soil into the coarse-textured rocks until the soil is 100% saturated. By adding 5 cm (2 inches) of rocks to a 15 cm (6 inch) pot, you have effectively moved the “drowning zone” 5 cm closer to the base of your cactus. You’ve made a deep pot into a shallow one, and that is a recipe for disaster.
The solution is to use the same material from top to bottom. If the soil is uniform, gravity can pull the water all the way to the drainage hole. This lowers the perched water table to the very bottom of the pot, away from the sensitive “neck” of the cactus where rot usually begins. If you are worried about soil falling out of a large drainage hole, use a small piece of fine mesh screen or a single curved piece of a broken terracotta pot (a “crock”) to cover the hole. This keeps the dirt in without creating a massive textural change that traps water.
The Best Materials for Cactus Drainage
Choosing the right ingredients for your mix is the foundation of precision order in your garden. You want materials that won’t break down over time. Organic matter like peat moss or compost eventually turns into a thick, mucky “sludge” that chokes roots. Minerals, however, stay chunky and maintain those vital air gaps for years.
- Pumice: This is the gold standard. It is a volcanic rock filled with tiny air bubbles. It holds a tiny bit of moisture but provides incredible aeration. It is heavy enough to keep pots from tipping over but porous enough to breathe.
- Perlite: A cheaper, lighter alternative to pumice. It works well but has a tendency to float to the top of the pot over time, which can look a bit messy. It also lacks the mineral weight some larger cacti need for stability.
- Coarse Sand: Not play sand or beach sand, which are too fine and can actually clog up drainage. You want “horticultural sand” or “builder’s sand” with grains roughly 2 mm to 4 mm (0.08 to 0.15 inches) in size.
- Horticultural Grit or Poultry Grit: Crushed granite or flint is excellent for adding weight and “sharpness” to the mix. Cacti roots love to grow around these hard surfaces.
- Calcined Clay: Often sold as “Turface” or certain types of oil absorbent. These fired clay pebbles hold water inside them while keeping the spaces between them open for air.
Recommended Mix Ratios
For most desert cacti, a ratio of 75% mineral to 25% organic is a safe bet. The “organic” part should ideally be a well-aged bark fines or a low-peat potting soil. For more sensitive species, like the Lophophora or certain “rock-eaters,” you might go as high as 90% mineral. If you live in a very humid climate, increase the mineral count. If you live in a scorching desert where pots dry out in hours, you might increase the organic part slightly to 40%.
Benefits of Proper Drainage Methods
When you get the drainage right, the most immediate benefit is a massive reduction in plant loss. Most cacti don’t die from “overwatering” in the sense of getting too much water at once; they die because the soil stays wet for too long. A properly drained pot can be soaked thoroughly, yet the roots will be back in a dry, oxygen-rich environment within 48 to 72 hours.
Another advantage is root health. Cactus roots are opportunistic. In a well-draining, gritty mix, they grow deep and wide, searching for the tiny pockets of moisture held by the pumice or grit. This creates a robust root system that can support a much larger, healthier plant above the soil. In heavy, poorly drained soil, roots stay near the surface or simply rot away, leaving the plant stunted and prone to falling over.
Finally, proper drainage makes fertilizing much easier. Because you are watering “through” the pot and letting the excess run out, you are constantly flushing out excess salts and minerals that can build up. This prevents the white, crusty buildup on the soil surface that can eventually burn the plant’s base. It keeps the chemistry of the soil stable, which is crucial for long-term growth.
Challenges and Common Mistakes
The biggest challenge for most gardeners is the psychological hurdle of “letting go” of the rock layer. It feels wrong to leave the bottom of the pot “empty.” We have been told for generations that gravel helps, and it takes a bit of faith to trust the physics of the perched water table. The best way to overcome this is to try it. Take two identical cacti, pot one with the “old way” and one with a uniform gritty mix, and watch how they grow over six months. The difference is usually clear.
Another common mistake is using the wrong kind of sand. Fine sand acts like cement when it gets wet. It fills in all the tiny gaps between the larger soil particles, creating a solid block that water can’t penetrate and air can’t enter. If you can’t find coarse horticultural sand, it is better to leave sand out entirely and just use perlite or pumice.
We also see a lot of people using pots without holes. This is the ultimate “drainage chaos.” No matter how gritty your soil is, if there is nowhere for the water to go, it will eventually pool at the bottom. Even if you water very sparingly, salts will build up and the bottom inch of soil will become a toxic, anaerobic swamp. Always, always use a pot with at least one generous drainage hole.
The Role of Pot Material
The material of your container is just as important as the holes in the bottom. While you can grow a cactus in almost anything if you are careful, some materials are much more forgiving than others. For a beginner, or someone living in a cool, damp climate, the choice of pot can make or break the plant’s health.
| Pot Material | Breathability | Weight | Best For |
|---|---|---|---|
| Terracotta (Unglazed) | High (Porous) | Heavy | Beginners, humid climates, desert cacti |
| Plastic | None | Light | Experienced growers, tropical cacti, nurseries |
| Glazed Ceramic | None | Heavy | Decorative use, needs very gritty soil |
| Concrete | Medium | Very Heavy | Large outdoor specimens |
Terracotta is the “experienced gardener’s secret.” Because the clay is porous, water can evaporate through the sides of the pot as well as from the top. This effectively “wicks” moisture away from the roots, helping the soil dry out much faster. If you tend to be a “helicopter parent” who waters too often, terracotta is your best friend. Plastic and glazed ceramic, on the other hand, trap every drop of moisture inside. If you use these, your soil mix needs to be even grittier to compensate for the lack of evaporation through the walls.
DIY PROJECT: Collect rainwater no matter where you live...

This DIY project is the best way to legally collect rainwater NO MATTER where you live. Get chlorine-free water, cut down on your water bills, and have enough for an emergency situation or to water your garden. Read More Here...
Practical Tips for Precision Watering
Once you have the drainage set up, you need to know how to use it. The “soak and dry” method is the only way to water a cactus. You don’t give it “sips” of water every few days. You wait until the soil is bone dry—all the way to the bottom—and then you drench it until water pours out of the drainage holes. This mimics a desert rainstorm.
- Use a Chopstick: Not sure if the soil is dry at the bottom? Stick a wooden chopstick or a bamboo skewer deep into the pot. Leave it for a minute. If it comes out damp or with soil clinging to it, wait a few more days. If it’s bone dry, it’s time to water.
- Weight the Pot: Pick up your pot when it’s freshly watered, then pick it up again when it’s dry. You will quickly learn the “feel” of a thirsty plant just by its weight.
- Watch the Plant: A thirsty cactus will often shrivel slightly or lose its “plump” look. This is a much safer indicator than a calendar. Most cacti can go weeks or even months without water, but they can’t survive a single week in standing water.
- Temperature Matters: In the winter, most cacti go dormant. They aren’t growing, so they aren’t drinking. If you keep your plants in a cool garage or windowsill, you may only need to water them once or twice during the entire winter season.
Advanced Considerations: The Wicking Trick
For those who want to get really technical, there is a way to remove even more of that perched water table from the bottom of your pots. This is a trick often used by show growers. You take a piece of synthetic yarn or a specialized fiberglass wick and thread it through the drainage hole so it sits about 2 cm (1 inch) into the soil. Let the other end of the wick hang out of the bottom of the pot by a few inches.
When you water the plant, the wick will continue to pull water out of that “saturated zone” at the bottom of the pot and drip it onto the ground even after the main flow has stopped. It uses capillary action to “tease” the water out of the soil. It’s a simple, low-tech way to ensure that your cactus roots are never sitting in a puddle, even for an hour. This is especially useful for very shallow pots or “mame” style bonsai-sized cacti where the water table takes up a huge percentage of the total soil volume.
Examples of Drainage Success
Consider a 10-year-old Barrel Cactus (Echinocactus grusonii). In a standard potting mix with a layer of rocks at the bottom, this plant might grow for a year or two before the center of the root ball begins to sour. Because the organic peat stays wet and the rock layer keeps that moisture high, the main taproot eventually rots. The plant looks fine from the outside until one day it simply collapses into a heap of yellow slime.
Now, take that same Barrel Cactus and put it in a mix of 50% pumice, 25% coarse sand, and 25% bark fines. Use a terracotta pot with a 2 cm (0.75 inch) drainage hole covered only by a piece of mesh. When you water, the moisture hits the roots, the pumice absorbs just enough to stay “cool,” and the rest of the water exits immediately. Within two days, the air gaps are back. This cactus will not only survive but will likely produce its first yellow flowers because its root system is healthy enough to support the energy-intensive blooming process.
Another scenario involves small “living stones” like Lithops. These are extremely sensitive to moisture. Many growers use a 100% mineral mix—just pumice and lava rock. There is no organic matter at all. In this setup, the “drainage” isn’t just about the hole in the bottom; it’s about the fact that the medium itself cannot hold enough water to cause rot. This is the ultimate “precision order” for the most difficult plants.
Final Thoughts
Building a pot that breathes is the single most important skill you can learn as a cactus grower. It’s not about finding a “magic” fertilizer or the perfect grow light; it’s about respecting the physics of water and the biology of the roots. When you move away from the “rocks at the bottom” myth and embrace a uniform, gritty soil mix, you are giving your plants the foundation they need to live for decades.
Remember that every environment is different. A mix that works for me in my dry backyard might be too heavy for someone in a rainy coastal city. Don’t be afraid to experiment. Buy a bag of pumice, find some old terracotta, and start observing how the water moves. Once you see a cactus respond to proper drainage with a flush of new spines or a sudden growth spurt, you’ll never go back to the old way again.
Gardening is a long game, and cacti are the ultimate marathon runners. By fixing your drainage today, you are ensuring that your prickly neighbors will be around to greet you for many seasons to come. If you find yourself wanting to dive deeper into soil health or perhaps explore how irrigation methods can be fine-tuned for a larger collection, those are the natural next steps on this rewarding journey.