
That annoying soggy spot in your yard is actually the perfect habitat for a high-yield cranberry crop. Most homeowners see a low spot in the yard as a drainage nightmare. Strategic gardeners see a gold mine. Cranberries love wet feet and acidic soil—here is how to turn suburban runoff into a thriving berry harvest.
I have spent many years watching folks try to fight nature in their backyards. They pour money into French drains and gravel pits just to move a little water from one side of the fence to the other. To me, that always seemed like a lot of work for a very small reward. If you have a spot where the grass always feels like a sponge, you are already halfway to a harvest of some of the most antioxidant-rich fruit you can grow.
Growing cranberries is a bit different than tending to your tomatoes or your rose bushes. These plants are survivors from a different era of the landscape. They do not want the black, crumbly loam that most vegetables crave. Instead, they want grit, acid, and plenty of moisture. When you get the conditions right, these low-growing evergreen vines will carpet your ground and reward you with ruby-red berries every autumn.
I remember the first time I tried to put a few “Stevens” plugs into a marshy corner of my property. I made every mistake in the book, mostly by trying to treat them like normal plants. But over the decades, I have learned that the secret is in the prep work. Once you set the stage, the cranberries do most of the heavy lifting themselves.
Cranberries For Rain Gardens
A rain garden is essentially a shallow depression designed to capture and soak up rainwater runoff from roofs, driveways, or sidewalks. Most people fill these with native grasses or sedges, which are fine for aesthetics. However, an edible rain garden takes that same concept and turns it into a food production zone. Cranberries (Vaccinium macrocarpon) are the ultimate candidate for this specific niche because they are one of the few edible crops that evolved to handle temporary flooding and high soil moisture.
In the wild, you will find these plants in peat bogs and sandy wetlands across the northern United States and Canada. They are low-growing, woody perennials that rarely get taller than 8 to 10 inches (20 to 25 cm). They spread using long, creeping runners that can reach out 2 to 3 feet (60 to 90 cm) in a single season. From these runners, “uprights” grow vertically, and that is where the flowers and fruit actually appear.
Cranberries are built for the cycles of a rain garden. They can handle being submerged under several inches of water during a heavy spring downpour. In fact, they often prefer it, as the water protects their delicate buds from late-season frosts. They also have a very shallow root system, usually staying in the top 6 inches (15 cm) of the soil, which makes them perfect for the layered soils of a managed drainage area.
When we talk about using them in a residential setting, we are looking at USDA hardiness zones 2 through 8. These plants need a “chill requirement”—a certain number of hours between 32°F and 45°F (0°C and 7°C) during the winter—to reset their internal clock for spring. If you live in a place where the ground never freezes, you might struggle to get a good fruit set, but for the rest of us, they are remarkably resilient.
Assessing Your Low Spot
Before you go out and buy a hundred plugs, you need to look at your land with a critical eye. Just because a spot is wet does not mean it is ready for cranberries. You have to consider three main factors: sunlight, soil chemistry, and the “stagnation factor.” If your low spot is under a dense canopy of maple trees, you will get beautiful green vines but zero berries. Cranberries need full sun—at least 6 to 8 hours a day—to produce the energy required for fruit production.
Soil chemistry is the biggest hurdle for most backyard growers. Most garden soil has a pH between 6.0 and 7.0. Cranberries, much like their cousins the blueberries, need a very acidic environment. They thrive when the pH is between 4.0 and 5.5. If your soil is too “sweet” (alkaline), the plants will literally starve. They cannot absorb nutrients effectively unless the soil is acidic enough to break those minerals down into a usable form.
Then there is the drainage. This might sound like a contradiction, but cranberries do not like to “drown” in stagnant water. In a commercial bog, the water is constantly moving or is drained away after a flood. If your yard has a spot where water sits for three weeks and turns into a stinking, anaerobic puddle, you need to fix the drainage before planting. Cranberry roots need oxygen just like any other plant; they just happen to like a lot of water passing through the neighborhood.
The Percolation Test
I always tell my neighbors to do a simple “perc test” before they start digging. Dig a hole about 12 inches (30 cm) deep and fill it with water. If it drains away within 12 to 24 hours, you have good infiltration. If the water is still there two days later, you have a heavy clay base that will need to be amended or “punched through” with a layer of sand and gravel to ensure the roots can breathe between rain events.
How to Build Your Cranberry Bed
If your soil is not naturally acidic and sandy, you will need to create a “managed bed” within your rain garden. This sounds more complicated than it actually is. You are essentially making a mini-bog. Start by excavating the area to a depth of about 8 to 12 inches (20 to 30 cm). You want a flat bottom so the water distributes evenly across the entire planting zone.
Once you have your hole, you should consider a liner if your soil is extremely alkaline or if you want to prevent weeds from encroaching from the sides. However, a traditional rain garden is meant to let water soak into the earth, so I usually skip the plastic liner and instead use a thick layer of peat moss as my base. Peat is naturally acidic and holds a tremendous amount of moisture while still allowing for air gaps.
Mix your excavated soil with a generous amount of sphagnum peat moss and coarse sand. A good ratio for a home bed is 50% peat, 30% sand, and 20% native soil (provided it is not pure clay). If you are dealing with heavy clay, you might want to go with 60% peat and 40% sand and leave the clay out of the mix entirely. This creates a medium that stays wet but doesn’t pack down like a brick.
Level the surface of your amended soil so it is about 2 inches (5 cm) below the surrounding grade. This “basin” effect is what will capture the runoff from your roof. At the low end of the basin, you should have an overflow point—perhaps a rock-lined notch—so that during a truly massive storm, the excess water has a safe path to leave without washing your new plants away.
Choosing the Right Varieties
Not all cranberries are created equal. Some are bred for the massive commercial harvests of Wisconsin, while others are better suited for the smaller, more varied conditions of a backyard garden. If you are just starting out, I recommend looking for “rooted plugs” or 4-inch (10 cm) potted plants rather than unrooted cuttings. Plugs establish much faster and have a higher survival rate in a rain garden setting.
| Variety | Berry Size | Maturity Timing | Best For |
|---|---|---|---|
| Stevens | Large | Mid-Season | Highest yield and disease resistance. Great for beginners. |
| Early Black | Small/Medium | Early Season | Deep red color, very sweet, good for shorter growing seasons. |
| Pilgrim | Very Large | Late Season | Best for impressive-looking fruit and long-term storage. |
| Ben Lear | Medium | Early Season | Excellent for juice and sauce; very deep burgundy color. |
| Howes | Medium | Late Season | Firm berries that keep for months in the crisper drawer. |
In my experience, “Stevens” is the gold standard for home gardeners. It was developed in the 1950s and is incredibly vigorous. It can handle a bit of neglect and still produce a heavy crop. If you live in a northern area with early frosts, “Early Black” is a smart choice because you can get the berries off the vine before the hard freezes hit in late September or October.
Planting for Success
The best time to plant is in the spring, once the threat of a hard ground freeze has passed but before the heat of summer sets in. Space your plants about 12 to 18 inches (30 to 45 cm) apart. This might look sparse at first, but remember that these vines want to run. By the end of the second year, those gaps will be filled with a thick mat of green foliage.
DIY PROJECT: Collect rainwater no matter where you live...

This DIY project is the best way to legally collect rainwater NO MATTER where you live. Get chlorine-free water, cut down on your water bills, and have enough for an emergency situation or to water your garden. Read More Here...
When you set the plant into the soil, make sure the top of the root ball is level with the soil surface. Do not bury the crown too deep, or you might encourage rot. After planting, give the entire bed a good soaking. For the first few weeks, you want that soil to stay consistently moist—not flooded, but definitely damp to the touch. This helps the shallow roots “anchor” into their new home.
One trick I learned from an old commercial grower is to add a 1-inch (2.5 cm) layer of clean, coarse sand over the surface of the bed after planting. This is called “sanding.” It does a few things: it suppresses weed seeds, keeps the peat from drying out on top, and encourages the runners to strike new roots. It also makes the bed look very tidy, which helps if your rain garden is in the front yard where the neighbors can see it.
Maintenance and Long-Term Care
Cranberries are not high-maintenance, but they are not “plant and forget” either. The first two years are all about weed control. Because the plants grow so low to the ground, they can easily be smothered by aggressive grasses or dandelions. Hand-weeding is the only way to go here. I find it therapeutic to spend a cool morning pulling a few sprigs of crabgrass while checking on the progress of the runners.
Watering is the next priority. In a rain garden, you are relying on the sky to do most of the work, but during a summer drought, you must intervene. If the soil dries out completely, the plants will go into survival mode and drop their flower buds. Aim for about 1 inch (2.5 cm) of water per week. If you have a rain barrel connected to your downspouts, that is the perfect source. Rainwater is naturally acidic, which helps maintain that low pH your plants love.
Fertilizing should be done sparingly. Use an acid-loving fertilizer (the kind sold for azaleas or blueberries) in early spring just as the new growth starts. Avoid high-nitrogen fertilizers, which will give you plenty of long, spindly vines but very few berries. You want a balanced approach that encourages the “uprights”—those short vertical stems that actually hold the fruit.
The Art of Sanding
Every two or three years, you should apply another thin layer of sand—about half an inch (1.25 cm)—directly over the vines in the spring. This might look like you are burying your plants, but the vines will grow right through it. This process “pins” the runners to the ground, creating a much denser mat of plants and revitalizing the root system. It is the secret to keeping a cranberry bed productive for 30 or 40 years.
Challenges and Common Mistakes
The number one mistake I see is people trying to grow cranberries in high-pH soil. If your soil test comes back at 7.0, you cannot just dig a hole and drop a plant in. You must use elemental sulfur to bring that pH down. It takes time—often six months to a year—for sulfur to work its way through the soil biology. Plan ahead and prep your soil the season before you intend to plant.
Another pitfall is “wet feet” without drainage. If you have standing water that doesn’t move, you are inviting fungal diseases like Phytophthora root rot. Your rain garden should be designed to drain away the surface water within 24 hours of a storm. The soil underneath should stay moist, like a wrung-out sponge, but you shouldn’t see puddles three days after the rain has stopped.
Lastly, don’t be discouraged by a slow start. Cranberries are slow-motion plants. You won’t see a single berry the first year. The second year might give you a handful to show off. By the third or fourth year, though, you will be wondering what to do with five pounds (2.2 kg) of berries from a 10-by-10 foot (3-by-3 meter) patch. Patience is a gardener’s best tool.
Limitations: When This May Not Be Ideal
Cranberries are fantastic, but they aren’t for everyone. If you live in a very hot climate (Zone 9 and above), the heat of the summer will likely scorch the vines. They are truly northern plants that enjoy a cool, damp breeze. Similarly, if your “low spot” is actually a drainage ditch for a road, be careful. Rain gardens filter out heavy metals and oils from runoff. While the plants will grow fine, you might not want to eat berries that have been acting as a sponge for street pollutants.
If your yard is prone to heavy foot traffic, cranberries will struggle. Their woody stems are brittle and don’t take kindly to being stepped on by dogs or kids. You should treat your cranberry rain garden as a “protected zone.” Use some attractive stones or a low fence to signal that this is a productive garden, not a shortcut to the driveway.
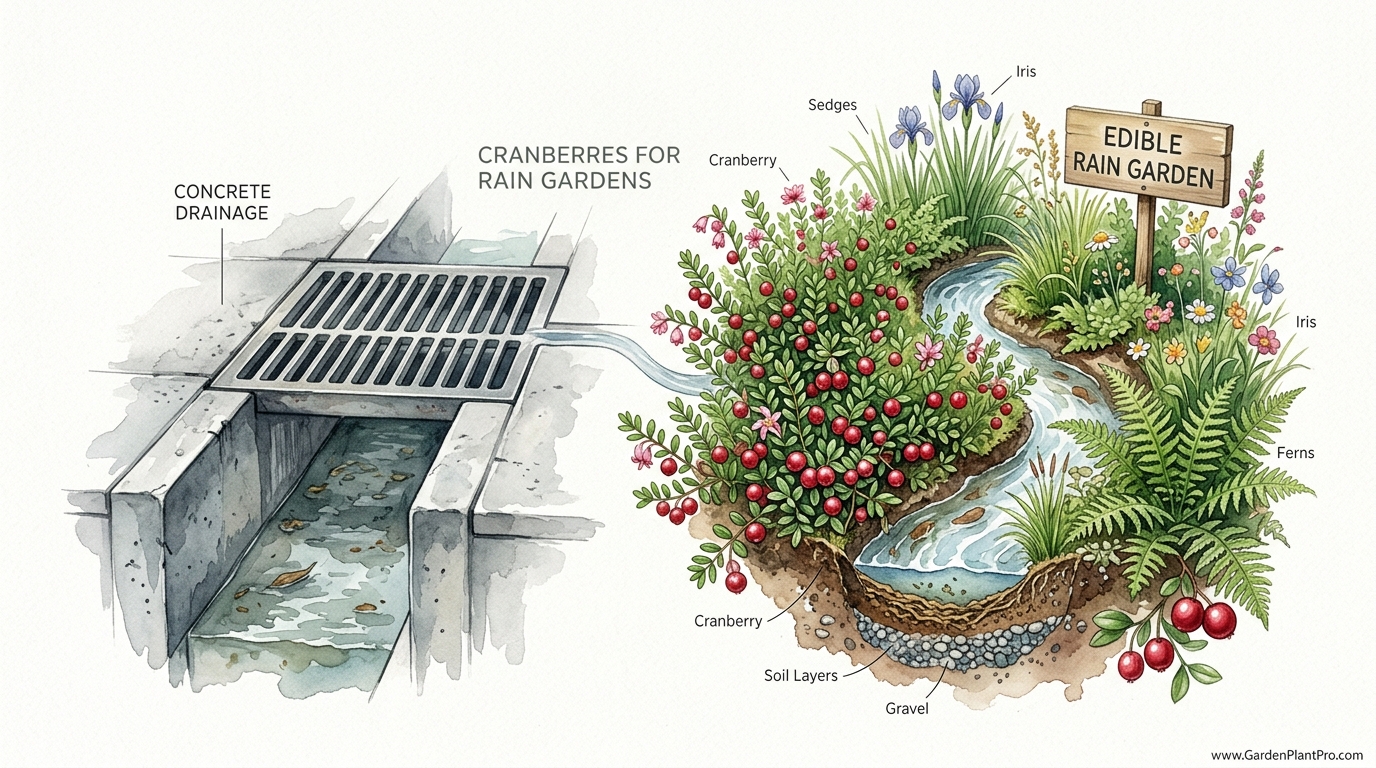
Concrete Drainage vs. Edible Rain Garden
In many suburban developments, the standard solution for a wet yard is a concrete swale or a plastic pipe system. While these are efficient at moving water, they provide zero ecological value and often just create a problem for the neighbor downstream. An edible rain garden, on the other hand, slows the water down and uses it to create life.
| Feature | Concrete Drainage | Edible Rain Garden |
|---|---|---|
| Cost | High (Material + Labor) | Low to Moderate (Plants + Soil) |
| Output | None (Waste Water) | Food Production (Cranberries) |
| Maintenance | Clearing debris from pipes | Weeding and occasional sanding |
| Environmental Impact | Increases runoff speed | Filters pollutants & recharges groundwater |
| Aesthetics | Industrial / Hidden | Lush, evergreen groundcover |
Practical Tips for a Better Harvest
- Pollination Matters: Cranberries are self-fertile, but they produce much better crops if bees are present. Plant some native flowers like Joe Pye Weed or Aster nearby to draw in the bumblebees.
- Mulch with Pine Needles: If you don’t have access to clean sand, pine needles make an excellent acidic mulch. They break down slowly and help keep the soil pH in the “sweet spot” for the berries.
- Frost Protection: If a late spring frost is predicted after the buds have started to swell, you can actually flood your rain garden slightly or cover it with a frost blanket. The water holds heat much better than the air and can save your entire crop.
- Check for Fruitworms: Keep an eye out for berries that turn red way too early in the summer. This is often a sign of the cranberry fruitworm. Pick those berries and toss them in the trash (not the compost) to break the life cycle of the pest.
Winter Considerations
In colder climates, winter can be hard on evergreen vines. The real danger is “winterkill”—when the ground is frozen solid but the sun and wind dry out the leaves. Because the roots can’t pull up any water from the frozen ground, the plant desiccates. In commercial bogs, they solve this by flooding the entire field and letting a layer of ice form over the plants.
In a backyard setting, you can do something similar if you have a way to contain the water. However, a simpler method is to cover your cranberry patch with a few inches of loose straw or pine boughs once the ground has frozen. This breaks the wind and provides enough shade to keep the plants dormant and hydrated until the spring thaw. I usually wait until the first real cold snap in December to put the “blanket” on, and I pull it off as soon as the snow starts to melt in March.
Example Scenario: The Suburban Swale
Let’s look at a typical 10-foot by 5-foot (3-m by 1.5-m) low spot at the end of a downspout. Instead of fighting the mud, the homeowner digs out the area to a depth of 10 inches (25 cm). They fill it with a mix of 10 bags of peat moss and 5 bags of coarse all-purpose sand. They add 2 lbs (0.9 kg) of elemental sulfur to ensure the pH drops over the first season.
They plant 20 “Stevens” plugs in May. Total cost for plants and materials is roughly $150. Over the first year, they spend about 15 minutes a week pulling weeds. By the third year, the patch has filled in completely. That autumn, they harvest 4 lbs (1.8 kg) of berries—enough for fresh sauce, several loaves of cranberry-orange bread, and a gallon of homemade juice. Not bad for a spot that used to be a mud pit.
Final Thoughts
Turning a drainage problem into a productive garden is one of the most satisfying things you can do as a homeowner. It shifts your perspective from seeing the rain as a nuisance to seeing it as a free resource. Cranberries are the perfect partner in this shift. They are tough, beautiful, and provide a unique harvest that you simply cannot find at the local grocery store in its freshest form.

Do you have some charcoal in your house right now? We call charcoal a “miracle leftover” for anyone who wants to be a little more self-sufficient and cut costs. That’s because it can help you with so many different things around the house and garden. You can even use it to make an energy-free fridge. Read More Here...
If you have that soggy spot, I encourage you to stop fighting it. Get a soil test, grab some peat moss, and order a few dozen cranberry plugs. You might find that the “worst” part of your yard becomes your favorite corner to visit. It takes a little patience and some dirty fingernails, but the sight of those ruby berries resting on a bed of green vines in the autumn sun is worth every bit of the effort.
Once your cranberry bed is established, you can start looking at other ways to improve your garden’s ecosystem. You might consider exploring soil health techniques like vermicomposting or pest management through beneficial insect habitats. The more you work with the natural tendencies of your land, the more the land will reward you with its bounty.