
Did you know you’re likely losing half your mustard harvest to the wind before it ever hits your spice jar? Most gardeners wait all season for those spicy seeds, only to watch them scatter into the dirt during harvest. If your garden floor is covered in tiny black specks, you’re doing it wrong. Here’s the orderly trick to catching every single grain without the waste.
Mustard is one of the most rewarding crops a patient gardener can grow, but it is also one of the most frustrating to collect if you don’t understand the plant’s natural defense mechanism: shattering. In the wild, mustard depends on its pods popping open at the slightest touch or breeze to spread its offspring far and wide. While this is a brilliant survival strategy for the plant, it is a nightmare for the person trying to make a batch of homemade dijon.
I have spent years watching my hard work disappear into the mulch because I waited just one day too long or tried to harvest during the heat of a dry afternoon. Learning how to manage a structured collection instead of a messy harvest is the difference between a jar full of seeds and a garden full of volunteer weeds next spring. It requires a bit of finesse, a few household tools, and a deep respect for the morning dew.
This guide will walk you through the process of taking mustard from a bolted flower bed to a shelf-stable spice. We will cover the biology of the seed, the precise visual cues that signal maturity, and the physical techniques used to ensure not a single grain is lost to the wind.
Mustard Seed Harvesting Guide For Beginners
To the uninitiated, mustard is just a condiment in a squeeze bottle, but to a gardener, it is a versatile member of the Brassicaceae family. Whether you are growing Yellow Mustard (Sinapis alba), Brown Mustard (Brassica juncea), or the fiery Black Mustard (Brassica nigra), the lifecycle follows a predictable pattern of rapid growth, vibrant yellow flowering, and finally, the development of seed pods known as siliques.
Mustard plants are generally cool-season annuals. Many of us start them for their spicy greens, but if you want the seeds, you have to let the plants “bolt.” This means the plant stops producing leaves and sends up a tall flowering stalk. Those bright yellow flowers are more than just a treat for pollinators; they are the precursors to your spice harvest. Once the flowers fade, tiny green pods begin to form along the stems.
The real challenge begins during the ripening phase. As the pods mature, they lose their moisture and become increasingly brittle. This is when the seeds are at their most vulnerable. In a real-world gardening scenario, a single heavy rain or a gusty afternoon can trigger a “shatter event,” where the pods unzip and drop their contents. Understanding this biology is the first step toward a successful harvest.
The Three Main Types of Mustard
While the harvesting technique remains largely the same, the plants themselves vary in habit and heat. Yellow mustard is the most common for beginners because it is relatively short, usually reaching about 60 cm to 90 cm (2 to 3 feet) in height, and its pods are more resistant to shattering than its darker cousins. It produces large, tan-colored seeds with a mild, tangy flavor.
Brown mustard is the workhorse of the spice world, used for Dijon-style spreads and many Indian dishes. These plants can grow taller, often reaching 120 cm (4 feet), and the seeds are smaller and more pungent. Finally, there is Black mustard, which is the “wild child” of the group. It can tower over 2 meters (6.5 feet) high and shatters its seeds at the mere suggestion of a breeze. If you are growing black mustard, your timing must be impeccable.
Timing the Harvest: Visual and Physical Cues
Success starts with knowing exactly when to step into the garden with your shears. If you harvest too early, the seeds will be green, bitter, and prone to shriveling. If you harvest too late, the pods will have already emptied themselves onto the soil. I like to tell my neighbors to look for the “faded parchment” look. When the pods transition from a vibrant green to a dull, translucent tan or light brown, the window of opportunity has opened.
You should also look at the leaves of the plant. As the seeds draw the last of the nutrients from the stalk, the leaves will turn yellow and begin to drop off. This is the plant’s way of shutting down its vegetative systems to focus entirely on its offspring. At this stage, the pods should feel dry to the touch, almost like thin paper. If you shake a branch and hear a faint, metallic rattling sound, that is the sound of success.
The “Thumb and Finger” Test
Before you commit to cutting the whole crop, perform a physical check on a few pods at the base of the plant, as these usually ripen first. Gently press a pod between your thumb and forefinger. A mature pod should “snap” or “zip” open with very little pressure, revealing hard, fully colored seeds. If the seeds inside are still green or feel soft and “squishy” when pressed, they need more time on the stem.
For Yellow Mustard, look for 75% of the pods to be tan. For Brown and Black varieties, you may want to move slightly earlier—around 60% maturity—because their shattering reflex is so much more sensitive. It is better to harvest a slightly under-ripe plant and let it finish drying in a controlled environment than to lose a fully ripe plant to a sudden thunderstorm.
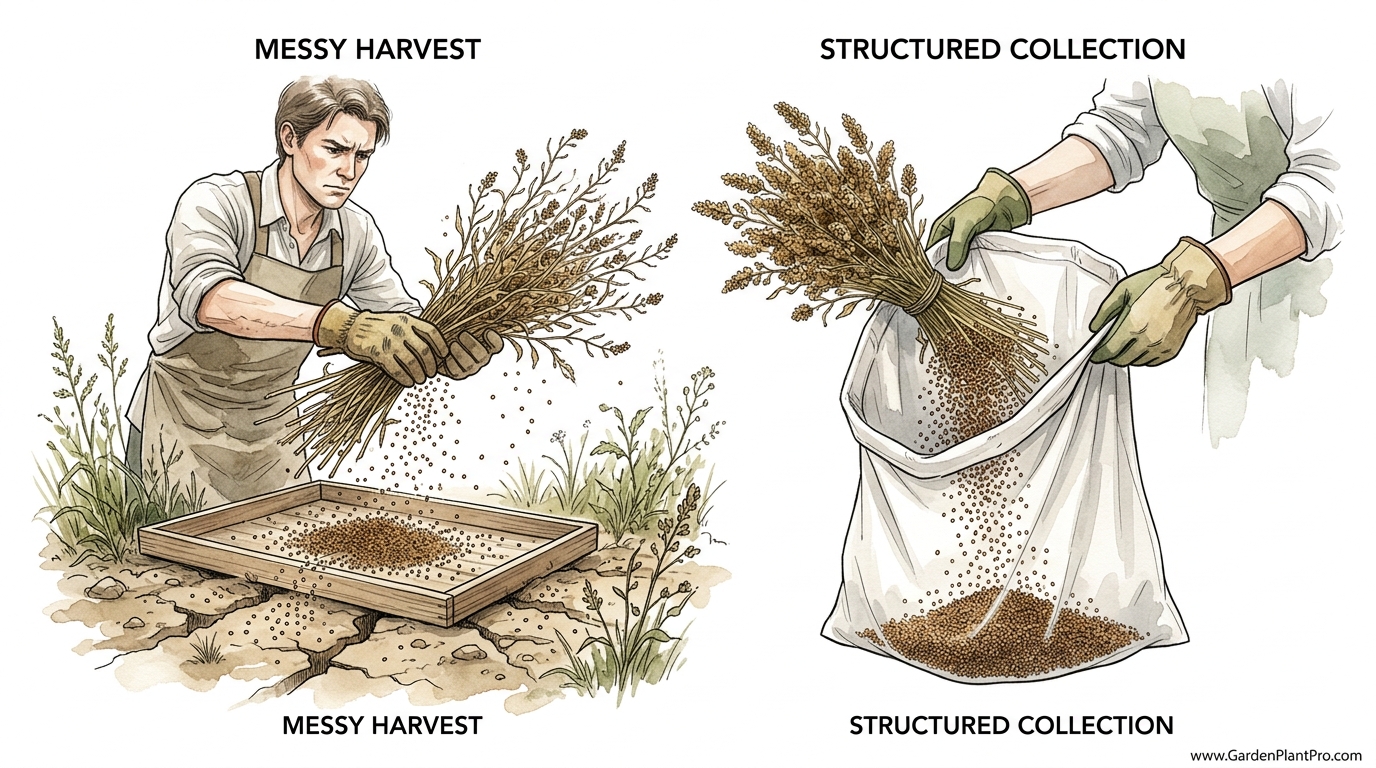
The Orderly Trick: How to Harvest Without Waste
The “orderly trick” I mentioned earlier is all about moisture management and containment. Most people try to harvest mustard seeds by picking individual pods or shaking plants over a bowl in the garden. This is a recipe for waste. Instead, follow this structured method to ensure every seed makes it into your kitchen.
Step 1: Harvest in the Early Morning
Timing during the day is just as important as timing during the season. You should always harvest your mustard in the early morning while the plants are still damp with dew. The moisture from the night air makes the pods slightly more flexible and less likely to “shatter” the moment you touch them. By the time the sun has dried the dew at 11:00 AM, the pods become incredibly brittle and will explode at the slightest vibration.
Step 2: The Containment Bag Method
Never carry uncovered mustard stalks across the yard. Instead, take a large paper bag or a clean plastic bin directly to the plant. Carefully slide the bag over the top of the seed-bearing branches before you make your cut. Once the branches are inside the bag, snip the main stem at the base. Any seeds that pop off during the cutting process will fall safely into the bottom of the bag rather than onto the ground.
Step 3: The Hanging Cure
If the plants are not 100% dry, do not try to thresh them immediately. Bundle the stalks together using twine and hang them upside down inside a large paper bag or over a clean tarp in a dry, well-ventilated area like a garage or shed. Ensure the temperature is between 15°C and 25°C (60°F to 77°F). As the plants continue to dry over the next 7 to 14 days, many pods will naturally open and drop their seeds into the container below. This is the most “orderly” way to collect the bulk of your harvest with zero effort.
Threshing and Winnowing: Separating the Good Stuff
Once your mustard stalks are bone-dry and brittle, it is time for threshing. This is the process of physically breaking the seeds out of their pods. If you have used the bag method, this part is easy. Close the top of the bag and give it several vigorous shakes, or even lightly beat the bag against a soft surface like a lawn or a rug. You can also lay the dried stalks out on a clean bedsheet and walk over them with clean shoes. The pods will crumble, releasing the seeds.
After threshing, you will be left with a mixture of seeds and “chaff”—the broken bits of pods, stems, and dust. This is where winnowing comes in. Winnowing uses the difference in density between the heavy seeds and the light chaff to clean the harvest. I prefer to do this on a slightly breezy day or in front of a small electric fan set to a low speed.
DIY PROJECT: Collect rainwater no matter where you live...

This DIY project is the best way to legally collect rainwater NO MATTER where you live. Get chlorine-free water, cut down on your water bills, and have enough for an emergency situation or to water your garden. Read More Here...
The Two-Bucket Technique
Place a clean bucket on the ground and hold a second bucket filled with the seed-chaff mixture about 30 cm to 60 cm (1 to 2 feet) above it. Slowly pour the mixture into the bottom bucket. The wind (or fan) should blow the lighter chaff away, while the heavier mustard seeds fall straight down. You may need to repeat this process 3 or 4 times to get a perfectly clean result. Pro tip: Do this over a large sheet so you can easily recover any seeds that miss the bucket.
Benefits of Harvesting Your Own Mustard Seeds
Why go through all this trouble when a jar of mustard seeds costs a few dollars at the store? The primary reason is potency. Commercial mustard seeds are often months or even years old by the time they reach your kitchen. Homegrown seeds have a significantly higher oil content and a much sharper, more complex flavor profile. When you crush a fresh homegrown seed, the aroma of spicy allyl isothiocyanate is unmistakable.
Beyond flavor, growing your own allows you to control the variety. You can grow rare heirloom cultivars that aren’t available in stores, or save seeds from your most productive plants to create a strain that is perfectly adapted to your local microclimate. It is also an excellent way to practice sustainable gardening; mustard is a fantastic “green manure” crop that can improve soil health between vegetable rotations.
Challenges and Common Mistakes
The most common mistake I see is the “Procrastination Trap.” Gardeners see the pods turning brown and think, “I’ll get to that this weekend.” By Saturday, a single windstorm has emptied the stalks. You must be proactive. If you see more than half the pods changing color, the time to act is now.
Another frequent error is improper drying. If you store seeds that still contain internal moisture, they will quickly develop mold. Mustard seeds have a high oil content, and that oil can go rancid if the seeds aren’t kept dry. I always recommend the “Hammer Test.” Place a single seed on a hard surface and hit it with a hammer. If it squashes into a paste, it’s too wet. If it shatters into a fine powder, it is perfectly dry and ready for storage.
Pest and Weather Issues
- Birds: Goldfinches and other small birds love mustard seeds. If you see them starting to feast, you may need to cover your crop with fine bird netting (1.2 cm or 1/2 inch mesh) during the final weeks of ripening.
- Moisture: If a long period of rain is forecast right when your pods are ripening, harvest them immediately, even if they are slightly green. Drying them indoors is far better than letting them rot or sprout in the pods.
- Cross-Pollination: If you plan to save seeds for planting next year, remember that different varieties of the same species will cross-pollinate. Keep at least 250 meters (800 feet) between different mustard varieties to maintain genetic purity.
Limitations: When This May Not Be Ideal
Mustard seed harvesting isn’t for everyone. If you live in an extremely humid tropical climate, drying the seeds can be a significant challenge. Without a dehumidifier or a very low-temperature food dehydrator (set below 40°C or 104°F), your seeds may mold before they ever reach the storage jar. In such regions, it might be better to grow mustard strictly for its leaves.
Space is another consideration. While a few plants will provide enough seeds for a couple of jars of condiment, you need a significant area—at least 5 to 10 square meters (50 to 100 square feet)—to produce enough seed for serious oil pressing or year-round spice usage. If your garden is limited to a few containers, you might find the yield disappointing relative to the effort of cleaning and winnowing.
Practical Tips for Best Results
To maximize your harvest and minimize the “messy harvest” syndrome, keep these best practices in mind:
- Succession Planting: Don’t plant all your mustard at once. Stagger your plantings by 2 weeks so that the harvest window is spread out. This makes it easier to manage the labor of harvesting and drying.
- Soil Health: Plants grown in soil rich in sulfur will produce seeds with more “heat.” Amending your soil with compost or a light application of elemental sulfur can improve the pungency of your harvest.
- Labeling: It is remarkably easy to mix up yellow, brown, and black mustard seeds once they are cleaned. Label your drying bags and storage jars immediately.
- Storage: Store your cleaned seeds in airtight glass jars in a cool, dark place. Whole seeds will maintain their potency for up to a year, while ground mustard should be used within 6 months.
Advanced Considerations: Scaling Up
If you find yourself falling in love with mustard production, you might want to look into more advanced tools. A set of graduated seed screens can make the cleaning process much faster than simple winnowing. These screens allow you to sift out particles that are exactly larger or smaller than the mustard seed itself, leaving you with a professional-grade product.
For those interested in the culinary science, consider the difference between “cold” and “hot” mustard preparation. The enzyme that creates the heat in mustard, myrosinase, is deactivated by heat or acid. If you want the spiciest mustard possible, grind your seeds and mix them with cold water, letting the paste sit for 10 minutes before adding vinegar or salt to “lock in” the flavor. Understanding these post-harvest steps ensures your gardening efforts translate into the best possible food.
Example Scenario: The Backyard Spice Gardener
Let’s look at a typical scenario. Sarah has a 1.2m x 2.4m (4ft x 8ft) raised bed dedicated to Brown Mustard. By mid-summer, her plants have reached 1.5 meters (5 feet) tall and the flowers have been replaced by thousands of thin green pods. She notices that the lowest pods are starting to turn a light tan color. She checks the weather forecast and sees that a dry, breezy week is coming.
On Tuesday morning at 7:00 AM, while the dew is still heavy, Sarah takes a stack of large paper grocery bags to the garden. She carefully slides a bag over a cluster of stems, clips them at the base, and secures the bag with a rubber band. She repeats this until all her plants are tucked into bags. She hangs these bags from the rafters of her garden shed.
Two weeks later, the plants are so dry they “crackle” when touched. She shakes the bags vigorously for 30 seconds each. When she pours the contents out, 90% of the seeds are already at the bottom of the bags. She spends 20 minutes winnowing the seeds in front of a box fan on her patio. From her single raised bed, Sarah harvests nearly 500 grams (about 1.1 pounds) of clean, pungent brown mustard seed—enough to supply her kitchen for an entire year.
Final Thoughts
Harvesting mustard seed is a bridge between the gardening season and the culinary year. It is a process that rewards observation over brute force. By choosing the right moment to intervene and using the simple “orderly trick” of morning harvesting and bag containment, you can eliminate the waste that plagues so many beginner gardeners.
The satisfaction of hearing those seeds rattle into a jar is immense. It is a tangible connection to generations of gardeners who understood that the best things in the garden often come in very small packages. Don’t be discouraged if your first attempt involves a few scattered seeds; each season is a chance to refine your technique and better understand the rhythm of your soil.
Once you have mastered mustard, you might find yourself looking at other seed crops with new eyes. The techniques learned here—timing, moisture management, and winnowing—are the same principles used for harvesting radishes, kale, and even decorative flowers. Take what you’ve learned, experiment with different varieties, and enjoy the spicy, homegrown flavor that only a patient gardener can produce.