
Your potatoes don’t want a lab-made chemical cocktail; they want the nitrogen harvest nature already grew for them. Did you know that synthetic nitrogen actually makes your potatoes rot faster in storage? We’ve been taught to feed the plant, but the pros feed the soil. By switching from chemical salts to ‘Green Manure,’ you aren’t just fertilizing; you’re building a biological engine that creates the creamiest, longest-lasting spuds you’ve ever tasted.
I’ve spent many a spring leaning on my shovel, watching neighbors spread those bright blue granules of synthetic fertilizer across their potato patches. It looks easy, and for a few weeks, their vines look like a jungle. But come winter, when we’re both pulling spuds from the cellar, their potatoes are often soft, watery, and starting to sprout or rot. Mine stay firm and flavorful until the following May. The difference isn’t in the seeds or the water; it’s in the way we treat the soil during the “off-season.”
Using green manure is about playing the long game. It’s a tradition that goes back centuries, long before we started relying on factory-made salts. When you grow a cover crop specifically to turn it back into the earth, you are essentially “harvesting” nitrogen from the air and “mining” minerals from deep in the subsoil. You’re then tucking those nutrients into a soft bed of organic matter that the potato roots absolutely adore.
If you are tired of scab-marked skins or tubers that turn to mush in the pantry, it is time to look at what you’re growing before the potatoes even hit the ground. Let’s talk about how to turn your garden into a self-sustaining nutrient factory.
How Green Manure Improves Potato Yields
Green manure is simply a crop grown to be sacrificed for the health of the next one. Instead of harvesting these plants for the dinner table, you grow them until they are lush and green, then chop them up and mix them into the soil. This practice is the backbone of high-quality potato production because it addresses the three big needs of the potato plant: loose soil, consistent moisture, and a steady, slow-release supply of nitrogen.
Potatoes are “heavy feeders,” meaning they demand a lot of nutrients to build those starchy tubers. However, they also have relatively shallow and inefficient root systems compared to other vegetables. This makes them very sensitive to the soil environment. If the soil is too hard, the tubers come out misshapen. If the soil is too sandy, the nutrients wash away before the plant can use them. Green manure solves both problems by adding “tilth”—that crumbly, cake-like texture that lets potato roots breathe and expand.
In the real world, gardeners use this to bridge the gap between harvests. For example, after you dig up your early potatoes in mid-summer, the ground usually sits bare and baking in the sun. This “empty” time is when you lose your best topsoil to wind or rain. Sowing a quick-growing green manure like buckwheat or mustard keeps the soil covered and active. When you eventually dig that green matter in, it feeds the earthworms and microbes that will spend the winter prepping your soil for next year’s spud crop.
Think of it like a battery. The green manure “charges” the soil with energy from the sun and nitrogen from the atmosphere. When the potato plants start growing the following spring, they “discharge” that energy, turning it into the starch and flavor you find in a perfectly roasted potato. This biological engine provides a much more stable environment than the “sugar rush” of synthetic fertilizers.
How It Works: Growing and Incorporating Your “Green Gold”
The process of using green manure is a simple cycle of sowing, growing, and returning. You aren’t just tossing seeds; you are managing a living system. Here is the step-by-step breakdown of how to handle a green manure crop specifically for a potato rotation.
Sowing the Seeds
You want to get your cover crop in as soon as a patch of ground opens up. If you just finished harvesting a summer crop, rake the soil to a fine tilth and broadcast your seeds. For most home gardens, a “broadcast and rake” method works fine. You sprinkle the seeds thickly—think about 15 to 20 grams per square meter (roughly 0.5 to 0.7 ounces per 10 square feet)—and then lightly rake them in so they are about 1 to 2 centimeters (0.5 to 0.75 inches) deep.
Walk over the area or use a light roller to ensure the seeds are in firm contact with the soil. This “treading in” is vital because if the soil is too loose, the seeds will sprout and then die the first time the surface dries out. If you’re sowing in late summer, you might need to give them a light watering to get them started. Once they are up, they usually take care of themselves.
The Growth Phase
Let the plants grow until they are just about to flower. This is the “sweet spot” for nutrient density. At this stage, the stems are still soft and sappy, which means they will break down quickly in the soil. If you let them go to seed, the stems become “woody” or lignified. These woody stems take much longer to rot and can actually “tie up” the nitrogen in your soil, leaving your potatoes hungry when they need food the most.
The Termination: Digging It In
When it is time to end the crop—usually 2 to 4 weeks before you plan to plant your potatoes—you need to break the plants down. For a small backyard patch, a pair of garden shears or a string trimmer works wonders. You want to chop the greenery into small pieces. The smaller the pieces, the faster the soil microbes can eat them.
Once chopped, you have two choices. You can dig the green matter into the top 15 to 20 centimeters (6 to 8 inches) of soil with a spade, or you can leave it on the surface as a mulch for a “no-dig” approach. Most potato pros prefer digging it in because it puts the nutrients right where the new tubers will be forming. If you are using a biofumigant like mustard (which we will get to in a minute), you must dig it in immediately after chopping to trap the beneficial gases in the soil.
Benefits of the Green Manure Approach
Switching away from synthetic nitrogen to this living system offers several practical, measurable benefits that you’ll notice from the first harvest.
- Better Tuber “Skin Set”: High levels of late-season synthetic nitrogen keep the potato vines green for too long, which prevents the potato skin from toughening up. Green manure releases its nitrogen more predictably, allowing the plant to “shut down” naturally at the end of the season. This results in a thick, durable skin that resists bruising.
- Enhanced Storage Life: Research has shown that potatoes grown with excessive chemical salts are more prone to “shrinkage” and pressure bruising in the cellar. Because green manure provides a balanced diet of minerals and organic matter, the cell walls of the potato are stronger, leading to a much longer shelf life.
- Improved Water Retention: Every 1% increase in organic matter can help the soil hold thousands of gallons more water per acre. In a backyard context, this means your potatoes are less likely to get “knobby” or develop hollow hearts during a mid-summer dry spell.
- Natural Disease Suppression: Certain green manures, like mustard and radish, release natural compounds (isothiocyanates) that act like a mild organic fumigant. These can significantly reduce the population of harmful nematodes and the fungi that cause common scab.
Challenges and Common Mistakes
While this method is powerful, it isn’t foolproof. I’ve seen many beginners get frustrated because they missed a key detail in the timing or the choice of plant.
One of the most frequent errors is the “Nitrogen Tie-Up.” If you dig in a very mature, straw-like crop (like fully grown rye or oats) right before planting your potatoes, the bacteria in the soil will use up all the available nitrogen just to break down that tough carbon. Your potato plants will turn yellow and stunted because the “clean-up crew” is hogging all the food. To avoid this, always incorporate your green manure while it is still “succulent” and green, or wait at least 3 to 4 weeks after digging it in before you plant your spuds.
Another pitfall is “Sowing Too Late.” In colder climates, if you wait until October to sow your cover crop, the seeds might germinate but they won’t put on enough biomass to do any real good. You need at least 4 to 6 weeks of growth before a hard frost hits. If you miss that window, you’re better off just mulching the bed with finished compost and waiting until spring.
Slugs can also be a nuisance. A thick, lush green manure crop is like a five-star hotel for slugs. If you have a major slug problem, you might want to avoid leaving the chopped greenery on the surface as a mulch. Digging it in deeply helps to disturb their breeding ground and keeps them away from your emerging potato shoots.
DIY PROJECT: Collect rainwater no matter where you live...

This DIY project is the best way to legally collect rainwater NO MATTER where you live. Get chlorine-free water, cut down on your water bills, and have enough for an emergency situation or to water your garden. Read More Here...
Limitations: When Green Manure Might Not Be Ideal
It is important to be realistic. Green manure is not a “magic pill” that works perfectly in every single situation.
In extremely dry climates where every drop of water is precious, growing a cover crop can actually “steal” moisture from the soil that the following potato crop will need. If you live in an area with severe water restrictions or chronic drought, you have to be very careful. You might need to irrigate your green manure to get enough biomass to make it worth it, which could be an expensive trade-off.
Space is another constraint. If you have a very tiny garden and you want to grow food year-round, you might feel like you can’t “waste” a bed on a crop you won’t eat. In this case, you might be better off using a high-quality organic compost or “compost tea” to feed your soil, rather than a full-season green manure. However, even a 6-week “catch crop” of mustard between your spring peas and your fall potatoes can make a difference.
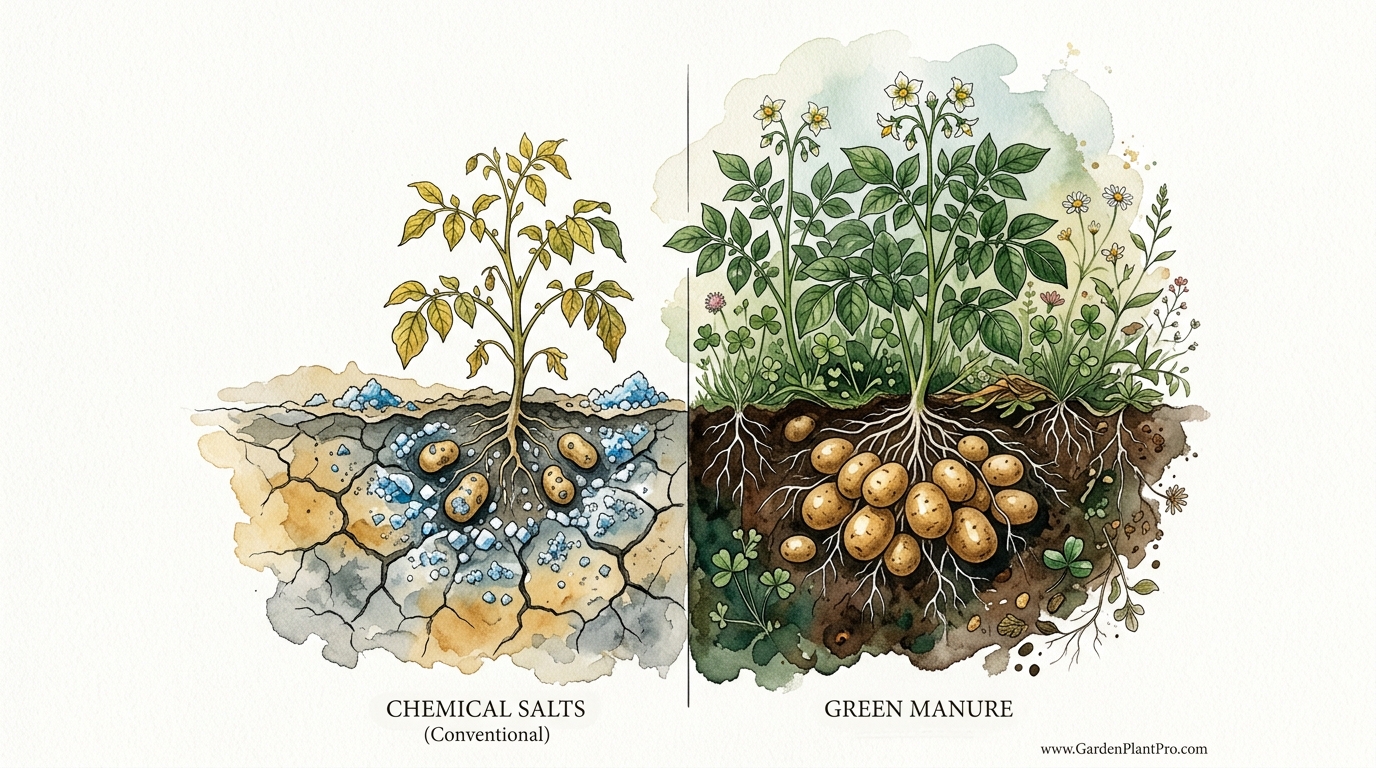
Comparing the Two Worlds: Green Manure vs. Chemical Salts
To help you decide which path to take, let’s look at how these two methods stack up in terms of practical garden performance.
| Feature | Green Manure (Organic) | Chemical Salts (Synthetic) |
|---|---|---|
| Nitrogen Source | Atmospheric N fixed by bacteria | Petroleum-based urea or nitrates |
| Release Speed | Slow & Steady (aligned with growth) | Instant “Flash” (can cause burn) |
| Soil Structure | Builds tilth and organic matter | Can degrade soil life over time |
| Disease Impact | Suppresses scab and nematodes | Excess N can increase blight risk |
| Storage Quality | Excellent skin set and firmness | Higher risk of soft rot and shrink |
Practical Tips for Best Results
After decades of tinkering with this, I’ve picked up a few “best practices” that will save you time and improve your results.
- The “Mustard Mash”: If you are growing mustard to prevent potato scab, don’t just dig it in. You need to macerate it. Mow it down or run over it with a lawnmower first. This ruptures the plant cells, releasing the enzymes that create the “biofumigant” gas. Dig it in within 20 minutes of chopping to lock those gases in the soil.
- Mix Your Species: Don’t just grow one thing. A mix of 70% legumes (like vetch or clover) and 30% scavengers (like oats or rye) is the gold standard. The legumes “fix” new nitrogen, while the scavengers “grab” existing nutrients from the soil so they don’t wash away during winter rains.
- Check Your Inoculant: If you are sowing legumes (peas, vetch, or clover) in a spot that hasn’t had them before, make sure to use a “Rhizobium” inoculant. This is a powder containing the specific bacteria the plants need to fix nitrogen. Without it, your legumes are just regular plants, not nitrogen factories.
- Wait for the “Wilt”: After you chop your green manure, let it sit on the surface for a few hours to wilt before digging it in. This makes it easier to turn over with a spade and speeds up the initial breakdown process.
Advanced Considerations for the Serious Grower
Once you’ve mastered the basics, you can start looking at “mineralization timing.” This is the science of making sure the nitrogen from your green manure becomes available exactly when the potato plants are “bulking” their tubers.
Potatoes typically need the most nitrogen between 25 and 40 days after they sprout. Since it takes about 2 to 4 weeks for green manure to start releasing its payload of nutrients, you want to time your “termination” carefully. If you incorporate the green manure too early in a very cold, wet spring, the nutrients might be released and washed away before the potato roots are even big enough to find them.
In some climates, serious practitioners use “relay cropping.” They will sow a low-growing clover between the rows of their standing potato crops late in the season. As the potato vines die back, the clover takes over, protecting the soil instantly. This requires a bit more finesse with a hoe to avoid damaging the potato tubers, but it ensures the “biological engine” never stops running.
Example Scenario: The 10x10ft Potato Patch
Let’s look at how this works in a standard backyard plot. Imagine you have a 3-meter by 3-meter (roughly 10ft by 10ft) garden bed.
In late August, after pulling up your onions or early beans, you rake the bed and sow a mix of **Crimson Clover** and **Mustard**. You use about 150 grams (5 ounces) of seed total. By October, you have a lush, knee-high green carpet. Bees are loving the clover flowers, and the mustard is crowding out any winter weeds.
In March, you take your garden shears and “mow” the whole thing down. You wait four hours for it to wilt, then use a spade to turn it into the top 15 centimeters (6 inches) of soil. You let the bed rest for three weeks. By early April, the green matter has mostly disappeared, replaced by dark, rich-smelling earth full of active worms.
When you plant your seed potatoes, you don’t add any synthetic fertilizer. By June, your potato vines are a deep, healthy forest green—not the neon, sickly green of “urea-fed” plants. When you harvest in August, the tubers come out clean, with bright, thick skins and zero scab. Those potatoes will sit in your pantry until next spring, as firm as the day they were dug.
Final Thoughts
Shifting your focus from “feeding the plant” to “building the soil” is the single most important transition a gardener can make. It takes a little more planning and a bit of patience, but the results speak for themselves in every bite of a creamy, homegrown potato. You are moving away from a system of chemical dependency and toward a partnership with the living earth.
Nature has spent millions of years perfecting the way nutrients move through the soil. When we use green manures, we are simply tapping into that ancient wisdom. We are using the power of the sun and the biology of the soil to create a superior product that no factory can replicate.
I encourage you to start small. Choose one bed this season and sow a quick-growing cover crop. Watch how the soil changes. Feel the difference in the tilth. Once you see how your potatoes respond to this “nitrogen harvest,” you’ll likely find yourself looking at those blue chemical granules as a relic of the past. Happy planting, and may your cellar always be full of firm, flavorful spuds.