
Why are your carrots always tangled and stunted while the pros get perfect, uniform roots every time? Every time you “scatter” carrot seeds, you’re signing up for hours of back-breaking thinning later—or worse, a harvest of tangled, stunted roots. The difference between a chaotic mess and a garden-to-table masterpiece is just a few inches of precision. Learn the seed spacing secret that saves your seeds, your soil, and your sanity.
Lean over the fence here for a second, and I’ll tell you the truth about carrots. Most folks treat carrot seeds like they’re seasoning a steak, just tossing them into a trench and hoping for the best. Those tiny seeds are smaller than a grain of salt, and once they hit the dark soil, they’re invisible. You end up with a clump of twenty seedlings in one spot and a foot of empty dirt in the other.
Precision placement is the old-timer’s way of working smarter, not harder. It’s the difference between a garden that looks like a wild meadow and one that feeds your family all winter long. When you take the time to space things right from the start, you aren’t just saving yourself from the tedious task of thinning; you’re giving every single root the room it needs to breathe, drink, and stretch deep into the earth.
Let’s walk through how we can stop “scattering” and start growing the kind of carrots that would make a blue-ribbon judge take notice.
How To Plant Carrots Without Thinning
Planting carrots without thinning means you are placing each individual seed exactly where it needs to grow to maturity, rather than overseeding and pulling out the “extras” later. In a typical garden setting, carrot seeds are sown so thickly that they compete for light, water, and nutrients from the moment they sprout. This competition leads to the “tangled mess” many beginners face. By using precision methods, you ensure that every seed that germinates has a 2-to-3-inch (5-to-7.5 cm) “buffer zone” of soil all to itself.
This practice exists because thinning is not just a chore—it’s actually a risk to your crop. When you pull out a tiny carrot seedling to make room for its neighbor, you often disturb the delicate root hairs of the plant you intended to keep. This “root shock” can cause the remaining carrot to fork, twist, or stop growing altogether. Precision sowing bypasses this risk entirely.
Real-world gardeners use various “carrier” methods to achieve this. Since carrot seeds are too small for most human fingers to handle one by one with accuracy, we use things like homemade seed tapes, cornstarch gels, or clay-coated pelletized seeds. These methods act as a physical guide, locking the seed into a specific spot so it stays put through rain, wind, and watering until those first green “feathers” break the surface.
Precision Methods: From Seed Tapes to Fluid Sowing
Getting those tiny seeds into the ground with the right spacing requires a bit of a trick. You can’t just rely on your eyesight and a steady hand when the wind is blowing. Over the years, I’ve found three reliable ways to get the job done right the first time.
The DIY Seed Tape Method
This is the classic “kitchen table” project for a rainy afternoon. You take a roll of single-ply toilet paper and cut it into long strips about an inch (2.5 cm) wide. Mix a little flour and water into a thick, gooey paste—this is your “garden glue.”
Lay the strips out and use a toothpick to dab a tiny bit of paste every 2 inches (5 cm). Drop one or two seeds onto each dab. Once the paste dries, you can roll these tapes up and store them until planting day. When you’re ready, just lay the tape in a shallow trench 1/4 inch (6 mm) deep, cover it with a fine layer of soil, and water it in. The paper dissolves, the flour paste feeds the soil microbes, and your carrots sprout in a perfect, straight line.
The Fluid Sowing Technique
This one sounds fancy, but it’s just basic chemistry. You make a thick “gel” by boiling 2 tablespoons of cornstarch in 1 cup of water until it’s clear and thick like gravy. Let it cool completely—don’t cook your seeds! Mix your carrot seeds into this gel.
Pour the mixture into a plastic sandwich bag and snip a tiny corner off, just like a pastry bag for frosting. You then “pipe” a bead of gel along your planting row. Because the seeds are suspended in the thick gel, they stay separated and don’t clump together. The gel also holds onto moisture, which is the secret to getting carrots to sprout quickly in dry weather.
Using Pelletized Seeds
If you’ve got a little extra in the garden budget, you can buy seeds that come “pelletized.” Seed companies coat each tiny carrot seed in a round ball of inert clay. This makes them about the size of a BB or a small pea. They are incredibly easy to pick up with your fingers and drop exactly 2 inches (5 cm) apart. Just keep in mind that pelletized seeds need a lot of consistent moisture to break down that clay shell so the seed can actually get out.
Benefits of Precision Sowing
Choosing to be precise during planting season pays off in ways that might not be obvious at first. It’s about more than just avoiding a sore back from bending over the rows.
- Better Root Quality: When a carrot has its own space, it grows straight down without hitting a neighbor. This results in those long, beautiful roots you see in the catalogs rather than the “twins” that wrap around each other.
- Reduced Pest Problems: The carrot rust fly is a common enemy. This pest is attracted to the scent of crushed carrot foliage. When you thin your carrots by pulling them out, you release that scent into the air, practically ringing a dinner bell for the flies. Precision sowing means you never have to bruise the leaves.
- Seed Economy: A single packet of carrot seeds contains thousands of units. When you scatter sow, you might use an entire packet on one 10-foot (3-meter) row. With precision methods, that same packet could plant your entire garden for the next three years.
- Consistent Growth: Plants that aren’t competing for nutrients all grow at roughly the same rate. This means your entire row will be ready for harvest around the same time, making garden planning and food preservation much easier.
Challenges and Common Mistakes
Even the best-laid plans can go sideways if you miss the small details. Carrots are notoriously finicky during their first three weeks of life.
Mistake #1: Letting the soil crust over. Carrot seedlings are incredibly weak. If the sun bakes the top layer of your soil into a hard “crust,” those tiny sprouts will break their necks trying to push through. Always cover your seeds with something light, like vermiculite, fine compost, or even a light dusting of sand.
Mistake #2: Inconsistent moisture. A carrot seed is like a tiny battery. Once it gets wet and starts to “charge” (germinate), it cannot stop. If the soil dries out even for a few hours during those first 10 days, the seed will die. You have to keep the bed damp—not soggy, but damp—until you see green.
Mistake #3: Using fresh manure. This is a classic “new gardener” error. Carrots hate fresh nitrogen. If you put fresh manure in the bed, the carrot root will “fork” or grow “hairy” as it tries to chase the nitrogen pockets. Use well-rotted compost or a phosphorus-heavy fertilizer like bone meal instead.
Limitations: When Precision Isn’t Ideal
As much as I love a tidy row, there are times when precision sowing might not be the best use of your time. If you’re planting a “cover crop” of carrots or working in a massive market-garden scale without expensive mechanical seeders, it might be more efficient to broadcast the seeds and just accept that you’ll have smaller, “baby” carrots to harvest as you thin them out.
DIY PROJECT: Collect rainwater no matter where you live...

This DIY project is the best way to legally collect rainwater NO MATTER where you live. Get chlorine-free water, cut down on your water bills, and have enough for an emergency situation or to water your garden. Read More Here...
Environmental conditions also play a role. In areas with extremely heavy clay soil, even perfectly spaced carrots might struggle to push down. In those cases, you’re better off focusing on soil amendments like sand and organic matter before you worry about the millimetric precision of your seeds. If your soil is full of rocks, no amount of perfect spacing will give you straight carrots; they’ll hit a stone and hook to the side regardless.
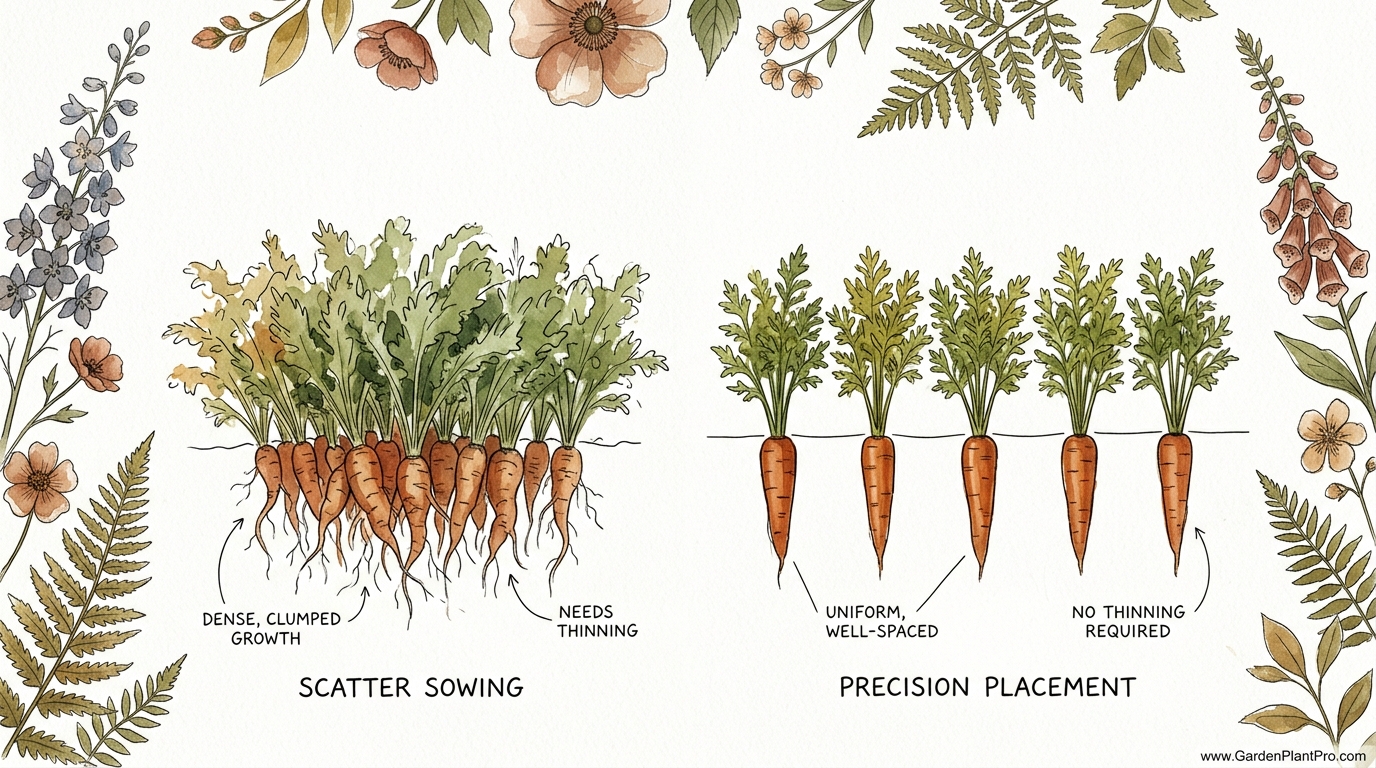
Comparison: Scatter Sowing vs. Precision Placement
| Factor | Scatter Sowing (Broadcasting) | Precision Placement |
|---|---|---|
| Planting Time | Fast (Minutes) | Slow (Hours/Preparation) |
| Maintenance (Thinning) | High Labor Required | Minimal to None |
| Seed Waste | High (up to 90% wasted) | Zero Waste |
| Root Uniformity | Random/Irregular | High/Uniform |
| Success Rate | Variable | High (if moisture is kept) |
Practical Tips and Best Practices
If you want to ensure your carrots come up like clockwork, follow these field-tested tips.
- The “Board Trick”: After you plant your seeds (especially with seed tape or gel), lay a 2×4 board directly over the row. This keeps the soil cool, dark, and perfectly moist. Check under it every day. As soon as you see the first tiny green loop, remove the board. This is a game-changer in hot climates.
- Mix with Radishes: Radishes are the “scouts” of the garden. They germinate in 3 days, while carrots take 14. If you mix a few radish seeds into your carrot rows, the radishes will pop up and mark the line so you don’t accidentally hoe your carrots while they’re still underground. Plus, radishes help break up the soil surface for the weaker carrots.
- Pre-Soak Your Seeds: If you aren’t using the gel method, try soaking your carrot seeds in warm water for 24 hours before planting. This softens the seed coat and can shave 5 days off the germination time.
- Wait for the Right Temp: Carrots will germinate at 40°F (4.5°C), but they’ll be slow. They are happiest when the soil is between 65°F and 75°F (18°C–24°C). If you plant too early in a cold, wet spring, the seeds might rot before they ever wake up.
Advanced Considerations: Variety Selection
Not all carrots are built the same. Choosing the right variety for your specific soil is just as important as the spacing.
Nantes Varieties
These are the favorites for home gardeners. They are cylindrical, sweet, and blunt-ended. Because they don’t have a long, sharp taproot, they are more forgiving if your soil isn’t perfectly loose. Varieties like Scarlet Nantes or Bolero are great choices for precision sowing in raised beds.
Chantenay Varieties
If you’re dealing with heavier, clay-rich soil, Chantenay is your best friend. These carrots are short and wide at the “shoulders,” meaning they have the physical strength to push through tough dirt. They are excellent for winter storage.
Imperator Varieties
These are the long, slender carrots you see in grocery stores. They need very deep, sandy soil to reach their full potential (often 10–12 inches or 25–30 cm). Unless your soil is like a beach, these can be frustrating to grow without them twisting into knots.
Example Scenario: The 4-Foot Raised Bed
Imagine you have a 4-foot by 4-foot (1.2m x 1.2m) raised bed. If you scatter sow, you might dump a whole packet of seeds and spend three Saturdays thinning them out, eventually ending up with about 100 usable carrots.
Instead, try the “Square Foot” approach. Divide that bed into 16 squares. In each square, use a template to poke 16 small holes, each 3 inches (7.5 cm) apart. Drop exactly two seeds in each hole. You’ll use less than half a packet of seeds. Even if only 80% germinate, you’ll have over 200 perfectly spaced carrots with zero competition and zero thinning required. That’s the power of working with the plant’s needs rather than against them.
Final Thoughts
Carrots are often called the “test” of a true gardener. They require patience, a bit of cleverness, and a deep respect for what’s happening beneath the surface. Moving away from the chaotic “scatter and pray” method toward precision placement isn’t just about efficiency; it’s about becoming a more observant steward of your land.
The methods we’ve talked about—seed tapes, gels, and boards—are simply ways to bridge the gap between our big hands and those tiny, fragile seeds. When you give a carrot its own kingdom of soil, it rewards you with sweetness and crunch that no store-bought root can ever match.
Take a Saturday this spring to try one of these techniques. You might find that the extra hour you spend at the kitchen table saves you ten hours in the sun later. Once you pull that first, perfectly straight, 8-inch (20 cm) carrot out of the ground, you’ll never go back to scattering seeds again. Happy gardening!