
You are likely killing your pepper plants years before their time—here is how to turn them into perennial producers. Most gardeners treat capsicums like disposable annuals, but they are actually short-lived perennials. If you bring them inside for the winter, your ‘Year 2’ plants will yield fruit 2 months earlier and produce 3x more than any seedling ever could. Stop starting from scratch and start building a pepper legacy.
I remember the first time I realized my bell peppers didn’t have to die with the first frost. I had a particularly productive ‘California Wonder’ that I just couldn’t bear to see shrivel up. I dug it up, hacked it back, and stuck it in a corner of the basement. That next spring, while my neighbors were still coddling tiny seedlings, my “old timer” was already a foot tall with a woody trunk like a bonsai tree. It felt like I’d discovered a secret cheat code for the garden.
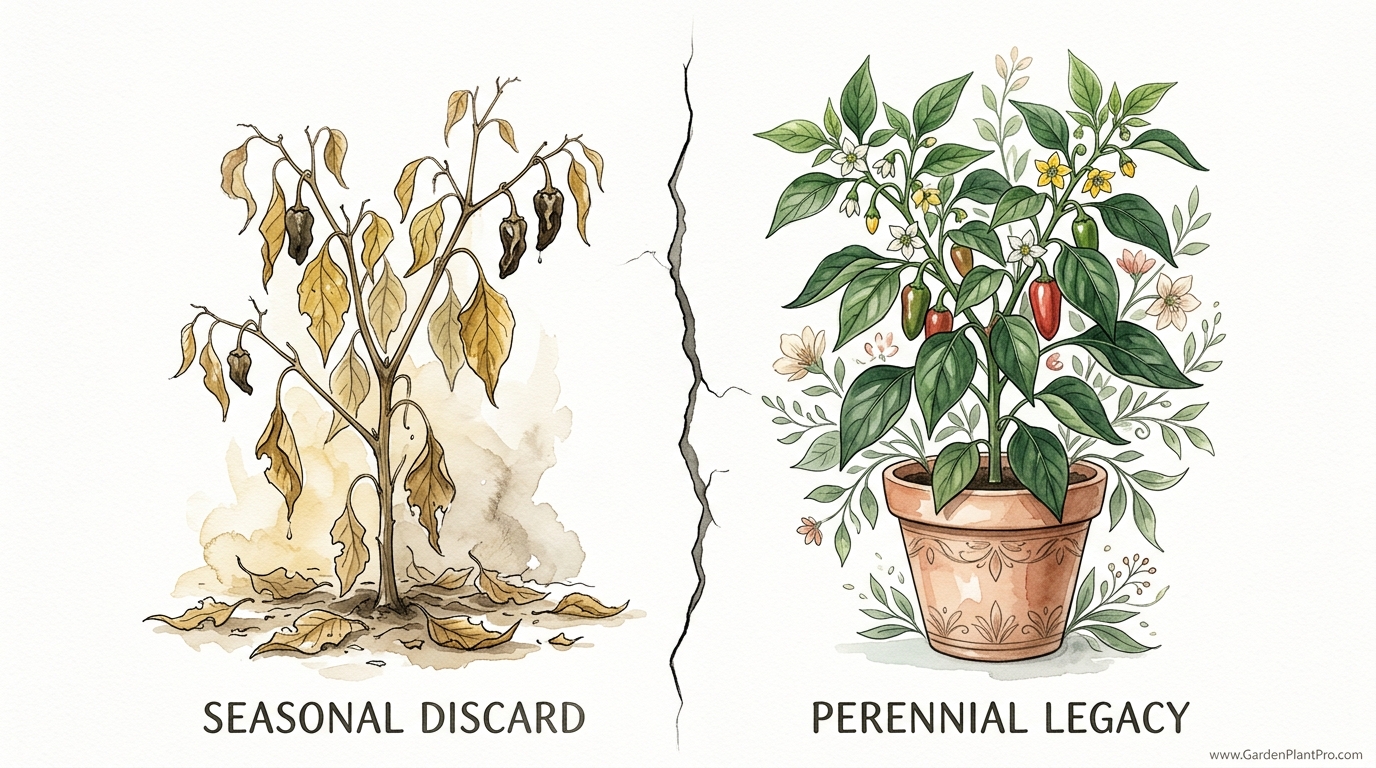
Most of us are conditioned by the local garden center to think in terms of a single season. We buy a six-pack of starts in the spring, harvest a handful of peppers in late summer, and then pull the plants out to make room for garlic or just let the frost take them. This is the SEASONAL DISCARD cycle. It is expensive, time-consuming, and frankly, it keeps you from seeing what a pepper plant is truly capable of. When you transition to building a PERENNIAL LEGACY, you are treating your peppers like the small trees they naturally want to be.
In the wild, in places like Mexico or Central and South America, capsicums live for years. They develop thick, corky bark and massive root systems that can push out incredible amounts of fruit. By learning the art of overwintering, you are simply respecting the plant’s true nature. You are giving it a “nap” during the cold months so it can hit the ground running as soon as the soil warms up again.
How To Overwinter Capsicum Plants For Infinite Harvests
Overwintering is the process of bringing a frost-sensitive plant indoors and keeping it alive in a state of semi-dormancy during the winter months. It is not about growing peppers in your living room—though you can do that with enough lights—it is about preservation. You are keeping the “engine” of the plant alive so it doesn’t have to rebuild itself from a tiny seed next year.
This technique is used by serious chili-heads and market gardeners who want to get a head start on the season. Because the plant already has a mature, established root system and a thick main stem, it doesn’t need to spend the first 60 days of spring growing leaves and branches. It already has the infrastructure. All it needs is a bit of heat and light to wake up and start pumping out flowers.
Think of it like a marathon runner. A seedling is someone starting their training from the couch. An overwintered plant is a pro athlete who just took a two-week vacation. Who do you think is going to cross the finish line first? In most climates, an overwintered pepper will give you ripe fruit in June, whereas a seed-grown plant might not produce until August or even September.
The beauty of this method is that it works for almost every variety of capsicum. Whether you are growing sweet bell peppers (Capsicum annuum), spicy Habaneros (Capsicum chinense), or the long-lived Tabasco types (Capsicum frutescens), the biological principles remain the same. The plant wants to live; you just have to give it a safe place to ride out the cold.
The Step-by-Step Guide to Overwintering Your Peppers
Timing is everything. You want to start this process before the first hard frost hits. While a light frost might just singe the leaves, a hard freeze—anything below 0°C or 32°F—will crystallize the water inside the plant cells and kill it instantly. Watch your local forecast closely as autumn progresses.
Step 1: The Great Pruning
The most shocking part for beginners is how much you have to cut the plant back. You aren’t just trimming it; you are essentially reducing it to a skeleton. Using sharp, clean pruning shears, cut the main stems back so the plant is only about 15–20 cm (6–8 inches) tall. Look for “nodes”—those little bumps on the stem where leaves used to grow—and make your cuts just above them.
Remove all remaining leaves, tiny peppers, and flowers. This feels like murder, but it is actually an act of mercy. Leaves transpire moisture and require energy to maintain. By removing them, you tell the plant to stop trying to grow and instead focus all its remaining energy on keeping the root ball and the main trunk alive.
Step 2: Lifting and Root Pruning
If your peppers are in the ground, use a spade to dig a wide circle around the base, trying to keep as much of the root ball intact as possible. If they are already in pots, you have it easier. Shake off the excess garden soil. You want to get rid of most of the old dirt because it often contains pests like fungus gnats or aphid eggs that you definitely don’t want in your house.
Don’t be afraid to trim the roots. If the root ball is too big for the pot you’ve chosen, you can trim the outer edges with your shears. A pepper plant in dormancy doesn’t need a massive root system. Aim for a pot size of about 2–4 liters (roughly a half-gallon to a gallon) for the winter stay.
Step 3: The Pest Prevention Bath
Before bringing the plant inside, give it a good wash. Use a gentle stream of water to rinse the remaining soil off the roots and spray down the stems. Many gardeners use a mild solution of soapy water (a few drops of dish soap in a liter of water) or a neem oil spray to ensure no hitchhikers make it indoors. This is the single most important step for maintaining your sanity during the winter.
Step 4: Potting Up
Use fresh, high-quality potting mix. Do not use garden soil in your indoor pots; it is too heavy and won’t drain well enough for a dormant plant. Plant the pepper at the same depth it was growing before, firm the soil down, and give it a very light watering. You want the soil to be damp like a wrung-out sponge, not soaking wet.
Step 5: Finding the “Goldilocks” Spot
Now, place your pots in a cool, relatively dim area. A basement, an insulated garage, or a cool spare room works best. The temperature should ideally stay between 10°C and 15°C (50°F–60°F). If it gets too warm, the plant will try to grow weak, spindly “leggy” branches. If it gets too cold, the roots might rot. You don’t need grow lights for this; a simple window with indirect light is usually enough to keep the plant in its “hibernation” state.
Why Perennial Peppers Are Worth the Effort
The primary benefit is speed to harvest. In many regions, the growing season is just a bit too short for certain peppers. For example, Super Hot varieties like the Carolina Reaper or Ghost Pepper can take 100 to 120 days just to reach maturity. If you start from seed in March, you might not get ripe fruit until October. An overwintered plant starts the season with a massive “battery” of energy, allowing it to flower weeks earlier.
Another advantage is yield volume. A second or third-year pepper plant is significantly more productive than a first-year plant. The woody stem can support more weight, and the established root system can pull up nutrients more efficiently. I’ve seen three-year-old Jalapeño plants that look like small shrubs, producing hundreds of peppers in a single season.
There is also a significant cost saving. While a packet of seeds isn’t expensive, the soil, seed-starting lights, heat mats, and the time spent nurturing seedlings adds up. By keeping your best producers alive, you reduce your dependency on the “buy-and-replace” cycle of modern gardening. You are investing in your soil health and your plant genetics rather than just buying new ones every May.
DIY PROJECT: Collect rainwater no matter where you live...

This DIY project is the best way to legally collect rainwater NO MATTER where you live. Get chlorine-free water, cut down on your water bills, and have enough for an emergency situation or to water your garden. Read More Here...
Finally, there is the genetic advantage. When you overwinter a plant, you are choosing to save a specific individual that performed well in your specific microclimate. You are essentially doing your own “on-farm” selection. If a plant survived a heatwave and produced great fruit, that is the one you want to keep for next year.
Challenges and Common Pitfalls to Avoid
The most common way gardeners kill their peppers in the winter is through overwatering. Because the plant has no leaves and is in a cool environment, it barely uses any water. If you water it like a normal houseplant, the roots will sit in stagnant water and succumb to root rot. You should only water when the top 2 or 3 inches of soil feel bone dry. This might only be once every 2 to 4 weeks.
Pests are the second biggest hurdle. Aphids are the bane of the indoor gardener. They can seemingly appear out of thin air, hitching a ride on your clothes or surviving the initial cleaning. Check your plants every time you water. If you see tiny green or black bugs or a sticky residue on the stems, treat them immediately with insecticidal soap. Don’t wait; a dormant plant is vulnerable because it isn’t actively growing new tissue to replace what the bugs eat.
Another mistake is fertilizing during dormancy. Never give a dormant pepper plant fertilizer. You do not want to encourage new growth during the dark months of winter. New growth during this time will be weak and will likely become a magnet for pests. Save the nutrients for the spring when you move the plant back outside and want it to explode with life.
Finally, watch out for temperature fluctuations. Placing a plant right next to a drafty window or a heating vent can stress it out. Consistency is key for a successful “hibernation.” If the plant thinks it is spring because of a heater, and then gets hit by a cold draft, it might drop its remaining “energy stores” and die off.
Limitations: When Overwintering Might Not Be Best
Overwintering isn’t always the right choice for every gardener or every plant. If a plant was sickly during the summer or showed signs of viral diseases like tobacco mosaic virus, do not bring it inside. You will only be preserving a problem and potentially infecting your other houseplants. Only overwinter your healthiest, strongest specimens.
Space is another practical constraint. If you have fifty pepper plants, you probably don’t have the room to bring them all inside. You have to be selective. Choose your favorites—the ones that are hard to find as starts, or the ones that took the longest to ripen. For common, fast-growing varieties like standard bells, it might actually be more efficient to just start fresh seeds if space is tight.
Environmental factors also play a role. If you live in a very humid climate, keeping plants indoors in the winter can lead to mold and fungal issues in the soil. On the other hand, if your indoor air is incredibly dry, spider mites can become a rampant problem. You have to be willing to monitor the environment and adjust as needed.
Lastly, consider the “return on investment.” Some peppers, like certain Capsicum annuum varieties, are naturally shorter-lived and might not show a huge increase in yield in year two. Varieties from the Capsicum chinense or baccatum species (like Aji Amarillos or Habaneros) tend to respond much better to the perennial lifestyle and are usually the best candidates for your effort.
Comparison: Annual vs. Perennial Pepper Growth
To help you decide which path to take, consider this comparison of the two different approaches to pepper gardening.
| Factor | Annual Seedlings (Seasonal Discard) | Overwintered Plants (Perennial Legacy) |
|---|---|---|
| First Harvest | Late Summer / Early Autumn | Late Spring / Early Summer |
| Yield Potential | Standard (1x) | High (2x – 3x) |
| Stem Structure | Green, flexible, needs staking | Woody, sturdy, “bonsai-like” |
| Winter Maintenance | None (Store seeds) | Low (Occasional watering/pest checks) |
| Root System | Developing from scratch | Mature and established |
Practical Tips for Success
- Label everything: A bare stick in a pot looks exactly like every other bare stick. You won’t remember which is the ‘Jalapeño’ and which is the ‘Carolina Reaper’ by February. Use waterproof markers.
- Check for “V” shapes: When pruning, try to leave a few “V” joints in the main structure. These are the points where the plant is most likely to send out new shoots in the spring.
- Humidity management: If your house is very dry, place the pots on a tray of pebbles filled with water. The water shouldn’t touch the bottom of the pot, but as it evaporates, it creates a little micro-climate of humidity around the stems.
- The “Scratch Test”: If you aren’t sure if your plant is still alive in mid-winter, use your fingernail to gently scratch a tiny bit of bark off the main stem. If it is green underneath, the plant is still alive. If it is brown and brittle, it has likely passed on.
- Slow re-introduction: In the spring, don’t just throw the plant back into the sun. It needs “hardening off” just like a seedling. Give it an hour of morning sun the first day, and slowly increase the exposure over a week.
Advanced Considerations: The “Active Growth” Method
For those who have the equipment, you can choose to keep your peppers in active growth rather than dormancy. This requires high-intensity grow lights (LEDs or T5 fluorescents) and a warm room (20°C–25°C or 68°F–77°F). Under these conditions, the pepper won’t stop producing.
The benefit here is that you can actually harvest fresh peppers in the middle of January. The downside is that it is much more work. You have to continue fertilizing, you have to manage much higher water needs, and you have to be even more vigilant about pests like spider mites, which thrive in warm, indoor environments. You also need to act as the pollinator, gently shaking the plants or using a small paintbrush to move pollen from flower to flower since there are no bees in your basement.
Most experienced gardeners prefer the dormancy method because it gives both the plant and the gardener a well-deserved break. However, if you are trying to breed new varieties or cross-pollinate specific plants, the active growth method allows you to fit two or three “seasons” into a single calendar year.
Real-World Example: The Three-Year-Old Habanero
Let’s look at a typical scenario. A gardener in a temperate zone (like USDA Zone 7 or the UK) grows a Habanero. In Year 1, the plant is started in March, moved outside in May, and produces its first ripe orange pepper in September. By the time frost hits in late October, the plant has dozens of unripe green fruits that will never finish.
Instead of pulling it, the gardener prunes it back to 20 cm and keeps it in the basement. In March of Year 2, the gardener moves it to a sunny windowsill and begins watering more regularly. By April, the plant is fully leafed out. When it goes outside in May, it already has flower buds. By late June, the gardener is picking ripe Habaneros. Because the plant is larger and more established, it continues to flower and fruit all summer long, yielding 4 kg (about 9 lbs) of fruit compared to just 1 kg in the first year.
By Year 3, the main stem is nearly 5 cm (2 inches) thick and barky. The plant has become a permanent fixture of the garden, a “pepper tree” that neighbors come to admire. This is the power of building a legacy instead of starting from zero every spring.
Final Thoughts
Transitioning from treating peppers as annuals to seeing them as perennials is a major milestone for any gardener. It changes your relationship with your plants. They are no longer just temporary guests; they become old friends that you look forward to seeing every spring. The jump in productivity and the thrill of an early harvest are rewards that far outweigh the small amount of effort it takes to tuck them in for the winter.

Do you have some charcoal in your house right now? We call charcoal a “miracle leftover” for anyone who wants to be a little more self-sufficient and cut costs. That’s because it can help you with so many different things around the house and garden. You can even use it to make an energy-free fridge. Read More Here...
Start small this year. Pick your one favorite pepper plant—the one that tasted the best or looked the healthiest—and try the dormancy method. You might lose a plant or two as you learn the right balance of moisture and temperature, but once you succeed, you’ll never want to go back to the old way of doing things. You’re not just growing food; you’re cultivating a living history in your garden.
As you master this, you might find yourself looking at other “annuals” with a new eye. Many of our favorite garden crops, from eggplants to certain herbs, have similar perennial potential. The more we work with the natural rhythms of our plants, the more the garden gives back. Happy overwintering!