
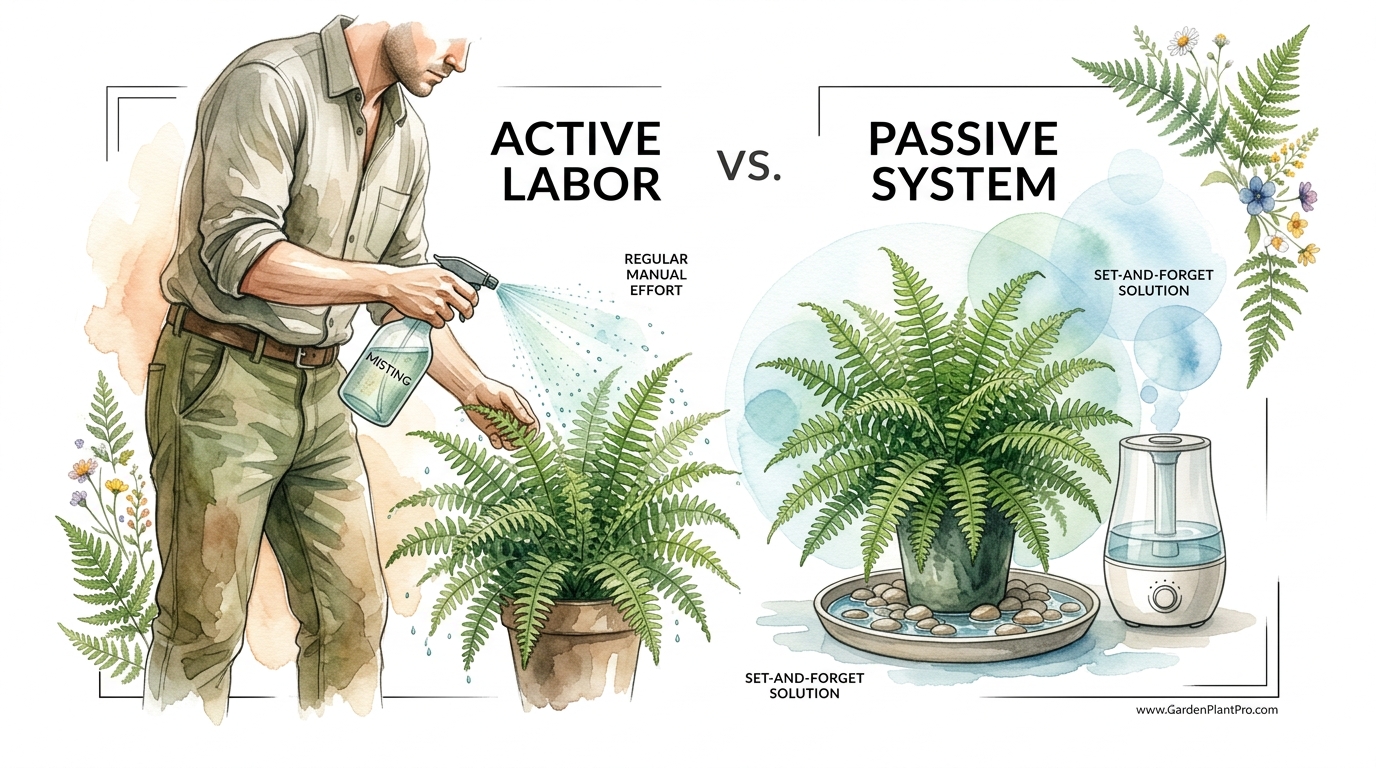
Is your daily misting routine actually a 10-second fix for a 24-hour humidity problem? We spend hours every month misting our Boston ferns, thinking we’re helping. In reality, we’re creating a cycle of wet leaves and bone-dry air. Learn how to switch from high-energy labor to a passive system that mimics the rainforest floor without you lifting a finger.
I remember the first Boston fern I brought home back in the late ’70s. It was a lush, cascading beauty that I hung proudly in my living room. Within three weeks, it looked like it had been through a drought in the Sahara. I did what every beginner does: I sprayed it. I sprayed it in the morning, I sprayed it after work, and I even gave it a little spritz before bed. Despite all that work, the floor ended up wetter than the plant, and the fronds kept turning into crispy brown needles that made a mess of my carpet.
What I didn’t realize then—and what many gardeners still struggle with today—is the difference between active labor and a passive system. Misting is a high-energy chore that provides a temporary spike in moisture that evaporates in minutes. To truly keep a Nephrolepis exaltata happy, you need to change the environment itself. We need to stop acting like rain clouds and start acting like forest engineers.
How To Increase Humidity For Boston Ferns
Increasing humidity for Boston ferns is the practice of raising the amount of water vapor in the air immediately surrounding the plant to match its native tropical habitat. In the wild, these ferns are found in the damp understories of Florida, Central America, and the Caribbean. They thrive in environments where the relative humidity (RH) consistently stays between 50% and 80%. When we bring them into our homes, especially during the winter months when heaters are running, that humidity can plummet to as low as 10% or 20%.
Think of humidity like a soft blanket for the fern’s leaves. Without it, the plant loses moisture faster than its roots can pull it from the soil. This process is called transpiration. When the air is dry, it acts like a sponge, literally sucking the water right out of the fern’s delicate fronds. By the time you see brown tips, the plant has already been under “moisture stress” for days. Increasing humidity isn’t just about making the plant look pretty; it’s about keeping the biological machinery of the plant from seizing up.
Most successful indoor gardeners use a combination of methods to achieve this. These range from simple DIY tricks like pebble trays to mechanical solutions like ultrasonic humidifiers. The goal is to create a “microclimate”—a small pocket of air that is significantly more humid than the rest of the room. This allows you to keep your home comfortable for yourself while providing the fern with the swampy air it craves.
The Science of the Sword Fern
To understand why humidity matters so much, we have to look at the fern’s anatomy. Unlike a succulent, which has a thick, waxy skin to trap water, the Boston fern has thin, feathery fronds with a massive surface area. Each of those tiny leaflets is covered in microscopic pores called stomata. These stomata open to take in carbon dioxide for photosynthesis, but every time they open, water vapor escapes.
If the air outside the leaf is dry, the water escapes much faster. This creates a “vapor pressure deficit.” The plant tries to compensate by closing its stomata to save water, but this also means it stops growing because it can’t “breathe” in the carbon dioxide it needs. It’s a lose-lose situation for the plant. By raising the humidity, we reduce that pressure, allowing the plant to keep its pores open and keep growing without drying out.
Methods for Creating a Humid Environment
If you want to move away from the “active labor” of misting and toward a “passive system,” you have several proven options. Each has its own set of requirements and benefits. I usually suggest starting with the simplest passive methods before investing in mechanical equipment.
1. The Grouping Strategy (The Jungle Effect)
One of the easiest ways to boost humidity without spending a dime is to group your plants together. This is a classic “passive system” that relies on the plants themselves. As every plant in the group transpires, they all release water vapor into the air. When they are clustered together, they create a shared envelope of moisture that stays trapped between the leaves.
I like to place my Boston fern in the center of a group of other moisture-loving plants like Calatheas, Peace Lilies, or even Pothos. The larger the group, the more effective the microclimate becomes. You’re essentially building a tiny, indoor rainforest where the plants support one another. Just be sure to leave enough space for air to circulate so you don’t invite fungal issues.
2. The Classic Pebble Tray
A pebble tray is a shallow dish filled with small stones and water, placed directly beneath the plant’s pot. As the water in the tray evaporates, it rises directly into the fern’s foliage. It’s a simple, low-tech way to provide a constant, gentle source of moisture.
- Find a tray that is at least 2 inches (5 cm) wider than the base of your pot.
- Fill it with decorative pebbles, river rocks, or even Marbles.
- Add water until it is just below the top of the stones.
- Place the fern on top of the stones, ensuring the bottom of the pot never touches the actual water.
The key here is that the pot must stay dry. If the soil sits in water, the roots will rot. You’re looking for evaporation, not irrigation. In my experience, a pebble tray can raise the local humidity by about 3% to 5%. It’s not a miracle worker, but it’s a solid foundation for a larger system.
3. Using a Room Humidifier
When you have a large collection or live in a particularly dry climate (like the high plains or a drafty old house in winter), a mechanical humidifier is the “gold standard.” This is the most reliable way to maintain a steady 60% humidity level. You can choose between ultrasonic (which creates a cool mist) and evaporative models.
| Type | Pros | Cons |
|---|---|---|
| Ultrasonic | Very quiet, energy-efficient, no filters to change. | Can leave a “white dust” if your tap water is high in minerals. |
| Evaporative | Self-regulating (won’t over-humidify), no white dust. | Noisier fan, requires regular filter/wick changes. |
I usually recommend placing the humidifier about 3 to 4 feet (1 meter) away from the fern. You want the mist to disperse into the air before it hits the leaves. Direct, constant dampness on the fronds can lead to leaf spot or mold, which is exactly what we’re trying to avoid by moving away from misting.
Benefits of a Passive Humidity System
Switching to a passive system isn’t just about saving yourself the work of misting; it’s about providing the plant with a much more stable environment. Ferns, like most living things, don’t handle “yo-yo” conditions very well. Misting creates a spike and a crash. A passive system creates a plateau.
The most immediate benefit is lush, green growth. When a Boston fern is happy with its humidity, the fronds will be a deep, vibrant green and will feel supple to the touch. You’ll also see fewer “needle drops,” which is the fern’s way of shedding leaves it can no longer support in dry air. If your vacuum cleaner is constantly full of dried fern bits, your humidity system is failing.
Another benefit is disease prevention. It sounds counter-intuitive, but misting actually increases the risk of fungal infections. Wet leaves in a still room are a playground for spores. A passive system humidifies the air, not the leaf surface, which keeps the plant hydrated while keeping the foliage dry and healthy.
Common Mistakes and Challenges
One of the biggest mistakes I see is confusing humidity with watering. If your fern has brown tips, your first instinct might be to pour more water into the soil. But if the soil is already damp and the air is dry, adding more water to the roots won’t help. In fact, it often leads to root rot because the plant can’t process the extra water. You end up with a plant that is “drowning” at the bottom and “starving” at the top.
DIY PROJECT: Collect rainwater no matter where you live...

This DIY project is the best way to legally collect rainwater NO MATTER where you live. Get chlorine-free water, cut down on your water bills, and have enough for an emergency situation or to water your garden. Read More Here...
Another pitfall is ignoring air circulation. High humidity is great, but stagnant air is dangerous. In the rainforest, there is always a breeze. If you create a high-humidity pocket in a corner with no airflow, you might see “damping off” or gray mold (Botrytis) appearing on the inner fronds. A small, oscillating fan set on the lowest possible setting—not pointing directly at the plant—can make a huge difference.
Finally, don’t forget to clean your tools. If you use a humidifier or a pebble tray, they can become breeding grounds for bacteria or algae. I make it a habit to scrub my pebble trays once a month with a bit of vinegar and water, and I follow the manufacturer’s cleaning instructions for my humidifier religiously. Your fern wants clean moisture, not a cocktail of microbes.
When These Methods May Not Work
There are certain situations where even the best humidity hacks struggle. If you have your fern hanging directly over a forced-air heating vent, no amount of pebble trays will save it. The hot, moving air from a furnace is like a blow-dryer for a fern. Before you try to fix the humidity, you have to fix the placement. Move the plant at least 5 to 6 feet (2 meters) away from any HVAC vents or radiators.
Drafty windows are another enemy. In the winter, the air near a single-pane window can be significantly colder and drier than the rest of the room. This “cold draft” can shock the fern, causing it to drop fronds even if the humidity in the center of the room is fine. If you can’t feel the humidity on your own skin, the fern is definitely feeling the lack of it.
Practical Tips and Best Practices
If you’re ready to get serious about your fern’s environment, I recommend picking up a hygrometer. You can find digital ones for less than $15, and they take the guesswork out of the equation. Place it right next to your fern. If it reads below 40%, you need to step up your game. If it’s above 60%, you’re in the “thriving zone.”
- Use the Bathroom: If you have a window in your bathroom, it is often the best room in the house for a Boston fern. The steam from your daily shower provides a massive, free boost of humidity.
- Kitchen Sink Placement: The area near a kitchen sink is naturally more humid due to dishwashing and cooking. A fern on a shelf above the sink is often much happier than one in the living room.
- Double Potting: Place your fern’s nursery pot inside a slightly larger decorative pot, and fill the gap between the two with damp sphagnum moss. This creates a localized humid zone that slowly releases moisture around the root ball.
- Winter Strategy: In the winter, consider moving your fern to a smaller room where a humidifier can work more efficiently. It’s much easier to humidify a 100-square-foot office than a 500-square-foot open-plan living area.
Advanced Considerations: Enclosures and Wardian Cases
For those who want to go “pro” or live in a desert climate, you might consider an enclosure. Historically, people used Wardian cases—glass cabinets that were essentially the first terrariums—to keep ferns alive in dry, Victorian-era homes. You don’t need a fancy antique, though. A modern glass display cabinet (like the popular ones from IKEA) can be converted into a “fern palace.”
By keeping the fern inside a glass enclosure, you trap almost 100% of the transpired moisture. You only need to open the door occasionally for fresh air. This is the ultimate passive system because it creates its own self-sustaining water cycle. It’s a great way to display a specimen plant while ensuring it never sees a dry day in its life.
Examples and Real-World Scenarios
Let’s look at a common scenario. Suppose you have a large Boston fern in a hanging basket in your dining room. The room is 12×15 feet (3.5×4.5 meters), and it has a central heating vent in the corner. In January, the humidity in that room might be 15%. Your fern starts shedding leaves like a shaggy dog.
The Fix: Instead of misting it twice a day (active labor), you move the hook 4 feet away from the vent. You place a small 1-gallon (4-liter) ultrasonic humidifier on the sideboard nearby, set to “low.” You also add a few large Pothos plants on the sideboard to create a cluster. Within two weeks, the RH near the fern will jump to 50%, and you’ll see new “fiddleheads” (the curled-up baby fronds) starting to emerge from the center of the plant. You’ve replaced 10 minutes of daily work with a system that works while you sleep.
Final Thoughts
Mastering the art of humidity is the “secret sauce” to growing those massive, floor-length Boston ferns you see in old photographs. It’s not about how much you water the soil or how often you stand there with a spray bottle. It’s about understanding the invisible environment around the plant and making small, smart adjustments to mimic the tropics.
Start by moving your fern away from the drafts and vents. Group it with some friends, and if you can, give it the gift of a dedicated humidifier. Once you get the humidity right, the plant will do the rest of the work for you. You’ll spend less time cleaning up dried needles and more time enjoying the lush, green canopy of a truly healthy fern. Gardening is always more rewarding when you work with nature’s systems instead of trying to out-work them yourself.
If you’ve mastered the air around your plants, the next step is often looking at the soil health or perhaps exploring different irrigation methods to ensure the roots are just as happy as the fronds. But for now, take a deep breath of that humid air and watch those green leaves thrive.