
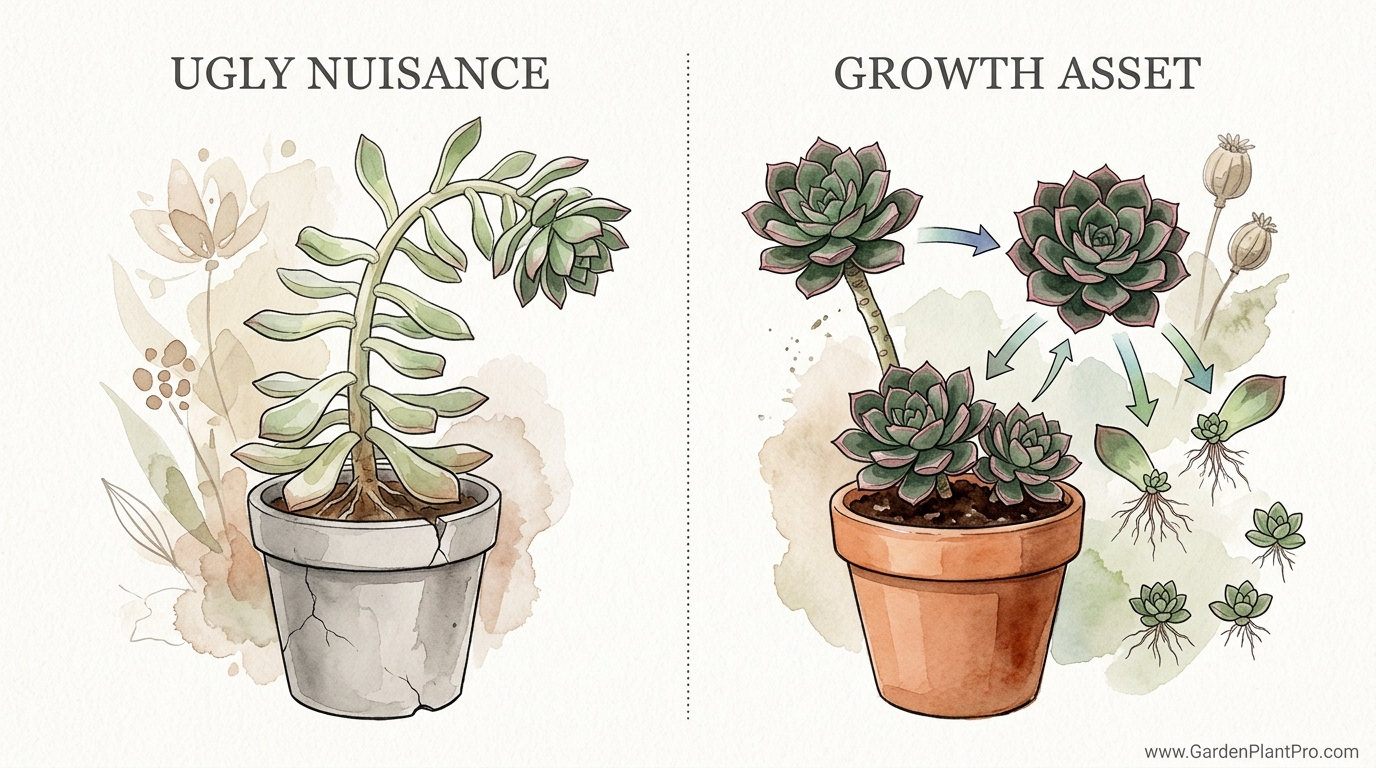
That ‘ugly’ stretched-out succulent is actually a hidden factory capable of producing 20 free plants in weeks. Most people hide ‘leggy’ succulents in the back of the shelf, thinking they’ve failed. In reality, that long stem is a biological goldmine of nodes. Stop mourning the shape and start harvesting the clones. One ‘ugly’ plant can be the start of your entire succulent empire.
I’ve seen it a hundred times over the fence. A neighbor brings me a pot with a plant that looks more like a palm tree than a compact Echeveria. They’re ready to toss it, but I always tell them to put those shears down. That stretching, or what we gardeners call etiolation, is just the plant reaching out for a little more light. It’s not a death sentence; it’s an invitation to multiply.
When a succulent stretches, it creates space between the leaves along the stem. Each of those spots where a leaf was attached is a growth node. In the gardening world, a node is like a tiny biological switch waiting to be flipped. With the right touch, every single node can spark a brand-new life.
How To Fix Stretched Succulents With Propagation
Fixing a stretched succulent is less about “repairing” the old growth and more about “restarting” with new, better-positioned pieces. Once a stem has elongated, it will never shrink back down to its original compact form. Propagation is the practical method gardeners use to take the healthy parts of a “leggy” plant and turn them into multiple, perfectly shaped specimens.
Think of your leggy plant as a resource rather than a failure. The process typically involves three main actions: beheading the top rosette, harvesting individual leaves from the middle, and leaving the rooted “stump” to sprout new babies. This is a standard practice in nurseries and home gardens alike because it maximizes the output of a single mother plant.
You might see this most often with rosette-forming succulents like Echeveria, Sedum, or Graptosedum. When they sit in a window that doesn’t get enough hours of bright light, they start their survival stretch. By intervening with propagation, you aren’t just fixing the look of your shelf; you’re using the plant’s own survival biology to grow your collection for free.
The Restoration Process: A Step-by-Step Guide
If you want to turn one “ugly” plant into a dozen or more, you need to follow a logical order. I always start with clean tools. A pair of sharp, bypass pruners or a sterilized craft knife is essential. If your tools are dirty, you risk introducing rot right into the fresh cuts, which is the quickest way to end your propagation experiment before it starts.
First, identify where the growth is still relatively compact at the very top. This is your “head.” You’ll want to cut this off, leaving about 1 to 2 inches (2.5 to 5 cm) of stem attached to the rosette. This piece will become your most beautiful “new” plant almost immediately once it develops its own roots.
Next, look at that long, bare middle section of the stem. If there are still leaves attached, gently wiggle them side-to-side until they “pop” off cleanly. It is vital to get the entire leaf base, including the tiny bit of tissue that connects it to the stem. If the leaf tears in the middle, it won’t have the necessary cells to grow a new pup.
The Critical Callous Phase
This is the part where most beginners get impatient. You cannot stick a fresh succulent cutting directly into wet soil. If you do, the open wound will drink up too much water and turn to mush within days. You must let the cuttings sit in a dry, shaded area for 3 to 5 days.
During this time, the plant forms a “callous,” which is a dry, hardened layer of cells over the wound. It’s similar to a scab on a human. Once that callous is firm and no longer looks “wet” or green, the cutting is ready to meet the soil. I usually just lay my leaves on a dry tray in the garage or a shelf out of direct sun.
Planting for Success
For the “beheaded” top, you can simply tuck that calloused stem into a pot of fresh, dry succulent mix. For the individual leaves, just lay them flat on top of the soil. You don’t need to bury them; the tiny roots will find their way down on their own. The old rooted stump should stay in its original pot, where it will eventually sprout several tiny “pups” from the remaining nodes.
The Biological Benefits of Propagation
The most obvious advantage of this approach is the sheer volume of new plants. One leggy Echeveria can easily yield 10 to 15 leaves, one healthy top cutting, and a mother stump that might produce 3 to 5 new babies. That is nearly 20 plants from a single “failure.”
Beyond the numbers, propagation actually rejuvenates the genetics of your collection. The new plants will be better adapted to the light conditions you provide from the start. If you move the new babies to a sunnier spot than the mother plant had, they will grow in that tight, colorful rosette shape that makes succulents so popular.
There is also a hidden benefit for the mother plant’s root system. By removing the heavy, leaning top, you take the physical stress off the roots. The plant can then redirect all its energy into pushing out new growth from the base, often resulting in a “cluster” effect that looks much fuller and more natural than a single tall stalk.
Challenges and Common Pitfalls
The biggest enemy of succulent propagation is moisture. Many gardeners are used to watering their plants to “help” them grow, but cuttings have no roots to drink with yet. If the soil is too damp, the leaves will simply rot. You should avoid watering leaf cuttings until you see actual pink roots or tiny green leaves appearing at the base.
Another common mistake is light management. While mature succulents love direct sun, “unrooted” cuttings are vulnerable. Placing a fresh cutting in a 90°F (32°C) windowsill will often scorch it before it can establish itself. I recommend bright, indirect light—a spot where you can read a book comfortably but the sun isn’t hitting the leaves directly.
Temperature fluctuations can also stall the process. Succulents generally root best when the air is between 70°F and 80°F (21°C to 27°C). If your house is too cold in the winter, the leaves might just sit there for months without doing anything. In those cases, a gentle heat mat designed for plants can sometimes kickstart the biological factory.
Limitations of This Method
It is important to remember that not every succulent propagates the same way. While “soft” succulents like Echeveria and Sedum are incredibly easy to start from a single leaf, others are more stubborn. For example, most Haworthia and Aloe species cannot be grown from a leaf; they usually require “offsets” or “pups” that grow from the base.
DIY PROJECT: Collect rainwater no matter where you live...

This DIY project is the best way to legally collect rainwater NO MATTER where you live. Get chlorine-free water, cut down on your water bills, and have enough for an emergency situation or to water your garden. Read More Here...
Environmental limits also play a role. If you live in a very high-humidity climate, callousing might take longer, or the risk of fungal issues might be higher. Conversely, in an extremely arid desert climate, the leaves might shrivel up and dry out before they have a chance to root. You have to adjust your “neglect” based on the air in your room.
Finally, realize that propagation is a slow game. While you might see roots in 2 weeks, it can take 6 months to a year before a leaf cutting looks like a real, standalone plant. If you’re looking for an “instant” garden, stem cuttings (the beheading method) are much faster than leaf propagation.
Comparing Propagation Methods
| Feature | Leaf Propagation | Stem Cuttings (Beheading) | Offset/Pup Division |
|---|---|---|---|
| Success Rate | Moderate (60-80%) | High (90%+) | Very High |
| Time to Maturity | 6–12 Months | 2–4 Months | 1–2 Months |
| Effort Level | Low (Set and forget) | Medium (Requires pruning) | Low (Simple separation) |
| Output Quantity | Very High (20+ potential) | Low (1 per stem) | Low (Depends on plant) |
Best Practices for Success
To get the most out of your “ugly” factory, timing is everything. While you can propagate succulents year-round indoors, the highest success rates occur in the spring and early summer. This is when the plant’s natural growth hormones are at their peak. Cuttings taken during winter dormancy will take much longer to strike roots and are more likely to fail.
When choosing leaves to pull, always go for the plump ones near the bottom or middle. Avoid using the tiny, young leaves at the very center of the rosette; they often don’t have enough stored energy to support a new baby plant. Conversely, if a leaf is already yellowed or mushy, it’s likely already too far gone to propagate.
The soil mix you use for the babies should be even grittier than what you use for adults. I like to use a mix that is 50% pumice or perlite and 50% organic potting soil. The “grit” provides the air pockets that tiny new roots need to breathe. If the soil is too dense, the roots can’t push through, and the plant will stall.
Advanced Techniques for the Serious Gardener
If you find yourself with a particularly stubborn species, you might consider using rooting hormones. These typically contain auxins, which are natural plant chemicals that tell a cell to become a root instead of a leaf. You can find these in powder or liquid form. Just a quick dip of the calloused end before planting can speed up the process by several weeks.
For those looking to fill in bare stems without cutting them, there is a product called Keiki Cloning Paste. Originally used for orchids, this paste contains cytokinins that encourage “budding” at the nodes. You can score a small notch on a bare succulent stem and apply a tiny dab of paste to trick the plant into growing a new pup right on the old stalk without ever having to “behead” it.
Another advanced tip involves light spectrums. If you are propagating indoors during the darker months, using a full-spectrum LED grow light can make a massive difference. Aim for a light that provides a high “color rendering index” to mimic natural sunlight. Keeping your “baby nursery” under these lights for 12 to 14 hours a day will prevent the new generation from becoming leggy like their parent.
Real-World Example: The Echeveria Rescue
I remember a specific “Perle von Nurnberg” Echeveria I rescued from a dark corner of a local shop. It was 8 inches (20 cm) tall with a tiny, pale rosette at the top. Most people would call it a lost cause. I followed the process: I cut the top 2 inches (5 cm) off, pulled 14 healthy leaves from the stem, and left the bottom 2 inches (5 cm) of the rooted stem in the pot.
After 4 days of callousing, I replanted the head and laid the leaves on a tray. Within three weeks, the head had rooted firmly into the soil. By week five, 12 of the 14 leaves had tiny pink “fingers” (roots) and minuscule purple rosettes. The original stump in the pot had sprouted 4 new babies around the rim. By the end of the season, that one “ugly” $5 plant had turned into 17 healthy, vibrant succulents.
Final Thoughts
The next time you see a succulent stretching out of its pot, don’t look at it as a sign of failure. Look at it as a biological goldmine. That leggy stem is packed with potential, and all it takes is a sharp pair of shears and a little bit of patience to unlock it. You’re not just fixing a plant; you’re participating in one of the most rewarding parts of gardening.
Start by experimenting with your easiest plants, like a common Sedum or a Graptoveria. Once you see those first tiny roots appear on a leaf you would have otherwise thrown away, you’ll be hooked. It’s a sustainable, cost-effective way to fill your home with greenery or create thoughtful, homegrown gifts for your neighbors.
Don’t be afraid to make mistakes—not every leaf will grow, and that’s perfectly fine. The beauty of the “ugly” factory is that it gives you plenty of chances to get it right. So, go ahead and give that stretched-out plant a haircut. Your future succulent empire is waiting in those hidden nodes.