
Is your daily misting routine actually rotting your plant from the outside in? Stop misting and start thinking about airflow. Dieffenbachia thrive in dynamic humidity, not stagnant water droplets that sit on the foliage. Learn how to create a jungle microclimate that keeps your leaves huge and green without the risk of fungal rot.
I’ve spent more years than I care to admit leaning over my garden fence, watching folks try to “help” their tropical plants by dousing them with a spray bottle every morning. It’s a common sight, neighbor, but it’s one that often leads to more heartache than health. We see those massive, variegated leaves on a Dieffenbachia—the “Dumb Cane,” as we used to call it—and we naturally think they need a constant soaking to feel at home.
In reality, those big leaves are like solar panels and sails combined. They want the air to move around them, carrying moisture in a gentle dance, not sitting in heavy puddles that invite every fungus in the county to take up residence. If you’ve noticed the edges of your plant turning a crispy brown or a mushy yellow, it’s not just a cry for water; it’s a signal that the environment isn’t quite right.
Let’s sit down and talk about how to actually mimic the floor of a Central American rainforest right in your living room. It isn’t about fancy gadgets, but about understanding how water, air, and soil work together. Once you get the “dynamic flow” right, those brown edges will become a thing of the past.
Dieffenbachia Leaf Care Tips For Brown Edges
When you see those unsightly brown margins creeping inward from the tips of your Dieffenbachia leaves, it’s easy to panic and reach for the watering can. But before you do, you need to understand that brown edges are a symptom, not a single disease. Think of it like a cough—it could be a dry throat, or it could be something deeper. In the world of houseplant care, brown edges usually point to three main culprits: lack of ambient humidity, mineral toxicity from tap water, or “salt burn” from over-fertilizing.
Dieffenbachia leaves are quite thick compared to some other tropicals, which means they hold onto moisture well, but they are also sensitive to what’s inside that moisture. If the air is too dry—typically below 40% or 50% humidity—the plant loses water through its leaves faster than the roots can pull it up from the soil. This causes the cells at the very edges to collapse and die, resulting in that “crispy” look we all dread.
However, it isn’t always about the air. Sometimes, the problem is what we’re putting into the soil. These plants are notorious for being sensitive to the salts and minerals found in city tap water, specifically fluoride and chlorine. Over time, these minerals build up in the leaf tissues. Since the tips are the “end of the line” for the plant’s vascular system, that’s where the toxins settle, eventually burning the foliage from the inside out.
Finally, we have to consider the “too much of a good thing” scenario. Many well-meaning gardeners over-feed their plants during the growing season. If you’re seeing brown edges accompanied by a white, crusty film on the surface of your soil, you’ve likely got a salt buildup. This prevents the roots from drinking properly, leading to a weird paradox where the plant is thirsty even though the soil is wet.
How Dynamic Humidity Works
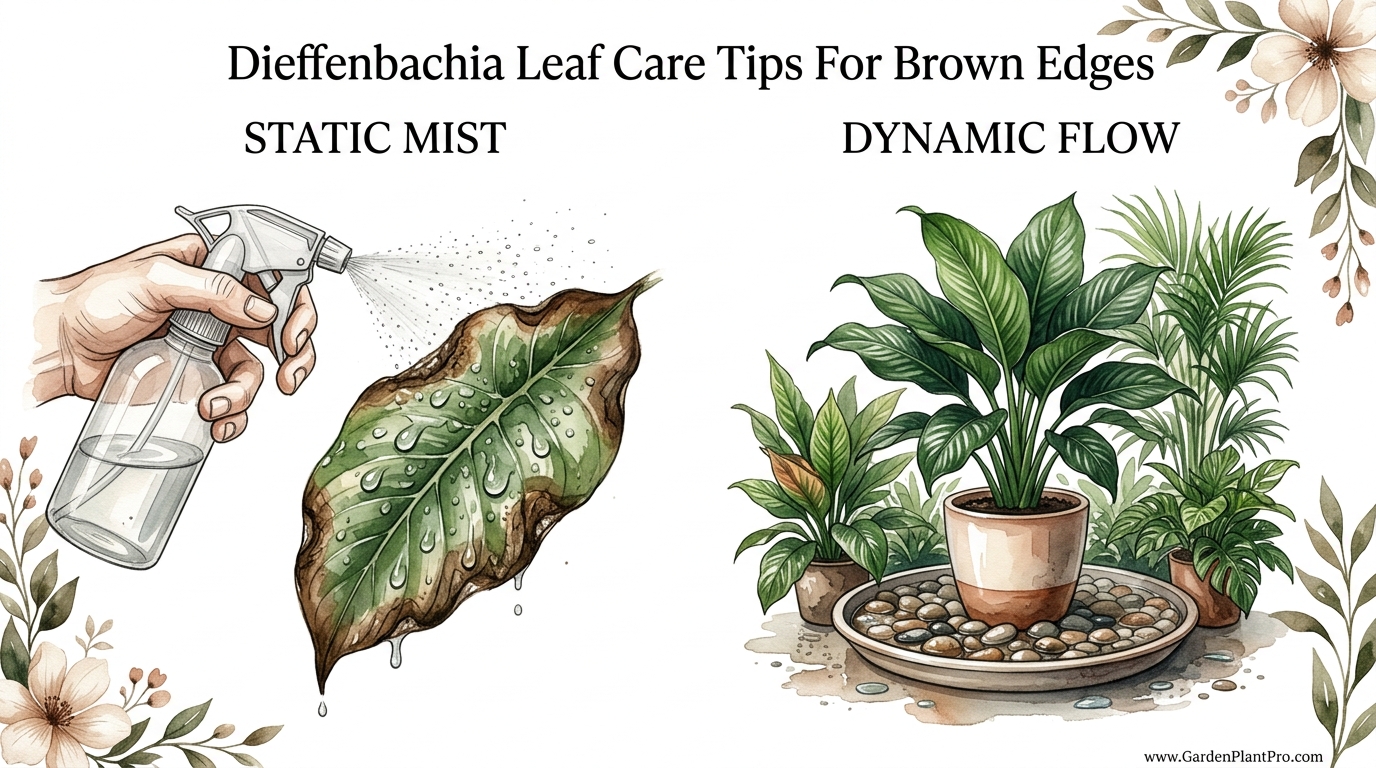
If you want to fix those brown edges, you have to move away from “static” moisture and toward “dynamic” flow. Static moisture is what happens when you mist your plant. You spray a fine layer of water on the leaf, and it just sits there. In a room with poor airflow, that water doesn’t evaporate quickly. It creates a “micro-marsh” on the leaf surface, which is the perfect breeding ground for fungal pathogens like Bipolaris sorokiniana, the cause of leaf spot.
Dynamic humidity, on the other hand, is about the moisture in the air, not on the leaf. In the wild, Dieffenbachia grow under a canopy where the air is constantly moving, even if it’s just a slight breeze. This movement ensures that the leaves can “breathe” through their stomata without being suffocated by liquid water. Here is how you can set this up at home without a degree in meteorology.
The Pebble Tray Method
This is an old-school trick that still works wonders. Find a shallow tray and fill it with decorative stones or gravel. Pour in enough water to reach just below the top of the stones. Place your Dieffenbachia pot on top of the stones, making sure the bottom of the pot never touches the actual water. As the water evaporates, it creates a “bubble” of humid air around the foliage. Because the water is rising as a vapor, it doesn’t leave droplets on the leaves to cause rot.
Grouping Your Plants
Plants “breathe” out moisture through a process called transpiration. If you huddle your tropical plants together, they create their own little microclimate. The air trapped between the plants stays more humid than the air in the rest of the room. Just make sure they aren’t packed so tightly that air can’t circulate at all. I usually leave about 3 to 5 inches (7 to 12 cm) of space between pots to keep the “dynamic” part of the flow alive.
The Humidity-Airflow Balance
If you’re using a mechanical humidifier—which I highly recommend during the winter months—don’t point it directly at the plant. You want the room to feel “soft,” not like a steam room. I often keep a small oscillating fan on its lowest setting in the same room. It shouldn’t be blowing hard enough to ruffle the leaves, just enough to keep the air from becoming stagnant. Aim for a humidity level between 50% and 60% for the best results.
The Hidden Importance of Water Quality
I’ve seen more “brown thumb” reputations cured by changing the water than by changing the soil. As I mentioned, Dieffenbachia are sensitive souls when it comes to chemicals. If you’re using water straight from the kitchen tap, you’re likely feeding your plant a cocktail of chlorine, fluoride, and heavy minerals. While we can handle those in small doses, the plant has nowhere to put them except into its leaf tips.
If you want to clear up those brown edges, try switching to rainwater or distilled water for a month. If that isn’t practical, at least let your tap water sit out in an open pitcher for 24 to 48 hours before using it. This allows the chlorine to evaporate off. Keep in mind, though, that fluoride doesn’t evaporate, so if your local water is heavily fluoridated, you might still see some spotting. In that case, a simple charcoal filter—like the ones in those common water pitchers—can make a world of difference.
Temperature matters, too. I always tell my neighbors: never give a tropical plant a cold shower. Using ice-cold water straight from the pipe can shock the roots, leading to yellowing or “leaf drop” where the plant just gives up on its lower foliage. Aim for “lukewarm” or room temperature water, which is usually around 68°F to 72°F (20°C to 22°C).
Benefits of Proper Dieffenbachia Care
When you finally dial in the humidity and water quality, the rewards are visible almost immediately. It’s not just about stopping the brown edges; it’s about the overall vitality of the plant. A healthy Dieffenbachia is a sight to behold.
- Vibrant Variegation: When the plant isn’t stressed by salt buildup or dry air, it can put its energy into producing those beautiful cream and white patterns. If the light is right and the plant is happy, the colors will be crisp and the contrast will be sharp.
- Faster Growth: These plants are actually quite fast growers when they feel at home. In the spring and summer, you might see a new leaf every two weeks. Proper humidity ensures those new leaves unfurl easily without getting “stuck” or tearing.
- Natural Air Purification: Large-leafed plants like Dieffenbachia are excellent at scrubbing the air in your home. They can absorb common household toxins like formaldehyde and xylene. A healthy leaf with clear pores (stomata) is much more efficient at this than one covered in misting residue or dust.
- Structural Integrity: Good watering and humidity practices lead to a thicker, sturdier cane. This means your plant is less likely to lean or become “floppy” as it reaches heights of 4 to 6 feet (1.2 to 1.8 meters).
Challenges and Common Mistakes
Even with the best intentions, it’s easy to trip up. One of the biggest mistakes I see is the “rescue drench.” Someone sees a brown tip, thinks the plant is dying of thirst, and dumps a gallon of water into the pot. If the soil doesn’t have excellent drainage, this leads to the dreaded root rot.
The Misting Trap: I’ll say it again—misting is a temporary fix that creates long-term problems. It raises the humidity for about ten minutes, but leaves the foliage wet for hours. This is especially dangerous in the evening when temperatures drop. If you must clean the leaves, use a damp cloth to wipe away dust once a month. This keeps the “pores” open without leaving standing water.
DIY PROJECT: Collect rainwater no matter where you live...

This DIY project is the best way to legally collect rainwater NO MATTER where you live. Get chlorine-free water, cut down on your water bills, and have enough for an emergency situation or to water your garden. Read More Here...
The Wrong Soil: Many people use “all-purpose” potting soil, which is often too heavy and peaty for an aroid like the Dieffenbachia. Over time, this soil compacts and turns into a muddy brick that suffocates the roots. Roots need oxygen just as much as they need water. If the roots can’t “breathe,” they can’t send water to the leaves, and you get—you guessed it—brown edges.
Over-fertilizing: We often want to “force” growth by feeding the plant every time we water. In the winter, Dieffenbachia go into a semi-dormant state where they don’t need much help. If you keep feeding them during the dark months, those salts build up and scorch the leaves. I generally stop feeding entirely from November through February in the Northern Hemisphere.
Limitations: When the Environment is the Boss
Sometimes, no matter how many pebble trays you set out, your home’s environment might be too harsh. If you live in an area with extremely cold winters and forced-air heating, the humidity can drop to desert-like levels (10% or 15%). In these cases, a pebble tray is like bringing a squirt gun to a house fire.
If you find that your plant is still struggling despite your best efforts, you might need to reconsider its placement. Moving it away from heating vents or drafty windows is a must. If the light is too intense—like in a south-facing window with no curtain—the brown edges might actually be sunburn. Dieffenbachia prefer “bright indirect” light. Think of it as the light you’d find under a patio umbrella on a sunny day.
Also, keep in mind the plant’s natural lifespan. As Dieffenbachia age, they naturally lose their lower leaves. This is how they form that distinctive “cane” or trunk. If you see an occasional yellow leaf at the very bottom of the plant, don’t panic. That’s just the plant moving its energy to the new, bigger leaves at the top.
Practical Tips for Success
If you’re ready to get your hands dirty, here are the steps I take to keep my Dumb Canes looking like they belong in a botanical garden.
- The Finger Test: Don’t water on a schedule. Stick your finger into the soil up to the second knuckle. If it feels dry, it’s time to water. If it’s still damp, wait a few more days. Typically, this ends up being every 7 to 10 days, but it varies by season.
- Drainage is King: Always use a pot with drainage holes. If you have a beautiful decorative “cachepot” without holes, keep the plant in its plastic nursery pot and set that inside the decorative one. Never let the plant sit in a saucer full of water for more than 30 minutes.
- The “Aroid” Soil Mix: If you’re repotting, mix 2 parts regular potting soil with 1 part orchid bark and 1 part perlite. This creates a “chunky” texture that allows water to flow through and air to reach the roots.
- Trimming with Care: If the brown edges are bothering you, you can trim them off. Use a pair of sharp, sterilized scissors and follow the natural curve of the leaf. Important: Leave a tiny sliver of the brown edge behind. If you cut into the “green” living tissue, the plant will just create a new brown scab, and you’ll be right back where you started.
Advanced Considerations: pH and Mineral Balance
For those of you who really want to go the extra mile, let’s talk about soil chemistry. Dieffenbachia prefer a slightly acidic soil, ideally with a pH between 5.5 and 6.5. If your soil becomes too alkaline—which often happens if you have “hard” tap water—the plant will have trouble absorbing micronutrients like iron and magnesium. This can cause the leaves to look pale or develop yellowing between the veins (chlorosis) before they ever turn brown at the edges.
If you suspect a salt buildup, you can “flush” the soil once every six months. Take the plant to the sink or outside (if the weather is warm) and pour distilled water through the pot for several minutes. Let it drain completely. This literally washes away the accumulated salts and minerals, giving the roots a fresh start. It’s like a spring cleaning for your plant’s home.
Example Scenario: The Office Rescue
I remember a neighbor brought me a Dieffenbachia that looked like a goner. It had been sitting in a cubicle under an air conditioning vent. Every leaf had a half-inch of crispy brown around the edge, and the soil was as hard as a rock. Here is how we fixed it:
| Issue | The Fix | Result (after 4 weeks) |
|---|---|---|
| Static Air / AC Draft | Moved to a corner away from vents with a pebble tray. | New leaves emerged without any crispy tips. |
| Compacted Soil | Repotted into a 2:1:1 mix of soil, bark, and perlite. | Roots began to grow; plant stopped drooping. |
| Tap Water Stress | Switched to filtered water. | The “spots” on the leaves stopped spreading. |
| Unsightly Damage | Trimmed brown edges with sterilized shears. | The plant looked instantly refreshed and “clean.” |
Final Thoughts
Growing a Dieffenbachia is a lesson in patience and observation. These plants don’t ask for much, but they do ask for consistency. By moving away from the “misting” myth and focusing on a microclimate of dynamic humidity and clean water, you are setting your plant up for decades of growth rather than a few months of struggle.
Remember that gardening is a conversation between you and the soil. If the leaves are telling you they’re unhappy, listen to them. Check the air, check the water, and most importantly, check the drainage. It’s those small, practical adjustments that turn a “houseplant” into a family heirloom that spans generations.
I encourage you to try the pebble tray method this week and see if you don’t notice a change in how those new leaves look. And keep an eye on your other tropicals while you’re at it—many of them, like your Philodendrons or Monsteras, will thank you for the extra airflow and humidity too. Happy growing, neighbor!