
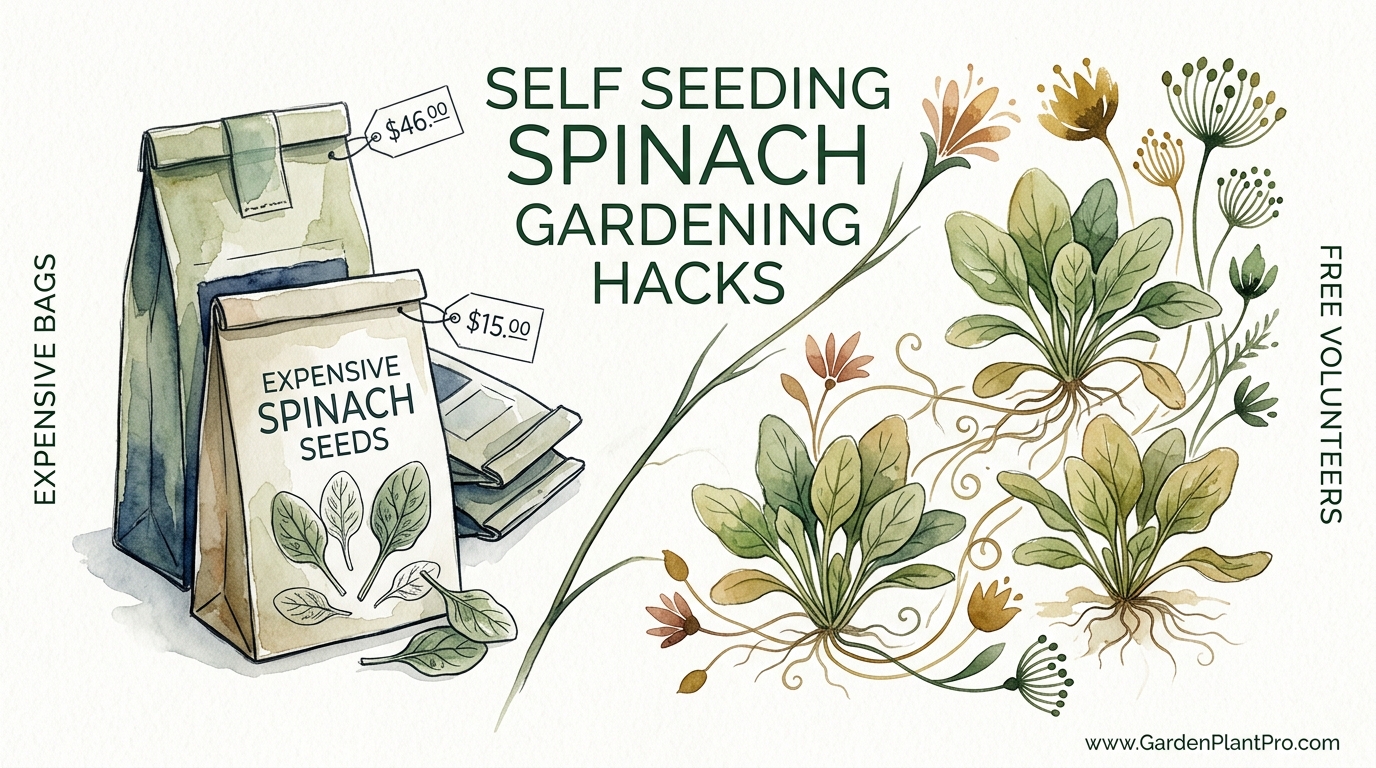
Are you stuck in the cycle of buying seeds every year when your garden is trying to give them to you for free? Most gardeners panic when they see their spinach starting to flower, but that ‘bolting’ is actually a financial windfall. By letting just two or three plants go to seed, you can create a self-sustaining ‘volunteer’ patch that returns every single year with zero effort or cost. Here is how to break the cycle of expensive seed packets and move toward true garden abundance.
Moving away from the constant purchase of seed packets starts with understanding how the plant thinks. Spinach is a cool-weather specialist that wants to reproduce before the heat of summer arrives. While the grocery store version comes in expensive plastic bags, the free volunteers in your backyard are often hardier and better adapted to your specific soil.
Learning to manage this process transforms your garden from a high-maintenance chore into a self-regulating ecosystem. You stop fighting the plant’s natural urge to go to seed and start using it to your advantage. This guide will walk you through the subtle art of letting nature do the heavy lifting for you.
Self Seeding Spinach Gardening Hacks
Self-seeding is the process where a gardener allows a plant to complete its full life cycle, from leaf production to flowering and finally to seed drop. Instead of harvesting the entire plant, you leave a small selection in the ground to wither and “ugly up” the bed for a few weeks. These plants eventually drop thousands of seeds directly into the soil, where they lie dormant until the conditions are perfect for the next generation.
Most people view bolting as a failure, but seasoned gardeners see it as the beginning of a permanent harvest. In the real world, this looks like a dedicated corner of a raised bed or a specific “wild” patch where spinach is allowed to do its thing. Once the seeds drop, they often germinate in the late summer or early spring without any human intervention.
This approach works because spinach seeds are surprisingly resilient. They can survive freezing winters and dry summers while tucked under a thin layer of mulch. Using this “hack” means you will eventually develop a strain of spinach that is perfectly tuned to your local microclimate, often outperforming the fancy varieties you find in glossy catalogs.
The Secret Biology of the Spinach Plant
Spinach is a bit of an oddball in the vegetable world because it is dioecious. This botanical term simply means that individual plants are either male or female. You cannot just leave one plant and expect a bounty of seeds; you need a small community to ensure the wind can carry pollen from the boys to the girls.
Male spinach plants are typically the first to bolt. They send up a tall, thin stalk covered in tiny, inconspicuous flowers that release clouds of fine, yellow pollen. If you tap a mature male stalk on a dry afternoon, you might see a literal puff of “gold dust” floating away.
Female plants are the seed-bearers. Their flowers are tucked into the leaf axils—the little “armpits” where the leaves meet the stem. Once they catch the pollen traveling through the air, they begin to form the hard, green fruits that eventually turn into the seeds we recognize.
Identifying Your Garden Residents
Learning to spot the difference between the two is vital for a successful volunteer patch. Male plants tend to look a bit “leggier” and lack the clumpy, seed-forming structures at the leaf bases. They provide the spark, but the females do the heavy lifting of building the future harvest.
Maintaining a ratio of at least one male for every three or four females is a good rule of thumb. If you pull all the “early bolters” because they look messy, you might accidentally remove all your males and end up with no viable seeds. Patience is the greatest tool in this specific style of gardening.
Designing a Permanent Spinach Patch
Location is everything when you want a plant to take over a small corner of your yard. Choose a spot that stays relatively cool and doesn’t get baked by the mid-afternoon sun. Partial shade under a trellis or near a taller perennial can provide the perfect sanctuary for spinach during its reproductive phase.
Soil preparation for a self-seeding area is slightly different than a standard vegetable bed. You want a soil surface that is loose and “crumbly” enough to catch falling seeds. A heavy layer of wood chips might prevent the tiny seeds from reaching the soil, so consider using a light compost mulch or even leaving some bare earth in the designated seed zone.
Drainage remains a top priority for spinach at all stages of life. While it loves moisture, it cannot stand “wet feet” or soggy roots. A slightly raised area or a spot with high organic matter will help the seeds survive the winter without rotting before they have a chance to sprout.
The Role of Soil pH and Nutrition
Spinach is notoriously sensitive to acidic soil. Aim for a pH between 6.5 and 7.0 for the best results. If your soil is too sour, the plants will struggle to produce the energy needed for a massive seed crop. A light dusting of garden lime can often solve this problem if you notice your plants looking stunted or yellow.
Nitrogen is the fuel for leaf growth, but as the plant moves into its flowering stage, it draws on phosphorus and potassium. In a self-seeding system, you don’t need to over-fertilize. The natural decomposition of the parent plants’ leaves provides a slow-release nutrient boost for the next generation of seedlings.
How the Self-Seeding Cycle Works Step-by-Step
The transition from a tasty salad green to a seed-producing machine happens faster than most beginners realize. It starts when the days grow longer, usually hitting that critical 14-hour mark of daylight. You will notice the center of the plant begins to stretch upward, a process often called “stretching” or “shooting.”
Once the stalk begins to rise, the leaves will change shape. They often become more arrow-shaped or pointed, and the flavor turns bitter as the plant moves its sugar and energy into the reproductive organs. This is the moment most people reach for the garden hoe, but you must resist the urge if you want free seeds.
The Pollination Window
Wind is the primary carrier for spinach pollen. On breezy days in late spring or early summer, the male plants release their payload. You can help this process along by gently shaking the male stalks as you walk through the garden. This “manual breeze” ensures that even the females tucked behind larger leaves get their share of pollen.
DIY PROJECT: Collect rainwater no matter where you live...

This DIY project is the best way to legally collect rainwater NO MATTER where you live. Get chlorine-free water, cut down on your water bills, and have enough for an emergency situation or to water your garden. Read More Here...
Seeds take several weeks to mature after pollination. They will start as small green bumps and gradually harden into tan or brown shells. Do not be tempted to harvest them while they are still green and soft; they need that final drying phase on the parent plant to become fully viable.
The Natural Drop and Dormancy
Eventually, the mother plant will turn completely brown and brittle. At this stage, she is effectively a standing seed bank. The seeds will fall naturally during rainstorms or when birds land on the stalks. These seeds then settle into the soil, where they enter a period of dormancy.
Cold temperatures are often the trigger that breaks this dormancy. In many climates, the seeds will sit quiet through the heat of summer and suddenly “wake up” in the cool, damp days of autumn. This second flush of growth provides a “bonus” harvest before the winter freezes set in.
Managing Your Free Volunteers
One of the biggest challenges with a self-seeding garden is that nature doesn’t plant in neat rows. You will likely find spinach seedlings popping up in your pathways, inside your lettuce beds, or even in the middle of your flower pots. Learning to manage these “hitchhikers” is the key to a productive yard.
Thinning is the most common chore for a volunteer gardener. If a thousand seeds drop in one square foot (0.09 square meters), the resulting seedlings will choke each other out. You should thin them until they are roughly 4 to 6 inches (10 to 15 centimeters) apart. The best part? The tiny plants you pull out are the most delicious “microgreens” you’ll ever eat.
Transplanting the Wanderers
If a spinach plant pops up in a spot where it really doesn’t belong, you can often move it. Spinach has a sensitive taproot, so you must be careful. Use a small trowel to dig deep and lift the entire root ball with as much original soil as possible. Move it quickly to its new home and water it in immediately to reduce transplant shock.
Timing is critical for moving volunteers. Try to do your “shuffling” on a cloudy day or in the late evening. This gives the plant a chance to settle into its new location without the stress of direct sunlight beating down on its recovering roots.
Overwintering Spinach for a Massive Spring Harvest
Spinach is incredibly hardy and can survive temperatures down to 15°F (-9°C) without much help. If you provide a bit of protection, like a cold frame or a layer of agricultural fabric, they can handle even colder dips. Overwintered spinach is often the sweetest you will ever taste because the plant converts starches to sugars as a natural antifreeze.
Plants that survive the winter are “primed” to explode with growth the moment the soil thaws. Because they already have an established root system, they will grow much larger than anything you plant from seed in the spring. This massive growth leads to a truly legendary seed crop by early summer.
The “Green Bridge” Consideration
Allowing plants to stay in the ground year-round can sometimes create a “green bridge” for pests and diseases. Aphids, in particular, love to overwinter in the protection of leafy greens. Keep a close eye on your overwintered patch and remove any plants that show signs of heavy infestation or viral spotting.
Maintaining a clean garden environment around your self-seeding patch helps mitigate these risks. Pull any nearby weeds that might host the same pests, and ensure there is plenty of airflow between your plants. A healthy plant is its own best defense against the “hangover” pests of the previous season.
Benefits of a Self-Seeding System
Moving toward a self-seeding model offers more than just financial savings. It fundamentally changes the quality of the food you are growing. Over several generations, the “natural selection” occurring in your backyard ensures that only the strongest, most heat-tolerant, or most cold-hardy plants survive to drop their seeds.
This process is known as developing a “landrace” variety. While a commercial seed packet is bred for uniformity so it can be harvested by machines, your backyard volunteers are bred for resilience in your specific dirt. They often show a vigor that store-bought seeds simply cannot match.
* Zero Cost: Once you buy your first packet of heirloom seeds, you never have to spend another dime on spinach.
* Superior Hardiness: Volunteer plants are often more resistant to local pests and weather swings.
* No Planting Schedule: The seeds know exactly when to sprout based on soil temperature and moisture.
* Maximum Nutrition: Freshly sprouted greens from the garden have higher vitamin levels than anything that has sat on a truck.
Challenges and Common Mistakes
While the “lazy” gardener’s dream of a self-perpetuating patch is achievable, there are a few traps you need to avoid. The most common mistake is letting hybrid plants go to seed. If you bought “F1” hybrid seeds, the offspring will not be the same as the parent. They often revert to weird, stunted versions that lack flavor or bolt almost instantly.
Always start your self-seeding journey with “open-pollinated” or “heirloom” varieties. These are genetically stable and will produce offspring that look and taste like their parents. Varieties like ‘Bloomsdale Long Standing’ or ‘Giant Winter’ are perfect candidates for this project.
Cross-Pollination Concerns
Spinach pollen can travel for miles on a strong wind. If your neighbor is growing a different variety of spinach and letting it bolt at the same time, your seeds might become “mutts.” For most backyard growers, this doesn’t matter much, but if you are trying to keep a specific strain pure, you might need to isolate your plants.

Do you have some charcoal in your house right now? We call charcoal a “miracle leftover” for anyone who wants to be a little more self-sufficient and cut costs. That’s because it can help you with so many different things around the house and garden. You can even use it to make an energy-free fridge. Read More Here...
Be aware of “wild” relatives too. In some regions, wild goosefoot or lamb’s quarters can cross-pollinate with cultivated spinach, though it is relatively rare. The most likely source of “contamination” is simply a different variety of true spinach being grown nearby.
Limitations: When Self-Seeding Isn’t Ideal
Self-seeding requires a certain amount of space and a tolerance for “messiness.” A plant that is going to seed does not look like the tidy, green rosettes you see in gardening magazines. It looks like a tall, drying weed. If you have a very small urban balcony or a strict homeowner’s association, this might not be the best method for you.
Environmental factors like extreme humidity can also be a deal-breaker. In very wet climates, the seeds may rot on the stalk before they have a chance to dry and drop. In these cases, you are better off harvesting the stalks and hanging them upside down in a dry garage or shed to finish the ripening process.
Comparison: Store-Bought Seeds vs. Volunteer Patches
Understanding the trade-offs between these two methods helps you decide how much of your garden to dedicate to each. While one offers control, the other offers resilience and ease.
| Feature | Store-Bought Packets | Self-Seeding Volunteers |
|---|---|---|
| Annual Cost | $3.00 – $6.00 per packet | $0.00 (Free) |
| Genetic Adaptability | Low (Bred for general regions) | High (Bred for your backyard) |
| Planting Effort | High (Manual sowing and timing) | Zero (Self-timing) |
| Visual Tidiness | High (Controlled rows) | Low (Wild/Spontaneous) |
| Harvest Consistency | Uniform results | High variability in traits |
Practical Tips for Success
Start small by dedicating just one corner of a bed to the “seed experiment.” This allows you to keep the rest of your garden looking tidy while you learn the ropes of reproductive botany. Once you see the first flush of free volunteers popping up in the spring, you’ll likely want to expand the program.
Mulching is your best friend when managing volunteers. Use a light, breathable mulch like shredded leaves. This protects the seeds from being eaten by birds while still allowing the tiny sprouts to push through when the time is right. If the mulch is too thick, the seeds will never “see” the light or feel the temperature shift needed to germinate.
* Label your patch: It is easy to accidentally weed out “mysterious” seedlings in the spring. Mark the area with a stake so you remember it’s a spinach zone.
* Check for “prickly” seeds: Some older varieties have very sharp, spiky seeds. Wear gloves when handling the dried stalks to avoid thousands of tiny pinpricks.
* Water the “drop zone”: If it is a particularly dry summer, give the area where the seeds fell a light sprinkling once a week to keep the soil from becoming a hard brick.
* Don’t over-clean: Leave the spent stalks on the ground for a few weeks after they turn brown to ensure every last seed has fallen.
Advanced Considerations: Selecting for the Future
Serious practitioners don’t just let *any* plant go to seed. They practice “roguing,” which is the fancy term for pulling out the losers. If you have a plant that bolts three weeks earlier than its neighbors, pull it out before it flowers! You don’t want those “early-bolt” genetics in your future garden.
Instead, select the plants that stay lush and tasty for the longest time during the spring. By only allowing the “slow-bolters” to reproduce, you are actively breeding a better, more heat-resistant spinach for your specific climate. This is how the great heirloom varieties were created by our ancestors over centuries of careful observation.
Managing Genetic Diversity
If you only save seeds from a single plant, you will eventually run into “inbreeding depression.” This shows up as weak growth and poor germination. To keep your spinach patch vibrant, try to let at least 25 to 30 plants go to seed every few years. This ensures a wide “gene pool” and keeps the population healthy.
Swapping seeds with a neighbor who also grows heirloom spinach is another great way to refresh the genetics. Introducing a few “outsider” seeds into your volunteer patch can bring back vigor and disease resistance that might have faded over time.
Real-World Example: The “Infinite Salad” Bed
Imagine a gardener named Joe in a temperate climate. In March, Joe plants a 4-foot by 4-foot (1.2m x 1.2m) bed with ‘Bloomsdale’ spinach. He harvests heavily through April and May, taking the outer leaves for his morning smoothies. By June, the plants are stretching toward the sun and the leaves are getting tough.
Instead of pulling them, Joe stops harvesting and lets the stalks grow 3 feet (0.9m) tall. By July, the plants are brown and dry. Joe knocks the stalks against the ground to shatter the seeds and then clears the “mess,” leaving the soil undisturbed. In September, after a heavy rain, Joe looks down and sees thousands of tiny green “v” shapes—his free autumn crop has arrived. He thins them, eats the thinnings, and enjoys a second harvest until the first hard frost.
Final Thoughts
Embracing the self-seeding nature of spinach is one of the most rewarding shifts a gardener can make. It moves you away from being a consumer of garden products and toward being a steward of a living system. There is a deep, quiet satisfaction in seeing those first volunteer sprouts appear in the spring, knowing that you didn’t have to spend a cent or lift a finger to make them happen.
This method teaches you to slow down and observe the natural rhythms of the seasons. You start to see the beauty in a “messy” drying plant because you know it’s a vessel for future life. Experiment with one small patch this year and see for yourself how much abundance nature is willing to provide if you just step out of the way.
The lessons learned from spinach can be applied to many other garden favorites like cilantro, dill, and even certain types of lettuce. Once you master the art of the “volunteer” patch, your garden will never be the same. You’ll find yourself looking at every bolting plant not as a failure, but as an opportunity for next year’s free feast.