
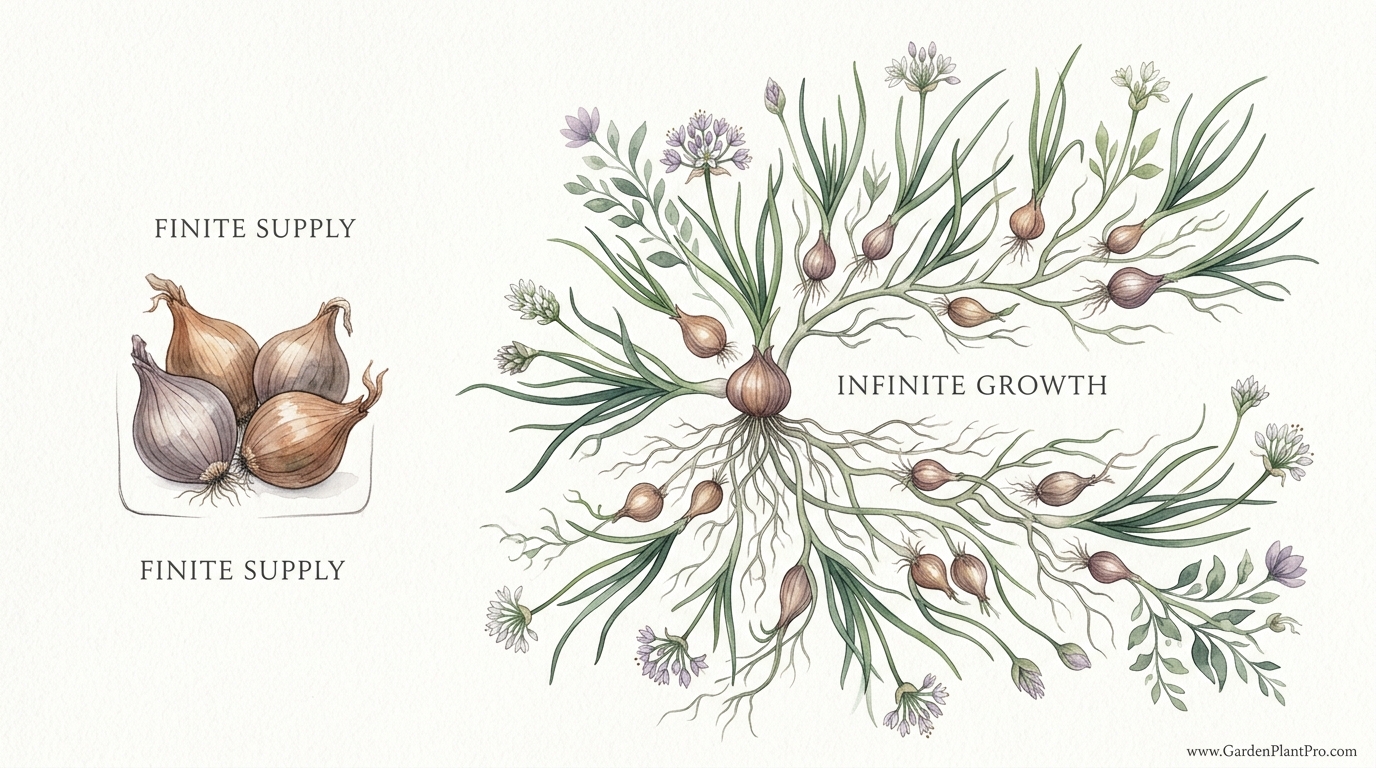
One is a dead end for your money; the other is a biological engine that multiplies your food for free. Most people see a shallot as a one-time ingredient—a static product on a shelf. But gardeners see a dynamic engine. When you buy a bag at the store, the energy stops there. When you put that same bulb in the ground, it enters a state of dynamic multiplication. One bulb becomes eight; eight become sixty-four. Stop paying for a static commodity and start managing a dynamic system that feeds you forever.
Every time you walk into a grocery store and buy a net bag of shallots, you are engaging in a finite transaction. You trade your hard-earned currency for a product that is designed to be consumed and forgotten. This is the definition of a finite supply. However, the moment you decide to press a single shallot bulb into fertile soil, you transition from a consumer to a manager of an infinite growth system.
Shallots are unique in the allium family because of their incredible ability to divide. Unlike a standard onion that grows into one large bulb from one seed, a shallot is a cluster-forming machine. It is a gift that keeps giving, provided you understand how to facilitate its natural drive to multiply.
Propagating Shallots For Unlimited Harvest
Propagating shallots is the practice of using the bulb itself as the “seed” for the next generation. In the gardening world, we often refer to these small bulbs as “sets.” While you can grow shallots from actual black seeds, the most reliable and traditional method for a backyard gardener is vegetative propagation. This means you take one bulb, plant it, and let it divide into a cluster of five to twelve new bulbs.
This system exists because shallots are biologically programmed to replicate through their basal plate. Each bulb contains multiple growing points. Once tucked into the earth, these points activate, drawing nutrients from the soil to build individual structures. By the end of the season, what was once a single unit has become a small family of shallots, physically connected at the base but ready to be separated and either eaten or replanted.
Gardeners use this method to bypass the delicate, slow-growing seedling stage required by seeds. It is a shortcut to a massive harvest. In real-world terms, if you save just twenty percent of your harvest every year to use as “seed” for the following season, you will never have to buy shallots again. You have effectively created a closed-loop food system in your backyard.
Selecting Your Foundation: French Gray vs. Dutch Yellow
Not all shallots are created equal, and your choice of foundation stock determines the flavor and longevity of your “engine.” There are two primary lineages you will encounter: the “true” French shallots and the more common Dutch varieties.
The French Gray (Griselle) is often considered the pinnacle of shallot flavor. It has a long, slender shape and a thick, grayish skin. Crucially, the French Gray is a true multiplier that almost never sets seed; it can only be propagated by replanting the bulbs themselves. If you want the most refined, garlicky-sweet flavor that professional chefs crave, this is your starting point. However, be aware that they have a shorter shelf life than other varieties.
Dutch shallots, such as the Dutch Yellow or Red Sun, are more robust and rounder. They look more like tiny onions and possess a much longer storage life, often staying firm for eight to ten months. These are excellent for beginners because they are incredibly hardy and less prone to rotting in damp soil. Many of these varieties can also be grown from seed, but they still perform best when propagated from sets.
The Mechanics of Planting: Timing and Depth
Successful propagation depends on working with the seasons rather than against them. Shallots are cool-season crops that require a period of vernalization—exposure to cold—to trigger their division and bulbing process.
Autumn vs. Spring Planting
In most temperate regions, planting in the autumn (October or November in the Northern Hemisphere) is the secret to a massive harvest. Fall-planted shallots establish a strong root system before the ground freezes. When spring arrives, they hit the ground running, often producing larger clusters and more complex flavors. If you live in a region with extreme winters (USDA Zone 4 or lower), you may need to wait until the ground can be worked in early spring.
Spring planting should happen as soon as the soil is no longer a muddy mess. While you will still get a respectable harvest, spring-planted bulbs often don’t have enough time to grow as large as their autumn-planted cousins. Aim to get them in the ground at least four weeks before your last expected frost.
Spacing and Depth Measurements
When you are ready to plant, prepare a bed that is loose and free of large stones. Space your shallots 6 to 8 inches (15 to 20 cm) apart within the row. This may seem like a lot of space for a small bulb, but remember: that one bulb is going to become a cluster. They need room to expand without competing for nutrients.
The depth is where most beginners fail. Do not bury a shallot deep like a tulip. Instead, press the bulb into the soil so that the “shoulders” are just below the surface and the very tip is barely visible or just covered by a thin layer of earth. Planting them too deep can lead to elongated, misshapen bulbs and increases the risk of neck rot.
Environmental Factors for Peak Performance
Your biological engine needs the right fuel and environment to run at maximum efficiency. Shallots are not particularly “fussy,” but they do have specific requirements regarding soil and light.
The Importance of Drainage
If there is one thing that will kill a shallot crop, it is “wet feet.” Shallots planted in heavy, waterlogged clay will rot before they ever have a chance to divide. They thrive in sandy loam or soil that has been heavily amended with well-rotted compost. If your garden soil is heavy, consider building a raised bed. This naturally improves drainage and allows the soil to warm up faster in the spring.
Sunlight and Photoperiodism
Shallots are photoperiod-sensitive, meaning they react to the length of the day. They spend the short days of spring growing lush green foliage. Once the days reach a certain length (usually 14 hours or more), the plant stops making leaves and starts directing all its energy into the bulbs. To ensure your plants have enough energy to build those bulbs, they must be in full sun—at least 6 to 8 hours of direct light daily.
Ongoing Care: Managing the Multiplication Phase
Once the green shoots emerge, your job is to keep the path clear for growth. Shallots are shallow-rooted and do not compete well with weeds. A thick carpet of weeds will steal the nitrogen and moisture your shallots need to divide.
Watering Cycles
Maintain consistent moisture, especially during the first two months of growth. Aim for about 1 inch (2.5 cm) of water per week. However, as the bulbs reach maturity and the tops begin to yellow, you must scale back. Excess water during the final weeks of the cycle is a recipe for fungal issues and poor storage life.
DIY PROJECT: Collect rainwater no matter where you live...

This DIY project is the best way to legally collect rainwater NO MATTER where you live. Get chlorine-free water, cut down on your water bills, and have enough for an emergency situation or to water your garden. Read More Here...
Feeding the Engine
While shallots appreciate fertile soil, avoid high-nitrogen fertilizers late in the season. Too much nitrogen will encourage the plant to keep growing green leaves when it should be focused on maturing its bulbs. A balanced organic fertilizer or a top-dressing of compost at planting time is usually sufficient. Some experienced gardeners swear by a light dusting of wood ash in late winter to provide potassium, which aids in bulb development and disease resistance.
The Harvest: Harvesting Your Multiplied Investment
The most exciting part of managing this system is seeing the one-to-eight multiplication in the flesh. You will know it is time to harvest when the green tops lose their luster, turn yellow, and begin to “lodge” or flop over onto the ground.
Do not pull them by the stems. The necks of shallots are delicate, and if you snap the greens off, you open a doorway for bacteria to enter the bulb. Use a garden fork to gently lift the entire cluster from underneath. Shake off the excess soil, but do not wash them. Moisture at this stage is your enemy.
Curing and Selection for Next Year
Curing is the process of drying the outer skins and “sealing” the neck of the shallot. This is what transforms a perishable vegetable into a long-term storage commodity. Lay your clusters out in a warm, dry, shaded area with excellent airflow. A porch or a well-ventilated garage works perfectly. Avoid direct sunlight, as it can “sunscald” the bulbs.
After two to three weeks, the skins will be papery, and the roots will be brittle. Now comes the most important step for your infinite growth system: selection.
Instead of eating the biggest, most beautiful shallots, save them. In the world of propagation, you want to replant your “winners.” By selecting the largest, healthiest bulbs to use as next year’s sets, you are performing a slow, natural form of genetic selection. Over several years, your shallots will actually adapt to your specific microclimate and soil conditions, becoming more productive and resilient than any store-bought bulb could ever be.
Challenges and Common Pitfalls
Even a well-oiled engine can hit a snag. Being aware of potential issues allows you to intervene before they ruin your harvest.
- Onion Maggot: These are the larvae of a small fly. They tunnel into the base of the bulb, causing the plant to wilt and rot. Using floating row covers in the spring can prevent the flies from laying eggs near your plants.
- Downy Mildew: This appears as a grayish-purple fuzzy growth on the leaves during humid weather. To avoid this, ensure you follow the 6-8 inch (15-20 cm) spacing rule to allow for maximum air circulation.
- White Rot: This is a serious soil-borne fungus that manifests as a white, fluffy mold at the base of the bulb. If you find this, you must remove the infected plants and avoid planting any alliums in that spot for several years. Crop rotation is your best defense.
- Bolting: Occasionally, a shallot will send up a flower stalk. This usually happens due to temperature stress. Snip the flower off immediately to keep the energy in the bulb, and eat that specific shallot first, as “bolted” bulbs do not store well.
Limitations: When This May Not Be Ideal
While the “infinite growth” model is compelling, it isn’t perfect for every situation. There are realistic boundaries to consider.
| Factor | The Garden System | The Grocery Store System |
|---|---|---|
| Cost | Free after initial purchase | High (Shallots are expensive) |
| Labor | Medium (Planting, weeding, curing) | Zero |
| Flavor | Complex, terroir-specific | Standardized, often bland |
| Space | Requires dedicated garden bed | Requires shelf space |
| Reliability | Subject to weather and pests | Always available (for a price) |
If you live in a very small apartment with no balcony or yard, propagating shallots may be difficult. They do not thrive in shallow windowsills because they need the depth and volume of soil to divide. Furthermore, if you are in a tropical climate where the ground never cools down, the lack of a “winter” signal may prevent the bulbs from dividing properly. In those cases, you might be better off growing “multiplier onions” or “shallots” adapted specifically for the tropics.
Advanced Considerations: Scaling Your System
Once you have mastered the basic 1-to-8 multiplication, you can start thinking like a small-scale producer. If you plant 100 shallots, you could easily harvest 800. If you keep 100 for replanting and eat 700, you are consuming a high-value gourmet product for the cost of a few bags of compost.
For those looking to optimize, consider “multi-sowing” if you use seeds. This involves sowing three or four seeds in a single module and transplanting the whole clump. This mimics the cluster growth of a bulb set and can be a way to quickly increase your initial “foundation stock” if you cannot find enough bulbs to buy locally.
Example Scenario: The Neighbor’s Math
Let’s look at the math from a practical perspective. A neighbor of mine bought one pound (0.45 kg) of shallot sets for about $15. That bag contained roughly 25 bulbs.
Following the principles of proper spacing and autumn planting, each of those 25 bulbs produced a cluster of 8 shallots. By July, the neighbor had 200 shallots. He set aside the 25 largest ones for the next autumn’s planting. That left him with 175 shallots for the kitchen—enough to use three a week for the entire year.
The following year, his “investment” cost was $0. He simply repeated the cycle. By year three, his shallots were larger and more flavorful than the ones he originally bought because they had “learned” how to grow in his specific backyard soil.
Final Thoughts
Transitioning from buying food to propagating it is one of the most empowering shifts a gardener can make. Shallots represent the perfect entry point for this philosophy. They are resilient, high-value, and biologically eager to multiply. By treating a single bulb as a dynamic system rather than a static product, you unlock a level of food security that is both satisfying and delicious.
Remember to focus on the basics: good drainage, proper depth, and the patience to let them cure properly. If you manage the engine, the engine will manage your kitchen. Start with a handful of bulbs this season, and within a few years, you will find yourself with an abundance that you can share with your own neighbors over the fence.
As you become more comfortable with the allium family, you might find yourself exploring related systems like garlic propagation or the wonders of perennial “walking” onions. Each of these follows the same core principle: stop participating in a finite supply and start nurturing infinite growth. Enjoy the process, and more importantly, enjoy the flavor of a harvest that essentially paid for itself.

Do you have some charcoal in your house right now? We call charcoal a “miracle leftover” for anyone who wants to be a little more self-sufficient and cut costs. That’s because it can help you with so many different things around the house and garden. You can even use it to make an energy-free fridge. Read More Here...