
Your ‘premium’ potting soil might be the very thing drowning your Aloe’s roots. Most gardeners treat their Aloe like a tropical fern, but it’s actually a desert warrior. We compared plants grown in ‘Fragile’ water-retaining peat versus ‘Resilient’ gritty mineral mixes. The result? The gritty mix forces the plant to build a massive root system and thick skin, making it virtually impossible to kill through overwatering.
I have spent better part of my life watching folks bring home a beautiful Aloe vera only to have it turn mushy and gray within a month. They usually tell me they followed the instructions on the bag of “all-purpose” soil. The truth is, most of those big-brand mixes are designed for petunias and marigolds that want a constant drink. An Aloe comes from the rocky, sun-baked slopes of the Arabian Peninsula. It doesn’t want a sponge; it wants a sieve.
If you want to see your Aloe really take off—producing those thick, gel-heavy leaves and eventually sending up those tall, orange-yellow flower spikes—you have to start below the surface. Growing a resilient plant starts with understanding that the roots need oxygen just as much as they need water. In fact, they need air more often than they need a soak.
Best Soil Mix For Aloe Vera Success
The best soil mix for Aloe vera is a fast-draining, coarse medium that mimics a desert landscape rather than a forest floor. In the gardening world, we often distinguish between organic components, like compost or peat moss, and inorganic components, like rocks, sand, and minerals. For a successful Aloe, you want a mix that is heavily weighted toward the inorganic side.
When we talk about “success” with Aloe, we are looking for a plant that can go three weeks without water and not skip a beat, but also survive a week of accidental heavy rain if you leave it outside. A mineral-heavy mix provides this safety net. It creates large air pockets (macropores) that allow excess water to rush out the bottom of the pot almost as fast as you pour it in.
This type of soil is essentially a collection of small “aggregates.” Think of it like a jar of marbles versus a jar of flour. If you pour water into a jar of flour, it turns into a thick, airless paste. If you pour it into a jar of marbles, the water runs through the gaps and the surfaces of the marbles stay just damp enough. Your Aloe roots are the things living in those gaps, and they thrive when they can “breathe” between drinks.
How the Gritty Mix Works
To build a truly resilient Aloe, you need to understand the role of each ingredient in your mix. You aren’t just mixing “dirt”; you are engineering a drainage system. A classic “gritty” recipe usually follows a 1:1:1 ratio or sometimes a 2:1 ratio of inorganic to organic material.
The Inorganic Powerhouses
First, let’s talk about Pumice. This is volcanic rock that has been puffed up by trapped gases. It is light, but unlike perlite, it doesn’t float to the top of the pot every time you water. Pumice is covered in tiny pores that hold onto a microscopic amount of water and nutrients, but the spaces between the rocks stay filled with air. If you can find 1/4-inch (6 mm) pumice, that is the gold standard.
Then there is Coarse Sand. I cannot stress this enough: do not use fine “play sand” from a sandbox. Fine sand is the enemy of drainage; it fills up the air holes and turns your soil into concrete. You want builder’s sand or horticultural grit—the kind of stuff that feels like tiny pebbles, about 2-3 mm in size. This provides the weight and structural stability the plant needs to stay upright.
Perlite is the white, popcorn-looking stuff you see in many mixes. It’s cheap and easy to find. It does a great job of aerating the soil, but it has a habit of crushing over time and floating to the surface. If you are on a budget, perlite is fine, but if you want a “forever” mix, go with pumice or scoria (crushed lava rock).
The Organic Anchor
Your Aloe does need a little bit of organic matter to hold some nutrition. Coco Coir is a fantastic choice here. It’s made from coconut husks and has a near-neutral pH (around 6.0 to 6.8), which Aloes love. Unlike peat moss, coco coir is much easier to re-wet if it ever dries out completely. Peat moss, once bone-dry, actually repels water, which can lead to a situation where you think you’re watering the plant, but the water is just running down the sides of the pot while the root ball stays dry.
Pine Bark Fines are another great organic option. These are tiny bits of composted bark. They break down very slowly, meaning your soil won’t collapse and become “mushy” after a year or two. They also add a bit of acidity, keeping the pH in that sweet spot of 6.0 to 7.0.
Steps to Mixing Your Own Professional Aloe Soil
Mixing your own soil is a bit like making a cake—the proportions matter. Here is my favorite “backyard” recipe that has never failed me.
- 2 Parts Coarse Grit: Use pumice, crushed lava rock, or poultry grit (crushed granite). This is your primary drainage.
- 1 Part Coarse Sand: This adds weight and fills the smaller gaps without suffocating the roots.
- 1 Part Organic Matter: Use a high-quality potting soil (sifted to remove large chunks) or coco coir.
The Mixing Process
- Find a large bucket or a wheelbarrow. I like to do this on a dry day because the dust from perlite or pumice can be a bit much. Wear a mask if you’re working with very dry minerals.
- Add your minerals first. If you are using perlite or pumice, give them a quick rinse with a hose to get the “fines” (the tiny dust) out. That dust can settle at the bottom of your pot and create a “mud layer” that blocks drainage.
- Add your organic component. Break up any clumps of coco coir or bark.
- Toss it all together like a salad. You want a uniform look. When you grab a handful and squeeze it, it should feel gritty and fall apart immediately when you open your hand. If it stays in a ball, you need more grit.
Benefits of a Mineral-Heavy Mix
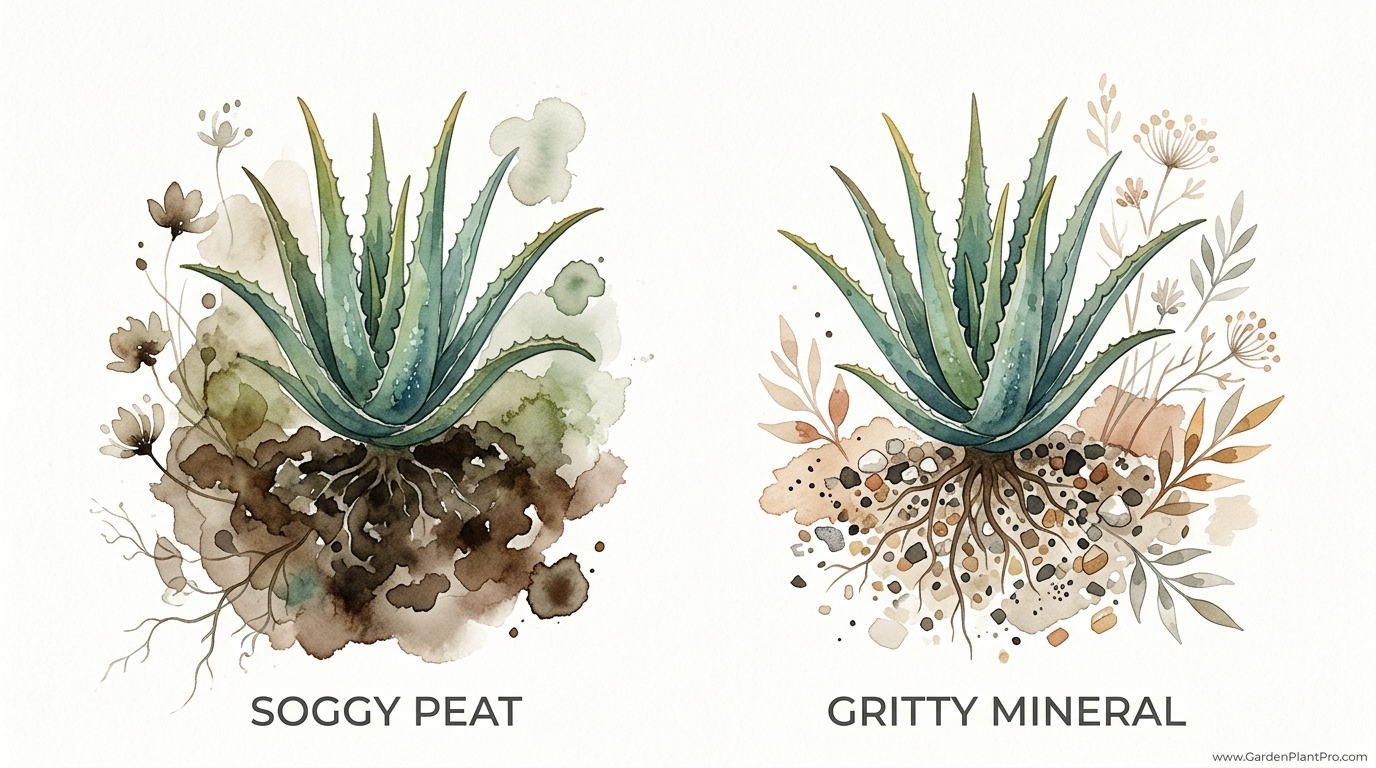
When you switch from SOGGY PEAT vs GRITTY MINERAL, the changes in the plant are visible within a few months. The most immediate benefit is Root Architecture. In a heavy, peat-based soil, Aloe roots tend to stay thin and fragile because they are struggling to find oxygen. In a gritty mix, the roots have to work harder to find water, which encourages them to grow thick, “succulent” roots that can store moisture themselves.
Another huge advantage is pH Stability. Most Aloes prefer a pH between 6.0 and 7.0. Peat moss is naturally very acidic and becomes more so as it decomposes. Minerals like pumice and granite are much more stable. This means you won’t have to worry about your soil “souring” over time, which often leads to the tips of the Aloe leaves turning brown or yellow.
Finally, there is the Temperature Buffer. In the heat of summer, a pot filled with dark, organic soil can get surprisingly hot, potentially “cooking” the roots. A mineral mix, especially one with light-colored pumice, provides better insulation and allows for better airflow, which keeps the root zone significantly cooler.
Common Mistakes to Avoid
The biggest mistake I see is gardeners adding a layer of “drainage rocks” to the bottom of a pot filled with heavy soil. This is actually a myth that can kill your plant. It creates something called a “perched water table.” The water doesn’t want to move from the fine-textured soil into the coarse rocks until the soil is completely saturated. This keeps the roots sitting in a swamp right above the rocks. It is much better to have a consistent, gritty mix from the top of the pot all the way to the bottom.
Another pitfall is using Garden Soil. Never scoop dirt from your backyard into a pot for an Aloe. Garden soil contains silt and clay particles that are far too small for container gardening. It will compact under the weight of the water and suffocate the roots. Plus, you risk bringing in pests like root aphids or fungus gnats that love damp, heavy soil.
Don’t forget the pot! You can have the best soil in the world, but if the pot doesn’t have a large drainage hole, you’re just making a very expensive mud pie. I always recommend Terra Cotta for Aloes. It’s porous, meaning it allows water to evaporate through the walls of the pot, helping the soil dry out faster.
DIY PROJECT: Collect rainwater no matter where you live...

This DIY project is the best way to legally collect rainwater NO MATTER where you live. Get chlorine-free water, cut down on your water bills, and have enough for an emergency situation or to water your garden. Read More Here...
Limitations: When a Gritty Mix Might Not Be Ideal
While I swear by a mineral-heavy mix, there are a couple of situations where you might want to adjust your recipe. If you live in an Extremely Arid Climate—think Arizona or the Australian Outback—and you keep your Aloes outside in the full sun, a 100% mineral mix might dry out *too* fast. You might find yourself having to water every single day. In these cases, increasing the organic matter to about 40% or 50% can help the plant stay hydrated without rotting.
Similarly, if you are growing Young Pups (the small baby plants that sprout from the base), they have smaller root systems and can’t store as much water as a mature plant. I usually give the “babies” a slightly finer mix with a bit more coco coir until they are about 6 inches (15 cm) tall, then I move them into the adult “resilient” mix.
Comparison: Peat-Based vs. Gritty Mineral Mix
| Feature | Standard Peat-Heavy Mix | Gritty Mineral Mix |
|---|---|---|
| Drainage Speed | Slow (holds water for days) | Instant (runs through in seconds) |
| Root Oxygenation | Poor (roots can suffocate) | Excellent (high air-to-water ratio) |
| Longevity | 1-2 years (compacts/decomposes) | 5+ years (minerals don’t break down) |
| Risk of Rot | High | Very Low |
| Weight | Lightweight | Heavy (prevents tipping) |
Practical Tips for Ongoing Success
Once you have your Aloe in the right soil, your watering habits need to change. Because this soil drains so well, you can—and should—water “deeply.” This means pouring water in until it flows freely out of the drainage holes. This flushes out any accumulated salts from your tap water and ensures the deep roots get a drink.
The “Finger Test”
Never water on a schedule. Instead, poke your finger about 2 to 3 inches (5-8 cm) into the mix. If it feels even slightly cool or damp, wait. If it feels like dry gravel, it’s time for a soak. In the winter months, your Aloe will go semi-dormant, and you can easily go 4 to 6 weeks between waterings.
Fertilizing in Mineral Soil
Since mineral mixes don’t have much built-in nutrition, you’ll want to give your Aloe a boost during the growing season (usually spring and summer). Use a liquid fertilizer diluted to half-strength. Look for one with a lower nitrogen number—something like a 10-40-10 or a specific “Cactus and Succulent” food. Too much nitrogen will make the leaves grow fast but “soft,” which makes them more prone to pests like mealybugs.
Advanced Considerations: Sourcing and Sifting
For those who want to take their Aloe care to the next level, the size of your particles is your secret weapon. Serious collectors often use soil sieves to ensure every piece of grit is between 1/8 inch and 1/4 inch (3 mm to 6 mm). By removing the very fine dust and the very large chunks, you create a “perfectly uniform” air space. This results in a root system that looks like a dense bird’s nest—extremely efficient and healthy.
If you are having trouble finding pumice, look for Calcined Clay. This is often sold as “oil absorbent” at auto parts stores (check the label to make sure it’s 100% baked clay with no chemicals) or as “Turface” at landscaping suppliers. It is fired at high temperatures so it doesn’t turn back into mud. It’s a wonderful mineral for holding onto nutrients while still providing excellent drainage.
Real-World Scenario: The Indoor Aloe
Imagine you live in a rainy climate like Seattle or London. Your Aloe is sitting on a windowsill. In standard potting soil, that plant might stay wet for two weeks after a single watering because the indoor air is stagnant. That’s a recipe for root rot.
Now, imagine that same plant in a 70% mineral mix. Even if the humidity is high, the large gaps between the rocks allow for enough evaporation that the roots dry out in three days. You’ve essentially removed the “danger zone” where fungus and bacteria thrive. This is why the gritty mix is the ultimate insurance policy for the indoor gardener.
Final Thoughts
Building a resilient Aloe vera isn’t about giving it more—more water, more fertilizer, or more “rich” soil. It’s actually about giving it less. By providing a gritty, mineral-heavy environment, you are respecting the plant’s evolutionary history as a survivor of harsh, rocky landscapes.
Don’t be afraid to experiment with your local materials. Whether you use crushed granite, lava rock, or pumice, the goal remains the same: drainage, aeration, and stability. Once you see the difference in the thickness of the leaves and the strength of the root system, you’ll never go back to those bags of soggy peat again.
Your Aloe has the potential to live for decades, producing dozens of pups and becoming a focal point of your home or garden. It all starts with the foundation you build beneath it. Give those roots some room to breathe, and they will reward you with a lifetime of health.