
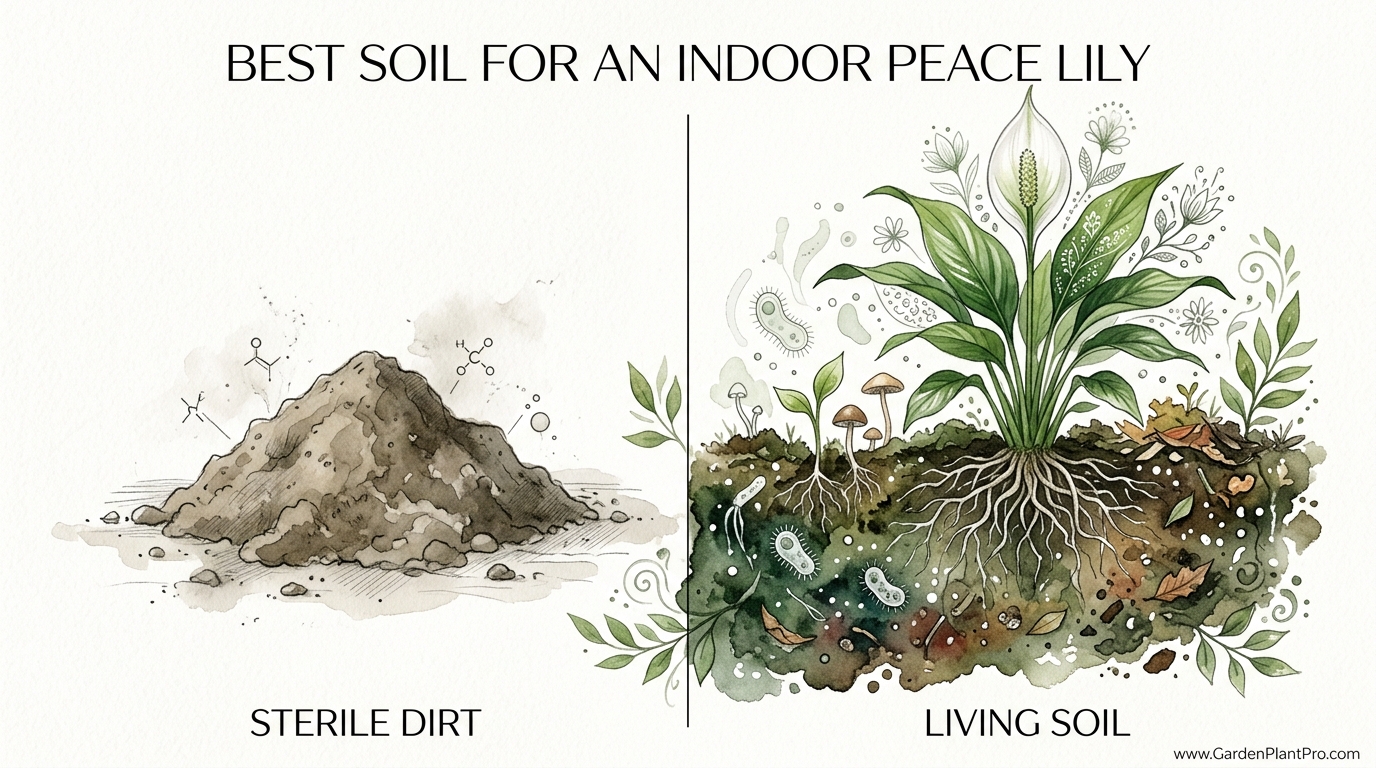
Your Peace Lily isn’t fussy – it’s just starving in a biological desert. Most people buy the purest bagged soil thinking they are helping, but they’re actually putting their Peace Lily in a sterile prison. These plants evolved in the fungus-rich debris of the jungle floor. Introducing living microbes and beneficial fungi turns a struggling houseplant into a thriving, air-purifying powerhouse with vibrant green leaves.
I have spent forty years watching folks bring home these elegant plants only to see them droop and yellow within months. The culprit is almost always the “sterile” mindset. We’ve been told for decades that dirt should be clean, but a Peace Lily (Spathiphyllum) wants dirt that is very much alive. In the rainforests of Central and South America, these plants live in a constant cycle of decay and rebirth. They sit in a loose, airy mix of fallen leaves, twigs, and insect castings that is teeming with microscopic life.
When you take that plant and shove it into a dense, compressed bag of peat from the big-box store, you are essentially suffocating it. The roots cannot breathe, and without the right fungi to help them “eat,” they start to rot. Transitioning to a living soil approach isn’t just about plant health; it’s about creating a miniature ecosystem right in your living room. It’s the difference between a plant that just survives and one that truly belongs in your home.
Best Soil For An Indoor Peace Lily
The best soil for an indoor Peace Lily is a chunky, well-aerated, and biologically active “aroid” mix. This isn’t just any dirt; it is a specific combination designed to mimic the loose forest floor. A good mix must balance three critical factors: moisture retention, drainage, and oxygen flow. Because Peace Lilies are aroids, they have specialized roots that require oxygen just as much as they require water. If the soil stays too wet for too long, the oxygen is pushed out, and the roots essentially drown in their own pot.
Living soil exists as a middle ground between the sterile potting mixes of the 20th century and the wild earth found in nature. It is used in situations where a gardener wants to reduce their reliance on chemical fertilizers and instead rely on the natural relationship between roots and microbes. In the real world, this looks like a mix that feels light and “fluffy” in your hands. It should hold enough water to keep the plant hydrated for a week, but it should also have enough large particles—like bark and perlite—to allow excess water to pour straight through the bottom.
Think of the soil as a sponge that has been torn into pieces rather than a solid block. The gaps between the pieces are where the magic happens. Those gaps hold the humid air that Peace Lily roots love. When we talk about the “best” soil, we are talking about a pH-balanced environment (ideally between 5.8 and 6.5) that supports the growth of beneficial bacteria and mycorrhizal fungi.
The Role of Biological Activity
Most beginners don’t realize that plants don’t actually “eat” soil. They absorb minerals that have been processed by microbes. In a sterile bag of dirt, there are no microbes to do this work. You end up having to dump chemical fertilizers into the pot, which can lead to salt buildup and those dreaded brown tips on the leaves. A living soil mix uses organic components like worm castings and compost to provide a slow-release buffet of nutrients that the plant can access naturally.
Building Your Living Mix: The Recipe
Creating your own soil mix is the most important thing you can do for your Peace Lily. I’ve found that a “60-30-10” ratio works wonders for almost every variety, from the small ‘Power Petite’ to the massive ‘Sensation.’ This recipe ensures the roots stay moist but never soggy. You’ll want to gather your ingredients in a large bucket and mix them by hand to ensure they are fully incorporated.
- The Base (60%): Coconut coir or high-quality peat moss. Coconut coir (derived from coconut husks) is my preference because it is more sustainable and doesn’t become hydrophobic (water-repellent) when it dries out. You’ll need about 6 liters (6.3 quarts) for a standard batch.
- Aeration & Structure (30%): Coarse perlite, pumice, or orchid bark. These larger chunks prevent the soil from compacting over time. I like using a 50/50 mix of perlite and pine bark to give the roots something to grip onto. Use about 3 liters (3.1 quarts).
- The Life Force (10%): Organic worm castings and a handful of horticultural charcoal. Worm castings are “black gold”—they provide the beneficial bacteria and nutrients. The charcoal acts as a filter and a home for microbes. Use about 1 liter (1.05 quarts).
Start by hydrating your coconut coir. If you buy it in a compressed brick, soak it in warm, filtered water until it expands. Once it’s fluffy, add your perlite and bark. Tossing these together by hand allows you to feel the texture. Finally, fold in the worm castings and a sprinkle of mycorrhizal inoculant. These fungi will attach to the roots and expand their surface area by up to 100 times, helping the plant find water and food more efficiently.
Adjusting for Your Environment
Every home is different. If you live in a very dry climate or have the heater running all winter, your soil will dry out faster. In these cases, you might increase the coco coir to 70% to hold more moisture. Conversely, if you live in a humid area or tend to be a “heavy-handed” waterer, increase the perlite to 40% to speed up drainage. The goal is a mix that feels damp like a wrung-out sponge, not a muddy puddle.
How Living Soil Works for the Peace Lily
Living soil operates on the principle of symbiosis. In a standard pot, the root system is limited to the physical space of the container. Mycorrhizal fungi, once introduced, grow tiny threads called hyphae that extend into the smallest pores of the soil. These threads can reach nutrients that the plant’s own roots are too thick to touch. This is especially important for phosphorus, which is the key nutrient for those iconic white blooms (spathes).
The fungal network also acts as a communication and transport system. It regulates water flow, holding onto moisture when the soil is dry and protecting the roots from pathogens when it’s too wet. This biological “buffer” is why plants in living soil are much more resilient. They don’t freak out and wilt the moment you’re a day late with the watering can. The microbes are essentially managing the pantry for the plant, making sure food is always available.
Furthermore, the physical structure of a living mix prevents “hydrophobia.” Many peat-based store mixes turn into a hard, crusty brick if they dry out completely. When you try to water a dried-out sterile mix, the water just runs down the sides of the pot and out the bottom, leaving the root ball bone dry. Living soil, with its blend of coir and bark, re-wets easily and holds onto that moisture where the plant needs it most.
Practical Benefits of This Approach
Switching to a living soil system provides measurable improvements that you can see within a few weeks. One of the most immediate changes is the color and texture of the leaves. Instead of a pale, dusty green, the foliage will take on a deep, waxy luster. This happens because the plant is finally receiving a full spectrum of micronutrients that are often missing from synthetic fertilizers.
- Reduced Transplant Shock: Because the microbes protect the roots, the plant “settles in” to a new pot much faster. You won’t see that dramatic two-week “sulk” where the plant looks like it’s dying.
- Natural Pest Resistance: Healthy soil biology produces natural compounds that deter common pests like fungus gnats and spider mites. A strong plant is much harder for a bug to kill than a starving one.
- Consistent Blooming: Most people struggle to get their Peace Lily to flower a second time. The phosphorus-unlocking power of mycorrhizae encourages the plant to produce those white spathes more frequently.
- Air Purification: Peace Lilies are famous for cleaning the air (benzene and formaldehyde), but research shows that much of this cleaning happens in the root zone. A living soil mix is more effective at processing these toxins than sterile dirt.
Another benefit is the reduction in maintenance. In a living system, the soil doesn’t “wear out” as quickly. You won’t need to repot every single year to refresh the nutrients. Adding a thin layer of fresh worm castings to the surface once or twice a year is often enough to keep the biological engine humming along.
Common Mistakes and Pitfalls
The most frequent error I see is using “Garden Soil” or “Topsoil” from a bag intended for the outdoors. These products are way too heavy for a pot. They contain clay and silt that will compact into a solid mass within weeks. Indoor plants need “potting medium,” not “dirt.” If you can’t see the individual chunks of bark or perlite in your mix, it’s probably too dense.
A second mistake is over-fertilizing with high-strength synthetic liquids. Imagine those microbes as a delicate workforce. When you dump a massive dose of chemical salts (which is what most liquid fertilizers are) into the pot, you effectively “burn” the microbial life. This forces the plant to rely entirely on you for food, and it often leads to salt buildup that turns the leaf tips brown and crispy.
Finally, avoid pots without drainage holes. It doesn’t matter how good your soil is if the water has nowhere to go. Even the best living soil will eventually go sour (anaerobic) if it sits in a pool of stagnant water at the bottom of a decorative planter. Always use a nursery pot with holes, and then set that inside your pretty ceramic pot.
Limitations of Living Soil
While living soil is superior for plant health, it does have some trade-offs. The most notable is the initial cost and effort. Buying individual bags of coir, bark, and castings is more expensive than buying one “all-purpose” bag. However, you have to weigh this against the cost of replacing dead plants every year. For a serious gardener, the investment pays for itself in longevity.
DIY PROJECT: Collect rainwater no matter where you live...

This DIY project is the best way to legally collect rainwater NO MATTER where you live. Get chlorine-free water, cut down on your water bills, and have enough for an emergency situation or to water your garden. Read More Here...
Another consideration is the presence of life. Because you are creating a biological ecosystem, you might occasionally see a harmless mushroom pop up or find a stray springtail (tiny, beneficial soil insects). Some folks find this off-putting indoors, but these are actually signs of a healthy, functioning soil. They aren’t “pests”—they are the cleanup crew. If you want a completely “sterile” and “bug-free” home, living soil might challenge your comfort zone.
Lastly, living soil requires a bit more patience. Chemical fertilizers give a quick “green-up” but weaken the plant over time. Living soil builds health from the roots up, which might take a month or two to show on the leaves. It’s a marathon, not a sprint.
Comparing Soil Options
To help you decide which path to take, I’ve put together a simple comparison based on my observations in the greenhouse. Most commercial mixes fall into the “Standard” category, while the “Living” category is what we are aiming for with our DIY recipe.
| Feature | Standard Bagged Mix | Living Aroid Mix |
|---|---|---|
| Main Ingredient | Peat Moss (Fine) | Coconut Coir & Bark |
| Drainage | Low (Tends to compact) | High (Stays chunky) |
| Microbial Life | Sterile (Dead) | Active (Fungi & Bacteria) |
| Nutrient Source | Added Chemical Pellets | Worm Castings & Microbes |
| Sustainability | Low (Peat mining) | High (Coir is a byproduct) |
The complexity of maintaining a living mix is slightly higher at first, but the maintenance over time is actually lower. You spend less time worrying about precise fertilizer measurements and more time simply enjoying the plant’s growth.
Best Practices for Success
Once you have your Peace Lily in its new living soil, there are a few tricks to keep the ecosystem healthy. First, watch your water source. Peace Lilies are notoriously sensitive to fluoride and chlorine found in city tap water. These chemicals can kill off the beneficial microbes you just worked so hard to introduce. Using filtered water, rainwater, or even just letting a pitcher of tap water sit out for 24 hours can make a huge difference.
- Bottom Water Whenever Possible: Instead of pouring water on top, set the pot in a tray of water for 20 minutes. This allows the soil to “wick” up exactly what it needs without compacting the top layer.
- Don’t Be Afraid of the “Droop”: A Peace Lily will tell you when it’s thirsty by wilting slightly. In living soil, it will bounce back much faster. Water it the moment you see that first sign of a lean.
- Keep it Warm: Microbes are like us—they slow down when it’s cold. Keep your plant in a spot that stays between 18°C and 27°C (65°F to 80°F) to keep the biological activity high.
- Aerate the Soil: Every few months, take a chopstick and gently poke a few holes down into the soil. This breaks up any minor compaction and lets fresh oxygen reach the roots.
Remember that the goal is consistency. Peace Lilies don’t like surprises. Keep the moisture levels steady, provide bright indirect light, and let the soil do the heavy lifting. If you see white “mold” on the surface, don’t panic! That’s usually just beneficial mycelium doing its job. Just stir it back into the top inch of soil.
Advanced Considerations: Biochar and Mineral Dust
For those who want to take their indoor gardening to the highest level, you can look into adding biochar and rock dust to your mix. Biochar is a specialized form of charcoal that is incredibly porous. It acts like a “condominium” for microbes, giving them a permanent place to live even if the soil is disturbed. Adding just 2% biochar to your mix can significantly increase the long-term fertility of the pot.
Azomite or other volcanic rock dusts provide trace minerals that aren’t found in standard compost. These minerals act like a multivitamin for the plant, strengthening the cell walls and making the leaves tougher against pests. Serious collectors often use these additives to ensure their ‘Variegated’ or ‘Domino’ Peace Lilies maintain their unique patterns and don’t revert to solid green.
Scaling this up is easy too. If you have a large collection, you can mix a “super-soil” base in a 50-gallon (190-liter) bin and keep it in the garage. As it sits, the microbes will colonize the entire batch, meaning every plant you pot up starts with a massive biological advantage.
Example Scenario: Saving a “Big Box” Lily
Imagine you just bought a Peace Lily from a local supermarket. It’s in a 6-inch (15 cm) plastic pot and the soil feels like heavy, wet coffee grounds. The leaves are starting to turn yellow at the bottom. This is a classic case of a plant in a “sterile prison.” To save it, you’d prepare your living mix and gently remove the plant from its pot.
Carefully shake off the old, soggy soil. You might even find a “death plug”—a small mesh wrap around the roots from when it was a seedling. Snip that off. Now, place the plant in a slightly larger 8-inch (20 cm) pot filled with your chunky aroid mix. Water it in with some diluted seaweed extract to help with the transition. Within two weeks, the yellowing will stop. Within a month, you’ll see new, bright green spears of growth emerging from the center. This isn’t magic; it’s just giving the plant the habitat it actually evolved for.
Final Thoughts
Creating the best soil for your Peace Lily is about shifting your perspective from “feeding the plant” to “feeding the soil.” When you focus on the life under the surface, the part of the plant you actually see will take care of itself. It is a more nostalgic, hands-on way of gardening that connects you to the natural rhythms of the rainforest floor right in your own home.
This approach isn’t just for Peace Lilies, either. Once you master the art of the aroid mix, you’ll find that your Monsteras, Philodendrons, and Pothos all thrive in similar conditions. It is a foundational skill that turns a houseplant hobby into a lifelong passion for soil health. Don’t be afraid to get your hands dirty and experiment with your ratios.
Take that first step and mix up a small batch of living soil this weekend. Your Peace Lily has likely been waiting its whole life for a bit of real “home” to grow in. As you watch it transform from a drooping office plant into a vibrant jungle specimen, you’ll realize that the secret wasn’t a green thumb—it was a living soil.