
Your Monstera isn’t ‘fussy’ – it’s simply starving in a biological desert. Most ‘premium’ potting soils are effectively sterile graveyards for your Monstera. Without the symbiotic relationship of beneficial microbes and high-oxygen drainage, your plant is on permanent life support. Switch to a living, chunky aroid mix and watch your Monstera finally ‘breathe’ and produce those giant split leaves you’ve been waiting for.
I’ve spent forty years watching folks bring home those beautiful, glossy green Monstera deliciosa plants, only to see them stall out six months later. They come to me over the fence, wondering why their “Swiss Cheese Plant” stopped making holes or why the bottom leaves are turning that sickly yellow. Most of the time, I don’t even have to look at the leaves. I just poke my finger into the dirt. Nine times out of ten, that plant is suffocating in a bag of heavy, peat-based “all-purpose” soil that’s about as airy as a wet sponge.
You see, in the wild, these plants aren’t sitting in dense dirt. They’re climbers. They spend their lives snaking up tree trunks in Central American rainforests, with their roots tucked into crevices of bark, moss, and decaying leaf litter. Their roots are thick, fleshy, and practically crave the open air. When you shove those roots into a tight, sterile mix, you’re essentially asking a mountain climber to run a marathon in concrete boots. To get that explosive growth we all want, you have to stop thinking about “dirt” and start thinking about a living ecosystem.
Best Monstera Potting Mix For Faster Growth
The “Best Monstera Potting Mix For Faster Growth” isn’t a single secret ingredient you buy at a big-box store; it’s a specific texture often called a “chunky aroid mix.” This mix is designed to mimic the loose, debris-heavy floor of a tropical jungle. It provides the structural support a large plant needs while ensuring that water never pools around the roots for long enough to cause rot. The goal is to create a medium where water flows through in seconds, leaving the roots damp but surrounded by massive air pockets.
In the gardening world, we call this “porosity.” High porosity means the soil has lots of tiny holes and big gaps where oxygen can reach the root system. Roots need to breathe just like we do. If they’re submerged in water-logged soil, they literally drown, which leads to the dreaded root rot. A chunky mix uses large particles like orchid bark and perlite to keep the soil from compacting over time, ensuring your Monstera has the energy to push out those iconic fenestrations—the splits and holes—that make the plant famous.
Think of it like this: regular potting soil is a dense, heavy blanket. A chunky aroid mix is a loose, woolly sweater. Both hold warmth and moisture, but only the sweater lets the breeze through. For a Monstera, that breeze is the difference between a plant that just survives and one that grows a new leaf every two weeks during the summer months.
Building the Ultimate Chunky Aroid Mix: Ingredients and Ratios
To get your Monstera moving, you need to assemble a “team” of ingredients that each play a specific role. I like to keep things simple, but I never skip on quality. Here’s the breakdown of what I use in my backyard shed when I’m prepping a mix for a big Monstera deliciosa or even its smaller cousin, the Monstera adansonii.
The Structural Base: Orchid Bark
Orchid bark is the backbone of any good aroid mix. It consists of coarse pieces of fir or pine bark that don’t break down quickly. I prefer the “medium” grade bark, which is usually about 1/2 inch to 3/4 inch (12 mm to 19 mm) in size. This creates those big “macropores” or air gaps that allow the roots to snake through easily. It also mimics the tree bark the plants naturally climb in the wild.
The Aerator: Coarse Perlite or Pumice
Perlite is that white, popcorn-looking stuff you see in soil. For Monsteras, you want the “coarse” or #3 grade perlite if you can find it. Standard perlite is often too fine and can eventually float to the top or settle at the bottom. If you want something even better, use pumice. Pumice is a volcanic rock that is heavier than perlite, so it won’t float away when you water, and it has thousands of tiny pores that hold onto beneficial microbes.
The Moisture Buffer: Coco Coir or Coco Chips
While we want drainage, we don’t want the plant to go bone-dry in twenty minutes. Coco coir (the fibrous husks of coconuts) is a sustainable alternative to peat moss. It holds moisture without becoming a muddy mess. Even better are coco chips—the larger, cubed versions of the fiber. These add even more “chunk” while acting like a slow-release water reservoir for the roots.
The Natural Fuel: Worm Castings
I call worm castings “black gold.” It’s essentially worm poop, and it is packed with the microbes your plant is starving for. Unlike synthetic fertilizers that can burn tender roots, worm castings provide a gentle, slow-release form of nitrogen and minerals. Most importantly, they introduce the “living” part of the ecosystem—the bacteria and fungi that help the plant absorb nutrients.
The Detoxifier: Horticultural Charcoal
Charcoal isn’t just for the grill; horticultural charcoal is highly porous and helps “clean” the soil. It can absorb excess salts from fertilizers and prevent the soil from becoming sour or smelly if it stays damp a little too long. It also provides a fantastic home for beneficial mycorrhizae to colonize.
The “Golden Ratio” Recipe
If you’re ready to mix your own, here is the ratio I’ve found works best across most home environments. You can measure this with a simple plastic scoop or an old coffee tin:
- 3 Parts Orchid Bark: For structure and aeration.
- 2 Parts Coarse Perlite or Pumice: To ensure fast drainage.
- 2 Parts Coco Coir or Potting Soil: To act as a moisture-retaining base.
- 1 Part Coco Chips: For extra chunkiness and moisture buffering.
- 1/2 Part Worm Castings: For natural nutrition and microbial health.
- A Handful of Horticultural Charcoal: To keep the mix fresh and filtered.
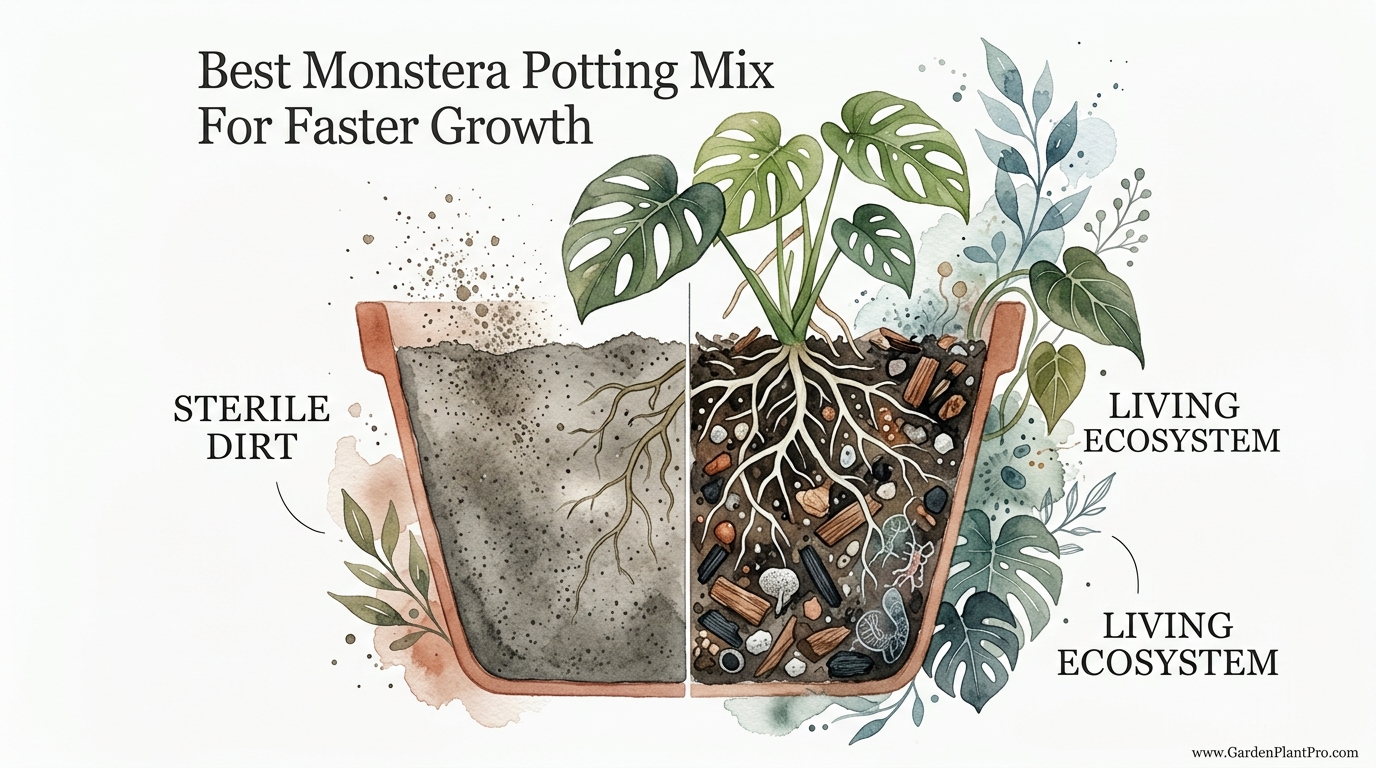
How the “Living Ecosystem” Beats Sterile Dirt
When you buy a bag of standard soil from a big warehouse, it’s often been heat-treated or sterilized to kill off bugs and weeds. While that sounds good on paper, it also kills off the “good guys.” In a LIVING ECOSYSTEM, your Monstera forms a partnership with beneficial fungi called mycorrhizae. These fungi attach to the roots and act like an extension of the plant’s own reach, pulling in water and phosphorus from parts of the pot the roots can’t even touch.
In contrast, STERILE DIRT forces the plant to do all the work itself. Without those microbes to break down organic matter into “bite-sized” pieces for the plant, your Monstera can actually starve even if you’re pouring liquid fertilizer into the pot. By using ingredients like worm castings and biochar, you’re essentially “re-wilding” your houseplant’s environment. This leads to thicker stems, larger leaves, and a much higher resistance to pests like spider mites or thrips, because a healthy plant is a resilient plant.
Benefits of a High-Oxygen, Chunky Mix
Switching to a chunky mix offers more than just faster growth; it provides peace of mind for the gardener. One of the biggest killers of indoor plants is “overwatering,” but the truth is that it’s rarely the *amount* of water that’s the problem—it’s the *lack of air*. When you have a high-oxygen mix, it is almost impossible to overwater your plant because the excess water simply falls out the bottom of the pot.
Practical benefits include:
- Visible Root Health: When you repot, you’ll see thick, white, fuzzy roots instead of brown, mushy ones.
- Reduced Fungus Gnats: Those annoying little flies love wet, decaying peat. They hate the dry, airy surface of a chunky bark mix.
- Faster Dry-Back: The soil “dries back” faster, which signals the plant to grow more roots in search of moisture, leading to a more robust root system.
- Bigger Fenestrations: Oxygen-rich roots provide the massive energy required to produce those deep splits and holes in new leaves.
Challenges and Common Mistakes to Avoid
The most frequent mistake I see when folks move to a chunky mix is they don’t change their watering habits. Because this mix drains so much faster than traditional soil, you might find you need to water more often. In the peak of summer, a large Monstera in a chunky mix might want a drink every 5 to 7 days, whereas in heavy soil, it might stay wet for two weeks.
Another pitfall is using a pot that is way too big. Even with a great mix, a “biological desert” can form if there’s a massive amount of soil with no roots to drink the water. Always choose a pot that is only 1 to 2 inches (2.5 cm to 5 cm) wider than the current root ball. This ensures the roots can “patrol” the entire pot and keep the moisture levels balanced.
DIY PROJECT: Collect rainwater no matter where you live...

This DIY project is the best way to legally collect rainwater NO MATTER where you live. Get chlorine-free water, cut down on your water bills, and have enough for an emergency situation or to water your garden. Read More Here...
Lastly, don’t forget to wash your coco coir or bark if it seems dusty or salty. Some lower-quality coco coir can have high salt content from being processed near the ocean. Giving it a quick rinse in a colander or a bucket before mixing can save your Monstera from “salt burn,” which shows up as brown, crispy edges on the leaves.
Limitations: When a Chunky Mix Might Not Be Ideal
While I swear by a chunky mix for mature plants, it isn’t always the right choice for every situation. If you’re starting a tiny Monstera cutting that only has one or two small roots, a “mega-chunk” mix might be too dry. Small roots need more contact with moisture to establish themselves. For seedlings or fresh propagations, I usually start with a “nursery mix” that is about 60% coco coir and 40% perlite, then move them into the chunky stuff once they have a few thick roots.
Also, if you live in an incredibly dry environment with very low humidity (less than 30%) and you’re away from home for long periods, a very chunky mix might dry out too fast. In that case, I’d suggest adding a little more coco coir to the recipe to act as a “moisture insurance policy.”
Advanced Considerations: Tuning Your Mix
For the serious gardener who wants to take things to the next level, you can “tune” your mix based on your home’s micro-climate. Not every living room is the same. If your Monstera lives in a terracotta pot, which is porous and breathes on its own, your soil will dry out much faster than if it were in a plastic or ceramic pot.
If you notice your plant is wilting just three days after watering, increase the “fines” (the coco coir or worm castings) by 10%. If the soil is still damp after ten days, increase the “chunks” (the bark and perlite) by 10%. This kind of fine-tuning is what turns a regular plant owner into a master gardener. You’re not just following a recipe; you’re listening to what the plant is telling you.
Example Scenario: The Case of the Stalled Monstera
Let’s look at a real-world example. A neighbor of mine had a three-year-old Monstera deliciosa that hadn’t put out a new leaf in eight months. It was sitting in a heavy, dark soil that smelled slightly of sulfur—a sure sign of anaerobic (oxygen-free) bacteria. We took the plant out, washed the old mud off the roots, and found they were starting to turn grey and soft.
We pruned the rot back to healthy white tissue, dusted the ends with a little cinnamon (a natural antifungal), and repotted it into the “Golden Ratio” chunky mix I mentioned above. Within three weeks, the plant pushed out a new “spike”—a leaf ready to unfurl. Six weeks later, that leaf opened up, and it was the largest the plant had ever produced, with double fenestrations. The only thing we changed was the “biological desert” it was living in.
Practical Tips for Success
- Bottom Water Occasionally: While chunky mixes are great for top-watering, every few months, let the pot sit in a basin of water for 20 minutes. This ensures the bark and coco chips fully saturate their internal pores.
- Check Your Water Quality: Monsteras aren’t as sensitive as Calatheas, but they do appreciate filtered water or water that has sat out overnight to let chlorine dissipate.
- Seasonal Adjustments: During the winter months, your Monstera’s metabolism slows down. Reduce your watering frequency significantly, but don’t let the mix go “desert dry” or the beneficial microbes might die off.
- Support is Key: As your Monstera grows faster in this new mix, it will need something to climb. A moss pole or a sturdy cedar board mimics the trees it loves in the wild and encourages even larger leaves.
Final Thoughts
At the end of the day, gardening isn’t about following a strict set of rules found on the back of a bag; it’s about observing nature and doing your best to recreate it in a little corner of your home. Your Monstera has the genetic blueprint to be a jungle giant, but it needs the right foundation to get there. Moving away from sterile, suffocating dirt and into a living, breathing aroid mix is the single best gift you can give your plant.
Don’t be afraid to get your hands dirty and experiment with the ratios. You’ll know you’ve got it right when you pour a watering can over the soil and see the water dance right through the chunks and out the bottom, leaving behind a fresh, earthy scent. That’s the sound of your Monstera finally being able to breathe.
Once you’ve mastered the soil, you might find yourself looking at other parts of your garden with a new eye. Maybe your pothos or your philodendrons could use a little more “chunk” in their lives, too? The lessons you learn from one plant often open doors to a whole new way of growing everything else in your home.