
Are you a salad enthusiast wanting to elevate your culinary creations? Look no farther than watercress, a vivid green leafy vegetable that is both tasty and nutritious. Watercress is a versatile ingredient with a crisp texture and a peppery flavor that can be used in everything from sandwiches and soups to stir-fries and smoothies.
But why buy store-bought watercress when you can cultivate your own? It’s not only more cost-effective and ecologically sustainable, but it’s also a pleasant and satisfying way to interact with nature and eat the freshest vegetables available. In this guide we’ll lead you through the process of growing your own watercress, from choosing the correct soil and containers to harvesting and enjoying it so you can elevate your salad game.
A Brief History
Watercress has a long and varied history, with the earliest written record of its use dating back over 2000 years. It is thought to be native to Europe and Asia, but it is now found all over the world. It has been used in traditional medicine for centuries, and was even recommended by Hippocrates for its healing properties.
Watercress has been cultivated in many parts of the world for centuries, and was particularly popular in Britain during the Victorian era. In fact, it was so popular that there were several watercress farms in England at one point. In more recent times watercress has become increasingly popular as a health food, with its rich vitamin and mineral content making it a great addition to any diet. It is widely used in salads, soups, sandwiches and other dishes, adding a peppery flavour to the food.
Watercress is also known for its resilience – it can be grown in many different conditions, from damp soil to being fully submerged in water. As such, it can be grown both indoors and outdoors, making it easy to cultivate at home. So why not give it a go? With this guide you can learn how to grow your own watercress at home – so you can enjoy this tasty vegetable all year round.
Nutritional Benefits
Watercress is a nutrient-rich plant that offers numerous health benefits. High in antioxidants, watercress is an excellent source of vitamins A, B1, B3, C, and K as well as iron, potassium, and calcium. It also has a low calorie count at just 3.7 calories per cup.
In addition to its antioxidant content, watercress is also known for its high levels of vitamin K, which can help protect the heart from cardiovascular disease. Vitamin K is also known for aiding in the absorption of calcium and promoting healthy bones. Watercress is also a good source of folate, which helps reduce the risk of birth defects and supports healthy cell growth.
Watercress has been linked to other health benefits such as decreasing inflammation, improving digestion, and aiding in weight loss. It can be used as a salad green or cooked in soups and stews. Watercress is also an excellent source of dietary fiber which helps keep you full longer and aids digestion.
If you’re looking to get more of these incredible health benefits into your diet, growing your own watercress is an easy way to do it.
Common Varieties & Their Uses
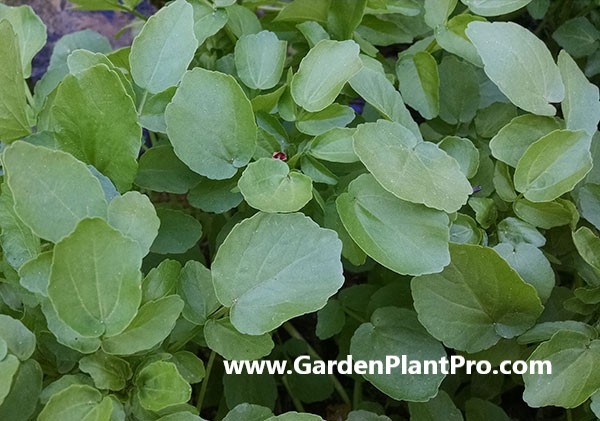
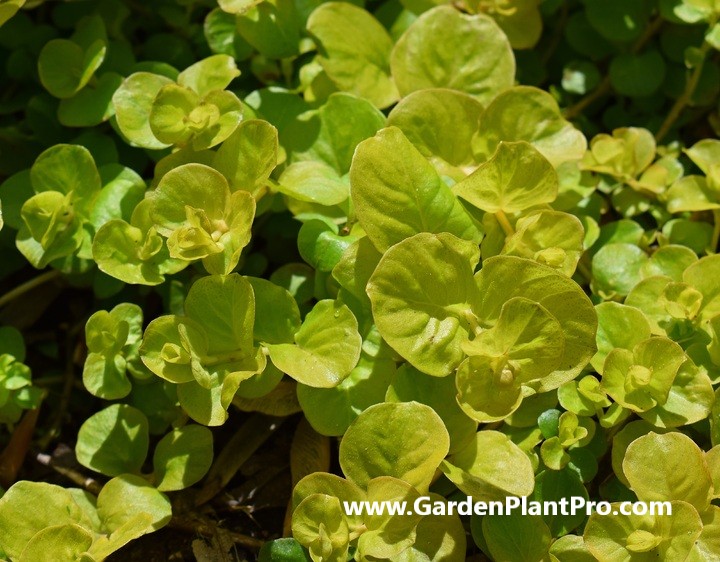
When it comes to watercress, there are a several varieties to choose from. The most common home grown variety is Nasturtium officinale, which is an aquatic plant native to Europe and Asia. This variety can be grown in the garden, in containers, or even in a pond. Other varieties include the upland cress (Barbarea verna) and the winter cress (Barbarea vulgaris).
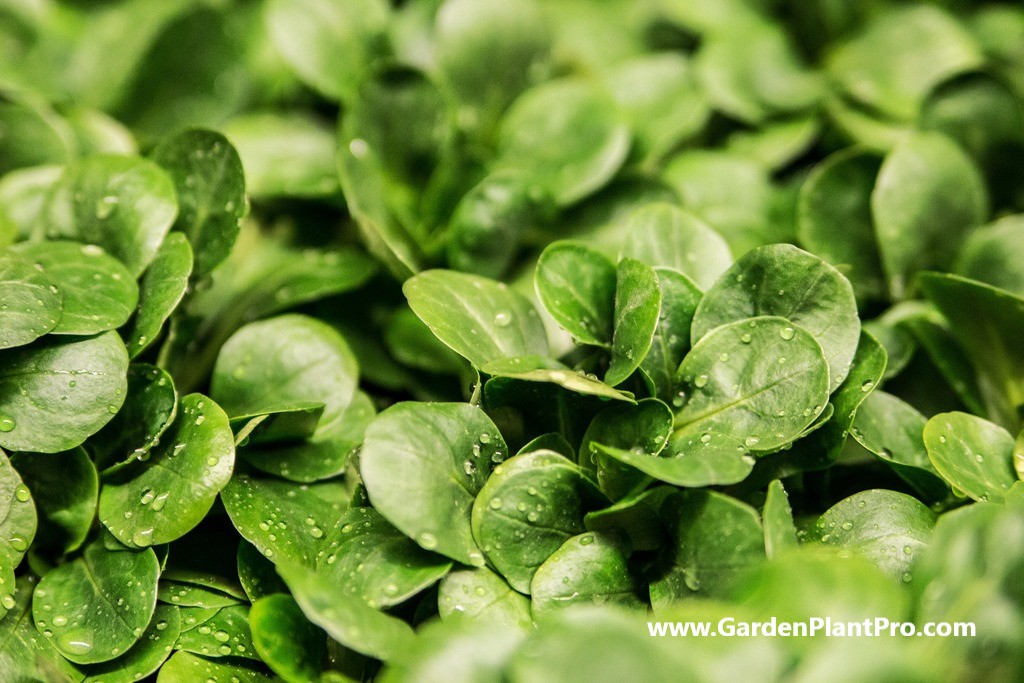
Upland cress is a hardy perennial that can be grown in cold climates and is often used as a salad green. It has a pleasant peppery flavor. Winter cress is a biennial that can be grown in warmer climates and has a slightly more pungent flavor. It is usually harvested from late autumn through springtime. Both of these varieties can also be used for microgreens or baby greens.
When choosing which variety to grow, consider where you will be growing it as well as how it will be used. For example, if you are growing watercress in a pond, then the Nasturtium officinale variety will do best. If you are growing it in your garden or containers, then either of the other two varieties may work better. If you plan on using your watercress as microgreens or baby greens, then either of the other two varieties may also work better.
No matter which variety you choose, it’s important to keep soil moist and organic matter-rich for best results. Watercress also benefits from regular fertilizing and occasional harvesting to keep it producing throughout the season.
When To Sow
Watercress is best sown in spring or autumn, as plants tend to run to seed in mid-summer. Seeds germinate in 8-10 days and can be sown directly into the soil, or onto wet tissue paper before transferring to the soil. Fill a plant pot with compost, pressing down firmly until the pot is almost full. Liberally scatter the seeds on the surface of the soil, then cover with a thin layer of compost or vermiculite.
It is important to water regularly and avoid extremes of temperature, as this can cause the plant to run to seed prematurely. Watercress does not tolerate frost and should be grown in a sheltered spot outdoors or in an unheated greenhouse. To encourage continuous harvesting it may be beneficial to sow successive crops every two weeks from late spring through summer.
When planting watercress from seedlings, it is important to ensure that the roots are not damaged during transplanting. Dig a hole for each seedling and gently place them into position ensuring that they are at the same depth as they were in the pot. Fill in around them with soil and press down firmly to ensure that they are firmly planted into position. Water gently and add a thin layer of mulch around each one.
Choosing A Suitable Location In The Garden
Choosing the right location in the garden for growing watercress is essential to ensure healthy and abundant watercress crops. Watercress thrives in moist, shady spots, making it ideal for growing close to streams, ponds, and other water sources. It can also be grown in pots and containers.
When selecting a spot for your watercress, look for a place that gets partial shade throughout the day as too much direct sunlight can cause the leaves to become scorched. Make sure that the area is well drained and doesn’t become waterlogged after heavy rains. A sunny spot is ideal for germinating the seeds but once established, watercress plants should not be exposed to direct sunlight for long periods of time.
Watercress can also be grown as an intercrop with other vegetables as it helps to attract beneficial insects like ladybugs which help keep pests away from other crops. It can also help reduce erosion along stream banks and provide shade to fishponds, so it is an excellent choice for gardeners looking to create a diverse landscape with multiple uses.
DIY PROJECT: Collect rainwater no matter where you live...

This DIY project is the best way to legally collect rainwater NO MATTER where you live. Get chlorine-free water, cut down on your water bills, and have enough for an emergency situation or to water your garden. Read More Here...
Preparing The Soil
Preparing the soil is an important step in growing watercress at home.
The best soil for watercress is a well-drained, light soil with a neutral pH balance. To prepare the soil, mix in organic matter such as compost or leaf mould. A light application of a balanced fertilizer can also be added at this time.
If growing in a container, use potting mix and ensure it is well-drained. To ensure sufficient moisture levels, cover the tray or container with a clear plastic bag and place on a windowsill. This will allow the watercress to get the moisture it needs while keeping the soil from becoming overly wet.
Watercress can also be grown in a tray of water or hydroponically, however there are some important considerations when doing so. If growing in a bucket of water, it is important to change the water weekly and add an organic fertiliser such as liquid compost to kickstart growth. Once it is established, however, no additional fertilizer should be needed.
Planting The Seeds Or Seedlings
Once you have chosen the location and prepared the soil, it is time to plant your watercress seeds or seedlings. Sow seed direct, planting them in clumps of 2-3, as they tend to form a clump when they grow. Seeds germinate in 8-10 days, so it is best to sow them in spring or autumn.
If you are using seedlings, make sure to handle them with care and use a trowel to make a hole large enough for the root ball. Gently press the soil around the roots to ensure good contact with the soil and water thoroughly after planting.
Young plants should be spaced 22-30cm apart in sun with part shade on hot afternoons.
If you’re going to be using containers, germinate the seeds on wet tissue paper then transfer to containers for growing. For those wishing to take a shortcut, watercress can also be grown from cuttings. Whichever method you choose, it is important not to overcrowd the plants as this will reduce air circulation and increase the chances of disease.
Once your watercress is planted, it is important to provide them with adequate water and fertilizer throughout their growing season. Water regularly during dry periods and fertilize twice a month with a balanced liquid fertilizer. This will ensure healthy growth and ensure an abundant harvest of sweet tasting leaves.
Caring For The Seedlings
Once the seedlings have been planted and watered, it is important to care for them properly. Watercress needs moist soil at all times, so it is important to check the soil regularly and keep it evenly moist.
If growing in containers of water, empty the containers every two to three days to avoid standing water. Plants need constant fresh water so make sure to water them regularly.
Fertilization is not necessary, but if desired, a liquid fertilizer can be used every two months in small amounts. To ensure healthy growth, remove any dead or yellowed leaves and stems as they appear. In addition, prune plants as needed to promote bushier growth.
If growing indoors, watercress prefers a shady spot with approximately four hours of sunlight early in the day and then shade in the afternoon. If growing outdoors, make sure to weed the area regularly as weeds will compete for nutrients and water.
Watering & Fertilizing
Once you have chosen a suitable location for your watercress plants, it is important to ensure that they receive adequate water and fertilizer.
Watercress prefers a moist environment and should be watered regularly, especially during dry weather. The best way to water your plants is to use a slow-release hose or soaker system that gently releases water over a period of time. Alternatively, you can use a watering can with a fine rose attachment.
When it comes to fertilizing, it is best to apply it very lightly (less than half the recommended rate on the label) with a water-soluble fertilizer every few weeks. Avoid using chemical fertilizers as these can damage the delicate foliage of the watercress plants. If you are growing your plants in water, such as in a bucket, add an organic liquid compost or other natural fertilizer every week to kickstart growth.

When & How To Harvest
Harvesting watercress is an important step in the growing process and should be done with care to ensure the best results.

Do you have some charcoal in your house right now? We call charcoal a “miracle leftover” for anyone who wants to be a little more self-sufficient and cut costs. That’s because it can help you with so many different things around the house and garden. You can even use it to make an energy-free fridge. Read More Here...
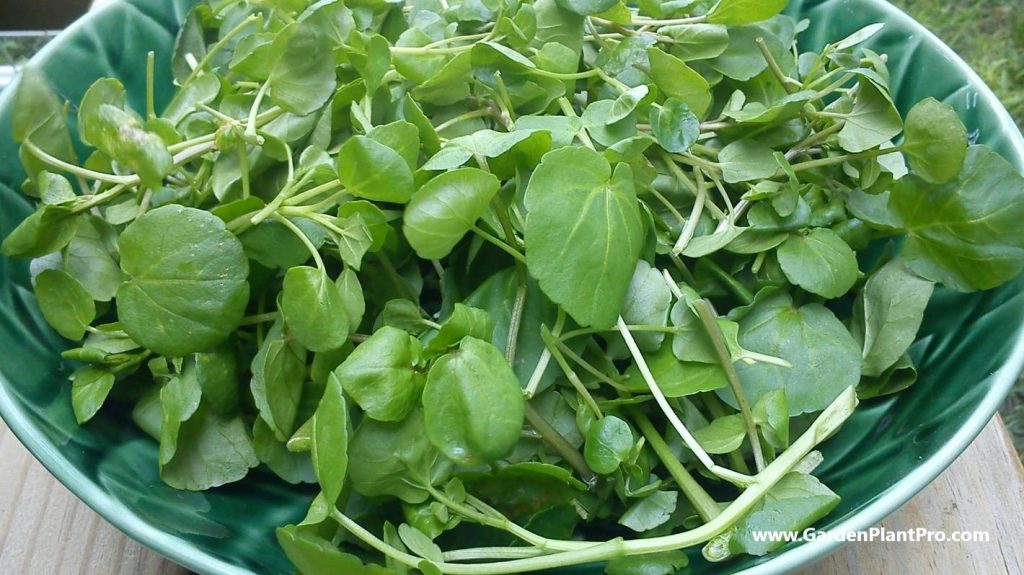
Watercress should be harvested when the leaves are a deep green color and the stems are at least 15 cm long. It is best to use scissors to snip off the top stems, but never take more than a third of the plant at any one time. Pulling on the stem can damage the plant, so it is best to avoid this method.
Watercress leaves can typically be harvested from about 21 days after they have emerged, and if you cut or prune the plant back to about 4 inches it will encourage more growth. Leaving some leaves for regrowth will ensure a continuous harvest throughout the season.
Be sure to store any harvested watercress in a cool place and use it within 2-3 days for maximum freshness. With proper care and attention, you can enjoy fresh watercress from your own garden all season long.
Storing & Preserving
Storing and preserving watercress is a great way to extend the life of your home-grown crop and enjoy it throughout the year. To store, cut the stems off the watercress and place them in a container with a damp paper towel or cloth. Place the container in the refrigerator and use within three days.
To preserve watercress, you can either freeze or dehydrate it. To freeze, blanch the watercress for two minutes and then plunge it in cold water to stop cooking. Drain well and spread out on a cookie sheet lined with parchment paper. Once it’s completely frozen, transfer to an airtight container or freezer bag and store for up to one year.
To dehydrate, cut off stems, wash and pat dry. Place leaves onto dehydrator trays, leaving space between them so they don’t stick together. Dry at 125°F for around 4-6 hours until completely dried out. Once dried, crumble into small pieces before storing in an airtight container or freezer bag for up to six months.
Watercress can also be pickled by adding it to vinegar solution with spices like garlic, mustard seeds, peppercorns, juniper berries and dill seed. Place in an airtight jar and store in the refrigerator for up to three weeks.
Whichever storage method you choose, make sure to store watercress away from other fruits and vegetables as they give off ethylene gas that can cause spoilage.
Common Diseases & How To Control Them
Watercress is a hardy plant, but it can be susceptible to certain diseases.
The most common diseases affecting watercress are downy mildew, clubroot and root rot. Knowing how to identify and control these diseases is essential for growing healthy watercress.
Downy mildew is a fungal disease that appears as white fuzzy spots on the leaves of the watercress plant. To treat downy mildew, remove all affected leaves and spray the remaining leaves with a fungicide.
Clubroot is a soil-borne disease that causes the roots of the watercress plant to become swollen and distorted. This disease is difficult to control without damaging the plant, so the best solution is to prevent it from occurring in the first place by adding lime to your soil mix and planting in well-draining soil.
Root rot is another fungal disease that can affect watercress plants. This disease causes the roots and stems of the plant to rot away, resulting in wilting and yellowing of the leaves. To prevent root rot, ensure that your plants are not overwatered, and keep an eye out for any signs of yellowing or wilting leaves. If you do find any affected plants, remove them immediately and treat the surrounding soil with a fungicide.
Common Pests & How To Control Them
Common pests can be a major problem when growing watercress. Although the plant is generally very hardy, snails and whiteflies are attracted to it and can quickly colonize and damage the leaves. The best way to control these common pests is to take preventative measures.
Snails are particularly fond of watercress and should be removed by hand or trapped. If necessary, baited traps can be used to catch large numbers of snails.
Whiteflies are attracted to the plant and can rapidly colonize it. The safest and easiest way to keep them under control is to squish them by hand or use a soft jet of water to knock them off the plants. Soapy water or neem oil sprays can also be used to control whitefly infestations.
By taking these preventive steps and monitoring your plants regularly, you should be able to keep common pests away from your watercress crop. If any pests do become visible, make sure you take action quickly as they can spread throughout the garden very quickly if left untreated.
CASE STUDY: We've been living off the grid for the last 40 years...

In all that time an electric wire has never been connected to our house. We haven’t gotten or paid an electricity bill in over 40 years, but we have all the electricity we want. We grow everything we need, here, in our small backyard. We also have a small medicinal garden for tough times. Read More Here...
Beneficial Companion Plants
When it comes to beneficial companion plants for watercress, chives, peppermint and wintergreen are some of the best options. These plants can help keep watercress healthy and thriving by providing it with the necessary nutrients and protection from pests.
Chives are a great companion for watercress because they provide nitrogen to the soil and make a great pest repellent. The peppermint will also help repel pests, while wintergreen helps protect against fungus and other diseases. Planting these three in your garden will provide watercress with the protection it needs.
When planting your watercress, it is important to make sure that there is enough space between the different plants. Watercress is a small crop and too much competition can stunt its growth. Try to leave at least 6 inches between each plant so they have room to grow and spread out.
Using Your Home Grown Watercress
Once you’ve harvested your own watercress, you can use it fresh or preserve the flavor for longer.
One of the simplest ways to preserve your watercress is to store it in a vase of water with rocks. To do this, fill a glass or vase with cool, clean water, then place the cut end of the stem in the water. Add a few stones to the bottom to keep the stems in place and keep the water cool and oxygenated. Change the water every few days to prevent it from becoming stagnant.
Another option is to blanch and freeze your watercress. Start by washing it thoroughly and trimming off any woody stems. Place it in boiling water for 1-2 minutes, then immediately shock in cold or iced water to stop the cooking process. Spread out on a baking tray and freeze until solid. Once frozen, store in an airtight bag or container in your freezer and use within 12 months.
Watercress can also be used in a variety of recipes such as soups, salads, sandwiches and smoothies – as well as being used as a garnish for plates. It’s also great for juicing – combine with other fruits and vegetables such as spinach, apples and celery for a refreshing drink that’s packed with nutrients.
Finally, if you have leftovers that you don’t want to go to waste, why not try propagating them? Cut off some healthy-looking stems and place them in a pot filled with moist soil or compost, then cover lightly with more soil or compost. Keep moist but not soggy until new shoots appear – then enjoy your homegrown watercress all over again!