

Turnips are a tasty and healthy root vegetable that grows easily in your own vegetable garden. Growing turnips may be a rewarding experience whether you’re a seasoned gardener or just getting started. They are not only a nutritious supplement to your diet, but they may also be used as a cover crop to boost soil health.
In this guide we’ll cover all you need to know to successfully produce turnips in your home garden. We’ll lead you through the entire process, from selecting the correct kind and preparing your soil to planting, caring for, and harvesting your turnips. We’ll also provide you pointers and tactics to assist you overcome typical issues and ensure a plentiful crop.
A Brief History
Turnips have a long and interesting history.
They were cultivated in Europe for centuries, with cows and pigs being fed the roots. In more recent times, turnips have become an exceptionally popular vegetable in many parts of the world.
Turnips were also used for medicinal purposes in some cultures, as early as the 3rd century BC. It was believed that the leaves of the turnip had healing properties. The ancient Romans even used them to treat snakebites.
The turnip was also a staple food during times of hardship. During World War II, the British government encouraged people to plant and eat turnips in order to make up for food shortages caused by the war.
Today, turnips are still an important part of many diets around the world. They are a valuable source of vitamins, minerals and fiber and can be used in a variety of dishes.
Nutritional Benefits
Turnips are a nutritious vegetable, that can provide a number of health benefits when consumed. They are low in calories, high in fiber, and contain a variety of vitamins and minerals.
Turnips are a great source of dietary fiber which helps to reduce pressure and inflammation in the colon. High-fiber foods can also reduce the risk of certain cancers. One medium-sized turnip contains 34 calories, 8 grams of carbohydrates, 2 grams of fiber and 1 gram of protein. It also contains 30% of your daily vitamin C as well as a source of vitamin A which is important for healthy skin and hair growth.
Turnip greens are another nutritious option. They are high in vitamin A and can be cooked or eaten raw in salads or stir-fries.
In order to get the most nutritional benefit from turnips, it is important to choose the right variety for your needs. For example, some varieties are better suited for cooking while others are better for eating raw. It is also important to choose a location in your garden that is well-drained and receives plenty of sunlight for optimal growth. Preparing the soil with compost or aged manure will help to ensure healthy growth as well as adding fertilizer when needed.
When harvesting turnips, it is important to wait until they reach their full size before pulling them from the ground. This will ensure maximum flavor and nutrition from your home grown crop. Once harvested, turnips can be stored in the refrigerator for up to two weeks or they can be preserved by pickling or freezing them.
Common Varieties & Their Uses
When it comes to selecting the right turnip variety for your garden, there are several factors to consider. Some turnip varieties are more suitable for spring planting, while others are best planted in the fall. Some varieties are more suitable for salads and other raw dishes, while others are better cooked. Here’s a look at some of the most popular turnip varieties and their uses:
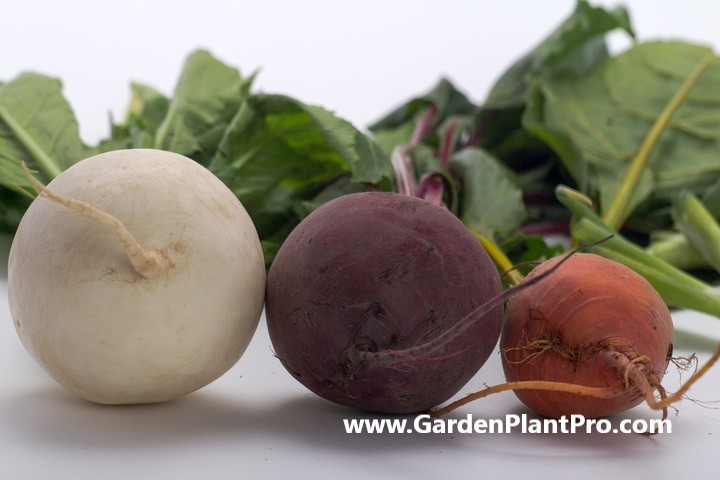
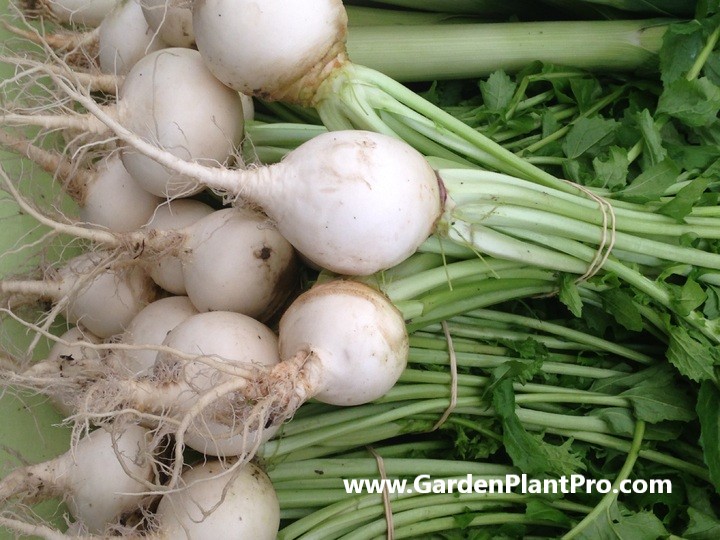
White Globe: This is a classic variety of turnip, with white-skinned roots that can grow up to four inches in diameter. The crisp white flesh has a sweet, mild flavor that is great for salads and roasting.
Purple Top White Globe: This variety has purple skin and white flesh. It is slightly sweeter than the White Globe variety, and its flesh remains firm when cooked. It is best used for boiling or steaming.
Hakurei: Hakurei is a small, round variety that has thin white skin and sweet, mild flavor. It is great for eating raw or lightly cooked in salads or stir-fries.
Golden Ball: This is a pale yellow variety of turnip with a mild flavor that becomes sweeter when cooked. It is best used in soups, stews and casseroles.
Japanese Salad Turnip: This variety is small, round and white with a sweet flavor that makes it ideal for salads and slaws.
Red Round: This is a mild-flavored variety of turnip with reddish-purple skin and crisp white flesh. It can be boiled, roasted or mashed.
DIY PROJECT: Collect rainwater no matter where you live...

This DIY project is the best way to legally collect rainwater NO MATTER where you live. Get chlorine-free water, cut down on your water bills, and have enough for an emergency situation or to water your garden. Read More Here...
Whichever variety you choose to grow in your garden, remember to sow seeds in well-drained soil in sun or partial shade at least two to three weeks before your region’s last frost date.
When To Sow
Depending on your climate and chosen planting season, turnips may be grown in both the spring and fall. Turnips love milder temperatures and may be planted as soon as the soil is workable in the spring. Seeds for an autumn harvest should be planted in mid to late summer, giving the turnips ample time to grow before the first frost.
Turnips can also be seeded in the winter in locations with moderate winters for a late winter or early spring crop. Keep in mind that turnips prefer colder temperatures and may struggle in hot summer conditions. If you reside in a hotter region, you should grow turnips in the cooler months.
Choosing A Suitable Location In The Garden
When choosing a suitable location in the garden to grow turnips, it is important to keep in mind the plant’s needs. Turnips prefer full sun and cool, moisture-retentive soil in an open, sunny location. They also require six to eight hours of direct sunlight daily.
When preparing the soil, it should be loosened to a depth of 12 to 15 inches and enriched with blood and bone fertilizer which will help the turnips grow better.
Once the soil is prepared and enriched, choose a sunny spot with well-drained soil for planting the turnip seeds or seedlings. The ideal temperature for growing turnips is between 40°F to 75°F but they can tolerate temperatures up to 85°F in brief bursts.
For those with limited space, it is possible to sow turnips in large containers outdoors for harvesting when small as baby veg. It is important to take into account the drainage of container pots when deciding where they should be placed in the garden so as not to damage surrounding plants or areas of the garden due to overwatering or run-off from fertilizer.
With careful consideration and preparation, you can create an ideal environment for your home grown turnips.
Preparing The Soil
Preparation of the soil is essential for successful turnip growth.
Before planting, it is important to make sure that the soil is well-drained, fertile, and free of rocks, weeds, and other debris. The pH level should be between 6.0 and 7.0. The best time to prepare the soil is in the fall before planting in the spring.
To prepare the soil, begin by clearing any rocks and debris from the area. If the soil is compacted or has poor drainage, you can use a tiller or spade to loosen it up. This will also help to aerate the soil and allow for better water and nutrient absorption. After this step is complete, you can add a layer of compost or aged manure to improve fertility.
For optimal growth, it is important to provide plenty of organic matter for your turnips. A combination of compost, aged manure, peat moss, and/or leaf mold will help improve water retention and provide additional nutrients for your plants. You can also use a slow-release fertilizer such as ammonium sulfate or potassium nitrate to provide additional nutrients during the growing season.
When planting seeds directly in the garden bed, make sure to space them out evenly according to their variety’s recommended spacing requirements. Planting too close together can lead to overcrowded plants and reduced yields.
When transplanting seedlings from trays or flats into the garden bed, be sure to carefully dig up each seedling using a small trowel or spoon. Gently loosen the roots before transplanting into your prepared bed for optimal growth and establishment of your turnips.
Planting The Seeds Or Seedlings
Planting the seeds or seedlings is an essential step in growing turnips. For seeds, it’s best to sow them directly into the growing position and cover them lightly with seed raising mix.
Rake and hoe the soil as usual before planting, making sure that it is not too wet or dry. When you’re ready to plant, dig small holes in the soil, making sure they are at least a half inch deep. Place one or two seeds in each hole and cover with soil or seed raising mix. Water well after planting and keep regularly watered throughout the growing season.
For seedlings, plant them in sun or partial shade in well-drained soil at a depth of half an inch. Plant rows 23–30cm (9–12in) apart for early varieties and 30cm (1ft) apart for maincrops. Make sure to thin out weak plants as the seedlings grow.

Do you have some charcoal in your house right now? We call charcoal a “miracle leftover” for anyone who wants to be a little more self-sufficient and cut costs. That’s because it can help you with so many different things around the house and garden. You can even use it to make an energy-free fridge. Read More Here...
For best results when growing turnips, make sure to choose a suitable location in your garden, prepare the soil properly before planting and water regularly throughout the season. Additionally, fertilize your turnips with a balanced fertilizer once or twice during their growth cycle and control common diseases, pests and weeds in order to ensure that your turnips will thrive.
Caring For The Seedlings
Once you have planted your turnip seeds or seedlings, it is important to care for them in order to ensure a successful harvest. The best way to do this is by providing consistent soil moisture and keeping weeds at bay.
Watering is key to keeping your turnip plants healthy, and an inch of water per week should be enough to prevent roots from drying out. Be sure not to overwater, as too much moisture can cause the roots to rot.
Weeds can easily compete with your turnip plants for resources, so it is important to keep them under control. Regularly hoeing the soil around the plants can help reduce weed growth, and mulching with a layer of organic material can also help suppress weed growth.
Fertilizing regularly will also help provide your turnip plants with the nutrients they need to thrive. A balanced fertilizer that is low in nitrogen can be applied every few weeks to encourage healthy growth.
Watering & Fertilizing
In order to ensure the healthiest and most abundant turnip crop, proper watering and fertilizing is essential. Turnips will germinate best in deeply watered soil, so when growing, the roots need consistent moisture.
For in-ground turnips, apply 1 inch of water a week if rain is not sufficient. Additionally, apply 1/2 cup of fertilizer per 10 square feet of ground into the top 4-6 inches of soil before planting. When planting, mix in a nice low organic fertilizer (such as a 5-5-5) about 12 inches into the soil.
Once the plants have emerged, fertilize them again six weeks later using 1/3 cup of a nitrogen-based fertilizer, such as 34-0-0 or 21-0-0 for every 10 feet. Always water after applying fertilizer to help it soak into the soil. After this point, however, avoid over-fertilizing with nitrogen or you’ll get leafy growth instead of roots.
Consistent water is key for this hardy root vegetable and regular watering will help it to reach its full potential. In summary, remember to water your turnip beds with 1 inch of water per week if rain isn’t sufficient and fertilize with 1/2 cup of fertilizer per 10 square feet before planting and 1/3 cup of nitrogen-based fertilizer every six weeks afterwards.

When & How To Harvest
Once the turnips have grown to the desired size, it is time to harvest.
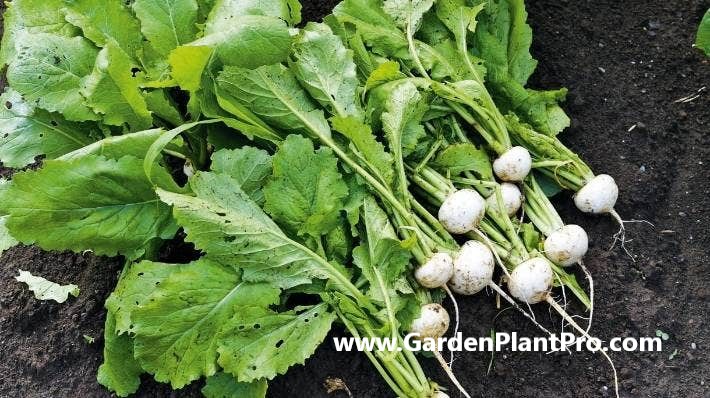
It is important to harvest turnips at the right time for maximum flavor and nutrition. The best time to harvest turnips is when they are between two and four inches in diameter. If left too long, they can become woody and taste bitter.
The easiest way to harvest turnips is to grasp each one firmly near the top of the root and pull it gently from the ground. Be careful not to damage the root or other plants around it. Once harvested, remove any excess soil and discard any that are damaged or diseased.
In addition to harvesting full-sized turnips, you can also pick young leaves and shoots for a fresh addition to salads or stir fries. Harvest these young leaves when they are no more than four inches in length.
After harvesting, it is important to store your turnips correctly so that they do not spoil quickly. Store them in a cool, dark place such as a refrigerator or a cellar. Wrap them in newspaper or paper towels before storing them away from moisture and light. When stored correctly, your turnips should last for several weeks before needing to be used or frozen for future use.
Storing & Preserving
Turnips can be stored in two ways: in the refrigerator for up to two weeks or in a root cellar for 8 to 10 months. To ensure successful storage, it is important to gently rub soil from the roots before storing. The greens should also be cut off close to the base of where they grow, as keeping the leaves on can make the vegetable rot while in storage.
The ideal storage temperature is between 32-35 degrees F, so the fridge is best. If storing turnips in a root cellar, ensure that it is a cool and humid environment. Store turnips away from other fruits and vegetables in order to avoid them from absorbing any odors. Make sure to store only the best turnips; damaged or bruised roots will not store well and should be eaten soon after harvest.
Turnips should be checked regularly for any signs of spoilage or mold. If any damage is found, use these turnips immediately and keep an eye on the remaining vegetables for any further damage.
CASE STUDY: We've been living off the grid for the last 40 years...

In all that time an electric wire has never been connected to our house. We haven’t gotten or paid an electricity bill in over 40 years, but we have all the electricity we want. We grow everything we need, here, in our small backyard. We also have a small medicinal garden for tough times. Read More Here...
Common Diseases & How To Control Them
Turnips and rutabagas are susceptible to a variety of diseases, including Alternaria leaf spot, downy mildew, and powdery mildew. But there are steps you can take to reduce the risk of these diseases.
If your turnip or rutabaga plants do contract this infection, you can use microbes (biofungicides) to help control it. Copper sprays may also be effective in controlling some diseases. It’s important to follow the package directions closely and make sure the spray covers all parts of the plant.
You can also help prevent disease by improving the soil in which you plant your turnips and rutabagas. Prepare the soil for planting by loosening it with a fork to a depth of about 30–38 cm (12–15 in). Remove any large rocks if present and incorporate 2–4 inches of organic matter into the soil.
Adding well-rotted manure or compost in spring or fall is also a great idea; however, you should avoid using fresh manure as it may contain harmful bacteria and increase weed growth.
Rotating your crops is another way to reduce the risk of disease. Avoid planting turnips in the same spot as cabbage or broccoli – they’re from the same family and this will help reduce soil borne diseases.
Common Pests & How To Control Them
Common pests can be a problem when growing turnips. White maggots, up to 9mm long, can tunnel into the edible parts of the root crops, ruining them. To prevent these pests from settling on your plants, there are a few steps you can take.
Firstly, prepare the soil for planting by loosening it with a fork to a depth of about 30–38 cm (12–15 in) and removing any large rocks if present. Incorporate 2–4 inches of organic compost into the topsoil before planting your turnips. This will help to provide essential nutrients to the soil and help to keep away pests.
You can also surround the turnip plants with reflective mulch like silver-colored plastic sheeting or aluminum foil. The reflective nature of these materials will confuse and repel many insect pests.
If you do spot any insects under leaves or on new growth, you can control them by contact using an insecticide spray or dusting with diatomaceous earth. Make sure to read and follow the label instructions carefully before applying any insecticides or other treatments.
Greens can be cut just above the root to regrow throughout the season without harming root development if harvested lightly, or cut the entire plant down about 2–3 inches above ground level. This will reduce pest populations as well as encourage new regrowth.
Beneficial Companion Plants
Beneficial companion plants can be an important part of growing turnips successfully. Plants like basil, beans, borage, broccoli, brussels sprouts, cabbage, cauliflower, celery, garlic, hyssop, kale and lettuce are all great companion plants for turnips. They can help to protect the turnip plants from pests and diseases, as well as adding additional nutrients to the soil.
When choosing companion plants for turnips, it is important to consider the particular needs of the turnip variety you are growing. For example, some turnips prefer a more acidic soil than others. Therefore, it is important to choose companion plants that will thrive in a similar conditions.
It is also important to avoid planting root vegetables in close proximity to your turnip plants. This is because root vegetables have a tendency to compete with one another for nutrients and water. If this competition becomes too intense it can result in stunted growth or even death for one or both of the plants.
Thyme and catnip are two herbs that make excellent companions for turnips. They are not only attractive additions to your garden but they also attract beneficial insects such as lacewings and ladybugs which can help control pests.
Garlic is another great companion plant for turnips. It helps repel pests while simultaneously providing essential nutrients to the soil. Cabbages, vetch, pole beans and broccoli are also good choices when looking for suitable companion plants for turnips.
When planting your companion plants it is important to remember that they should be planted at least six inches away from the main plant. This will ensure that the plants have enough room to grow without competing too much with one another for space or resources.
By carefully selecting suitable companion plants for your turnips you can ensure that your crop receives the best possible care throughout its growing season and beyond.
Using Your Home Grown Turnips
Once you have successfully grown your turnips, you can enjoy the fruits of your labour! Turnips are a versatile vegetable and can be used in a variety of dishes.
Boiled Turnips: Boiled turnips are a classic side dish. Simply rinse, peel, and boil the turnips until tender. Add salt, pepper, and butter for added flavour.
Mashed Turnips: Mashed turnips are a great alternative to mashed potatoes. Peel and cube the turnips before boiling in salted water until tender. Drain and mash with butter, milk, and seasonings.
Roasted Turnips: Roasted turnips are a delicious way to enjoy this vegetable. Preheat your oven to 450°F (232°C). Peel, cube, and toss the turnips with oil, salt, and pepper before spreading them out on a baking sheet. Roast for 25-30 minutes until golden brown and crispy.
Steamed Turnips: Steamed turnips are an easy side dish that can be prepared in just minutes! Peel and cube the turnips before adding them to a steamer basket with a little bit of water. Steam for 10 minutes or until tender.
Stir-Fried Turnips: Stir-fried turnips are one of the quickest ways to prepare this vegetable! Start by peeling and slicing the turnip into thin strips or cubes. Heat oil in a wok or skillet before stir-frying the turnip for 3-4 minutes until crisp-tender. Add your favourite seasonings like garlic or ginger for extra flavour.
Pickled Turnips: Pickled turnips are a great way to preserve this vegetable for later use! Peel and slice into thin rounds before adding to a sterilized jar with vinegar, sugar, salt, and spices of your choice. Cover and refrigerate for at least 3 days before enjoying this tangy treat!