
Your plant isn’t a slow grower; it is just trapped in a biological desert. Most store-bought potting mixes are sterile and dead. To see your Dieffenbachia truly explode with growth, you need to move beyond simple dirt. Discover how a living ecosystem of microbes and fungi can feed your roots and triple your plant’s size.
Walking through the aisles of a garden center, it is easy to get lured in by the brightly colored bags promising “miracle” growth. Most of those bags contain little more than peat moss and a handful of synthetic fertilizer beads. For a tropical powerhouse like the Dieffenbachia, this is the equivalent of living on a diet of vitamin-fortified cardboard. These plants come from the lush, humid floors of Central and South American rainforests, where the ground is a vibrating, living community of decomposition and symbiosis.
When you bring one of these “Dumb Canes” into your home, you are asking a jungle resident to live in a sanitized plastic pot. If the soil is biologically dead, the plant must work ten times harder to absorb nutrients. By switching to a living soil approach, you turn the soil into a partner that actively prepares food for the roots. This isn’t just about “dirt”—it is about engineering a habitat that breathes, eats, and grows alongside your plant.
Best Potting Mix For Dieffenbachia Growth
The best potting mix for Dieffenbachia growth is a chunky, well-aerated, and biologically active “aroid” blend. Unlike typical houseplants that might tolerate a dense, heavy soil, Dieffenbachia roots have a high demand for oxygen. If you look closely at the roots of a healthy specimen, they are thick, white, and fleshy—almost like noodles. These specialized roots are designed to navigate the loose, organic debris of a forest floor rather than a compacted garden bed.
A high-performing mix serves three primary masters: drainage, moisture retention, and microbial activity. Drainage is non-negotiable because Dieffenbachia are notoriously susceptible to root rot if water lingers around the root crown for too long. Moisture retention is equally vital because those large, broad leaves act like massive solar panels that evaporate water quickly. Finally, the microbial component ensures that organic matter is constantly being broken down into a form the plant can actually swallow.
In real-world terms, this means moving away from the “all-purpose” potting soil and toward a recipe that mimics the humus layer of a rainforest. Imagine the top few inches of a forest: it is a mix of fallen leaves, bits of bark, bird droppings, and a network of fungal threads. When we replicate this in a container, we use materials like orchid bark, perlite, and worm castings to create that same porous, nutrient-rich environment. This prevents the soil from turning into a “brick” of mud after a few months of watering.
The Anatomy of a High-Growth Substrate
The foundation of your mix should be a base of coco coir or high-quality sphagnum peat moss. These materials hold on to water without becoming heavy, but they are essentially “blank slates” with very little nutrient value. To make this base effective for growth, we add “chunky” amendments. Orchid bark is a favorite among seasoned gardeners because it provides physical structure that doesn’t collapse over time. Perlite or pumice acts as the “lungs” of the soil, ensuring that even when you water, there are always tiny pockets of air available for the roots to breathe.
How to Create a Living Aroid Mix Step-by-Step
Creating your own mix is simpler than it sounds, and it allows you to control the exact environment your plant lives in. Start by gathering your materials. You will need a large mixing tub or even a clean tarp spread out on the garage floor. The “Golden Ratio” for a thriving Dieffenbachia is typically two parts base, one part drainage, and one part aeration, enriched with organic amendments.
- 2 Parts Base: Use coco coir or a high-quality, peat-based potting soil. If you choose coco coir, make sure it has been rinsed to remove any salts.
- 1 Part Drainage: Use coarse perlite or pumice. Pumice is slightly heavier and won’t float to the top of the pot like perlite does.
- 1 Part Aeration: Use medium-sized orchid bark or fir bark. This provides the “chunks” that prevent compaction.
- The Biological Kick: Add 15% to 20% by volume of fresh worm castings. These are the gold standard for introducing beneficial bacteria.
- The Fungal Network: Sprinkle a handful of mycorrhizal fungi powder directly onto the root ball when planting or mix it into the substrate.
Begin by hydrating your base material. Coco coir usually comes in a compressed brick that needs to be soaked in a bucket of water until it expands. Once it is fluffy, start adding your perlite and bark. Mix it thoroughly with your hands; you want the distribution to be even so the plant doesn’t encounter a “pocket” of pure bark or pure peat. Finally, fold in your worm castings and any dry organic fertilizers. This process is often called “cooking” the soil if you let it sit for a week or two before use, allowing the microbes to wake up and start their work.
Adjusting for Your Environment
Gardeners in more humid climates like Florida or Queensland might find that their soil stays wet for too long. If you live in a high-humidity area, you should increase the perlite and bark to 40% of the total mix. Conversely, if you are growing your Dieffenbachia in a dry, air-conditioned apartment in New York or London, you might want to add a bit more coco coir to keep the roots from drying out too fast. Listen to your plant—if the leaves droop every three days, the mix might be too airy; if the soil is still soggy after ten days, it needs more drainage.
Benefits of Using a Living Soil Ecosystem
The primary advantage of a living soil mix is resilience. When you rely solely on synthetic fertilizers, your plant is on a “life support” system. If you forget to fertilize, the growth stops immediately. In a living system, the microbes act as a pantry, storing and releasing nutrients over a longer period. This creates a much more stable growth rate and prevents the “boom and bust” cycles that can stress a tropical plant.
Beneficial fungi, specifically mycorrhizae, form a symbiotic relationship with the Dieffenbachia’s roots. They effectively extend the root system’s reach by sending out microscopic filaments into the soil to grab water and phosphorus that the plant couldn’t reach on its own. In exchange, the plant gives the fungi sugars produced through photosynthesis. This partnership can result in a plant that grows up to 50 centimeters (about 20 inches) taller in a single season compared to one in sterile soil.
Furthermore, a living mix naturally suppresses many soil-borne diseases. Beneficial bacteria like Bacillus subtilis can outcompete “bad” fungi that cause root rot. It is like having a tiny security force living in your pot. While no soil can completely prevent rot if the plant is drowning in water, a biologically active mix provides a significant buffer that gives you more room for error.
Challenges and Common Mistakes
The biggest mistake gardeners make is using a pot that is too large for the root ball. Even the best mix can’t save a plant if there is a massive volume of soil that stays wet because the roots aren’t large enough to drink it all. Always choose a pot that is only 3 to 5 centimeters (1 to 2 inches) wider than the current root mass. This ensures the plant can “control” the moisture levels in the pot.
Another common pitfall is over-compacting the soil during the repotting process. It is tempting to push down hard to make the plant feel “secure,” but this collapses those vital air pockets we worked so hard to create. Instead, tap the sides of the pot to settle the soil around the roots. If the plant feels wobbly, use a bamboo stake for support until the roots grow into the new mix.
Watch out for “hydrophobic” soil. If you let a peat-based mix dry out completely, it can actually start to repel water. You might pour a liter of water in, and it just runs down the sides and out the bottom, leaving the root ball bone-dry. If this happens, you need to bottom-water the plant by sitting the pot in a basin of water for 30 minutes to allow the core to rehydrate.
Limitations: When a Custom Mix Might Not Work
While a custom living mix is superior for growth, it does require more maintenance in terms of observation. You can’t just set it and forget it. Because these mixes are more porous, they often dry out faster than the heavy store-bought stuff. If you are a traveler who is gone for weeks at a time, a highly aerated mix might leave your plant thirsty unless you have an automated irrigation system.
Cost is another factor. Purchasing high-quality orchid bark, pumice, and worm castings individually is more expensive than buying a single bag of “potting soil.” However, for many of us, the health of our plants is an investment. If you have a rare variety like a Dieffenbachia ‘Reflector’ or ‘Crocodile’, the extra few dollars for a premium mix is cheap insurance against losing an expensive plant to root rot.
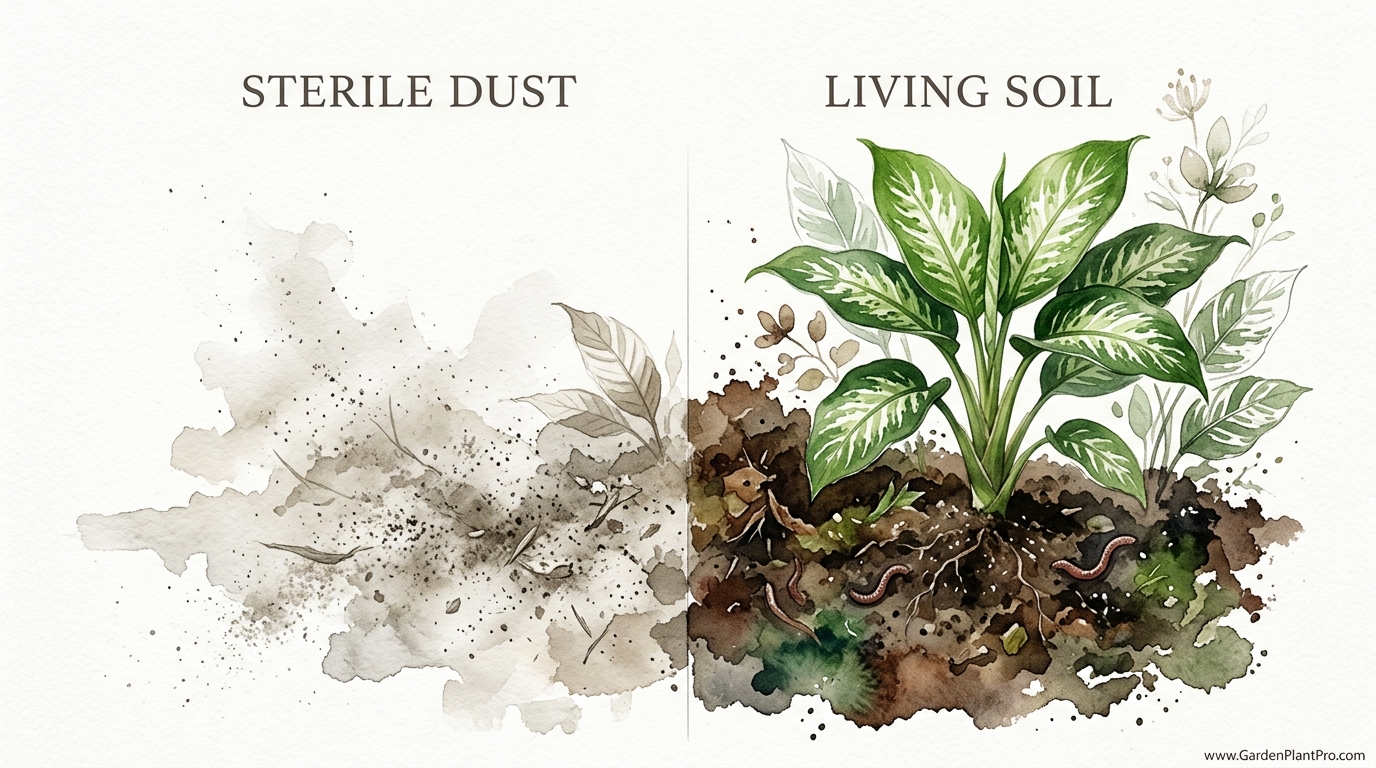
Comparison: Sterile Mix vs. Living Soil
Understanding the difference between these two approaches can help you decide which path to take for your garden. While both can grow a plant, they do so in very different ways.
DIY PROJECT: Collect rainwater no matter where you live...

This DIY project is the best way to legally collect rainwater NO MATTER where you live. Get chlorine-free water, cut down on your water bills, and have enough for an emergency situation or to water your garden. Read More Here...
| Feature | Sterile Potting Mix | Living Aroid Mix |
|---|---|---|
| Nutrient Source | Synthetic salts/beads | Microbial breakdown of organics |
| Drainage | Moderate to Low | High (due to bark and perlite) |
| Root Health | Susceptible to rot | Resilient with fungal support |
| Cost | Low ($5–$10 per bag) | Higher ($20–$40 for ingredients) |
| Longevity | Compacts within 6-12 months | Stays airy for 2+ years |
Practical Tips for Soil Maintenance
Even the perfect mix will eventually break down. Over time, the orchid bark will decompose, and the perlite might shift. To keep the “engine” running, you should top-dress your pot every spring. This involves removing the top 2 to 3 centimeters (about an inch) of old soil and replacing it with fresh worm castings or a bit of compost. This “recharges” the microbial population without the trauma of a full repot.
When watering, always try to use filtered water or water that has sat out overnight. Most city water contains chlorine or chloramine, which are designed to kill bacteria. While they are safe for humans, they can be tough on the beneficial microbes in your living soil. Using “stale” water allows some of these chemicals to dissipate, keeping your soil’s biological community happy and productive.
- Check the pH: Dieffenbachia prefer a slightly acidic environment (pH 6.1 to 6.5). If your water is very alkaline, the plant might struggle to absorb iron, leading to yellow leaves.
- Flush the Pot: Every three months, take your plant to the shower and run plenty of water through the soil to wash away any excess salts that might have built up.
- Monitor Temperature: These plants hate “cold feet.” Keep the pot off cold stone floors during the winter, as cold soil can cause the roots to go dormant or rot.
Advanced Considerations for Serious Growers
For those looking to push their Dieffenbachia to its absolute limit, consider adding biochar to your mix. Biochar is a form of charcoal that has been “charged” with nutrients and microbes. It acts like a permanent reef for soil biology, providing billions of tiny “apartments” where bacteria can hide and thrive. Unlike bark, biochar never breaks down, meaning your soil structure will remain perfect for years.
You can also experiment with humic acid. This is a concentrated form of organic matter that makes nutrients more “available” to the plant. Think of it as a lubricant for nutrient uptake. A small dose of humic acid once a month during the growing season can lead to leaves that are noticeably thicker and more vibrant. This is particularly effective for variegated varieties where the contrast between the green and white parts of the leaf is the main attraction.
Scaling your soil management is also important if you have a large collection. If you have ten or twenty large tropicals, it is often more efficient to mix your soil in a 50-liter (13-gallon) bin and keep it sealed. This “pre-mixed” soil actually gets better with age as the microbes colonize the entire batch. Just make sure the mix stays slightly damp so the biology doesn’t go dormant.
Real-World Example: Reviving a “Dumb Cane”
Consider a typical scenario: A gardener has a Dieffenbachia amoena that has stopped growing. It has been in the same pot for three years, using standard garden center soil. The leaves are small, and the lower ones keep turning yellow and mushy. Upon inspection, the soil feels like a heavy, cold sponge. There are no visible white root tips; everything is a dull, brownish color.
To fix this, the gardener removes the plant and shakes off the old, compacted dirt. They trim away any mushy roots and soak the remaining root ball in a weak solution of seaweed extract. They then repot the plant into a fresh aroid mix with 30% orchid bark and a healthy dose of mycorrhizal fungi. Within four weeks, the plant produces its first new leaf in six months—one that is twice the size of the previous ones. Within a year, the plant has doubled in height because the roots are finally able to “breathe” and access the nutrition they need.
Final Thoughts
Your Dieffenbachia is a tropical athlete, and the soil is its training ground. By moving away from sterile, dead potting mixes and embracing a living, chunky ecosystem, you are providing the exact conditions the plant has spent millions of years evolving for. It isn’t just about feeding the plant; it is about building a home where the roots can thrive without fear of suffocation or starvation.
Don’t be afraid to get your hands dirty and experiment with your ratios. Gardening is as much about observation and intuition as it is about following a recipe. Pay attention to how the soil feels when you stick your finger in it, and watch how the plant responds to its new environment. With a little bit of bark, a handful of worms, and a healthy dose of fungi, you will see your “Dumb Cane” transform into the lush, bold centerpiece it was always meant to be.
As you master the art of the perfect mix, you might find yourself looking at your other houseplants with new eyes. Many tropical favorites like Monsteras, Philodendrons, and Alocasias will respond just as vigorously to this “living soil” philosophy. It is a journey into the hidden world beneath the surface—a world that holds the secret to truly spectacular growth.