

One of these methods kills the plant within a season, while the other guarantees a decade of harvests. Most gardeners treat sage like a hedge, hacking away at the top and wondering why it turns into a woody, dead mess. The secret isn’t more water—it’s knowing exactly where to pinch. Learn the surgical approach to keep your sage vibrant and productive for years.
I have spent years watching folks in the neighborhood struggle with their herb patches. They plant a beautiful, soft-leaved sage in the spring, and by the following summer, it looks more like a bundle of dry kindling than a culinary treasure. It is a common sight, but it is entirely avoidable if you understand the biology of the plant. Sage is a Mediterranean shrub at heart, and it wants to grow tall and leggy to reach the sun, eventually hardening its stems into solid wood.
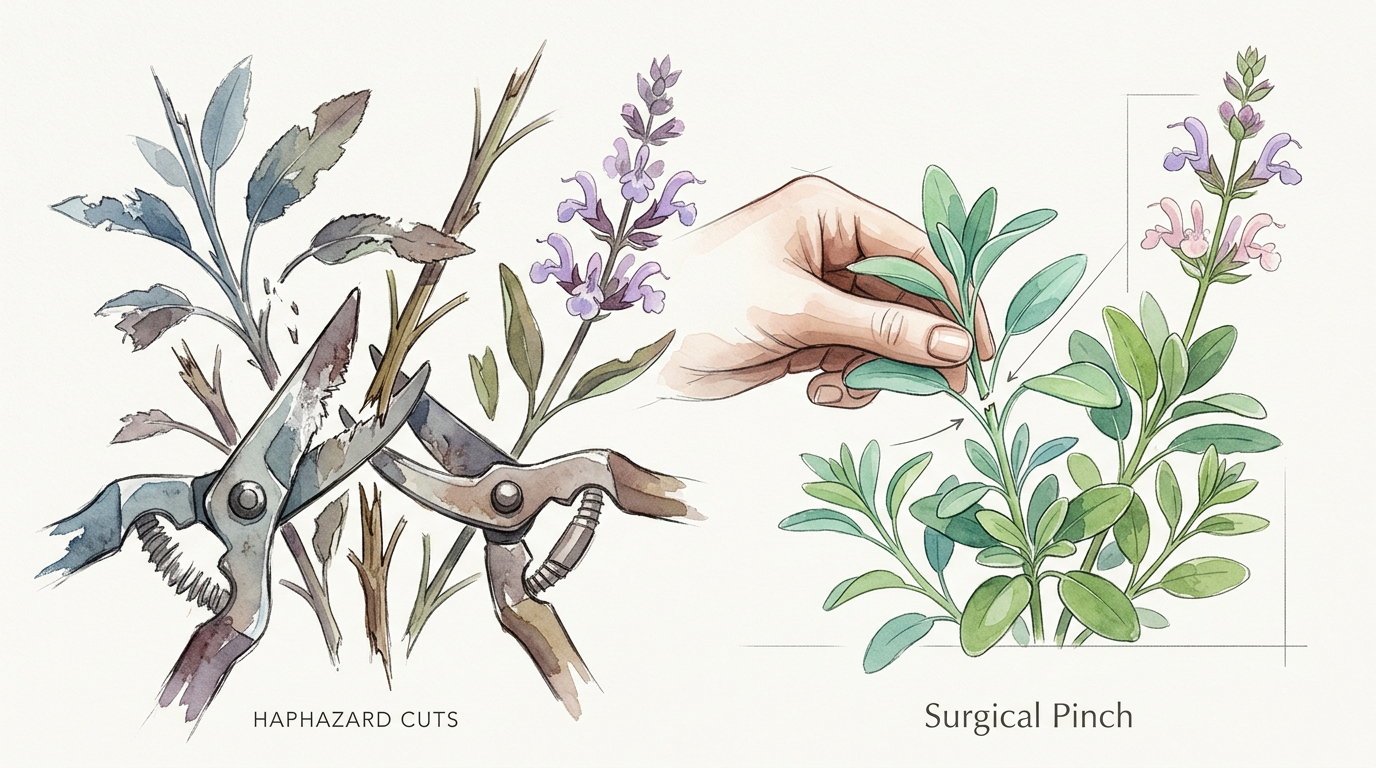
When you approach your sage with a pair of shears, you are doing more than just tidying up. You are directing the plant’s energy and deciding whether it will stay a lush, green mound or become a sprawling, brittle eyesore. This guide is about moving past the “haphazard cuts” that leave your herbs vulnerable and adopting a “surgical pinch” that triggers massive, healthy growth.
How To Prune Sage For Maximum Growth
Pruning sage is the process of selectively removing parts of the plant to encourage new, leafy stems while preventing the base from becoming overly woody. In the real world, sage (Salvia officinalis) is a perennial sub-shrub. This means it has a foot in two worlds: it produces soft, edible green growth every year, but its older stems eventually turn into “wood” that does not easily sprout new leaves. If you don’t manage this balance, the green part moves further and further away from the roots, and the center of your plant dies out.
Think of your sage plant like a factory. The green leaves are the solar panels powering the operation. If you let the plant get too tall without pruning, the factory has to spend all its energy transporting water and nutrients through long, woody “pipes” just to reach a few leaves at the top. By pruning, you keep the factory compact and efficient. This ensures that every bit of energy the plant absorbs from the sun goes directly into producing those aromatic oils that give sage its signature flavor.
Proper pruning also serves a vital environmental purpose. Sage is susceptible to powdery mildew and root rot if the air around it gets stagnant or the soil stays too damp. A well-pruned plant has an open structure that allows the breeze to move through the branches, drying out the leaves after a rain and keeping fungal spores from taking hold. It is not just about looks; it is about survival.
The Step-by-Step Surgical Approach
The difference between a thriving sage and a dying one often comes down to the precision of your cuts. You want to avoid “hacking” at the plant with no clear goal. Instead, follow this methodical process to ensure the best results for your herb garden.
1. Timing Your First Cut
Wait until you see the first signs of green life in the early spring. In most regions, this happens after the danger of the last hard frost has passed. You should see tiny green nubs appearing along the stems. This is your signal that the plant is awake and ready to heal. Never prune in late autumn or winter, as the fresh cuts will leave the plant open to freezing temperatures and damp-induced rot.
2. The Two-Thirds Rule
For an established sage plant, you can safely remove up to two-thirds of the overall height. However—and this is the most important rule in this entire guide—you must never cut back into the “dead” wood where no green growth is visible. If you cut a stem down to a spot that has no leaves or budding nodes, that stem will likely die. Always make your cut about 1/4 inch (approximately 6 millimeters) above a healthy pair of leaves or a visible growth node.
3. Using the 45-Degree Angle
When you make your cut, always angle your shears at 45 degrees. This prevents water from sitting on the flat surface of the cut, which is a major cause of stem rot. The water should be able to roll right off the “wound.” Use sharp, sterilized bypass pruners or heavy-duty herb snips. Dull blades will crush the stem rather than slicing it, which invites disease.
4. Thinning for Airflow
Once you have addressed the height, look at the center of the plant. If it is a tangled mess of crossing branches, remove a few of the oldest, woodiest stems right at the base of the plant. This “opening up” of the center is what seasoned gardeners call “letting the birds fly through.” It is the best defense against the humid summer air that turns sage leaves gray with mildew.
Why Precision Matters for Long-Term Harvests
The benefits of a surgical approach to pruning are measurable and immediate. By using precise pinches and cuts, you are manipulating the plant’s hormones—specifically auxins—which are responsible for vertical growth. When you snip the tip of a stem, those hormones are redistributed to the side buds, forcing the plant to branch out and become bushier.
Increased Essential Oil Concentration: When a sage plant is kept compact, it doesn’t struggle to move nutrients. This allows the plant to concentrate its essential oils in the leaves. You will notice that a properly pruned sage has a much stronger aroma and a more pungent flavor than a leggy, neglected one. For the cook, this means you need fewer leaves to achieve the same culinary impact.
Extended Plant Lifespan: A sage plant that is “haphazardly” cut often dies within three to four years because it becomes a hollow, woody shell. A surgically managed plant can remain productive for eight to ten years. By keeping the growth close to the crown of the plant, you prevent the stems from becoming too heavy and splitting under the weight of snow or heavy rain.
Aesthetic Appeal: Let’s be honest—we want our gardens to look good. A surgical pinch keeps the sage in a neat, rounded mound. This makes it an excellent “edge” plant for garden borders or a centerpiece for a container garden. It looks intentional and cared for, rather than looking like a weed that got out of hand.
Avoiding the “Woody Mess” Pitfall
The most common mistake I see beginners make is treating sage like a perennial flower that can be cut to the ground in the winter. If you do this to sage, it will almost certainly die. Sage is a sub-shrub, and it needs those woody stems to support the new growth. If you cut off all the “active” nodes near the top, the plant has no way to photosynthesize and rebuild itself.
Another frequent error is “over-harvesting” during the plant’s first year. A young sage needs every leaf it can get to establish a strong root system. If you start hacking away for your Thanksgiving stuffing before the plant is at least 6 to 8 inches (15 to 20 centimeters) tall, you are stunting its long-term potential. Be patient in year one; the reward in year two and beyond will be worth it.
Gardeners also tend to forget about the “secondary” prune. After sage flowers in the summer, the flower stalks turn brown and unsightly. Many people leave them there, but this signals to the plant that it is time to go dormant and produce seeds. By snipping those flower stalks off immediately after the blooms fade, you “trick” the plant into staying in its vegetative growth phase, giving you another flush of leaves before the end of the season.
When the Pruning Shears Should Stay in the Shed
There are times when the best thing you can do for your sage is nothing at all. Understanding these limitations is what separates the masters from the amateurs. Environmental conditions play a massive role in how the plant recovers from a cut.
- During a Heatwave: If the temperature is soaring above 90°F (32°C), do not prune. The plant is already stressed by the heat and trying to conserve moisture. Cutting it opens up wounds that will lose water rapidly, potentially leading to wilting or death.
- In Late Autumn: As the days get shorter and the first frost approaches, put the shears away. New growth triggered by pruning is tender and full of water. A sudden freeze will turn that new growth into mush, which can lead to rot that travels down into the main crown of the plant.
- When the Plant is Diseased: If your sage is already struggling with a heavy infestation of aphids or a bad case of root rot, pruning may be the “final straw.” Address the underlying health issue—usually by improving drainage or using an organic soap spray—before you ask the plant to expend energy on new growth.
Comparing Sage Varieties and Their Needs
Not all sage is created equal, and while the “surgical pinch” is a universal concept, some varieties require a slightly different touch. Knowing what you have in the ground will help you tailor your approach.
DIY PROJECT: Collect rainwater no matter where you live...

This DIY project is the best way to legally collect rainwater NO MATTER where you live. Get chlorine-free water, cut down on your water bills, and have enough for an emergency situation or to water your garden. Read More Here...
| Variety | Growth Habit | Pruning Intensity |
|---|---|---|
| Common Sage (S. officinalis) | Upright, fast-growing, very woody. | Moderate to Heavy; needs annual spring cut. |
| Berggarten Sage | Broad, low-mounding, stays compact. | Light; mostly just thinning for airflow. |
| Purple/Tricolor Sage | Slower growing, less hardy. | Gentle; avoid heavy 2/3 cuts; pinch tips only. |
| Pineapple Sage (S. elegans) | Very tall, herbaceous (non-woody). | Can be cut almost to ground in spring. |
If you are growing the variegated varieties like ‘Tricolor’ or ‘Golden Sage,’ be aware that they are generally less vigorous than the standard green common sage. They don’t recover as quickly from a heavy pruning, so I recommend a “little and often” approach with these. Pinch the tips every few weeks during the growing season rather than doing one massive cut in the spring.
Practical Tips for a Healthier Herb Patch
Beyond the actual cutting, there are several things you can do to ensure your sage responds well to your pruning efforts. These are the small details that make a big difference in the garden.
- Clean Your Tools: Before moving from one plant to another, wipe your blades with rubbing alcohol or a 10% bleach solution. This prevents the spread of soil-borne pathogens.
- Soil Drainage is Key: Sage loves “lean” soil. If your soil is heavy clay, the stress of pruning can trigger root rot. Consider growing your sage in raised beds or adding a handful of grit to the planting hole.
- Water at the Base: After a spring pruning, the plant is vulnerable. Avoid overhead watering, which gets the fresh wounds wet. Instead, use a soaker hose or water by hand at the soil level.
- Mulching for Moisture: While sage is drought-tolerant, a thin layer of gravel or light mulch around the base (but not touching the stem) helps keep the roots cool after a heavy prune.
From Pruning to Preservation
For the serious practitioner, pruning isn’t just about maintenance—it is the first step in harvesting. When you perform your spring or summer prune, don’t throw those stems away. This is the prime material for drying or making sage-infused oils.
The best time to harvest for flavor is in the morning, just after the dew has evaporated but before the sun gets high enough to start evaporating the plant’s essential oils. If you are doing a large-scale pruning, gather your clippings and tie them in small bundles. Hang them upside down in a dark, well-ventilated area. Within two weeks, the leaves should be crisp enough to crumble into a jar for winter use.
If you find that your plant is simply too old and woody to respond to pruning—usually after the 5-year mark—use your pruning session to take cuttings. Snip a 4-inch (10-centimeter) piece of soft, new growth from the tip, remove the lower leaves, and stick it in a pot of sandy compost. This way, you are always “cycling” your sage and ensuring you never run out of fresh leaves.
Scenario: Rescuing a Neglected Sage Shrub
Imagine you have moved into a new house and found a sage plant that hasn’t been touched in three years. It is 3 feet (1 meter) wide, a foot tall, and looks like a pile of gray sticks with a few green leaves at the very ends. Most people would pull it out, but you can save it with a two-year plan.
Year One: Do not cut it back all at once. In the spring, identify the stems that have the most green growth. Cut those back by only one-third, making sure you stay well above the wood. For the stems that are completely bare, leave them alone for now—they are the “lungs” of the plant. Throughout the summer, pinch the very tips of the new green growth to encourage it to fill in the center.
Year Two: Now that the plant has gained some vigor, you can be more aggressive. In the following spring, look for new green shoots that may have emerged lower down on the woody stems. Cut back to these new shoots. By the end of the second year, the “surgical” approach will have transformed that mess into a productive, tidy shrub again.
Final Thoughts
Mastering the art of pruning sage is one of those small gardening skills that pays massive dividends. It is the difference between having a plant that you replace every year and having a garden staple that grows with you for a decade. By moving away from haphazard hacking and adopting a surgical, node-based approach, you respect the plant’s biology and encourage it to thrive.
Remember that gardening is a conversation with the soil. Your sage will tell you what it needs—if it’s getting too leggy, it’s asking for a pinch; if the center is gray and damp, it’s asking for airflow. Take the time to look closely at the leaf nodes and the structure of the stems before you make your first cut. Your kitchen, and your garden, will be better for it.
Once you have mastered your sage, you might find yourself looking at the rest of your herb garden with new eyes. Many of these principles—like airflow and node-based cutting—apply to rosemary, lavender, and thyme as well. Keep experimenting, keep observing, and keep your shears sharp. There is always more to learn from a simple patch of dirt and a few aromatic leaves.