

Stop hunting for worms and let nature’s decoys do the heavy lifting for your brassicas. Are you spending your weekends on your hands and knees hunting for cabbage loopers? There is a strategic way to protect your harvest that uses companion planting to lure pests away. Learn how a simple flower border creates a ‘sacrificial’ zone so your cabbages can grow to trophy size.
I have spent more mornings than I care to admit with a bucket of soapy water, peering under the broad, waxy leaves of my kale and collards. If you have ever grown a member of the brassica family, you know the heartbreak of finding a beautiful head of cabbage riddled with holes that look like they were made by a miniature shotgun. Those velvety green caterpillars have a way of appearing out of thin air, perfectly camouflaged against the ribs of your plants.
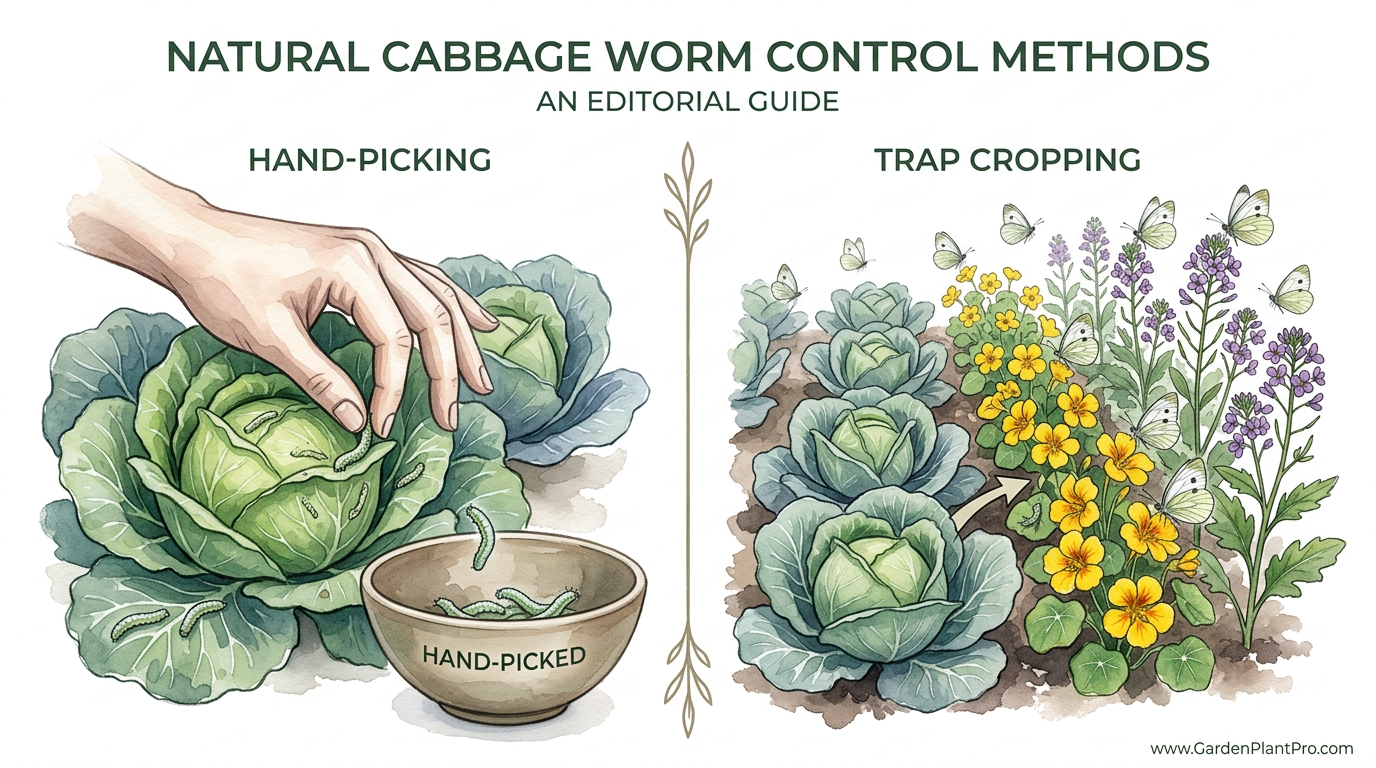
While many folks swear by the old-fashioned method of hand-picking every single larva, there comes a time in every gardener’s life when the knees start to protest. That is where trap cropping comes in. It is a bit like playing a game of chess with the local moth population. Instead of trying to keep them out entirely, you give them something they like even better than your prize-winning broccoli.
In the world of organic gardening, we call these “sacrificial plants.” By placing a more attractive host nearby, you can concentrate the pests in one spot, making them easier to manage without spraying your entire dinner plate with chemicals. It is a lesson I learned after decades of trial and error, and it has completely changed how I plan my spring and fall garden beds.
Natural Cabbage Worm Control Methods
Natural cabbage worm control is less about total eradication and more about smart management. When we talk about “cabbage worms,” we are usually dealing with three main culprits: the imported cabbageworm, the cabbage looper, and the diamondback moth. Each of these starts as a fluttering visitor to the garden—like those pretty white butterflies with black spots on their wings—but they leave behind eggs that quickly turn into hungry eating machines.
The core of a natural approach involves breaking the cycle of these pests without disrupting the rest of the garden’s ecosystem. One of the most effective strategies is trap cropping. This method involves planting specific varieties that are known to be irresistible to these pests. Think of it as a diversionary tactic; the moths see the “trap” first and decide that is where they want to start their family, leaving your main crops in peace.
Outside of decoys, natural control also includes hand-picking, which is the most direct but labor-intensive method. Many gardeners also use floating row covers, which act as a physical barrier to keep moths from ever reaching the leaves. However, trap cropping is unique because it works with the biology of the insect rather than just fighting against it. It is often used in larger homestead gardens or market gardens where covering every single plant isn’t always practical.
The Main Culprits to Watch For
Understanding which worm you are fighting helps you pick the right trap. The Imported Cabbageworm (Pieris rapae) is a slow-moving, velvety green caterpillar that usually hangs out right against the leaf vein. The Cabbage Looper (Trichoplusia ni) moves like an inchworm, arching its back because it lacks middle legs. Finally, there is the Diamondback Moth (Plutella xylostella) larva, which is much smaller and tends to wriggle frantically when you touch it.
How Trap Cropping Works in Your Garden
The principle behind a trap crop is “host preference.” Research has shown that certain insects are up to 11 times more likely to lay their eggs on specific “decoy” plants than on the main crop. For example, Indian Mustard (Brassica juncea) is like a neon sign for diamondback moths. They will fly right past a row of green cabbage to get to the mustard greens.
To make this work, you need to think about timing and placement. If you plant your trap crop at the exact same time as your main crop, the pests might not find it fast enough. I usually try to get my “sacrificial” plants in the ground about 2 to 3 weeks before my main brassicas. This gives them time to develop a large enough leaf surface to be seen from the air by those searching butterflies.
As for the “how-to,” you have two main layout options. You can create a perimeter trap, which means planting a border of the decoy plant all the way around your garden bed. This acts as a biological fence. The other option is intercropping, where you plant a trap crop every few feet within the row. For a small backyard bed, a border is usually easier to manage because it keeps the “messy” infested plants away from your tidy harvest zone.
Step-by-Step Setup
- Select your decoy: Choose Indian mustard, nasturtiums, or collards depending on your most common pest.
- Plan the spacing: Place the trap plants roughly 4 to 6 feet (1.2 to 1.8 meters) away from your main crop if using a border, or interplant one decoy for every four or five production plants.
- Plant early: Aim for a 14-day head start for the decoys.
- Monitor daily: Check the trap plants for the first signs of eggs (tiny white dots) or “window-paning” in the leaves.
The Best Plants for the “Sacrificial” Zone
Not all plants are created equal when it comes to luring pests. Over the years, I have found a few “superstars” that consistently do the heavy lifting. Indian Mustard is arguably the king of trap crops for the brassica family. It contains high levels of glucosinolates—the chemicals that give mustard its “bite”—which are exactly what the moths are looking for when they scout for a place to lay eggs.
Nasturtiums (Tropaeolum majus) are another classic choice. Not only are they beautiful and edible for us, but their peppery scent acts as a magnet for cabbage worms and loopers. They grow quickly and can handle quite a bit of damage before they give up the ghost. I like to use the climbing varieties on a small trellis at the end of a bed to maximize the “scent trail” in the wind.
If you are struggling specifically with cabbage moths, Collard Greens can actually serve as a great trap for your more sensitive cabbage or broccoli. They have a massive amount of leaf surface area and can host a large population of caterpillars without dying. Just remember that if you use collards as a trap, you shouldn’t plan on eating those specific leaves unless you want a little extra protein you weren’t expecting.
Top Trap Crop Recommendations
| Trap Plant | Primary Target Pest | Benefit |
|---|---|---|
| Indian Mustard | Diamondback Moth, Flea Beetles | Highly attractive; easy to grow from seed. |
| Nasturtiums | Cabbage Worms, Aphids | Beautiful flowers; also repels some beetles. |
| Collards | Cabbage Moths, Loopers | Durable; huge leaves provide plenty of “room” for pests. |
| Radishes | Flea Beetles | Grows incredibly fast; saves young seedlings. |
Benefits of This “Nature-First” Approach
The most obvious benefit is the reduction in labor. Instead of crawling through ten rows of kale to find worms, you only have to focus your attention on the few trap plants you’ve set out. When those decoys get heavily infested, you can simply pull them up, bag them, and toss them in the trash, effectively removing hundreds of future pests from your garden in one go.
Using this method also preserves beneficial insects. When you don’t spray pesticides—even organic ones like Bt (Bacillus thuringiensis)—on your main crops, you allow predatory wasps and ladybugs to thrive. Many of these “good bugs” actually move into the trap crop to feast on the concentrated pest population. It is like setting a buffet for the creatures that help you keep the garden in balance.
There is also an aesthetic advantage. A border of bright orange and yellow nasturtiums looks a whole lot better than a garden covered in plastic row covers or white netting. It makes the garden feel like a living ecosystem rather than a sterile production zone. For those of us who garden for the joy of it as much as the food, that matters.
Challenges and Common Mistakes
The biggest mistake I see beginners make is forgetting to “empty the trap.” If you let the caterpillars on your trap crop finish their life cycle, they will pupate and turn into even more moths. You have to be willing to destroy the trap plant once it is heavily infested. Think of it as a sponge; eventually, it gets full and you have to wring it out or get a new one.
Another pitfall is poor timing. If the cabbage plants are already 6 inches (15 cm) tall before you even think about the trap crop, the moths have likely already found your main harvest. You have to plan ahead and get those decoys started when you are first prepping your soil for the season. I often start my mustard seeds in the house or a cold frame a few weeks before the last frost to ensure they are ready.
Under-planting is also a common issue. A single nasturtium at the end of a 20-foot (6-meter) row isn’t going to do much. You need enough “lure” to make it the most obvious choice for a passing butterfly. A solid border or a plant every few feet is the minimum for effective control. If the pests have to search for the trap, they will likely just settle for whatever they find first—which is usually your broccoli.
DIY PROJECT: Collect rainwater no matter where you live...

This DIY project is the best way to legally collect rainwater NO MATTER where you live. Get chlorine-free water, cut down on your water bills, and have enough for an emergency situation or to water your garden. Read More Here...
Limitations: When This May Not Be Ideal
Trap cropping isn’t a “set it and forget it” silver bullet. In years where the pest pressure is extreme, the trap crops can become overwhelmed. If there are thousands of moths in your area, they will lay eggs on the trap, the main crop, and probably your garden gloves if you leave them out. In these cases, you still need to supplement with other methods like hand-picking or organic sprays.
If you have a very small garden, such as a single 4×4 foot (1.2×1.2 meter) raised bed, finding space for “sacrificial” plants can be tough. You might feel like you are wasting valuable real estate that could be growing food. In tiny spaces, a simple physical barrier like a row cover is often more efficient than trying to manage a complex intercropping system.
Lastly, environmental conditions play a role. If you are in a drought and your trap crop is wilting while you are babying your cabbages with extra water, the pests will head for the lush, hydrated plants every time. For a trap to work, it has to look more “delicious” than the main crop, which means you have to give those sacrificial plants at least a basic level of care.
Practical Tips for Success
To get the most out of your natural control system, start with healthy soil. A plant that is stressed by a lack of nutrients or water actually sends out chemical “distress signals” that attract pests. By keeping your brassicas well-fed with compost and keeping the soil moisture consistent, you make them less of a target. Use the trap crops as the primary attractor, not as a band-aid for weak plants.
When it comes to spacing, keep the “hops” in mind. If your trap plant is touching your main crop, a caterpillar can easily crawl from one to the other once it finishes eating the first leaf. Keep a small gap of at least 12 to 18 inches (30 to 45 cm) between your decoy plants and your production plants to force the pests to make a choice. This also makes it easier for you to see what is happening in the “buffer zone.”
- Use red varieties: Some gardeners find that red cabbage or purple kale is less attractive to the green worms because they can’t camouflage as easily.
- Check the undersides: Eggs are usually laid underneath the leaves. A quick daily check of your trap crop can tell you when the “invasion” has officially started.
- Succession planting: Plant a new batch of trap seeds every 3 weeks to ensure there is always fresh, attractive foliage available.
- Saltwater soak: After harvesting your main crop, soak the heads in warm water with a tablespoon of salt for 20 minutes to drive out any “hitchhikers” before you bring them into the kitchen.
Advanced Considerations: Going Beyond the Basics
For those who want to take it a step further, consider the wind direction. Most moths and butterflies are carried or guided by the breeze. If you can place your trap crop “upwind” of your main brassica patch, the scent of the mustard or nasturtiums will hit the moths first as they approach your garden. It creates a scent-barrier that effectively “hides” the cabbages behind it.
You can also integrate insectary plants alongside your trap crops. While the trap crop lures the bad guys, plants like Sweet Alyssum or Dill attract parasitic wasps (such as Trichogramma wasps). These tiny, non-stinging wasps lay their eggs inside the cabbage worm eggs or larvae, essentially doing the “squishing” for you. By combining a “lure” for pests with a “home” for predators, you are building a self-regulating system.
Don’t forget the winter cleanup. Cabbage worms often overwinter as chrysalises in the soil or on garden debris. Turning your soil over in the late fall or early spring can expose these to the frost and to hungry birds. If you’ve used a trap crop all season, that specific area will have the highest concentration of overwintering pests, so give that spot extra attention during your fall cleanup.
Real-World Scenario: The 10-Foot Bed Plan
Let’s look at how this works in a standard 10×4 foot (3×1.2 meter) garden bed. Suppose you want to grow 10 heads of cabbage. Instead of planting only cabbage, you would dedicate the outer 12 inches (30 cm) of the bed’s perimeter to Indian Mustard and Nasturtiums. This leaves a central area of 8×2 feet (2.4×0.6 meters) for your cabbage heads.
By the time the white butterflies start appearing in mid-spring, the mustard is already 6 inches (15 cm) tall and looking lush. As the butterflies approach, they land on the outer border first. They find the mustard greens highly satisfying and begin laying eggs there. Your cabbages, tucked in the center and slightly younger, remain untouched.
By week four, you notice the mustard leaves are starting to look “lacy.” You take a quick look and see dozens of tiny green worms. Instead of panicking, you simply pull up every other mustard plant, ensuring you don’t shake the worms off, and drop them into a bucket of soapy water or a sealed trash bag. You’ve just eliminated a generation of pests with about five minutes of work, and your central cabbages are still clean and growing strong.
Final Thoughts
Gardening is often a series of lessons in humility, and nothing humbles a person quite like a half-eaten head of broccoli. However, moving away from the “hunt and destroy” mindset of hand-picking and toward a more ecological approach like trap cropping makes the whole experience much more rewarding. It allows you to work with the natural tendencies of the “bad guys” to create a win for your “good guys.”
I always tell my neighbors that the best tool in the garden isn’t a hoe or a spray bottle; it’s observation. Spend a few minutes each morning just watching how the insects move. Once you see how much they prefer a spicy mustard leaf or a peppery nasturtium over your kale, you’ll never go back to spending your weekends on your hands and knees. It takes a little planning and a bit of “wasted” seed, but the payoff of trophy-sized, hole-free brassicas is worth every penny.
Give it a try this coming season. Start your seeds early, plant a beautiful border, and let nature’s decoys do the heavy lifting. You might find that your garden becomes more than just a place to grow food—it becomes a thriving, balanced ecosystem where even the pests have a role to play (preferably on the other side of the yard). Happy planting!