

Most gardeners throw these purple globes away, but chefs pay top dollar for the secret they contain. When your chives bolt, the harvest isn’t over—it’s just beginning. Those ‘spent’ purple flowers are actually flavor bombs that can transform ordinary vinegar into a gourmet masterpiece. Here is how to turn garden waste into your kitchen’s new secret weapon.
I remember the first time I realized I was tossing out a culinary treasure. For years, I would diligently deadhead my chive plants (Allium schoenoprasum), thinking the blooms were just a sign that the plant was getting “tough” or finished for the season. I’d toss those pom-poms into the compost bin without a second thought. One spring, a friend who runs a local bistro saw my flower-laden chive patch and nearly fell over. She explained that those blossoms hold a concentrated essence of onion and garlic that is both delicate and punchy.
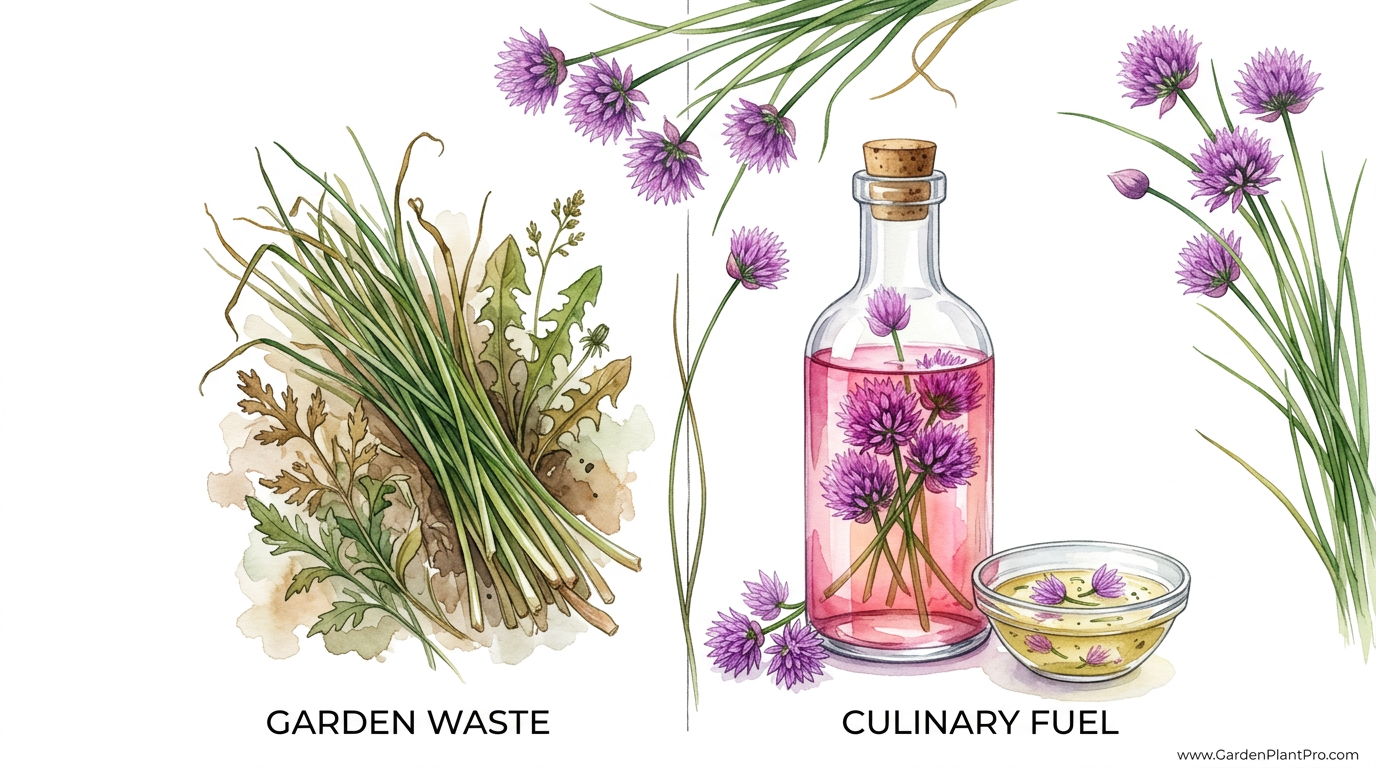
Turning these flowers into vinegar is one of the easiest ways to preserve the spring season. It requires almost no special equipment and relies on the natural infusion process. Within a week or two, you go from a jar of clear liquid and purple weeds to a vibrant, magenta-hued elixir that tastes like a refined version of an onion patch. It’s a perfect example of turning garden waste into culinary fuel.
In this guide, we will walk through every step of the process. Whether you are a beginner looking to save your first harvest or a seasoned gardener wanting to refine your infusion technique, there is plenty to cover. We will look at the best vinegars to use, how to handle the blossoms to avoid bitterness, and the many ways this infusion can brighten up your cooking throughout the year.
Chive Blossom Vinegar Uses
Chive blossom vinegar is more than just a pretty bottle on a shelf. It serves as a versatile acid that brings a savory, aromatic depth to dishes that standard white or apple cider vinegar simply cannot match. Think of it as a liquid seasoning that provides both brightness and a mellow “allium” (onion family) backbone.
The most common application is in homemade vinaigrettes. Because the vinegar already carries the flavor of chives, you can create a sophisticated dressing by simply whisking it with a good quality olive oil, a touch of Dijon mustard, and a pinch of salt. It pairs exceptionally well with spring greens, butter lettuce, and goat cheese. The floral notes of the blossom play beautifully against creamy textures.
Beyond salads, this vinegar is a fantastic marinade for lighter proteins. If you are grilling chicken or flaky white fish, a quick soak in chive blossom vinegar helps tenderize the meat while infusing it with a subtle onion aroma. It doesn’t overwhelm the food like raw garlic might; instead, it provides a “cooked onion” sweetness that lingers on the palate.
You can also use it to deglaze a pan. After searing pork chops or sautéing mushrooms, a splash of this vinegar releases the browned bits (the fond) from the bottom of the pan, creating an instant pan sauce that is bright and savory. It’s also a secret ingredient for quick-pickled vegetables. Submerge sliced cucumbers, radishes, or red onions in a mixture of this vinegar, water, and sugar for an elevated snack that looks as good as it tastes.
The Science of Infusion: How to Make Chive Blossom Vinegar
The process of making this vinegar is a simple cold-infusion. Unlike hot infusions where heat might change the delicate volatile oils of the flower, a room-temperature steep preserves the bright, floral characteristics of the chive. The acetic acid in the vinegar acts as a solvent, drawing out the pigment (anthocyanins) and the flavor compounds from the petals.
First, you need to harvest your blossoms at the right time. Look for flowers that are fully open but not yet starting to turn brown or go to seed. If the flower feels papery or dry, it has passed its peak. I prefer to harvest in the mid-morning after the dew has evaporated but before the sun is at its hottest, as this is when the essential oils are most concentrated.
Once harvested, give the flowers a gentle shake to dislodge any small insects. I try to avoid washing them if possible, as water can dilute the vinegar and introduce mold risks. If you must wash them, spin them very dry in a salad spinner and let them air dry on a towel for an hour. Moisture is the enemy of a shelf-stable infusion.
Fill a clean glass jar about half to three-quarters full with the blossoms. Do not pack them too tightly; you want the vinegar to circulate around every petal. Pour your chosen vinegar over the flowers until they are completely submerged. I typically use a ratio of about 1 cup (240 ml) of flowers to 2 cups (480 ml) of vinegar, but you can adjust this based on how strong you want the flavor to be.
Seal the jar with a non-reactive lid. Since vinegar can corrode metal lids, use a plastic lid or place a piece of parchment paper between the jar and the metal lid. Store the jar in a cool, dark place—not a sunny windowsill. Sunlight can bleach the beautiful purple color and degrade the flavor. Let it sit for 1 to 2 weeks. You will notice the vinegar turning a stunning pink or purple almost overnight, but the flavor takes a bit longer to fully develop.
Choosing Your Vinegar Base
The type of vinegar you choose will significantly impact the final result. You want a base that is acidic enough to preserve the flowers (at least 5% acidity) but neutral enough to let the chive flavor shine through. Here are the most common choices:
- White Wine Vinegar: This is the gold standard. It has a clean, crisp profile that allows the floral notes and the vibrant purple color of the chives to be the star of the show.
- Champagne Vinegar: Even softer and more delicate than white wine vinegar. This creates a truly “gourmet” finished product that is excellent for light summer salads.
- Apple Cider Vinegar: A more robust option. It adds its own fruity tang, which some people love, but it will result in a more “amber-pink” color rather than a bright magenta.
- Rice Vinegar: Very mild and slightly sweet. Ensure you are using unseasoned rice vinegar. This is a great choice if you plan to use the vinegar in Asian-inspired dressings or dipping sauces.
Benefits of Making Your Own Herb Infusions
One of the primary benefits of making chive blossom vinegar is the reduction of garden waste. In a typical garden cycle, once the chives flower, the stems become woody and less palatable. By harvesting the flowers, you are extending the utility of the plant. It’s a way to capture the “excess” of the spring garden and store it for the winter months.
From a culinary standpoint, the benefit is flavor control. Store-bought flavored vinegars often use “natural flavors” or extracts that can taste artificial. When you make it yourself, you know exactly what is in the jar: just vinegar and fresh flowers. The flavor is complex, carrying notes of both the green chive stem and the sweet, nectar-like quality of the bloom.
There is also a significant cost benefit. A small bottle of artisanal herb vinegar at a specialty food store can cost $15 to $20 (£12 to £16). You can produce a quart of the same quality product for the price of a bottle of basic white wine vinegar and a few minutes of picking flowers from your backyard. It also makes for an impressive, low-cost gift for neighbors and friends.
Finally, there is the aesthetic benefit. The deep pink-purple color of the finished vinegar is naturally striking. It adds a “wow” factor to your kitchen counter and makes even a simple bowl of greens look like a dish from a high-end restaurant. The pigment is entirely natural, derived from the same antioxidants found in blueberries and red cabbage.
Challenges and Common Mistakes
While the process is simple, there are a few places where gardeners often go wrong. The most common mistake is using flowers that are too old. Once the chive blossom starts to form seeds (you’ll see hard green bits in the center), the flavor turns from sweet and oniony to bitter and “weedy.” Always look for the soft, vibrant purple petals.
Another pitfall is failing to submerge the flowers completely. Any plant material sticking out above the liquid line is a potential site for mold growth. If your blossoms keep floating, you can use a small glass fermenting weight to keep them down, or simply give the jar a gentle shake every day to ensure everything stays coated in vinegar.
DIY PROJECT: Collect rainwater no matter where you live...

This DIY project is the best way to legally collect rainwater NO MATTER where you live. Get chlorine-free water, cut down on your water bills, and have enough for an emergency situation or to water your garden. Read More Here...
Temperature and light are also factors that can ruin a batch. I’ve seen people leave their infusion jars on a sunny porch thinking it will “speed up” the process. In reality, the heat and UV rays break down the delicate esters that give the vinegar its aroma. The result is often a dull-colored vinegar that tastes “cooked” rather than fresh. Keep it in a pantry or a dark cupboard.
Finally, be wary of the lid you use. The acetic acid in vinegar is quite strong and will eat through a standard Mason jar metal lid over time. This not only ruins the lid but can impart a metallic taste to your vinegar. Always use a plastic lid or a barrier like wax paper or plastic wrap if you only have metal lids available.
Limitations and When This May Not Be Ideal
Chive blossom vinegar is wonderful, but it isn’t a “forever” product. Over time, even in the dark, the vibrant purple color will eventually fade to a light tan or amber. While it is still safe to eat at that point, it loses its visual appeal. For the best experience, I recommend making enough to last one year and using it all before the next spring harvest.
It is also important to note that this is an infusion, not a fermentation. You are not creating a shelf-stable canned good in the traditional sense of heat-processing. While the high acidity of the vinegar makes it very safe, you should still store the strained vinegar in a cool place. Some people prefer to keep it in the refrigerator to maximize the longevity of the color and flavor.
If you have a sensitivity to alliums (onions, garlic, leeks), this vinegar will still trigger those reactions. The infusion process pulls out the fructans and other compounds that can cause digestive upset for those with specific dietary restrictions like a low-FODMAP diet. In those cases, a herb-infused vinegar using rosemary or thyme might be a better alternative.
Lastly, consider your garden conditions. If you have recently treated your garden with pesticides or heavy chemicals, or if your chives are located near a busy road where they might collect exhaust particulates, you should probably skip the infusion. Since you aren’t thoroughly scrubbing every tiny petal, you want to start with the cleanest, most organic flowers possible.
Comparing Vinegar Bases for Infusions
To help you decide which base to use, I’ve put together a small comparison based on my years of trial and error in the kitchen. Every vinegar brings a different personality to the final infusion.
| Vinegar Type | Flavor Profile | Color Result | Best Use |
|---|---|---|---|
| White Wine Vinegar | Clean, sharp, neutral acidity. | Bright, vibrant magenta. | General purpose, gift bottles. |
| Apple Cider Vinegar | Fruity, complex, earthy. | Muted pink/orange. | Marinades, hardy slaws. |
| Champagne Vinegar | Soft, floral, elegant. | Delicate pale pink. | High-end seafood dishes. |
| Distilled White Vinegar | Very harsh, one-note. | Vivid purple. | Cleaning or very heavy pickling. |
In most cases, I recommend avoiding standard distilled white vinegar for culinary infusions. It is far too aggressive and tends to mask the delicate floral notes of the chives. Save that for cleaning the windows or descaling the kettle.
Practical Tips for a Better Harvest
To get the most out of your chive plants, there are a few management tricks I’ve learned. If you want a large harvest of flowers all at once, you should avoid cutting the chives for a few weeks in early spring. This allows the plant to send up a uniform flush of bloom stalks.
- Succession Harvesting: If you have multiple clumps of chives, try cutting back one clump to the ground in early spring while letting the others flower. This ensures you have fresh green leaves for cooking while the other plants provide the flowers for vinegar.
- The “Stem” Issue: When you harvest the flowers, you will notice the stems (scapes) are quite tough. Do not include these in your vinegar jar. They don’t have the same concentration of flavor as the petals and can add a bitter, “grassy” note. Snap the flower head off right at the top of the stem.
- Bug Control: Chive flowers are magnets for tiny black aphids or small spiders. Instead of using water, try placing your harvested flowers on a white paper towel in the shade for 30 minutes. The bugs will usually crawl out and become visible against the white background, allowing you to shake them off.
- Straining: When the infusion is finished, use a fine-mesh sieve lined with cheesecloth or a coffee filter. You want to remove every bit of plant material. If small bits of petals are left in the bottle, they will eventually turn brown and look unappealing.
Advanced Considerations: Beyond Basic Vinegar
Once you’ve mastered the basic chive blossom vinegar, you can start experimenting with compound infusions. I’ve found that adding a single clove of smashed garlic or a few black peppercorns to the jar can add another layer of complexity. However, be careful not to overdo it; the goal is to highlight the chive flower, not bury it.
You can also use this vinegar as a base for a “shrub” or drinking vinegar, though this is a bit of an acquired taste. A savory shrub made with chive vinegar, a little sugar, and soda water can be a surprisingly refreshing palate cleanser during a heavy summer meal. It mimics some of the flavors found in traditional electrolyte drinks but with a garden-fresh twist.
For those interested in garden planning, remember that chives are perennials. If you harvest too many flowers, you are preventing the plant from self-seeding. While this is usually a good thing (chives can become invasive in some climates), if you want your patch to expand, leave a few “purple globes” to dry out on the plant. The seeds will drop and give you even more blossoms to harvest next year.
Another advanced tip involves the “second bloom.” Some varieties of chives, if cut back hard after the first flowering in spring, will produce a smaller, secondary flush of flowers in late summer or early autumn. This is a great way to get a fresh batch of vinegar when the first one is starting to run low.
Example Scenario: The Sunday Brunch Vinaigrette
Let’s look at how this works in a real kitchen setting. Imagine you are hosting a brunch and want to serve a simple spring salad. You’ve got a bowl of fresh arugula and some sliced strawberries.
Instead of reaching for a store-bought balsamic, you take your jar of chive blossom vinegar. You mix 3 tablespoons (45 ml) of the purple vinegar with 6 tablespoons (90 ml) of extra virgin olive oil. You add a half-teaspoon of honey to balance the acidity and a pinch of sea salt. Because the vinegar is already infused with that mild onion flavor, you don’t need to mince any shallots or garlic.
You whisk it together, and the dressing turns a beautiful, creamy pink. You drizzle it over the salad. The result is a dish that tastes like it took an hour to prep, but it only took you two minutes because you did the “work” weeks ago when the chives were blooming. The strawberries provide sweetness, the arugula provides pepper, and the chive vinegar ties it all together with a savory, floral finish.
Final Thoughts
Making chive blossom vinegar is one of those rare gardening tasks that feels like magic. It takes something that is often overlooked—a flower that has “gone to seed”—and turns it into a high-value culinary ingredient. It’s a practice that encourages us to slow down and observe the cycles of our garden more closely.

Do you have some charcoal in your house right now? We call charcoal a “miracle leftover” for anyone who wants to be a little more self-sufficient and cut costs. That’s because it can help you with so many different things around the house and garden. You can even use it to make an energy-free fridge. Read More Here...
I encourage you to start small. This year, don’t compost all your flowers. Save just one jar’s worth and see the difference it makes in your cooking. You’ll likely find yourself looking forward to the “bolting” of the chives every year, seeing those purple globes not as an end to the harvest, but as a glorious new beginning.
Once you’ve mastered this, you might find yourself looking at other “wastes” in the garden with new eyes. From radish seed pods to nasturtium seeds, the garden is full of hidden flavors waiting to be captured. If you’re interested in more ways to preserve your backyard bounty, you might want to look into herb drying techniques or the basics of soil health to ensure next year’s crop is even more vibrant.