

Are you working harder than your soil to keep your cucumbers alive? Most gardeners spend 4 hours a week watering cucumbers only to see them wilt by noon. Strategic mulching cuts your labor by 80% while keeping roots cooler and yields higher. It’s time to garden smarter, not harder.
I’ve seen a lot of changes in the garden over the last forty years, but one thing remains constant: cucumbers are thirsty, hungry, and very picky about their feet. If the soil gets too hot, they quit. If it gets too dry, the fruit turns bitter. If the leaves stay wet from constant hand-watering, powdery mildew moves in like an unwanted houseguest.
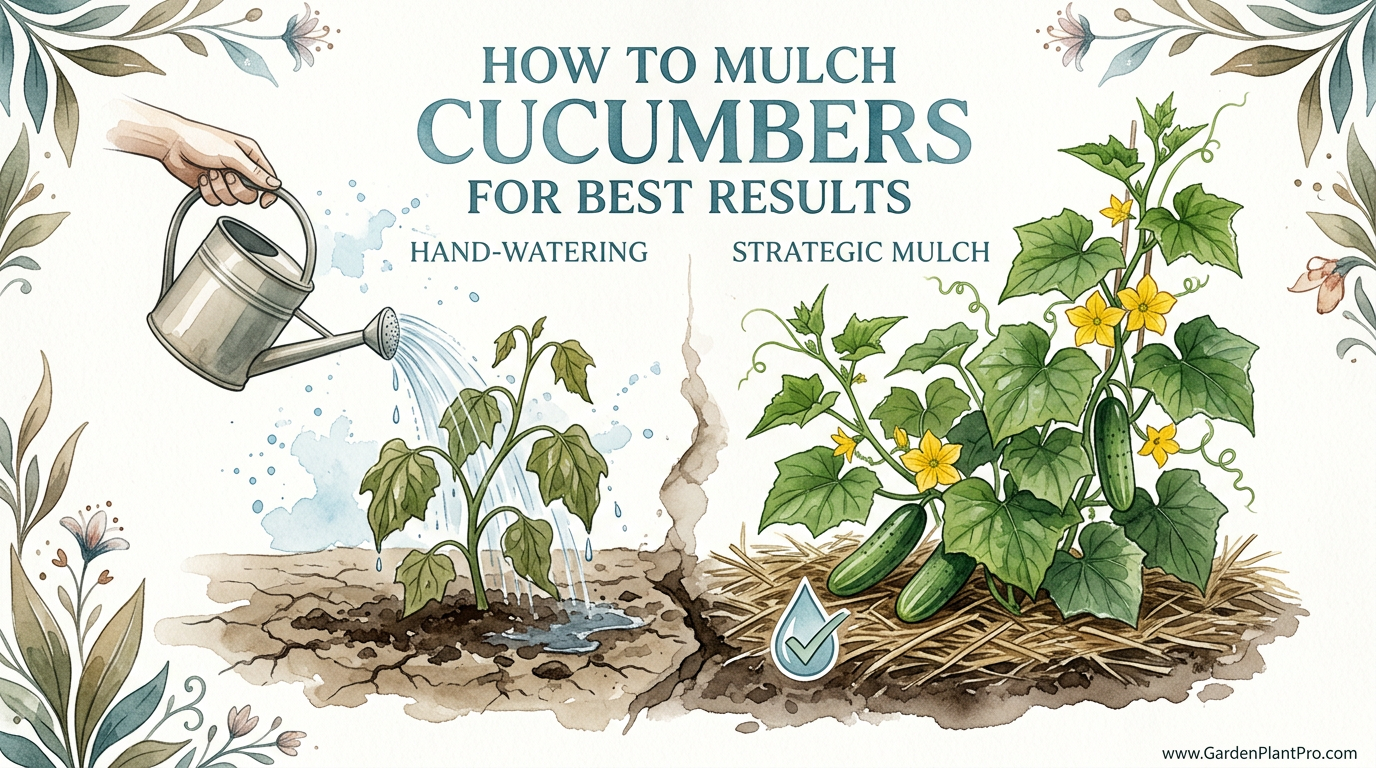
Mulching isn’t just about making the garden look tidy for the neighbors. It’s a functional tool that mimics the forest floor, creating a stable environment where your plants can actually thrive instead of just surviving. When you move from simple hand-watering to strategic mulching, you aren’t just saving water; you’re building a biological system that protects your harvest from the ground up.
How To Mulch Cucumbers For Best Results
Mulching cucumbers involves placing a protective layer of material over the soil surface to regulate its environment. In the real world, this acts as a barrier against the sun’s harsh rays, preventing the moisture in your soil from evaporating into thin air. Think of it like a lid on a pot; without it, the heat pulls everything away. With it, the moisture stays right where the roots can reach it.
Cucumbers are particularly sensitive because they have relatively shallow root systems. While some plants can tap into deep water reserves, cucumbers do most of their drinking in the top 6 to 12 inches (15 to 30 cm) of soil. If that top layer dries out or bakes in the sun, the plant goes into stress mode. This is why you’ll see those big leaves sagging by mid-afternoon even if you watered that morning.
Beyond moisture, mulching keeps your fruit off the bare dirt. If you’ve ever picked a cucumber only to find the bottom side yellowed, soft, or nibbled on by soil-dwelling insects, you know why this matters. A good layer of straw or wood chips keeps that fruit clean and dry, which significantly reduces the chances of belly rot and soil-borne diseases.
How It Works: Step-by-Step Technique
The secret to successful mulching isn’t just what you use, but when and how you put it down. I’ve seen many folks rush out in early spring, cover their ground, and then wonder why their seeds won’t sprout. Here is the process I’ve refined over the years.
1. Wait for the Warmth
Cucumbers are tropical at heart. They don’t like cold soil. If you apply a thick layer of organic mulch like straw too early, you’re essentially insulating the cold into the ground. I always wait until the soil temperature reaches at least 75°F (24°C). If you don’t have a soil thermometer, a good rule of thumb is to wait until the plants are about 3 to 5 inches (7 to 12 cm) tall and the nights are consistently above 60°F (15°C).
2. Clean and Prep the Bed
Before the mulch goes down, you have to get the weeds out. Mulch is great at preventing new weeds from starting, but it won’t always kill established ones. I like to give the area a good, deep weeding and then add a light side-dressing of compost or a balanced fertilizer. Once the mulch is on, it’s much harder to feed the soil, so do your “groceries” first.
3. The “Donut” Method
When you spread your material, never pile it right against the stem of the cucumber plant. This is a recipe for stem rot. Leave a small gap—about 2 inches (5 cm)—around the base of each plant. This allows for air circulation and prevents moisture from being trapped against the tender bark of the vine.
4. Set the Depth
For organic materials like straw or shredded leaves, aim for a depth of 2 to 4 inches (5 to 10 cm). Anything less won’t stop the weeds or hold the moisture; anything more might prevent oxygen from reaching the roots. If you are using wood chips, stay closer to the 2-inch mark as they are denser.
- Step 1: Confirm soil temperature is 75°F (24°C).
- Step 2: Remove all existing weeds from the root zone.
- Step 3: Water the soil deeply before applying mulch.
- Step 4: Spread mulch 2-4 inches deep, leaving a gap around the stem.
The Benefits of Mulching Your Patch
The most immediate benefit is moisture retention. Research shows that mulched soil can hold up to 21% more moisture than bare soil. For a water-heavy crop like cucumbers, that extra cushion is the difference between a bitter fruit and a sweet one. Consistent moisture prevents the “stress cycles” that lead to those misshapen, tapered ends on your cukes.
Then there is the yield increase. Studies have shown that using mulch can increase marketable cucumber yields by anywhere from 44% to over 100%, depending on the material used. Much of this comes from the reduction in competition. When weeds aren’t stealing the nitrogen and water, the cucumber plant can put all that energy into making fruit.
Finally, we have disease prevention. Many cucumber diseases, like Alternaria leaf spot, are soil-borne. When it rains or when you water, the droplets hit the bare dirt and splash pathogens onto the lower leaves. Mulch acts as a buffer, absorbing the impact of the water and keeping the foliage cleaner and healthier for longer in the season.
Challenges and Common Mistakes
One of the biggest mistakes I see is over-mulching. It’s tempting to think that if 3 inches is good, 6 inches must be better. But too much mulch can actually suffocate the soil, leading to anaerobic conditions where roots can’t breathe. This often results in yellowing leaves and stunted growth that looks like a nutrient deficiency but is actually a lack of oxygen.
Another common pitfall is mulching for pests. Slugs and snails love a damp, dark mulch layer. If you live in a particularly wet climate or have a “slug year,” a thick straw mulch can become a high-rise apartment for pests. In these cases, I suggest using a thinner layer or switching to a material that dries out faster on the surface, like pine needles or a specialized landscape fabric.
Using uncomposted wood chips can also cause a temporary problem known as “nitrogen tie-up.” If you mix fresh wood chips into the soil, the bacteria breaking them down will steal nitrogen from your plants. However, if you keep them strictly on the surface, this is rarely an issue for established plants. Still, for young seedlings, it’s a risk worth watching.
Limitations: When This May Not Be Ideal
Mulching isn’t a “one-size-fits-all” solution. If you have very heavy clay soil that tends to stay waterlogged, a thick mulch might keep the ground too wet for too long, leading to root rot. In these situations, you might actually want the sun to help evaporate some of that excess moisture, or you may need to use a very light, breathable mulch.
Environmental constraints also play a role. In very cold, short-season climates, the priority is often soil warmth above all else. In these regions, organic mulches like straw can actually delay your harvest by keeping the soil too cool. Gardeners in the far north often find that black plastic is a better choice because it actively traps heat while still offering some of the weed-suppression benefits.
Comparing Mulch Types for Cucumbers
Not all mulches are created equal. Depending on your goals—whether it’s saving money, warming the soil, or building long-term health—different materials will serve you better. Here is a breakdown of how common options stack up.
DIY PROJECT: Collect rainwater no matter where you live...

This DIY project is the best way to legally collect rainwater NO MATTER where you live. Get chlorine-free water, cut down on your water bills, and have enough for an emergency situation or to water your garden. Read More Here...
| Mulch Type | Best For | Soil Temp Effect | Maintenance |
|---|---|---|---|
| Straw / Hay | Cooling roots in hot summers | Cooling | Moderate (adds nutrients) |
| Black Plastic | Early start in cold springs | Warming | Low (disposable) |
| Wood Chips | Long-term soil health | Insulating | High (lasts a long time) |
| Grass Clippings | Free, quick nitrogen boost | Neutral | Moderate (breaks down fast) |
Practical Tips and Best Practices
Always water before you mulch. If you put dry mulch over dry soil, it can actually act as an umbrella, preventing light rains from reaching the roots. I like to give the patch a deep soaking, apply the mulch, and then give the mulch itself a light sprinkle to settle it into place.
Consider internal linking your knowledge by looking into drip irrigation. While mulch reduces evaporation, the best way to keep cucumbers happy is to deliver water directly under that mulch layer. Running a soaker hose or drip line beneath your straw allows you to water with zero evaporation loss and keeps the leaves perfectly dry.
If you use grass clippings, make sure they haven’t been treated with herbicides. “Weed and feed” products can linger in the clippings and kill your cucumbers just as effectively as they kill dandelions. Also, let clippings dry out for a day or two before applying them; otherwise, they tend to mat together into a slimy, stinking mess that blocks air.
Advanced Considerations: Soil Microbiology
For the serious practitioner, mulching is about more than just water; it’s about soil microbiology. As organic mulches like arborist wood chips or straw decompose, they provide a carbon source for fungi and bacteria. This activity creates “glues” that improve soil structure, making it more crumbly and better at holding both air and water.
There is also the fascinating concept of carbon-to-nitrogen (C:N) ratios. Straw has a high C:N ratio (about 80:1), meaning it’s carbon-heavy. While it won’t “rob” nitrogen from your plants if left on top, it does break down slowly. If you want a mulch that feeds your plants faster, mixing in a little compost or “green” material like fresh grass clippings can speed up that biological clock and provide a slow-release nutrient boost through the season.
Example Scenario: The July Heatwave
Let’s look at how this works in a real garden. Imagine it’s mid-July, and you’re hitting a week of 95°F (35°C) weather. In a bare-soil garden, the surface temperature can easily hit 110°F (43°C), literally baking the fine feeder roots of your cucumbers. You would need to water every single morning, and even then, the plants would likely wilt by 2:00 PM.
Now, look at the mulched garden next door. Under 3 inches (7.5 cm) of straw, that same soil remains at a steady 78°F (25°C). The moisture you applied three days ago is still there, trapped under the insulation. The plants don’t wilt, they keep photosynthesizing, and the fruit continues to grow without the bitter compounds triggered by heat stress. You’ve just saved 5 hours of watering and preserved your harvest quality.
Final Thoughts
Mulching is one of those rare gardening tasks where doing a little extra work upfront saves you a mountain of labor later in the season. It’s the difference between being a slave to the garden hose and being a gardener who can actually sit on the porch and enjoy the view. By regulating temperature, suppressing weeds, and keeping moisture consistent, you’re giving your cucumbers exactly what they need to be productive.
I encourage you to experiment with what you have on hand. Maybe it’s shredded leaves from last fall, or a bale of straw from the local feed store. Start small, watch how the soil behaves under that cover, and adjust. You’ll likely find that your plants are taller, your fruit is cleaner, and your back is a lot less sore by the end of August.
If you’re looking to take your garden to the next level, you might want to explore composting or soil health strategies. Building up the organic matter in your soil works hand-in-hand with mulching to create a resilient, high-yielding garden that can handle whatever the weather throws at it.