

Your soil is naked, and it is killing your tomatoes. Stop letting the rain splash soil-borne pathogens onto your plants. A simple layer of protection is the difference between a dead vine and a harvest that never ends. Discover why bare soil is a tomato grower’s worst enemy.
I’ve spent the better part of forty years watching the rain fall on my garden. When I was younger, I used to love the sight of a fresh summer storm, thinking it was doing all the work for me. But as the years went by, I noticed a pattern. A few days after a heavy downpour, those beautiful deep green leaves at the bottom of my tomato plants would start to show little brown spots. Within a week, the yellowing would climb the stem like a slow-moving fire. Before I knew it, I was looking at a skeleton of a plant with a few sun-scalded fruits hanging on for dear life.
It took me a long time to realize that the rain wasn’t the problem; the dirt was. Or rather, the lack of a barrier between the dirt and the plant. You see, when a raindrop hits bare, exposed dirt, it doesn’t just soak in. It acts like a tiny hammer, splashing a mixture of mud and microscopic spores right onto your lower foliage. That splash is the primary highway for the diseases we gardeners dread most. By the time you see the blight, the war is already half-lost. The secret to a healthy garden isn’t a fancy spray or a chemical cocktail—it’s making sure your soil never sees the sun or feels the direct strike of a raindrop.
In this guide, I want to share what I’ve learned about the “sheltered straw” method versus leaving your dirt exposed. We’ll talk about the best materials to use, the science of why they work, and the mistakes I made so you don’t have to. Whether you’re dealing with early blight, late blight, or just want to save yourself from weeding in the July heat, understanding the relationship between mulch and tomato health is the single most important lesson you can learn as a grower.
The Invisible Enemy: Why Soil Pathogens Love Bare Earth
To understand why we mulch, we have to look at what’s living in the ground. Your soil is a bustling metropolis of life, but not all the residents are friendly. Pathogens like Alternaria solani (the cause of early blight) and Septoria lycopersici (Septoria leaf spot) are opportunistic. They don’t just disappear when the season ends; they hunker down in the soil and on old plant debris, waiting for the right conditions to strike again. They are persistent, hardy, and remarkably good at hitching a ride on water droplets.
When your tomato plants are young, their leaves are often close to the ground. This puts them directly in the “kill zone.” If the soil is bare, every time you water with a hose or every time a storm rolls through, you are effectively inoculating your plants with whatever fungus is resting in the dirt. These spores thrive in the humid, shaded microclimate created by the tomato’s own canopy. Once they land on a leaf, they only need a few hours of moisture to germinate and begin digesting the plant tissue.
It’s a cycle of infection that repeats every single year unless you break the physical link. Experienced gardeners know that the goal isn’t necessarily to “kill” the blight in the soil—that’s nearly impossible in an organic backyard setting. Instead, the goal is containment. We want to trap those spores under a heavy, breathable blanket so they can’t reach the leaves. This is the fundamental principle of disease prevention in the tomato patch.
The Splash Zone: The Physics of Infection
Have you ever looked closely at your garden after a hard rain? You might see bits of mud splashed up onto your garden fence or the siding of your house. In a typical garden with heavy soil, a single raindrop can splash soil particles up to 18 to 24 inches (45 to 60 cm) high. Considering that many determinate tomato varieties only grow to about 3 or 4 feet (90 to 120 cm) tall, that splash zone covers nearly half the plant.
This is why blight almost always starts at the bottom. It’s not because the bottom leaves are “weaker,” but because they are the most accessible targets for the soil-borne spores. As the infection takes hold on the lower branches, the fungus produces new spores that are then carried upward by wind or secondary water splashes. It’s an upward ladder of destruction. By covering that bare dirt, you effectively reduce the splash height to near zero. A raindrop hitting a layer of straw or pine needles is absorbed or broken into a fine, clean mist that carries no pathogens.
Best Mulch For Tomatoes To Prevent Blight
When it comes to picking the right material, you want something that is clean, porous, and slow to break down. Over the years, I’ve tried just about everything from old carpet to shredded mail, but a few specific materials stand out as the gold standard for tomato health. Each has its own personality and requirements, but they all serve the same primary purpose: stopping the splash.
Clean Wheat or Rice Straw: This is my personal favorite. Straw is the hollow stem of a grain crop after the seed has been harvested. Because it’s hollow, it’s an incredible insulator. It keeps the soil cool in the heat of summer and acts like a dry sponge, soaking up rain without becoming a matted, slimy mess. It’s also bright and reflects some light back up into the plant canopy, which can help with ripening. Just be careful not to buy “hay”—hay contains seeds, and you’ll end up growing a field of grass instead of tomatoes.
Pine Straw (Pine Needles): If you live in an area with pine trees, you have access to one of the best mulches on the planet. Pine needles are naturally waxy, meaning they don’t soak up much water themselves. They interlock to form a mat that is very difficult for weeds to penetrate, yet they allow for excellent airflow. There is a common myth that pine needles will turn your soil acidic; in my experience, you would need to pile them a foot deep for decades to see a significant change in pH. For a single season of tomatoes, they are perfectly safe and highly effective.
Shredded Leaves: This is the “frugal gardener’s” choice. If you rake up your leaves in the fall and run them through a mower or a shredder, you have a nutrient-rich mulch for free. However, you must shred them. Whole leaves tend to “shingle” together, forming a waterproof barrier that prevents rain from reaching the roots and can actually encourage fungal growth underneath due to a lack of oxygen. Shredded leaves, however, breathe well and eventually break down into beautiful compost that feeds your soil microbes.
Grass Clippings: These can work in a pinch, but they require a bit of finesse. You must ensure the lawn hasn’t been treated with “weed and feed” or other herbicides, as these can stunt or kill your tomatoes. You also need to let the clippings dry out before applying them. Fresh, green grass clippings are high in nitrogen and moisture; if you pile them up thick while they’re wet, they will ferment, smell like a swamp, and can actually heat up enough to burn your tomato stems. Apply them in thin layers, letting each layer dry before adding the next.
Mulch Material Comparison Table
| Mulch Type | Blight Prevention | Weed Suppression | Cost | Durability |
|---|---|---|---|---|
| Wheat Straw | Excellent | High | Low-Medium | One Season |
| Pine Needles | Excellent | Very High | Free (if local) | Long-lasting |
| Shredded Leaves | Good | Medium | Free | Moderate |
| Wood Chips | Moderate | High | Varies | Very High |
| Black Plastic | Excellent | Complete | Medium | Temporary |
How It Works: The “Sheltered Straw” Technique Step-by-Step
Applying mulch isn’t just about throwing it on the ground and walking away. If you do it at the wrong time or in the wrong way, you could actually do more harm than good. Tomatoes are tropical plants at heart—they love warm soil and consistent moisture. Here is the process I follow every spring to ensure my plants stay protected from day one.
1. Wait for the Warmth: This is a common mistake. If you mulch too early, while the ground is still cool from winter, you trap that cold in the soil. This can stunt your tomato plants for weeks. I wait until the soil temperature reaches at least 70°F (21°C) or until the plants have been in the ground for about 3 to 4 weeks. Let the sun warm the roots first; once the summer heat really starts to kick in, then you put on the “blanket” to keep that heat from becoming excessive.
2. Clean the Area: Before mulching, pull every single weed. You don’t want to trap established weeds under the mulch where they can steal nutrients from your tomatoes. I also like to give the area a light dusting of organic fertilizer or compost before the mulch goes down. This way, the nutrients are right there at the soil surface, ready to be washed down to the roots by rain.
3. The 2-Inch (5 cm) Stem Rule: Never, ever let your mulch touch the main stem of the tomato plant. I always leave a circle of bare earth about 2 inches (5 cm) wide around the base of the plant. If mulch is piled against the stem, it creates a moist environment that invites stem rot, collar rot, and provides a hiding spot for boring insects. Think of the mulch as a donut, with the tomato plant in the center hole.
4. Depth Matters: For organic materials like straw or leaves, you want a layer that is at least 3 to 4 inches (7 to 10 cm) deep. It will settle over time, so don’t be afraid to pile it high initially. If the layer is too thin, the light will still reach the soil and weeds will sprout. A thick layer also ensures that even the heaviest rain won’t be able to penetrate through to the dirt and cause a splash.
The Inorganic Alternative: Plastic and Fabric
While I’m a fan of the natural look and the soil-building properties of organic mulch, I’d be remiss if I didn’t mention synthetic options. In many commercial operations and for some home gardeners in very wet or very short-season climates, plastic is the way to go. It offers a level of splash protection that is essentially 100% effective because the soil is completely sealed away.
DIY PROJECT: Collect rainwater no matter where you live...

This DIY project is the best way to legally collect rainwater NO MATTER where you live. Get chlorine-free water, cut down on your water bills, and have enough for an emergency situation or to water your garden. Read More Here...
Black Plastic: This is the standard. It warms the soil significantly earlier in the season, which can give you a jump-start on your harvest. It’s also the ultimate weed barrier. However, in the peak of summer, black plastic can actually get too hot, potentially cooking the roots of your plants. Many gardeners will throw a thin layer of straw over their black plastic once July hits to reflect the sun’s rays.
Red Plastic (Selective Reflective Mulch): There’s been a lot of research into red plastic mulch for tomatoes. The theory is that the specific wavelength of light reflected by the red plastic trickles the plant into growing more fruit and less foliage. Some studies have shown up to a 20% increase in yield. It works exactly like black plastic for blight prevention but with the added bonus of potentially more tomatoes.
Landscape Fabric: This is a woven material that allows water and air to pass through but blocks most weeds. It’s more durable than plastic and can be reused for several years. The main downside is that if you get dirt on top of the fabric (which happens), weeds will eventually grow their roots *through* the fabric, making them nearly impossible to pull without tearing the material.
Challenges and Common Mistakes
Even with the best intentions, mulching can introduce new problems if you aren’t paying attention. The biggest issue I’ve seen over the years is the “Slime Factor.” In very wet years, a thick layer of mulch can stay damp for too long, attracting slugs and snails. These critters love the cool, dark environment under the straw and will happily spend their nights munching on your ripening tomatoes. If you notice slug damage, you may need to pull the mulch back slightly or use an organic slug bait.
Another pitfall is Nitrogen Tie-up. This happens most often with wood-based mulches like sawdust or fresh wood chips. The microbes that break down carbon-rich wood need nitrogen to do their job. If the wood is mixed *into* the soil, those microbes will steal nitrogen from your plants. However, as long as the wood chips stay on top of the soil as a mulch, this is rarely an issue. Just be careful not to till them into the ground at the end of the season unless you plan to add extra nitrogen to compensate.
Finally, there’s the issue of Diseased Debris. If your plants did get blight the previous year, you must be extremely careful. While mulch helps, it won’t stop an infection if you’re using mulch that was contaminated with last year’s diseased vines. Always use fresh, clean material each season, and never compost your blighted tomato plants in a pile that you plan to use in your garden later. Those spores are tough, and most home compost piles don’t get hot enough to kill them.
Synergy: Combining Mulch with Pruning and Irrigation
If you really want to be the “Tomato King” of your neighborhood, you shouldn’t rely on mulch alone. Mulching is the foundation, but it works best when paired with two other practices: bottom-pruning and drip irrigation.
Once my plants are about 2 feet (60 cm) tall, I go in and remove all the branches on the bottom 12 inches (30 cm) of the plant. This creates a “dead zone” where no foliage exists. Even if a tiny bit of soil manages to splash up, there are no leaves for it to land on. This also significantly improves airflow around the base of the plant, which helps the leaves dry out faster after a morning dew. Remember: blight needs moisture to thrive. Anything you do to dry out the plant’s environment is a win.
Irrigation is the other half of the puzzle. If you are still watering your tomatoes with an overhead sprinkler, you are undoing all the good work your mulch is doing. Sprinklers create the exact same splash effect as rain and keep the foliage wet for hours. Use a soaker hose or a drip irrigation system *underneath* your mulch. This keeps the water at the roots and the leaves bone-dry. In my garden, the combination of straw mulch, bottom pruning, and drip tape has almost entirely eliminated early blight.
Advanced Considerations: The Soil Microbiome
For those who want to dive deeper, we have to talk about what’s happening at the microscopic level. Organic mulch doesn’t just block spores; it creates a habitat for beneficial microorganisms. Research has shown that fungi like Trichoderma harzianum and bacteria like Bacillus subtilis actually hunt and kill the pathogens that cause blight. These “good guys” thrive in the moist, carbon-rich environment under a layer of straw or compost.
By mulching with organic material, you are essentially building a defensive army in your soil. Over time, these beneficial microbes can colonize the roots of your tomato plants, providing a systemic boost to their immune systems. This is why plants in well-mulched, organic soil often seem more resilient even when blight is present in the neighborhood. You’re not just preventing a disease; you’re building a healthier ecosystem.
Practical Scenario: The Summer of Heavy Rain
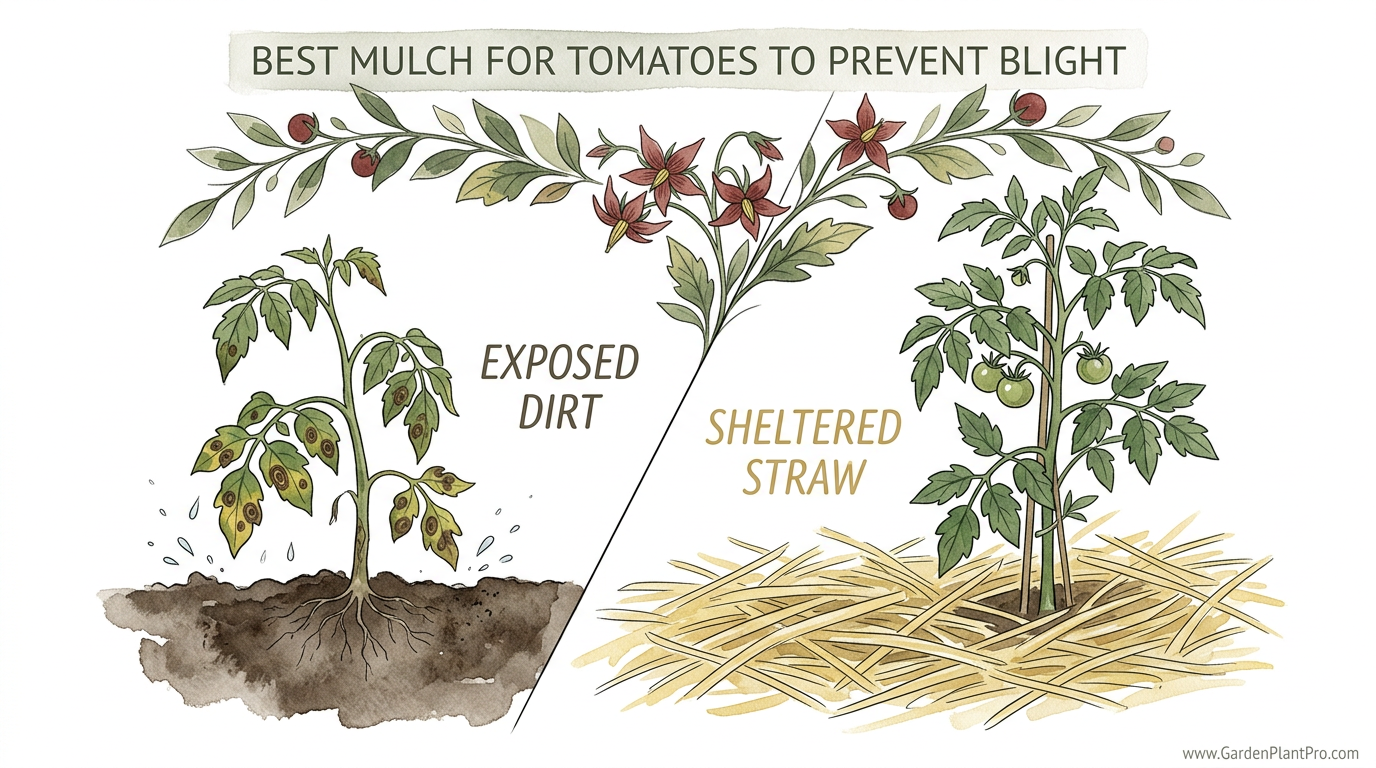
Let’s look at a real-world example. Imagine two gardeners: Neighbor A and Neighbor B. Neighbor A keeps a “tidy” garden with perfectly hoed, bare dirt between the rows. Neighbor B has 4 inches (10 cm) of straw covering every square inch of the patch.
A week of heavy, tropical-style rain hits. Neighbor A’s garden is a mud pit. The rain hammers the soil, splashing spores onto the bottom leaves. Because the soil is bare, the sun hits the mud after the rain, causing massive evaporation and creating a humid “sauna” effect under the tomato leaves—perfect for fungus. Within three days, Neighbor A sees yellowing leaves.
Neighbor B’s garden, meanwhile, stays clean. The straw absorbs the impact of the rain. There is no mud, and therefore no splash. The straw also helps the water soak in slowly rather than running off, so Neighbor B’s plants are well-hydrated but the foliage remains dry. When the sun comes out, the straw reflects the heat, and the soil temperature stays stable. Neighbor B won’t see a single spot of blight for weeks, if at all.
Final Thoughts
If there is one thing I’ve learned in forty years of digging in the dirt, it’s that nature hates a vacuum and it hates bare skin. In the forest, the ground is always covered with a thick layer of leaf litter. Our gardens shouldn’t be any different, especially when it comes to sensitive plants like tomatoes.
Choosing the right mulch—whether it’s the nostalgic scent of fresh wheat straw or the high-tech efficiency of red plastic—is the most proactive step you can take. It saves you water, it saves you the back-breaking labor of weeding, but most importantly, it saves your plants from the invisible enemies lurking in the soil. Don’t wait for the first brown spot to appear. Get out there, cover that naked soil, and give your tomatoes the protection they deserve. Your future self, standing in a kitchen full of ripe, red fruit, will thank you for it.
As you move forward, consider exploring other aspects of garden health, such as soil biology and natural pest management. The more you work with the natural systems of your soil, the less you’ll find yourself reaching for a bottle of fungicide. Gardening is a long conversation with the earth; make sure you’re listening as much as you’re planting.

Do you have some charcoal in your house right now? We call charcoal a “miracle leftover” for anyone who wants to be a little more self-sufficient and cut costs. That’s because it can help you with so many different things around the house and garden. You can even use it to make an energy-free fridge. Read More Here...