

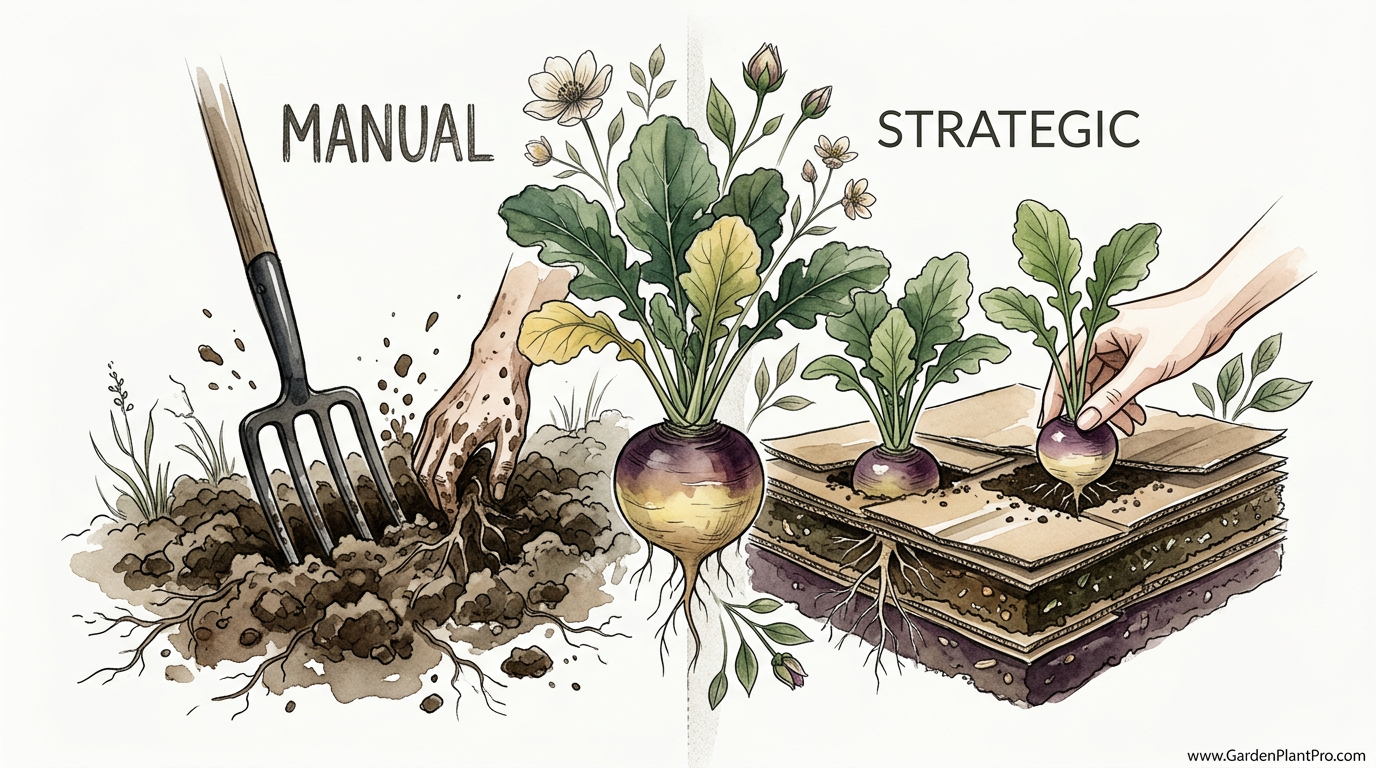
Why sweat for smaller roots when nature can do the heavy lifting for you? Most gardeners think swedes need a deep tilled bed to grow large, but the secret to those massive, sweet roots isn’t a shovel—it’s strategic layering. The ‘No-Dig’ method preserves soil structure and keeps your back from breaking.
I reckon I’ve spent more years than I care to admit wrestling with a garden fork, trying to “loosen” the soil for my winter vegetables. It took me a long time to realize that the worms and the natural fungi are far better at aerating the ground than I’ll ever be. When you stop digging, you stop inviting weeds to the surface and start building a soil ecosystem that feeds your plants exactly what they need.
Growing swedes—or rutabagas, as my friends across the pond call them—is a lesson in patience and timing. They are the quintessential winter fuel, standing steady in the frost and turning sweeter by the day as the temperature drops. Moving to a no-dig approach isn’t just about saving your joints; it’s about producing a root that is denser, less woody, and far more flavorful than anything you’ll find in a supermarket bin.
How To Grow Swedes Without Digging
Growing swedes without digging is a method of cultivation that relies on adding organic matter to the surface of the soil rather than turning it over with a spade. In the real world, this means you are mimicking the natural forest floor, where leaves and debris rot down from the top. For a root vegetable like the swede, which needs a firm but nutrient-rich environment, this approach is particularly effective.
The process usually begins with a layer of biodegradable mulch, often cardboard, laid directly over existing weeds or grass. This is then topped with a thick layer of well-rotted compost, usually around 10cm to 15cm (4 to 6 inches) deep. The cardboard starves the weeds of light, while the compost provides an immediate, clean medium for your swede seeds or transplants to take hold.
Most folks worry that a root vegetable won’t be able to “push through” undug soil. The truth is quite the opposite. Because the soil structure remains intact, it stays porous and full of microscopic channels created by earthworms and old roots. These channels allow the swede’s taproot to move deep into the earth for moisture while the bulbous “root”—which is actually a swollen stem—expands comfortably in the soft, rich surface compost.
The No-Dig Process: From Bed Prep to Harvest
Setting up a no-dig bed for swedes requires a bit of foresight, as these plants are slow burners that stay in the ground for a good six months. If you are starting from scratch on a patch of weeds, your first job is to flatten the vegetation as best you can. You don’t need to pull every weed; just knock them down so the cardboard can lay flat.
Preparing the Layered Bed
Lay down thick, brown cardboard with no plastic tape or glossy ink. Overlap the edges by at least 15cm (6 inches) to ensure no persistent weeds like dandelions or couch grass can find a gap. Once the cardboard is down, soak it thoroughly with a hose. This helps it start breaking down and encourages worms to come up and investigate.
Spread a generous layer of high-quality garden compost over the cardboard. For swedes, I recommend a depth of at least 10cm (4 inches). If your compost is particularly “green” or fresh, you might want to wait a few weeks for it to settle. However, if it’s well-rotted and dark, you can get to work almost immediately.
Sowing and Spacing
Swedes are best sown from late spring to early summer, typically between May and June in the Northern Hemisphere. If you sow too early, you risk the plants bolting or succumbing to powdery mildew during a mid-summer dry spell. If you sow too late, the roots won’t have enough time to bulk up before the short days of winter arrive.
You have two choices here: direct sowing or using modules. I’ve found that starting swedes in modular trays—two seeds per cell, thinned to the strongest one—gives them a massive head start against slugs. When they have two or three true leaves, you simply “plonk” them into the compost. If you prefer direct sowing, make a shallow drill about 1cm to 2cm (0.5 to 0.75 inches) deep and space your rows 30cm to 40cm (12 to 15 inches) apart.
Thinning for Size
If you direct sow, you must be ruthless with thinning. Crowded swedes will result in lots of leaves and spindly, disappointing roots. Aim for a final spacing of 20cm to 30cm (8 to 12 inches) between plants. I usually do this in stages, thinning first to 10cm (4 inches) and then taking out every other plant once they reach the size of a golf ball. Those mid-sized “thinnings” are tender and delicious in a summer stew.
Understanding the Soil Biology in No-Dig Systems
The reason no-dig works so well for brassicas like swedes is the preservation of mycorrhizal fungi. These are tiny fungal threads that attach themselves to plant roots, effectively extending the root system by hundreds of times. They help the plant pull in minerals—especially phosphorus—and water from deep in the soil profile. When you dig or till, you rip these delicate networks apart, forcing the plant to spend energy rebuilding them instead of growing a big, purple root.
Furthermore, undug soil maintains its “ped” structure. Soil peds are the natural clumps that allow air and water to move through the ground. In a traditional dug garden, the soil often collapses after the first heavy rain, becoming a sticky, anaerobic mess. In a no-dig bed, the compost on top acts as a sponge, protecting the soil structure below from the compacting force of raindrops.
Essential Care and the “Boron Factor”
Swedes are relatively low-maintenance once they are established, but they do have a few specific needs that can make or break your harvest. The most important of these is consistent moisture. If the soil dries out completely and then gets a sudden deluge of rain, the roots can split wide open. In a no-dig system, the mulch layer helps keep the moisture levels steady, but you should still water deeply during prolonged dry spells.
Managing Boron Deficiency
One common issue with swedes is “Brown Heart” or “Raan.” You won’t see it from the outside, but when you cut the swede open, the center is brown, woody, and bitter. This is caused by a deficiency in boron, a trace element. It often happens in soils with a very high pH or during very dry summers when the plant can’t take up nutrients.
To prevent this, ensure your compost layer is diverse. Adding a bit of seaweed meal or a liquid seaweed feed during the growing season usually provides enough trace elements. Some old-timers swear by a tiny pinch of household borax dissolved in a watering can, but be careful—too much boron is toxic to plants. A little goes a very long way.
Feeding the Crop
Swedes are moderate feeders. If you’ve put down a good 10cm (4 inches) of compost, you likely won’t need any additional fertilizer. Avoid high-nitrogen feeds, as these will give you a forest of leaves but a very small, “hairy” root. If your soil is particularly poor, a dressing of bone meal or a balanced organic fertilizer in mid-summer can help the roots bulk up.
Pests and Diseases: Protection Strategies
Being part of the brassica family, swedes are a favorite target for just about every pest in the garden. The no-dig method helps by producing a sturdier, more resilient plant, but it won’t stop a hungry cabbage white butterfly.
- Cabbage Root Fly: These tiny flies lay eggs at the base of the stem. The maggots then tunnel into the root, leaving brown tracks and often causing the plant to wilt. The best defense is a fine insect mesh or “Vege-Net” placed over the bed immediately after planting.
- Flea Beetles: These are tiny black beetles that jump when disturbed. They pepper the leaves with small holes, which can kill young seedlings. Keeping the plants well-watered and covered with mesh is the most effective organic control.
- Clubroot: This is a nasty soil-borne disease that causes roots to become swollen and distorted. It thrives in acidic soil. The beauty of no-dig is that you can easily adjust the pH of your surface layer. Adding a dusting of garden lime to the soil before you put your compost down can help keep the pH around 7.0, which discourages the disease.
- Slugs and Snails: While the compost mulch is a friendly environment for worms, it can also harbor slugs. I’ve found that transplanting larger “module-grown” plants makes them much less vulnerable than tiny seedlings emerging from the ground.
Benefits of the No-Dig Approach
The advantages of growing swedes this way extend far beyond just saving your back. It’s a holistic way of gardening that yields better results over time.
DIY PROJECT: Collect rainwater no matter where you live...

This DIY project is the best way to legally collect rainwater NO MATTER where you live. Get chlorine-free water, cut down on your water bills, and have enough for an emergency situation or to water your garden. Read More Here...
| Factor | Traditional Digging | Strategic No-Dig |
|---|---|---|
| Physical Effort | High (Turning heavy soil) | Low (Spreading mulch) |
| Weed Pressure | High (Brings seeds to surface) | Minimal (Smothers seeds) |
| Moisture Retention | Low (Surface dries quickly) | High (Mulch acts as a lid) |
| Soil Health | Disrupted fungal networks | Thriving soil food web |
| Harvest Quality | Roots can be “forked” in stony soil | Roots are smooth and uniform |
Challenges and Common Mistakes
The biggest mistake I see beginners make is being stingy with the compost. If you only put down a thin 2cm (1 inch) layer, the weeds will push through, and the swedes won’t have enough “soft” material to expand in. You really need that 10cm (4 inch) cushion to see the best results.
Another pitfall is spacing. Because the plants look small for the first two months, it’s tempting to plant them closer together. Don’t do it. A mature swede leaf can be 40cm (16 inches) long. If they are too close, they’ll shade each other out, air won’t circulate, and you’ll end up with powdery mildew and small roots.
Finally, watch your timing. Swedes need a long run-up. If you wait until July to sow in a northern climate, you’ll be harvesting golf balls instead of grapefruits. Aim to have them in the ground by the end of June at the very latest for a winter harvest.
Limitations: When This May Not Be Ideal
No-dig is a fantastic system, but it isn’t a magic wand for every situation. If you have extremely heavy, waterlogged clay, a simple mulch might not be enough to prevent the roots from rotting in a wet winter. In these cases, you might need to build “raised” no-dig beds by adding extra height to your compost layers to ensure the “shoulders” of the swedes stay out of the standing water.
Furthermore, if your garden is plagued by perennial weeds like horsetail or bindweed, a single layer of cardboard and compost won’t stop them. They will simply grow through the mulch. In these scenarios, you’ll need a more aggressive “mulch and wait” strategy, perhaps using a double layer of cardboard or a reusable silage tarp for a full season before you start planting.
Practical Tips for a Better Harvest
- The Frost Factor: Never harvest your entire crop before the first frost. Cold weather triggers the swede to convert its starches into sugars. A swede pulled in September tastes “earthy” and a bit sharp; one pulled in December is as sweet as a nut.
- Earth Up: As the swede grows, the top of the root will push out of the ground. This “shoulder” can sometimes turn green or get tough. I like to draw a little bit of the surface compost around the roots in late autumn to keep them protected and tender.
- Variety Selection: Look for varieties like ‘Marian’ or ‘Helenor’. Marian is particularly good because it has some resistance to clubroot and mildew, making it a reliable choice for the home gardener.
- Intercropping: Because swedes grow slowly, you can plant quick-growing crops like radishes or lettuce between the rows during the first two months. By the time the swedes need the space, the “catch crops” will be long gone.
Advanced Considerations: Scaling and Rotation
For the serious practitioner, think about how the swede fits into your wider rotation. Even in a no-dig system, it is wise to move your brassicas around. I follow a simple four-year plan: Potatoes, then Legumes, then Brassicas (including swedes), then Roots (onions/carrots).
Wait, you might ask—isn’t a swede a root? Botanically, yes, it’s grown for the root, but because it’s a brassica, it’s susceptible to the same diseases as cabbage and broccoli. Keeping it in the brassica part of your rotation ensures you don’t build up pests like the cabbage root fly in one corner of the garden.
If you are scaling up, consider the source of your compost. To grow 100 swedes, you’ll need a lot of organic matter. Many successful no-diggers build relationships with local stables for well-rotted horse manure. Just ensure the animals haven’t been grazing on fields treated with persistent herbicides (like aminopyralid), which can ruin a vegetable patch for years.
Example Scenario: A Year of No-Dig Swedes
Imagine it’s mid-May. You’ve got a patch of tired grass at the end of the garden. On a Saturday morning, you mow it short and lay down six large cardboard appliance boxes. You back up a wheelbarrow and dump twelve loads of dark, crumbly garden compost on top, leveling it to about 12cm (5 inches) deep.
You sow your ‘Helenor’ seeds into modular trays on the windowsill. Three weeks later, you have sturdy little plants. You poke holes in the compost every 30cm (12 inches) and tuck the transplants in. You immediately cover the bed with a fine mesh.
Through the summer, you pull the occasional weed that blows in from the top. You water once a week if it doesn’t rain. By September, the purple “shoulders” are starting to peek through the compost. In November, after the first hard frost has turned the grass white, you head out with a garden fork. You don’t need to dig; you just give the root a slight wiggle, and it pops out of the soft compost—clean, round, and ready for the roasting tin.
Final Thoughts
Nature has a way of organizing itself if we just step out of the way. Growing swedes through the no-dig method is a perfect example of this. By feeding the soil from the top and protecting the life beneath, you create an environment where vegetables thrive with a fraction of the traditional labor.
The result is a more resilient garden that handles droughts better, stays weed-free longer, and produces food with a depth of flavor that modern industrial farming simply cannot match. Whether you call them swedes, rutabagas, or neeps, these hardy roots are a cornerstone of the winter pantry.
I encourage you to try at least one no-dig bed this season. Once you see the health of the plants and the ease of the harvest, you’ll likely find your spade gathering dust in the back of the shed. It’s a transition from being a “tiller of the earth” to a “steward of the soil,” and your garden—and your back—will thank you for it.