

Why break your back digging trenches when the no-dig method produces larger shallot clusters with zero weeds? Stop treating your shallot bed like a construction site. Switching from manual digging to a strategic mulching system allows you to preserve soil structure and save hours of labor.
If you have ever spent a Saturday morning hunched over a garden fork, you know the toll traditional cultivation takes on your spine. Many of us grew up believing that soil had to be turned, fluffed, and pulverized to grow anything worthwhile. Decades of working the earth have taught me otherwise. The real magic happens when you step back and let the soil biology do the heavy lifting.
Shallots are a gourmet treasure that many beginners overlook, often settling for standard onions. These elegant alliums offer a complexity of flavor—a subtle sweetness with a hint of garlic—that transforms a simple sauté into a chef-quality base. They are also incredibly generous. While a single onion seed yields one onion, a single shallot set can multiply into a cluster of ten to fifteen bulbs by midsummer.
This guide explores how to transition your garden to a no-dig approach specifically for shallots. We will cover everything from selecting the right varieties to the science of soil health. Lean over the fence, and let’s talk about how to grow the best shallots of your life with a fraction of the usual effort.
How To Plant Shallots Faster
Speed in the garden is not about rushing; it is about eliminating unnecessary steps. Traditional planting often involves clearing weeds, digging a trench, amending the soil at the bottom, and then backfilling. This “construction site” mentality consumes hours and disrupts the delicate fungal networks in the earth. Faster planting begins with the realization that the soil is a living organism, not just a substrate.
The no-dig method focuses on building upward. Instead of working amendments into the ground, you layer them on top. For shallots, this usually means applying a 2-inch (5 cm) layer of well-rotted compost directly onto your existing bed. This single layer serves as your weed barrier, your fertilizer, and your planting medium.
When you use this system, you don’t need to dig a single hole. You simply take your shallot set and press it into the soft compost until just the tip is showing. This eliminates the need for trowels or spades. On a prepared no-dig bed, you can plant a hundred shallots in about fifteen minutes.
Real-world application shows that this method is especially effective for gardeners with heavy clay soil. Clay is notoriously difficult to dig when it is wet and turns into concrete when it is dry. Laying compost on top allows the shallot’s shallow roots to expand in the loose organic matter while the earthworms below gradually aerate the heavy clay for you.
The No-Dig Process Step-by-Step
Starting a no-dig shallot bed is a straightforward process that mimics the natural forest floor. If you are starting on a fresh patch of grass or a weedy area, do not reach for the tiller.
First, mow the area as short as possible. Leave the clippings where they fall to provide a quick burst of nitrogen. Cover the entire area with a layer of plain brown cardboard. Overlap the edges by at least 6 inches (15 cm) to ensure no light reaches the weeds or grass below. This cardboard will eventually rot away, but in the short term, it smothers the competition and invites earthworms to the surface.
Next, apply your compost. You want a generous layer of high-quality, weed-free compost. If you are planting immediately, 4 to 6 inches (10 to 15 cm) of compost is ideal over the cardboard. If you are preparing the bed months in advance, 2 inches (5 cm) is often sufficient. Shallots love organic matter, so don’t be stingy here.
Now comes the actual planting. Separate your shallot clusters into individual sets. Each bulb should be firm and healthy. Do not peel the papery skin off, as it protects the bulb from rotting in the ground. Press the bulb into the compost with the root end down and the pointed tip facing the sky.
Spacing is critical for cluster development. Unlike onions which can be grown quite close, shallots need room to expand. Space your sets 6 to 8 inches (15 to 20 cm) apart. This gap allows the individual bulbs to push outward as they multiply, forming a wide, healthy cluster. If you plant them too close, the bulbs will remain small and may become deformed as they fight for space.
Once the sets are in the ground, finish with a light layer of mulch. A thin dusting of straw or shredded leaves can help keep the tips from drying out. However, avoid burying them too deep. The tip of the shallot should be right at the surface of the mulch. This prevents the “neck” of the shallot from staying too wet, which can lead to fungal issues later in the season.
Choosing the Best Shallot Varieties
Not all shallots are created equal. Depending on your climate and culinary preferences, you might choose different varieties to suit your no-dig system.
French Red is perhaps the most famous variety. It produces beautiful, elongated bulbs with a copper-red skin and a mild, sweet flavor. These are excellent for the no-dig method because they are prolific multipliers, often giving you a ten-fold return on your initial planting.
Dutch Yellow shallots are rounder and tend to have a slightly sharper, more onion-like flavor. They are incredibly hardy and store exceptionally well. If you want a crop that will last you through the winter, Dutch Yellow is a reliable choice. They handle the moist conditions of a mulched bed very well.
Gray Griselle (or French Gray) is often called the “true shallot” by connoisseurs. These have a thick, grayish skin and a very intense, complex flavor. They do not store as long as other types, so they are best for gardeners who plan to use their harvest by late autumn. These prefer very well-drained conditions, so the loose structure of a no-dig bed is perfect for them.
Ambition is a popular hybrid that produces large, blocky bulbs. Hybrids can sometimes be more vigorous than heirlooms, making them a great choice if your soil is still in the process of improving. They have a high sugar content and caramelize beautifully.
Banana Shallots (also known as Echalion) are a cross between a shallot and an onion. They grow into a long, torpedo shape. While they don’t always multiply into clusters as aggressively as true shallots, they are much easier to peel in the kitchen. Many no-dig gardeners like to mix these into their beds for variety.
DIY PROJECT: Collect rainwater no matter where you live...

This DIY project is the best way to legally collect rainwater NO MATTER where you live. Get chlorine-free water, cut down on your water bills, and have enough for an emergency situation or to water your garden. Read More Here...
The Advantages of a No-Dig Approach
Building a garden without digging offers measurable benefits that go far beyond saving your back. The most significant advantage is the preservation of the soil food web.
When you dig or till, you slice through mycorrhizal fungi. These fungi form a symbiotic relationship with plant roots, effectively extending the root system’s reach to find water and nutrients. Shallots have relatively shallow and limited root systems compared to other vegetables. Keeping the fungal network intact allows them to access nutrients like phosphorus more efficiently.
Weed suppression is another massive win. Most weed seeds require a flash of light to trigger germination. Turning the soil brings thousands of dormant seeds to the surface, where they happily sprout. A no-dig bed stays covered, keeping those seeds buried and dark. Any weed seeds that blow in from the wind are easy to pull from the loose, friable compost on top.
Water retention is vastly improved in a mulched, no-dig system. The layer of organic matter acts like a sponge, holding moisture even during the heat of summer. Shallots need consistent moisture to bulk up their bulbs. If the soil dries out completely, the plant thinks the season is over and may start to go dormant prematurely, resulting in tiny bulbs.
Finally, the no-dig method leads to better soil drainage over time. It sounds counterintuitive, but digging actually compacts the soil layers below the depth of your fork, creating a “plow pan” that prevents water from draining. Earthworms in a no-dig system create permanent tunnels that act as a natural drainage system, ensuring your shallot bulbs never sit in stagnant water.
Managing Common Pests and Diseases
Even the most perfect no-dig bed will face challenges. Shallots are susceptible to many of the same issues as onions and garlic.
Onion Fly is a common pest where the larvae tunnel into the bulb, causing it to rot. In a no-dig system, the healthy soil biology often helps plants resist these attacks. However, if you have a history of onion fly, consider using a lightweight insect netting over your beds immediately after planting. This prevents the adult flies from laying eggs at the base of the plants.
Thrips are tiny insects that rasp the surface of the leaves, giving them a silvery appearance. They thrive in dry conditions. The moisture-retaining properties of a no-dig bed already help keep thrips at bay. If you do spot them, a sharp blast of water from a hose can often knock them off.
Downy Mildew and other fungal issues can occur if there is poor airflow or excessive moisture. This is why spacing is so important. Make sure your clusters have enough room for air to circulate between them. If you live in a very humid climate, avoid using heavy, wet mulches like fresh grass clippings. Instead, stick to a thin layer of airy straw.
Onion White Rot is the most serious threat. It is a soil-borne fungus that can live in the ground for decades. If you see your shallots wilting and find a white, fluffy mold at the base, you likely have white rot. The best defense is prevention. Always buy certified disease-free sets. If you do get white rot, do not plant any alliums in that spot for at least eight to ten years.
Limitations: When Mulching Might Fail
While I am a firm believer in the no-dig method, it is important to be realistic. There are situations where this approach might require adjustments.
In extremely arid, desert climates, the intense heat can dry out compost very quickly. While mulch helps, the wind can sometimes blow away light materials like straw or even dry compost. In these environments, you might need to use heavier mulches like arborist wood chips or even a layer of gravel to keep the organic matter in place.
If your garden is plagued by slugs and snails, the cool, moist environment under a no-dig mulch can become a breeding ground. In a high-slug year, I often pull back the mulch from the immediate base of the shallots to give the sun a chance to dry out the soil surface. This makes it much harder for the slugs to travel to the tender greens.
Very cold, wet winters can also be a challenge for fall-planted shallots. If the soil stays saturated for months on end, the bulbs may rot before they have a chance to grow in the spring. In these cases, growing in raised no-dig beds is essential. Raising the soil level even by 6 inches (15 cm) provides the necessary drainage to keep the bulbs safe through a soggy winter.
Finally, keep in mind that the “no-dig” label doesn’t mean “no-work.” You still need to source or create a significant amount of compost every year. For a large garden, this can be a logistical challenge. If you don’t have access to quality organic matter, the no-dig method loses its primary fuel source.
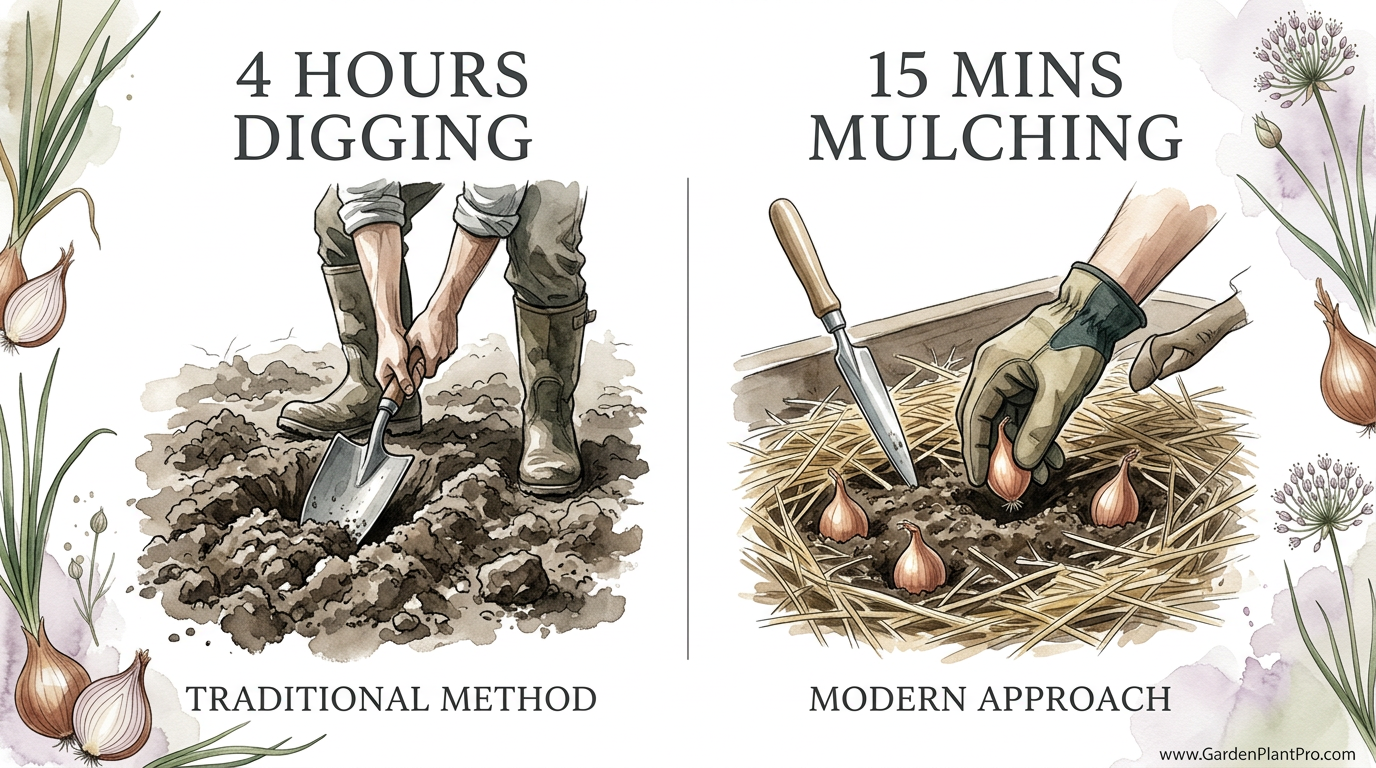
Direct Comparison: The 4-Hour Dig vs. 15-Minute Mulch
To see why this matters, let’s look at the numbers. Imagine a standard garden bed of 4 by 10 feet (1.2 by 3 meters).
| Feature | Traditional Digging | No-Dig Mulching |
|---|---|---|
| Preparation Time | 3-4 hours (weeding, tilling, raking) | 15-30 mins (laying cardboard/compost) |
| Planting Effort | High (digging individual holes) | Very Low (pressing into soft compost) |
| Weed Maintenance | Weekly hoeing or hand-pulling | Occasional “walk-by” weeding |
| Soil Health | Disturbed fungal networks | Intact microbiology and structure |
| Water Usage | High (bare soil evaporates quickly) | Lower (mulch retains moisture) |
The comparison is clear. The time you save on the front end can be spent on more enjoyable tasks, like planning your next crop or simply enjoying a cup of coffee in the garden. Over a decade, those hours add up to weeks of saved labor.

Do you have some charcoal in your house right now? We call charcoal a “miracle leftover” for anyone who wants to be a little more self-sufficient and cut costs. That’s because it can help you with so many different things around the house and garden. You can even use it to make an energy-free fridge. Read More Here...
Practical Tips for Success
Experience has taught me a few tricks that make a huge difference in the final harvest.
Source the best compost. Your success in a no-dig system is entirely dependent on the quality of your top layer. If your compost contains weed seeds or hasn’t been fully broken down, you are just importing a headache. If you buy in bulk, ask the supplier if it has been “hot composted” to kill pathogens and seeds.
Plant at the right time. Shallots are traditionally planted on the shortest day of the year and harvested on the longest. While this is a bit of a generalization, they do benefit from a long growing season. In most regions, planting in late autumn or very early spring is ideal. They need a period of cold (vernalization) to trigger the bulb to divide into a cluster.
Don’t overwater near harvest. As the shallots mature, the leaves will begin to turn yellow and fall over. This is a sign that the bulbs are curing. At this point, stop watering entirely. Keeping the soil wet during the final weeks can lead to rot and will drastically reduce the shelf life of your harvest.
Harvest carefully. Because shallots grow in clusters, it is easy to damage them if you just yank them out of the ground. Use a garden fork to gently lift the soil from underneath the cluster. In a no-dig bed, the soil should be so loose that the clusters almost pop out on their own.
Save your best bulbs. One of the best parts of growing shallots is that they are self-perpetuating. Save the largest, healthiest bulbs from your harvest to use as “seed” for next year. Over time, these shallots will adapt to your specific microclimate and soil conditions, becoming more productive every year.
Advanced Considerations: Mycorrhizae and Soil Microbes
For those who want to dive deeper into the science, the no-dig method is essentially a lesson in soil microbiology. The “rhizosphere”—the area of soil directly around the plant roots—is a bustling city of activity.
Bacteria and fungi in the soil process organic matter into a form that the shallot roots can absorb. When you add a fresh layer of compost every year, you are providing a buffet for these organisms. In turn, they produce glomalin, a sticky substance that helps bind soil particles into “aggregates.” This creates the crumbly, cake-like texture that gardeners crave.
Furthermore, keeping the soil covered protects these microbes from the sun’s ultraviolet rays. UV light is a potent sterilizer. A bare, dug soil is essentially a scorched-earth environment for beneficial bacteria. By maintaining a constant mulch layer, you ensure that the “workforce” in your soil is always at maximum capacity.
Another advanced tip is to consider the “carbon-to-nitrogen” (C:N) ratio of your mulch. Shallots are relatively heavy feeders. If you use a mulch that is very high in carbon, like fresh wood shavings, the soil microbes will use up all the available nitrogen to break down the wood, leaving none for your shallots. This is why well-rotted compost or aged straw is a much better choice for the immediate planting area.
A Year in the Shallot Bed: Seasonal Scenarios
Let’s look at how a typical year might play out in your no-dig shallot bed.
Autumn: You prepare the bed by laying down cardboard over a spent summer crop of lettuce. You add 3 inches (7.5 cm) of compost. In November, you press your French Red sets into the soil, spaced 8 inches (20 cm) apart. You cover the bed with a thin layer of straw to protect against the coming frost.
Winter: The shallots spend the cold months establishing a strong root system. You don’t need to do anything. Even if it snows, the insulation of the mulch protects the bulbs. On warmer days, you might see small green tips poking through the straw.
Spring: As the weather warms, the green shoots grow rapidly. You notice a few weeds popping through where the straw was thin, so you spend five minutes pulling them. You give the bed a deep watering once a week if the spring is dry. By May, each single stem has split into a bunch of five or six.
Summer: The clusters are now pushing the soil aside as they expand. The mulch keeps the bulbs from getting sunburned. In late June, the greens start to flop over and turn golden. You stop watering. A week later, you lift the clusters. You find that your initial 50 sets have turned into over 500 individual shallots.
Late Summer: You cure the shallots on a mesh rack in a shaded, breezy spot. After two weeks, the skins are papery and the necks are dry. You braid them or put them in mesh bags for storage in a cool pantry. The bed is immediately ready for a follow-up crop of kale or spinach—no digging required.
Final Thoughts
Gardening should be a source of joy, not a source of chronic back pain. The no-dig method for shallots proves that by working with nature’s existing systems, we can actually achieve better results with less effort. This isn’t about being lazy; it’s about being observant.
CASE STUDY: We've been living off the grid for the last 40 years...

In all that time an electric wire has never been connected to our house. We haven’t gotten or paid an electricity bill in over 40 years, but we have all the electricity we want. We grow everything we need, here, in our small backyard. We also have a small medicinal garden for tough times. Read More Here...
By prioritizing soil health and building a rich environment for your alliums, you create a garden that is resilient to pests, drought, and weeds. Shallots are the perfect candidate for this approach because of their unique growth habit and their love for high-quality organic matter.
I encourage you to try at least one bed this season using the no-dig method. Compare it side-by-side with your traditional garden patches. You will likely find that the plants are more vibrant, the clusters are larger, and your Saturday mornings are much more relaxed. Once you see the earthworms doing the work for you, you’ll never want to pick up a garden fork again.