

Why leaving your onions on the ground after harvest is a recipe for winter rot. Most gardeners lose 30% of their crop to rot simply because they leave their onions in the dirt to “dry.” Switch to strategic vertical curing and keep your harvest fresh until next spring.
I have spent forty years watching the seasons turn in my backyard, and if there is one thing that breaks a gardener’s heart faster than a late frost, it is reaching into a storage bin in January only to find a mushy, foul-smelling mess. We put months of work into nurturing those bulbs from tiny sets or seeds, battling weeds and watching for thrips, only to stumble at the very last hurdle. The mistake usually happens in those first few days after the bulbs come out of the earth.
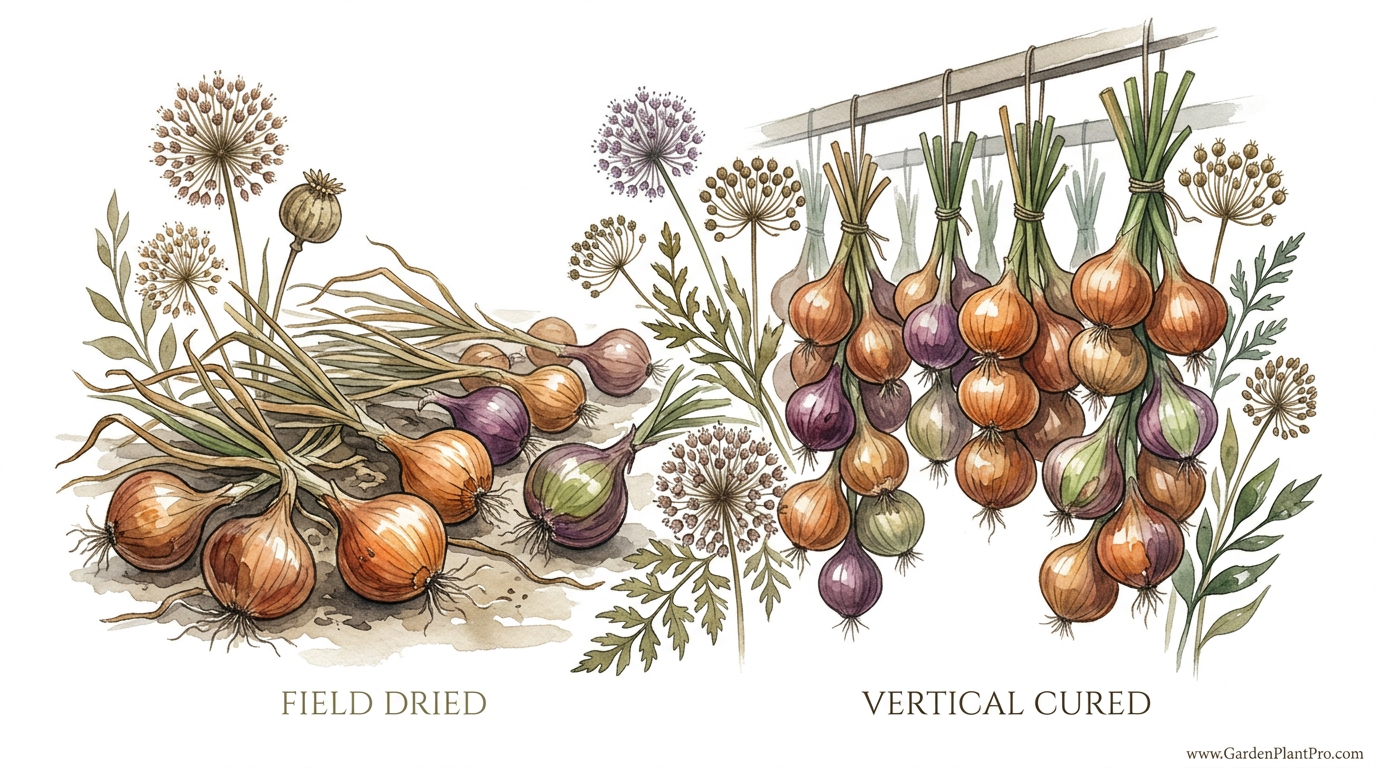
There is an old piece of advice that says you should just pull your onions and let them sit in the garden rows to bake in the sun. In a perfect world with zero humidity and steady breezes, that might work. But in the real world, the ground holds moisture, dew settles every night, and the sun can actually scald the sensitive skins of your harvest. Transitioning from traditional ground drying to a vertical curing system isn’t just a fancy trend; it is the most reliable way to ensure the “neck” of the onion seals tight against the bacteria that cause winter rot.
When we talk about curing, we are really talking about a controlled dehydration process. We want the outer skins to become papery and the moisture to leave the stem so the onion enters a deep dormancy. If that moisture gets trapped—especially at the base where the bulb met the soil—you are essentially inviting mold to dinner. Let’s walk through how to do this the right way, so your pantry stays full until the first chives poke through the snow next year.
Best Onion Storage And Curing Methods
Curing is the vital bridge between the garden bed and the kitchen table. It is the process of allowing the outer layers of the onion bulb to dry out and the neck—the area where the leaves meet the bulb—to constrict and close. A properly cured onion is essentially a biological fortress. It locks moisture inside the succulent rings while keeping pathogens, like Botrytis neck rot, firmly on the outside.
In the gardening world, you will generally see two main schools of thought: field curing and protected curing. Field curing involves leaving the onions exactly where they grew, often in “windrows” (long lines of pulled onions). While this is common in massive commercial operations in arid climates like Idaho or parts of eastern Washington, it is risky for the backyard grower. One unexpected afternoon thunderstorm can ruin a hundred pounds of produce in minutes.
Protected vertical curing, on the other hand, involves moving the harvest to a covered, well-ventilated area where the onions are suspended or stacked in a way that air can hit them from every single angle—top, bottom, and sides. This is often done using mesh bags, wire racks, or by braiding the still-attached greens and hanging them from rafters. By getting the onions up off the ground, you eliminate the “damp spot” that always forms when a bulb sits on soil or a solid floor.
Think of it like drying a load of laundry. You wouldn’t lay your wet shirts flat on a damp lawn and expect them to smell fresh; you hang them on a line where the breeze can work its magic. Onions are no different. They need moving air and a break from the earth’s natural humidity to truly stabilize for long-term storage.
How to Transition to Vertical Curing
The process starts the moment you notice the tops of your onions beginning to flop over. This is called “lodging,” and it is the plant’s way of saying it has finished its work. Once about 50% to 75% of your crop has flopped, it is time to act. If you wait until the tops are completely brown and brittle in the soil, you risk the bulbs starting to grow new roots or “splitting” if a late rain hits.
Step 1: The Gentle Harvest
Use a garden fork to gently loosen the soil about 3 to 4 inches (7.5 to 10 cm) away from the bulbs. Never pull an onion by the neck if the soil is hard; you can cause internal bruising or even detach the top, which opens a direct highway for bacteria. Lift them out, shake off the loose dirt, but do not wash them. Water is the enemy at this stage. If the soil is sticky, let it dry for an hour on the surface, then brush it away with a gloved hand.
Step 2: Preparing the Vertical Space
You need a spot that is out of direct sunlight but has excellent cross-ventilation. A porch, a shed with open windows, or even a covered carport works well. Direct sun can reach temperatures over 90°F (32°C) on the soil surface, which can literally “cook” the outer scales of the onion, leading to sunscald and early spoilage. Aim for a curing temperature between 75°F and 85°F (24°C to 29°C) with a relative humidity of around 60%.
Step 3: Setting Up the Vertical System
There are three primary ways to achieve a vertical cure:
- The Braiding Method: If you are growing soft-neck varieties, leave the greens attached. Group three onions together and braid the leaves as you would hair, adding a new onion every few inches. Hang these braids from a nail or a hook. The vertical orientation allows the weight of the bulb to pull the neck tight as it dries.
- The Mesh Bag Method: Place your cleaned bulbs into breathable mesh bags (repurposed orange or potato bags work great). Do not pack them tight; leave enough room so you can shake the bag and see the onions move. Hang these bags from the rafters of your shed.
- The Tiered Rack Method: Build or buy racks made of hardware cloth or heavy-duty wire mesh. Space the onions in a single layer so none of them are touching. This is “vertical” because you can stack these racks 5 or 6 levels high, using the rising warm air to carry moisture away from the bulbs.
Step 4: The Waiting Game
The curing process usually takes between 2 and 4 weeks. You will know they are ready when the necks are hard and shriveled, with no moisture remaining when you squeeze them. The outer skins should be “papery” and make a rustling sound when you run your hand over them. If you can still feel any “give” or softness in the neck, they need more time.
Benefits of Strategic Vertical Curing
The primary advantage of going vertical is the dramatic reduction in rot. By eliminating the contact point between the bulb and a solid surface, you prevent “sweating.” When an onion sits on a flat board or the ground, the side facing down stays cool and moist while the side facing up stays warm and dry. This temperature differential creates condensation, which is the perfect breeding ground for fungal spores.
Another benefit is the efficient use of space. Most backyard gardeners don’t have enough floor space in their garage to lay out 200 onions in a single layer. Vertical systems allow you to cure a massive harvest in a 2×2 foot (60×60 cm) footprint. This makes it much easier to keep the onions in a controlled environment where you can monitor them daily.
Finally, vertical curing often results in a better-looking onion. The skins dry more evenly, resulting in those beautiful, deep bronze or vibrant red colors that look so professional in the kitchen. More importantly, the even drying ensures that the “seal” at the neck is uniform. A lopsided cure can leave a tiny gap in the neck tissue, which is all a mite or a mold spore needs to get inside.
Challenges and Common Mistakes
The most frequent error I see is the “close shave.” Gardeners are often in a rush to make their onions look like the ones in the grocery store, so they trim the tops and roots immediately after harvest. This is a huge mistake. Cutting a green, moist neck opens the bulb to immediate infection. You should always wait until the neck is completely dry before trimming, or better yet, leave at least 1 inch (2.5 cm) of the dried stem attached during storage to act as a buffer.
Another common pitfall is ignoring the humidity. If you live in a particularly humid region, simply hanging onions in a shed might not be enough. If the air is stagnant and heavy with moisture, the onions won’t cure; they will just sit there and eventually sprout or rot. In these cases, you must use a small circulating fan to keep the air moving. You don’t need a gale-force wind, just a gentle, consistent breeze to carry the transpired moisture away.
Watch out for “thick necks” as well. Sometimes, due to excessive nitrogen late in the season or certain weather patterns, an onion will develop a very thick, fleshy neck that refused to dry down. These onions are “bad keepers.” No matter how well you cure them vertically, that thick neck will likely never seal perfectly. Identify these early—they are the ones that stay green while the rest of the crop is browning—and set them aside to be eaten first. Do not put them into long-term storage with the others.
Limitations of This Method
While vertical curing is superior for most, it does have its constraints. It requires more setup time than simply throwing onions on a tarp. If you are harvesting thousands of pounds, the labor involved in braiding or bagging every individual bulb can be overwhelming without specialized equipment. In those cases, pallet boxes with forced air are the industrial equivalent of our vertical racks.
DIY PROJECT: Collect rainwater no matter where you live...

This DIY project is the best way to legally collect rainwater NO MATTER where you live. Get chlorine-free water, cut down on your water bills, and have enough for an emergency situation or to water your garden. Read More Here...
Environmental conditions also play a role. If you are curing in an area that is too cold—below 60°F (15°C)—the drying process will happen so slowly that the onions may try to enter a second growth phase rather than going dormant. Conversely, if the area is too hot (above 95°F / 35°C), the onions can actually lose too much moisture too fast, leading to “baldness” where the outer skins fall off completely, leaving the bulb unprotected.
It is also worth noting that sweet onions, like Walla Wallas or Vidalias, have a naturally high water and sugar content. Even with the best vertical curing, these varieties only have a shelf life of a few weeks to a couple of months. Curing helps, but it won’t turn a sweet onion into a “storage” onion. For that, you need pungent varieties like Yellow Globe or Copra.
Field Dried vs. Vertical Cured
To help you decide which approach fits your garden, let’s look at how these two methods stack up across several practical categories. Most hobbyist growers find that while field drying is “easier,” the risks far outweigh the convenience.
| Feature | Field Dried | Vertical Cured |
|---|---|---|
| Weather Risk | High (Rain, Sunscald, Frost) | Very Low (Protected) |
| Air Circulation | Poor (Blocked by soil/leaves) | Excellent (360-degree flow) |
| Space Efficiency | Low (Uses garden beds) | High (Uses vertical space) |
| Rot Resistance | Moderate (Prone to soil pathogens) | Superior (Keeps bulbs clean) |
| Labor Intensity | Low | Medium |
Practical Tips for Best Results
Over the years, I’ve picked up a few “pro” tricks that make the vertical curing process even more effective. First, pay attention to the moon and the rain. If possible, harvest your onions during a dry spell when the soil is crumbly. Onions pulled out of mud take twice as long to cure and are much more likely to carry soil-borne fungi into your curing area.
- The “Rustle” Test: When you think the onions are done, grab a handful and rub them together. They should sound like dry autumn leaves or crinkling paper. If there is a “thud” or a “squish,” they aren’t ready.
- Keep the Lights Low: Onions are sensitive to light even after harvest. Too much light during the curing process can cause the bulbs to turn green, which can affect the flavor and, in some cases, lead to the production of bitter compounds. Keep your curing area shaded.
- Don’t Be Afraid of the Roots: Many people trim roots right away to make the bulb look clean. I prefer to leave the roots alone until the curing is done. Once the roots are brittle and “wiry,” they will often just brush off with your thumb, leaving the basal plate of the onion intact and uninjured.
- Separate the Varieties: If you grow reds, whites, and yellows, cure them in separate bags or sections. They often cure at different rates. Red onions, in particular, can sometimes be a bit more finicky and prone to external molds if the air isn’t moving fast enough.
Advanced Considerations for Serious Keepers
For those of you who want to push your storage life into the following spring, you need to think about the biology of the storage environment itself. Once cured, onions should be moved to a permanent storage home that mimics a “winter sleep.” The ideal temperature is actually quite cold—just above freezing, around 32°F to 36°F (0°C to 2°C).
In a home setting, this is often a cool basement, an insulated garage, or a root cellar. However, you must ensure the humidity stays between 60% and 70%. If the air is too dry (like in a heated house), the onions will shrivel and lose their “crunch.” If it is too wet (above 80%), they will break dormancy and start to grow roots or sprouts. A simple, inexpensive hygrometer is a great investment for any serious gardener’s storage room.
Also, consider the “companion” effect. Never store your cured onions near your potato harvest. Potatoes release moisture and ethylene gas, both of which will cause your onions to sprout prematurely. Keep them in separate rooms if possible, or at least on opposite sides of a well-ventilated space. I like to keep my onions in hanging mesh bags even in permanent storage; it ensures that if one onion does happen to go bad, it doesn’t have the “nesting” contact needed to rot its neighbors.
Example Scenario: The 100-Bulb Harvest
Let’s look at how this works in a real backyard scenario. Imagine you have a 4×8 foot (1.2×2.4 meter) raised bed that produced 100 beautiful yellow storage onions. In early August, you notice the tops are falling over. You check the forecast and see a week of clear skies with 80°F (27°C) days.
Instead of leaving them in the bed, you spend 30 minutes lifting them with a fork and brushing off the loose soil. You take them to your garage. You have three 10-pound mesh bags from the grocery store and a small 4-tier wire shelving unit you found at a yard sale. You put 20 onions in each bag and hang them from the ceiling joists. The remaining 40 onions are laid out on the wire shelves, ensuring they aren’t touching.
You set a small desk fan on the floor, pointing it toward the ceiling so it circulates the air without blowing directly on the onions with high force. Two weeks later, you check a bulb. The neck is hard like a twig. You trim the dried tops, leaving 1.5 inches (4 cm) of stem, and place them into a clean wooden crate. Because you used vertical curing, you didn’t lose a single bulb to the “damp spot” rot, and your harvest is ready for the root cellar by the time the September rains arrive.
Final Thoughts
Success in the garden is often measured by the harvest, but for those of us who eat from our land all year, the real victory is in the storage. Transitioning to vertical curing is one of those small, practical shifts that yields an outsized reward. It respects the biology of the onion and protects the investment of time and sweat you’ve put into your soil.
Don’t be discouraged if your first attempts at braiding are messy or if you have to scavenge for old mesh bags. The onions don’t care about aesthetics; they care about airflow. Start small, observe how the necks of your bulbs react to the breeze, and you will quickly develop a “feel” for when a crop is perfectly cured.
As you master onion storage, you might find yourself looking at other parts of your garden with a similar eye for preservation. Whether it is curing garlic, braiding shallots, or properly aging winter squash, the principles remain the same: respect the plant’s need for a slow transition into dormancy. Happy harvesting, and may your onion bins stay full and firm until the spring sun returns.