

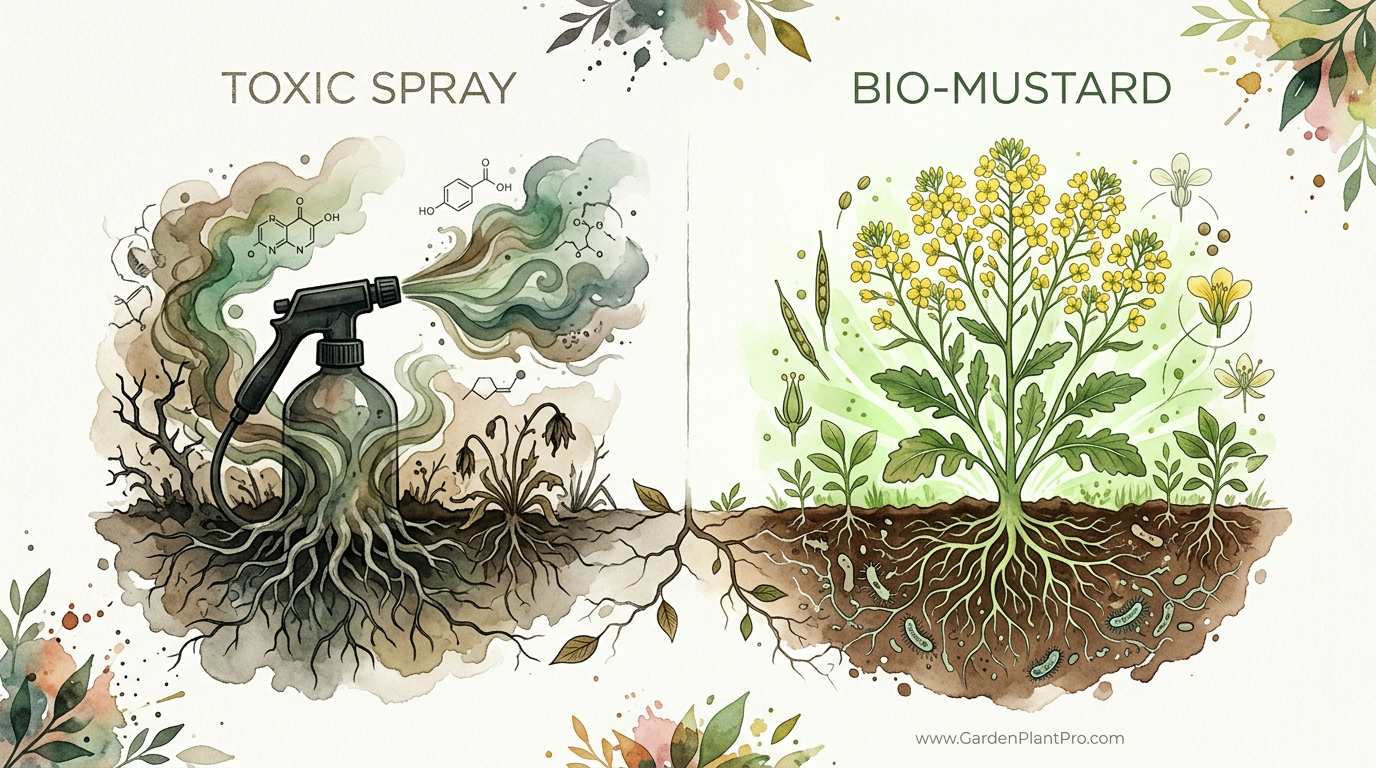
What if the most powerful pesticide in your garden was actually a spicy salad green? Stop reaching for heavy chemicals to fight soil pathogens. High-glucosinolate mustard acts as a natural biofumigant. When crushed and buried, it releases compounds that wipe out nematodes and fungi without destroying your soil’s microbial life.
I’ve spent forty years watching folks struggle with “tired soil.” Usually, they notice their tomatoes looking peaked by July or their potatoes coming up covered in scabby spots. For a long time, the only answer was to let the ground sit fallow for years or use heavy-duty sprays that killed every living thing in the dirt—the good, the bad, and the ugly.
Then I learned about biofumigation. It’s a bit of old-world wisdom that’s been backed up by modern science. Instead of a TOXIC SPRAY, we use a BIO-MUSTARD cover crop. It’s a specialized variety of mustard that you grow specifically to till back into the earth. It feels like a bit of magic, but it’s actually just clever chemistry that the plants do for us.
If you’re tired of seeing your hard work undone by microscopic pests you can’t even see, this is the technique you’ve been waiting for. It’s easy on the wallet, great for the worms, and remarkably effective if you get the timing right. Let’s walk through how you can turn a simple patch of greens into a soil-cleansing powerhouse.
How To Use Mustard For Natural Soil Biofumigation
Biofumigation is the process of using certain plants to suppress soil-borne pests and diseases. While many plants in the Brassicaceae family have some of these properties, “bio-mustard” varieties are bred to have exceptionally high levels of glucosinolates. These are the same natural compounds that give mustard, horseradish, and wasabi their “bite” or spicy kick.
When these mustard plants are finely chopped (a process called maceration) and immediately dug into the soil, those glucosinolates react with water and a specific enzyme in the plant cells called myrosinase. This reaction creates isothiocyanates (ITCs). If you’ve ever heard of commercial soil fumigants like Vapam (metam sodium), you might be surprised to learn that ITCs are the exact same active ingredients found in those synthetic chemicals.
Think of it like a “mustard bomb” for your garden. You grow the crop to full size, smash it into the dirt, and let the natural gases do the heavy lifting. Gardeners typically use this method to clear out stubborn problems like root-knot nematodes, Verticillium wilt, Rhizoctonia, and Fusarium. It’s especially popular in high tunnels or greenhouses where the same crops—like tomatoes—are grown year after year, causing disease pressure to build up to dangerous levels.
The Science of the “Spicy” Soil Scrub
To get the most out of your bio-mustard, you have to understand why it works. It isn’t just about the plant sitting in the soil; it’s about the destruction of the plant. The “magic” happens in the first twenty minutes after you mow the crop. If you just till the plants in whole, you won’t get the same effect. You need to rupture as many plant cells as possible to release that myrosinase enzyme.
Research from institutions like Michigan State University and Cornell has shown that the concentration of these natural gases peaks when the plant is at its lushest, just as it begins to flower. At this stage, the plant has maximized its biomass (the physical amount of green stuff) and its chemical potency. Wait too long, and the plant becomes “woody,” the chemicals dissipate, and you might accidentally let the mustard go to seed, creating a weed problem for next year.
The Key Players: Glucosinolates and ITCs
There are different types of glucosinolates for different jobs. For instance, sinigrin is the big gun when you’re fighting nematodes and fungal pathogens like Verticillium. Other compounds, like sinalbin, are better at suppressing weed seeds. Knowing which variety of mustard you’re planting is the difference between a nice green manure and a functional biofumigant.
Step-by-Step Guide: How to Biofumigate Your Garden
Success with mustard biofumigation isn’t hard, but it is time-sensitive. You can’t just mow the mustard on a Friday and till it in on a Sunday. You have to be ready to act fast. Here is the process I’ve used over the years with great success.
1. Prepare the Seedbed
Start with a clean slate. Clear out any large weeds and ensure your soil pH is above 5.5. Ideally, you want it closer to 7.0 (neutral). If your soil is too acidic, the chemical reaction that creates the fumigant gas won’t work as well. Broadcast your seeds at a rate of about 0.5 lbs per 1,000 square feet (2.25 kg per 100 square meters). Lightly rake them in or roll the soil to ensure good seed-to-soil contact.
2. Feed the “Fumigant”
Mustard needs fuel to create its defensive chemicals. Specifically, it needs Nitrogen (N) to grow big and Sulfur (S) to create those spicy glucosinolates. Most seasoned growers recommend applying about 100 lbs of Nitrogen per acre (112 kg per hectare) and about 20–30 lbs of Sulfur (22–33 kg per hectare). In a small backyard garden, a balanced organic fertilizer with a bit of extra elemental sulfur or gypsum works wonders.
3. Grow to Peak Bloom
Monitor your crop closely. It usually takes about 60 to 70 days to reach peak biomass. You want to see about 20% to 50% of the field in flower. This is when the chemical levels are at their absolute highest. If you let it go to full seed, the chemical levels drop drastically as the plant puts its energy into the next generation.
4. Macerate (The “Smash” Phase)
This is the most important step. You need to chop the mustard as finely as possible. On a farm, we use a flail mower because it shreds the stems into a pulp. In a backyard, a lawnmower on a low setting or a powerful string trimmer works. The goal is to see “green juice” on the ground. You want to rupture every cell you can find.
5. Incorporate Immediately
The 20-minute rule is law here. Within twenty minutes of mowing, 80% of the fumigant gas will have escaped into the air if it isn’t buried. You need someone following right behind the mower with a tiller. Dig that green pulp into the top 6 to 8 inches (15–20 cm) of soil. Do not use a plow that just flips the soil; you want a tiller that mixes the shredded mustard thoroughly with the dirt.
6. Seal the Soil
Once it’s buried, you have to keep the gas in the ground. You can do this by rolling the soil flat to pack it down or, even better, by watering the area thoroughly. The water acts as a “cap” that traps the gas. If you’re working on a small scale, you can even pull a heavy tarp or clear plastic over the area for a few days to really “cook” the pathogens.
7. The Waiting Period
Don’t be in a rush to plant your next crop. The same chemicals that kill the bad guys can also hurt your seeds. Wait at least 10 to 14 days for the mustard to break down and the gases to dissipate. If the soil is cold (below 50°F or 10°C), wait three weeks just to be safe.
Benefits of Mustard Biofumigation
Why go through all this trouble instead of just buying a bag of fertilizer or a jug of spray? The benefits go way beyond just killing pests. You’re essentially performing a “reset” on your soil health without the collateral damage of synthetics.
- Broad-Spectrum Control: It targets everything from Pythium (damping off) to Common Scab and Wireworms.
- Organic Matter Boost: You are adding a massive amount of “green manure” back into the dirt, which feeds the beneficial microbes once the gas phase is over.
- Nutrient Recycling: Mustard has a deep taproot that pulls up nutrients like calcium and potassium from deep in the subsoil and puts them back in the top layer where your veggies can reach them.
- Erosion Control: Growing a dense stand of mustard over the spring or fall keeps your topsoil from washing away in heavy rains.
- Improved Soil Structure: The decomposing roots leave behind tiny “tunnels” that help with drainage and aeration.
Common Mistakes to Avoid
Even though I’ve done this dozens of times, I still see folks trip up on the same few hurdles. If you avoid these, your success rate will skyrocket.
DIY PROJECT: Collect rainwater no matter where you live...

This DIY project is the best way to legally collect rainwater NO MATTER where you live. Get chlorine-free water, cut down on your water bills, and have enough for an emergency situation or to water your garden. Read More Here...
Waiting too long to mow: This is the most common error. Once the mustard is in full seed, the stems get “woody” and the glucosinolates are gone. Plus, you’ll be fighting volunteer mustard weeds for the next three years. Mow at first flower!
Working with dry soil: The chemical reaction requires moisture. If you till shredded mustard into bone-dry dirt, nothing happens. It’s just expensive mulch. Always make sure the soil is moist before you mow, and water it immediately after you till it in.
Poor chopping: If you leave the stalks in 6-inch pieces, the gases won’t release fast enough or in a high enough concentration to kill anything. You want a pulp, not a salad.
Limitations and Realistic Expectations
I always tell my neighbors that biofumigation is a “suppressor,” not an “eradicator.” While a chemical like methyl bromide (now largely banned) might kill 99.9% of everything, bio-mustard might kill 70% to 90%. That’s usually more than enough to get a great crop, but it isn’t a permanent cure. If you have a massive, out-of-control nematode infestation, you might need to do this for two seasons in a row.
Another thing to consider is sorption. If your soil is extremely high in organic matter (like a pure compost bed), the organic particles can actually “soak up” the mustard gas before it reaches the pests. Biofumigation often works best in “lighter” soils—sandy or loamy ground where the gas can move freely between the soil particles.
Choosing the Right Mustard Variety
Standard yellow mustard from the grocery store won’t cut it. You need varieties specifically bred for high glucosinolate levels. Here is a quick comparison of what’s on the market today:
| Variety Name | Primary Use | Key Strength |
|---|---|---|
| Caliente 199 | General Biofumigation | Very high glucosinolates; extremely fast growth. |
| Pacific Gold | Nematode Control | Specifically effective against root-lesion and root-knot nematodes. |
| White Gold | Weed Suppression | Produces massive biomass to shade out competitors. |
| AAC Guard | No-Seed Hybrid | Sterile hybrid that won’t become a weed; 20% more biomass. |
Practical Tips for Best Results
Over the years, I’ve found a few “tricks of the trade” that aren’t usually in the manuals. These little adjustments can make a big difference in how your garden responds.
- Check the weather: Try to time your incorporation for a cool, cloudy morning. Hot sun will cause the gases to evaporate faster than you can bury them.
- The “Tarp Trick”: If you are treating a small raised bed, cover the soil with a clear plastic painter’s sheet for 48 hours after tilling. It creates a “greenhouse effect” that helps the gases penetrate deeper.
- Sowing Depth: Don’t bury the seeds too deep. They are tiny. A depth of 1/4 inch to 3/4 inch (6 mm to 19 mm) is perfect. If you go deeper, they’ll struggle to emerge.
- Watch for “Volunteers”: Even with the best timing, a few seeds might escape. Be prepared to pull or hoe any mustard that pops up in your following crop before it gets big.
Advanced Consideration: Sulfur and Nitrogen Ratios
If you’re really looking to optimize your “mustard bomb,” pay attention to your nutrient ratios. The plant uses Sulfur to build the GSL molecules. If you have plenty of Nitrogen but no Sulfur, the plant will look big and green but have no “kick.” A good rule of thumb is a 6:1 ratio of Nitrogen to Sulfur. For every 6 lbs of Nitrogen you add, add 1 lb of Sulfur. This ensures the plant is as toxic as possible to those soil pathogens.
Example Scenario: The Tomato Patch Rescue
Imagine you have a 200-square-foot (18.5 sq m) patch where your tomatoes have suffered from Verticillium wilt for three years. In early spring, as soon as the frost is out of the ground, you broadcast 1.5 ounces (42 g) of Caliente 199 mustard seed. You sprinkle on a few cups of organic 10-10-10 fertilizer and a handful of elemental sulfur.
By late May, the mustard is waist-high and just showing yellow flowers. On a Tuesday morning, you run your mower over it on the lowest setting, then immediately follow with your rear-tine tiller, mixing the “green soup” into the top 6 inches of soil. You give it a good soak with the garden hose and walk away. Two weeks later, you transplant your tomatoes. Because you’ve knocked back the fungal population and added all that organic matter, those tomatoes stay green and productive until the first frost in autumn.
Final Thoughts
Biofumigation is a beautiful example of working with nature rather than against it. It reminds us that the garden is a complex system of chemistry and biology. By using high-glucosinolate mustard, we aren’t just killing “pests”; we are managing the soil environment to favor the plants we want to grow. It takes a little more planning and effort than just spraying a bottle of chemicals, but the long-term rewards for your soil’s health are immense.
Don’t be afraid to experiment with different varieties or timings. Every garden has its own unique soil signature and climate. What works in a cool, damp spring in the Pacific Northwest might need a little tweaking in a hot, dry Southern fall. The key is to get that mustard shredded and buried while it’s still “juicy.”
Once you see the difference in your plants—the deep green leaves, the lack of root knots, and the sheer vigor of your harvest—you’ll likely make mustard a permanent part of your crop rotation. It’s a tool every serious gardener should have in their belt. So, next time you’re planning your spring beds, save a little room for the “spicy” stuff. Your soil will thank you for it.