

You are one glass of water away from an infinite supply of organic rosemary. Why spend $20 at the garden center for a single plant that might struggle to transplant? You can turn a 50-cent grocery store sprig into a massive, permanent garden staple using nothing but a jar of water and 14 days of patience. This is how you build a food forest for zero dollars.
Many folks believe that a green thumb is a gift you are born with, but experience tells me it is mostly about observation. I have spent decades watching these Mediterranean shrubs thrive in the cracks of sidewalks and wither in expensive nursery pots. The secret lies in understanding that rosemary does not want to be coddled; it wants to be understood.
Growing from seed is a test of character that most gardeners fail, and for good reason. Rosemary seeds have notoriously low germination rates and can take months just to reach the size of a toothpick. Cuttings, however, give you a massive head start. You are essentially “cloning” a mature plant, ensuring the flavor and hardiness are exactly what you expect.
This guide will walk you through the nuances of propagation, from the specific angle of your cut to the chemistry of the water in your jar. Whether you are a beginner looking for your first “win” or a seasoned grower wanting to line your driveway with a fragrant hedge, these steps will get you there without spending a dime.
How To Propagate Rosemary From Cuttings For Free
Propagating rosemary from cuttings is the process of taking a small stem from an established plant and encouraging it to grow its own root system. In the gardening world, we call this vegetative propagation. It is a reliable way to multiply your garden because the new plant is genetically identical to the parent. This means if your neighbor has a rosemary bush that survives the harshest winters and tastes like heaven, your new plant will do the exact same.
Rosemary (Salvia rosmarinus) is a woody perennial that naturally wants to survive. In its native Mediterranean habitat, it often roots itself where branches touch the sandy soil. We are simply mimicking this natural behavior in a controlled environment. By taking a cutting, you bypass the fragile seedling stage and start with a “teenager” plant that already has the structure to support rapid growth.
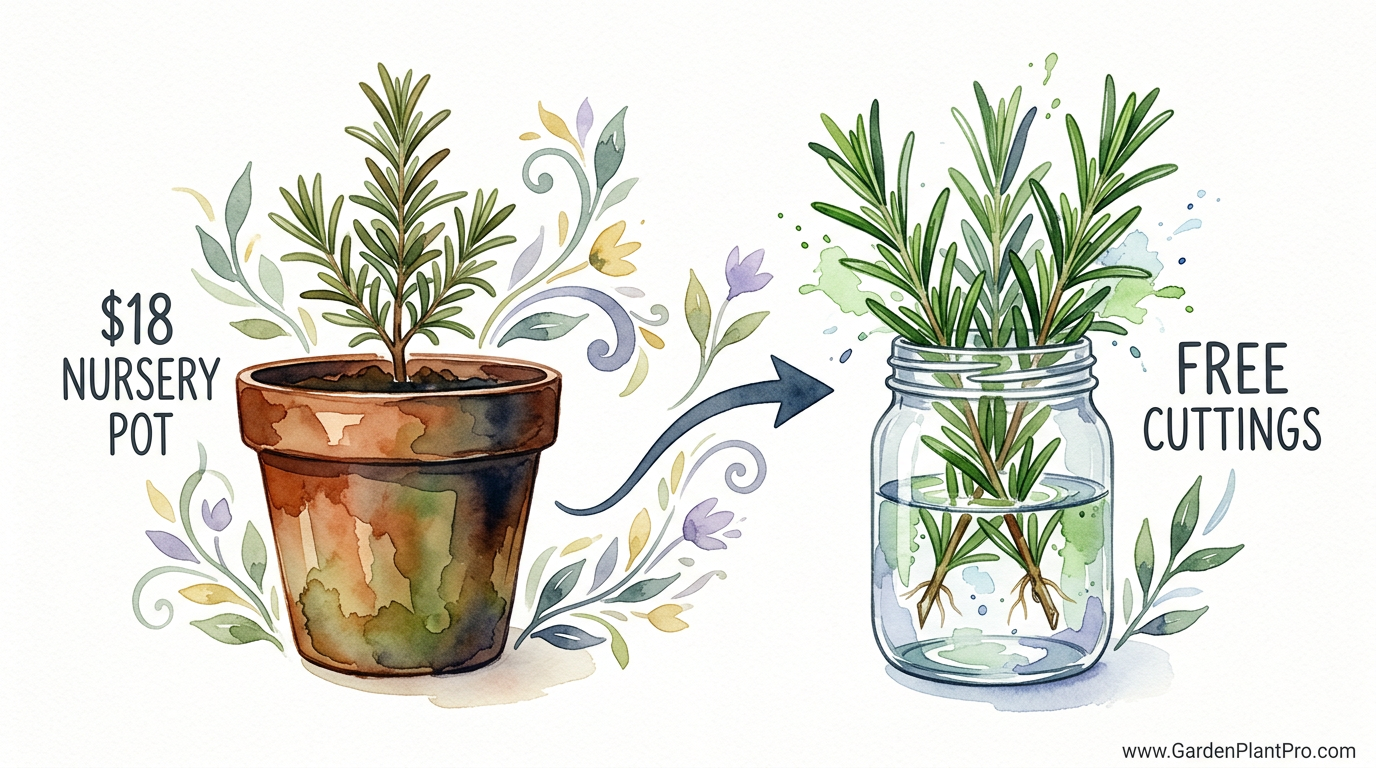
Gardeners use this method to save money, preserve favorite varieties, or create enough plants for a large-scale project like a rosemary hedge. While a single nursery pot might cost $18 or more, a single healthy mother plant can provide dozens of cuttings every season without any detriment to its own health.
The Step-by-Step Water Propagation Method
Rooting in water is often the favorite method for beginners because it provides visual confirmation. There is a certain magic in seeing those first white nubs emerge from a bare stem. It takes the guesswork out of the process.
First, you must select the right material. Look for “softwood” or “semi-hardwood” growth. This is the flexible, green, or slightly tan part of the stem found toward the tips. Avoid the very bottom of the plant where the wood is dark brown and brittle, as these cells are too old to easily transition into root production. Aim for stems that are about 10 to 15 centimeters (4 to 6 inches) long.
Use a sharp, clean pair of shears or a kitchen knife. A dull blade can crush the delicate vascular system of the stem, leading to rot instead of roots. Make your cut at a 45-degree angle. This increases the surface area for water absorption and helps the stem sit comfortably in the bottom of your container without sealing itself against the glass.
Carefully strip the leaves off the bottom 5 centimeters (2 inches) of the stem. You should be left with a tuft of foliage at the top and a bare “trunk” at the bottom. These bare points, called nodes, are where the plant’s growth hormones are most concentrated. This is exactly where the new roots will emerge.
Place the prepared cuttings in a clean glass or jar. Fill it with room-temperature water—ideally around 20°C (68°F)—just high enough to cover the stripped nodes. Do not submerge the leaves, as wet foliage is an open invitation for bacteria and decay.
Change the water every two to three days. Fresh water provides the oxygen that developing roots need to breathe. If the water becomes cloudy or smells slightly “off,” dump it immediately, rinse the stems, and start fresh. Place the jar in a spot with bright, indirect light. A windowsill that gets morning sun is perfect, but avoid the scorching heat of direct afternoon sun, which can cook the cuttings before they have a chance to drink.
Benefits of Propagating in Water
The most obvious advantage of water propagation is the visibility. In soil, you are often left wondering if anything is happening for weeks. In a jar, you can track the progress daily. This allows you to spot issues, like stem rot, the moment they begin.
Water propagation is also incredibly space-efficient. You can fit ten potential rosemary bushes in a single pint-sized mason jar on your kitchen counter. It requires no specialized equipment—no seed trays, no heating mats, and no expensive bags of starting mix.
This method also acts as a safety net. If a cutting is not going to “take,” it usually reveals itself within the first week by turning brown or dropping its needles. You can simply discard the failure and focus your energy on the winners. Once the roots are 2.5 to 5 centimeters (1 to 2 inches) long, the plant is ready for its permanent home in the soil.
The Critical Transition: Moving From Water to Soil
The most common point of failure is not the rooting process itself, but the transition to soil. Roots grown in water are different from those grown in soil. They are more delicate and lack the “hairs” designed to pull moisture from earth.
Prepare a small pot with a very well-draining medium. A mix of 70% potting soil and 30% coarse sand or perlite is a classic choice. Rosemary hates “wet feet,” and a heavy, clay-based soil will suffocate the new roots almost instantly. Use a pencil or your finger to poke a hole in the damp soil so you don’t have to force the delicate roots downward.
Settle the rooted cutting into the hole and gently firm the soil around it. Water it in immediately to remove air pockets. For the first week, keep the soil consistently moist—not soggy—to help the water-adapted roots adjust. This is the only time in a rosemary plant’s life where it will want frequent watering.
Gradually move the plant into more direct sunlight over the course of 10 days. This process, known as “hardening off,” prevents the leaves from scorching. Once you see new green growth appearing at the very tip of the plant, you know the transition is complete. Your free grocery store sprig is now a functioning plant.
DIY PROJECT: Collect rainwater no matter where you live...

This DIY project is the best way to legally collect rainwater NO MATTER where you live. Get chlorine-free water, cut down on your water bills, and have enough for an emergency situation or to water your garden. Read More Here...
Environmental Factors for Success
Rosemary is a sun-worshipper. To thrive, these plants need a minimum of 6 to 8 hours of direct light daily. If you are growing your new cuttings indoors, a south-facing window is your best bet. In regions with low light during winter, a simple LED grow light can prevent the plants from becoming “leggy” or weak.
Temperature plays a vital role in root development. Ideally, keep your propagation area between 18°C and 24°C (65°F to 75°F). If the room is too cold, the metabolism of the plant slows down, and the rooting process can take six weeks instead of two. Conversely, extreme heat can cause the water to harbor pathogens more quickly.
The pH of your soil should be between 6.0 and 7.0. Rosemary is fairly forgiving, but it prefers slightly acidic to neutral conditions. If your garden soil is very alkaline, consider adding a bit of organic compost. Compost not only balances pH but also improves the “tilth” or texture of the soil, making it easier for young roots to spread.
Choosing the Right Rosemary Variety
Not all rosemary is created equal. Depending on your goals, you might want to seek out specific varieties for your cuttings.
Upright Varieties
Tuscan Blue is the gold standard for many gardeners. It grows quickly, reaching heights of up to 1.8 meters (6 feet), and features beautiful deep blue flowers. It is excellent for hedges but can be tender in very cold climates. Arp is another famous upright variety, known specifically for its cold hardiness, surviving temperatures as low as -18°C (0°F).
Prostrate and Dwarf Varieties
If you want a plant that spills over a stone wall or acts as a ground cover, look for Prostratus. It rarely grows taller than 30 centimeters (1 foot) but can spread several feet wide. Blue Boy is a charming dwarf variety that stays compact, making it the perfect choice for small containers or indoor herb gardens.
Common Mistakes and Challenges
Overwatering is the number one killer of rosemary cuttings. It is tempting to keep the soil drenching wet, but roots need oxygen just as much as they need water. If the soil stays saturated, the roots will turn black and mushy—a clear sign of rot.
Taking cuttings from a flowering plant is another frequent error. When a rosemary bush is in bloom, its energy is focused on reproduction and seed production, not root growth. For the best success, take your cuttings either before the flowers appear or after they have faded.
Submerging leaves in the water jar is a recipe for disaster. Foliage decomposes quickly in water, creating a bacterial soup that will kill the stem before it can root. Always ensure the bottom 5 centimeters (2 inches) of your stem are completely bare of needles.
Using Natural Rooting Stimulants
While rosemary usually roots well on its own, you can give it a boost using items found in your kitchen or backyard.
- Honey: Raw honey has natural antibacterial and antifungal properties. Dipping the end of a cutting in honey before placing it in soil (or even a light dilution in water) can protect the open “wound” from infection.
- Willow Water: Willow trees are packed with indolebutyric acid (IBA), a powerful rooting hormone. By steeping chopped willow twigs in water for 24 hours, you create a “tea” that can significantly speed up the rooting process for other plants.
- Aloe Vera: The gel from an aloe leaf can act as a natural sealant and mild growth stimulant. Simply dip the cut end into the gel before planting.
Practical Comparison: Water vs. Soil Propagation
| Feature | Water Propagation | Soil Propagation |
|---|---|---|
| Visibility | High – easy to see roots. | None – must wait for top growth. |
| Complexity | Very Low – just a jar and water. | Moderate – requires specific mix. |
| Root Strength | Delicate “water roots.” | Strong “earth roots.” |
| Success Rate | High for beginners. | Very high for experienced growers. |
| Transplant Shock | Moderate during move to soil. | Low – already in its medium. |
Long-Term Care and Maintenance
Once your rosemary is established in the garden, it requires very little attention. Pruning is the most important maintenance task. Every spring, or after the plant finishes flowering, give it a light trim. This prevents the center of the bush from becoming overly “woody” and encourages a flush of new, tender growth that is perfect for the kitchen.
Harvesting is essentially a form of pruning. Always cut just above a leaf node. This encourages the plant to branch out, resulting in a fuller, bushier specimen. Never remove more than one-third of the plant at a time, as this can stress the root system.
Winter care depends on your location. If you live in a region that sees hard freezes, consider growing your rosemary in a terracotta pot. These pots are breathable, which helps prevent root rot during damp winters. When the temperatures drop below -5°C (23°F), you can easily move the pot into a garage or a bright sunroom.
Final Thoughts
The beauty of propagating rosemary is that it reconnects you with the fundamental cycles of the garden. There is a deep satisfaction in knowing that the massive, fragrant bush at your doorstep started as a simple cutting in a glass on your windowsill. It reminds us that nature is abundant and that with a little patience, we can create wealth in our gardens without spending a cent.
Experiment with different varieties and methods. If one cutting fails, do not be discouraged. Even the most seasoned gardeners lose a few sprigs to rot or wilting. The key is to always take more cuttings than you think you need. You will inevitably end up with a surplus, which makes for the perfect gift for neighbors and friends.
Apply these same principles to other woody herbs like lavender, sage, or thyme. Once you master the art of the cutting, your garden will no longer be a place of expense, but a self-sustaining nursery of flavor and fragrance. Go ahead and take that first snip—your future food forest is waiting in a glass of water.