

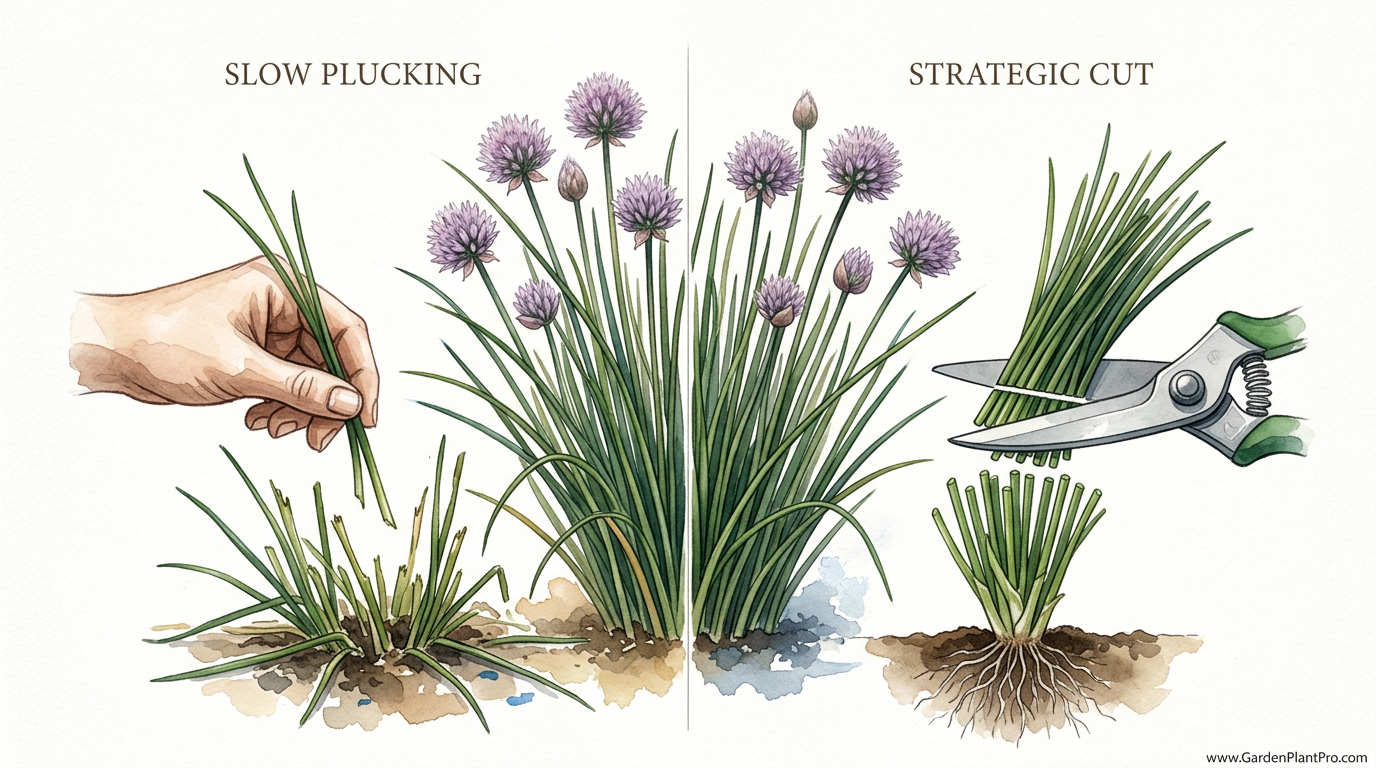
Are you wasting 20 minutes picking stems when you could finish the job in 20 seconds and double your yield? Stop being so gentle with your herbs! If you want a never-ending supply of chives all summer, you need to ditch the individual plucking. A strategic ‘haircut’ triggers a massive regrowth response that keeps your plants productive and tidy. Work smarter, not harder.
I have spent many years watching new gardeners treat their chive patches like delicate china. They lean over the bed, carefully selecting one or two green spears at a time, afraid to hurt the plant. It is a noble sentiment, but frankly, it is the exact opposite of what your chives actually want.
Think of your chives like a head of hair that has seen better days. When you give them a proper, aggressive trim, you are not just clearing away the old growth; you are sending a signal to the roots that it is time to get back to work. This response is what turns a leggy, tired-looking clump into a lush, vibrant green fountain of flavor.
In this guide, I will share the “neighborly” secrets to mastering the chive haircut. We will talk about why the strategic cut beats the slow pluck every time, how to handle different varieties, and the little tricks for keeping your patch healthy for a decade or more.
How To Cut Chives For Regrowth
Cutting chives for regrowth is a straightforward technique that relies on the plant’s natural biology. Unlike some herbs that grow from a central woody stem, chives are a perennial allium that grows in dense, grass-like clumps from small underground bulbs. When you understand that the growth point is at the base, everything changes.
The “haircut” method involves taking a bunch of stems and cutting them all at once, rather than picking through them. This approach is used by experienced gardeners to maintain a constant supply of tender, young shoots throughout the entire growing season. In the real world, this prevents your plants from becoming “woody” or tough as the weather warms up.
Imagine your lawn. You do not pluck individual blades of grass; you mow it to a uniform height, and it responds by growing back thicker and greener. Chives operate on a similar principle. By removing the older, taller foliage, you allow light and air to reach the center of the clump, stimulating the bulbs to push out fresh, succulent growth.
The Step-by-Step “Ponytail” Technique
If you have been doing the “slow pluck,” let me walk you through the faster, better way. I call it the ponytail chop. It is efficient, satisfying, and your plants will thank you for it by producing more than you can possibly eat.
1. Gather Your Tools
You do not need anything fancy. A sharp pair of kitchen scissors or clean garden snips will do the job perfectly. The most important thing is that they are sharp. Dull blades crush the stems rather than slicing them, which can lead to ragged edges that are more susceptible to disease or yellowing.
2. The Hand-Hold
Reach down and grab a handful of chive stems, gathering them together just like you would gather hair into a ponytail. You can do the whole plant at once if it is a smaller clump, or work in sections if your patch has grown into a massive mound. Pull the stems slightly taut, but do not tug on the roots.
3. The Big Snip
While holding the bundle, cut straight across the stems about 1 to 2 inches (2.5 to 5 cm) above the soil level. Do not be afraid of how short they look. I have seen chives grow back half an inch (1.2 cm) in a single day after a cut like this. Cutting at this height ensures you are removing the tougher, older parts while leaving enough of the base for the plant to recover quickly.
4. Cleanup
After the cut, take a quick look at what is left. If there are any stray yellowed bits or dead stems hiding in the center, pull them out. This is also a great time to shake out any dried leaves or debris that might have been trapped in the clump. Good airflow is the secret to preventing the rots and mildews that sometimes plague alliums.
Why the Strategic Cut Beats the Slow Pluck
You might wonder why we don’t just take what we need for dinner and leave the rest. While that works for a week or two, it eventually leads to a messy, unproductive plant. Here is why the “strategic cut” is the superior approach for serious gardeners.
First, it manages the apical dominance of the plant. When you cut the entire plant back, you disrupt the hormones that keep the growth focused on the existing tall stems. This forces the plant to activate new growth points at the base, resulting in a much bushier, more productive clump.
Second, it prevents “woodiness.” If you only pick the tips or a few outer stems, the older stems in the middle continue to age. They become tough, fibrous, and eventually flower. While chive flowers are beautiful and edible, the stems they grow on are often too tough to enjoy. Regular haircuts keep every stem in your patch at peak tenderness.
Finally, it is a massive time saver. Why spend 15 minutes hunting for the “best” stems when you can have a perfect bundle in 15 seconds? You can take the excess, wash it, and freeze it for later, ensuring you never run out even in the dead of winter.
Benefits of Aggressive Harvesting
The benefits of being “mean” to your chives are measurable and almost immediate. If you start this practice in the spring, you will notice a difference in your garden’s productivity by mid-summer.
- Increased Yield: Regular cutting can double or even triple the amount of foliage a single plant produces over a season.
- Better Flavor: Young, fast-growing shoots have a much milder and more pleasant onion or garlic flavor compared to old, stressed foliage.
- Pest Reduction: By frequently removing the bulk of the foliage, you are physically removing hiding spots for aphids and thrips.
- Improved Aesthetics: A “shorn” chive patch looks tidy and intentional, whereas a neglected one often looks like a patch of unruly weeds once the flowers fade.
Common Mistakes to Avoid
Even though chives are incredibly hardy, there are a few ways you can go wrong. I have seen these mistakes repeatedly over the decades, and they usually stem from a lack of confidence.
Cutting Too High: If you only cut the top half of the plant, the remaining bottom half of the stems will often turn yellow or brown at the tips. This doesn’t look great, and it doesn’t trigger that “regrowth surge” we are looking for. Commit to that 1-2 inch (2.5-5 cm) mark.
Ignoring the Flowers: Many people love the purple globes of common chives, and for good reason. However, if you let every flower go to seed, your chives will stop producing leaves and focus all their energy on reproduction. Plus, they will self-seed and start popping up in your gravel paths, your rose beds, and everywhere else. Cut the flower stalks down to the base as soon as the blossoms start to fade.
DIY PROJECT: Collect rainwater no matter where you live...

This DIY project is the best way to legally collect rainwater NO MATTER where you live. Get chlorine-free water, cut down on your water bills, and have enough for an emergency situation or to water your garden. Read More Here...
Over-Harvesting Young Plants: If you just planted your chives from seed this year, give them a break. For the first season, only harvest sparingly. Let them build up a strong root system and a healthy bulb before you start the aggressive “haircut” routine in their second year.
Environmental Factors and Garden Conditions
While the way you cut is vital, the environment provides the fuel for that regrowth. Chives are not picky, but they do have preferences that will help them bounce back faster after a trim.
Sunlight: Chives love the sun. Aim for at least 6 to 8 hours of direct light. They will grow in partial shade, but the regrowth will be much slower, and the stems will be thinner and less flavorful. In very hot climates, a little afternoon shade can actually prevent the tips from scorching.
Soil and pH: These plants thrive in well-drained soil rich in organic matter. They prefer a pH between 6.0 and 7.0. If your soil is heavy clay, the bulbs might rot in a wet winter. I always recommend mixing in some compost or well-rotted manure to improve the structure and drainage. Think of it as “fluffing up” their bed.
Watering: Because chives have relatively shallow root systems (about 25-30 cm or 10-12 inches deep), they do not like to dry out completely. Keep the soil consistently moist, especially in the week following a major haircut. Mulching with straw or shredded leaves can help hold that moisture in during the heat of July.
Common Chive Varieties: Common vs. Garlic
Not all chives are created equal. In my garden, I grow both common chives and garlic chives, and they require slightly different considerations during the harvest.
| Feature | Common Chives (A. schoenoprasum) | Garlic Chives (A. tuberosum) |
|---|---|---|
| Leaf Shape | Hollow, cylindrical, like tiny straws. | Flat, solid, blade-like. |
| Flower Color | Purple or pink globes. | White, star-shaped clusters. |
| Flavor | Mild onion. | Garlic undertones. |
| Growth Habit | Clumping, grows early in spring. | Vigorous, flowers later in summer. |
| Hardiness | USDA Zones 3-9. | USDA Zones 4-9 (slightly less cold hardy). |
The “haircut” method works perfectly for both. However, keep in mind that garlic chives can be a bit more aggressive. Their seeds are very viable, so if you don’t stay on top of deadheading those white flowers, you might find yourself with a “garlic chive forest” by next year.
Maintenance and Long-Term Care
Once you have the harvesting down, there are a few chores that keep the patch going for a decade. I have a clump of chives that has been in the same corner of my garden for nearly fifteen years, and it is still as productive as ever.
Dividing the Clumps
Every 3 to 4 years, your chives will become “pot-bound” even if they are in the ground. The center of the clump might start to die out, or the stems will become very thin. In the early spring or late fall, dig up the whole clump with a spade. Use your hands or a garden knife to pull it apart into smaller sections, making sure each section has a good bunch of bulbs and roots. Replant them 6 to 12 inches (15-30 cm) apart, and they will grow back with renewed vigor.
Feeding Your Chives
Chives are not heavy feeders, but they do appreciate a little boost after a big harvest. I like to top-dress my patch with a couple of inches of fresh compost every spring. If your soil is particularly poor, a light application of a balanced organic fertilizer or a nitrogen-heavy fish emulsion in early summer can help the plant recover quickly from its “haircut.”
Practical Tips for a Better Harvest
After years of snipping and clipping, I have picked up a few small habits that make the process even smoother.
- Harvest in the Morning: The best time to cut is right after the dew has dried but before the sun gets too hot. This is when the leaves have the highest moisture content and the best flavor.
- The Rotational Cut: If you have several clumps, don’t cut them all on the same day. Give one clump a haircut, use what you need, and then wait a week before cutting the next one. This creates a staggered harvest so you always have some “ready to use” foliage while the other plants are regrowing.
- Use Proper Scissors: Invest in a pair of dedicated “herb snips.” They are smaller than traditional garden shears and allow for much more precision when you are working around the base of the plant.
- Don’t Wash Until Needed: If you are planning to use the chives later in the day, don’t wash them immediately after cutting. They stay fresh much longer if they are kept dry and refrigerated in a loosely closed bag.
Challenges and Pests
Even though chives are known for repelling pests, they aren’t totally invincible. Occasionally, you might run into a few issues that slow down that beautiful regrowth.
Aphids: These tiny black or green bugs love to hide in the crevices of the hollow common chive leaves. If you see them, give the plant a firm “haircut” and blast the remaining base with a strong stream of water from your hose. This usually clears them up without needing any chemicals.
Onion Fly: In some regions, the larvae of the onion fly can burrow into the bulbs, causing the foliage to wilt and turn yellow. The best defense here is crop rotation and keeping your garden clean of rotting allium debris. If a plant is badly infested, it is often best to dig it up and dispose of it to protect the rest of your patch.
Rust: This is a fungal disease that looks like orange or brown dusty spots on the leaves. It usually happens in very humid weather or when plants are too crowded. If you see rust, do not compost the clippings! Cut the plant back to the ground, dispose of the infected foliage in the trash, and ensure the new growth has better airflow.
Real-World Application: What to do with the Bounty?
When you start using the haircut method, you will suddenly find yourself with a mountain of chives. You can only eat so many baked potatoes! Here is how I handle the “problem” of having too much.
Freezing: This is my favorite method. I wash the chives, pat them completely dry, and snip them into small rings. I spread them out on a baking sheet to “flash freeze” them for an hour, then dump them into a freezer bag. They don’t stick together, and I can just grab a handful whenever I need them for soup or eggs. They keep their flavor much better than dried chives.

Do you have some charcoal in your house right now? We call charcoal a “miracle leftover” for anyone who wants to be a little more self-sufficient and cut costs. That’s because it can help you with so many different things around the house and garden. You can even use it to make an energy-free fridge. Read More Here...
Chive Oil and Butter: If I have a particularly large harvest, I’ll blend a cup of chopped chives with some high-quality olive oil and a pinch of salt. I freeze this in ice cube trays. These “flavor bombs” are incredible for starting a sauté or finishing a grilled steak. Chive butter is equally wonderful and can be rolled into logs and frozen for months.
Final Thoughts
Learning how to cut chives for regrowth is one of those small gardening shifts that yields massive results. It takes you from being a “collector” of herbs to a true producer. By ditching the gentle plucking and embracing the strategic haircut, you are working with the plant’s natural rhythm rather than against it.
Remember to be bold with your scissors. As long as you leave an inch or two of growth and provide plenty of sun and water, your chives will bounce back faster than you expect. It is a rewarding, low-stress way to ensure that your kitchen is never without that fresh, green zip that only home-grown herbs can provide.
I encourage you to go out to your garden tomorrow morning and give one of your clumps the “ponytail chop.” Watch how it responds over the next few days. Once you see that vibrant green regrowth pushing up from the center, you’ll never go back to slow plucking again. Happy gardening!