

See why our ancestors called this ‘The Root of the Holy Ghost’ and why modern potting sheds fail to replicate its true power. Centuries ago, Angelica was the crown jewel of the apothecary garden, prized for its height and medicinal vigor. Today, we try to cram it into small plastic pots and wonder why it fails. It is time to return to the ancestral ways of growing this majestic biennial.
If you have ever stood beside a fully grown Angelica archangelica, you know it is less of a plant and more of a presence. It towers over the garden with hollow, purple-tinged stems and massive, architectural green umbels. It feels like something out of a medieval tapestry, and for good reason. Our forebears believed it was a gift from the archangels, capable of warding off the most terrifying of plagues.
Growing it today requires a bit of unlearning. We are used to buying a flat of annuals and expecting instant results. But Angelica is a slow-burn plant that demands a relationship with the soil and the seasons. It follows a biennial rhythm that cannot be rushed by synthetic fertilizers or tight greenhouse schedules.
In this guide, I want to share the hard-won lessons from my own garden. We will talk about why those store-bought seeds often refuse to sprout and how to create the cool, damp environment this giant craves. Whether you want it for its candied stems or its striking silhouette, you need to understand the soul of the plant.
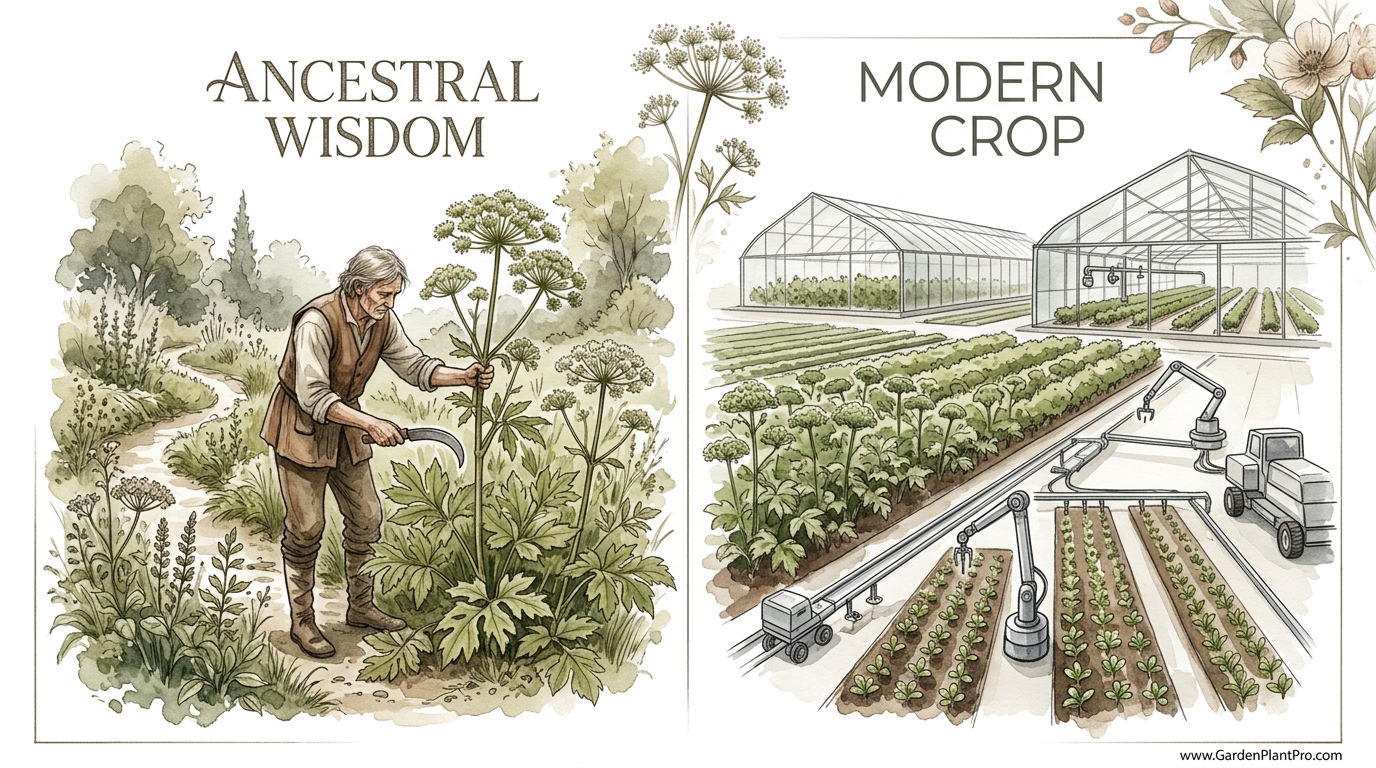
Growing Angelica: Traditional Vs Industrial Methods
Traditional cultivation of Angelica is a lesson in patience and observation. In the old days, gardeners did not rely on plastic seed trays or climate-controlled warehouses. They understood that Angelica seeds have a very short shelf life. They would simply let the plant drop its own seeds in late summer, allowing nature to handle the stratification process.
This traditional “self-sowing” method mimics how the plant grows in the wild across Northern Europe and Asia. In these regions, Angelica thrives along riverbanks and in moist meadows. It relies on the cold winter dampness to break seed dormancy. By the time spring rolls around, the garden is naturally filled with sturdy little seedlings that have already adapted to the local microclimate.
Modern industrial methods, however, often struggle with this plant’s specific needs. Commercial growers frequently produce Angelica in small plugs or pots to make them easy to ship. This is often where the trouble begins. Angelica develops a significant taproot very early in its life. When that taproot hits the bottom of a plastic pot, the plant becomes stressed and may never reach its full seven-foot (2.1-meter) potential.
Industrial seed production also faces the challenge of seed viability. Once Angelica seeds dry out completely for long-term storage, their germination rate plummets. This is why so many backyard gardeners fail when they buy a packet of seeds from a big-box store. To grow this plant successfully, you have to bridge the gap between old-world wisdom and modern convenience.
| Feature | Traditional Method | Industrial/Modern Method |
|---|---|---|
| Seed Starting | Direct sowing of fresh seed in autumn. | Controlled sowing in trays with refrigeration. |
| Root Development | Deep taproot grows naturally in place. | Taproot often restricted by small containers. |
| Maintenance | High organic mulch and natural moisture. | Liquid fertilizers and frequent overhead irrigation. |
| Success Rate | Higher long-term vigor and self-sufficiency. | Faster initial growth but prone to transplant shock. |
How the Angelica Cycle Works
To grow this plant, you must first understand that it is a biennial or a short-lived perennial. In its first year, the plant focuses entirely on building a lush rosette of green, divided leaves. These leaves can reach up to 2-3 feet (60-90 cm) in length. During this stage, the plant is quietly sending a thick, fleshy taproot deep into the earth.
The second year is when the real magic happens. As temperatures rise in the spring, a thick, hollow flower stalk emerges from the center of the rosette. This stalk can grow at an incredible rate, eventually reaching heights of 6 to 9 feet (1.8 to 2.7 meters). By early summer, the plant produces large, spherical umbels of greenish-white flowers that act as a magnet for pollinators.
Once the flowers fade and the seeds ripen in late summer, the plant typically dies. This is known as being “monocarpic”—flowering once and then passing on. However, if you are diligent about deadheading (removing the flower heads) before they set seed, you can sometimes trick the plant into living for three or even four years. This allows the root to grow even larger and more potent.
Step-by-Step Propagation and Sowing
The most common reason gardeners fail with Angelica is using old seed. If you are buying seeds, look for a “packed for” date that is current. Ideally, you want to get your hands on seeds that were harvested only weeks ago. If you cannot sow them immediately, keep them in a sealed jar in the refrigerator to preserve their moisture.
The Cold Stratification Process
Angelica seeds generally need a period of cold and moisture to germinate, a process known as stratification. In colder climates (USDA Zones 4-7), you can simply sow the seeds outdoors in the autumn. The natural freeze-and-thaw cycle of winter will do the work for you. If you are starting them in the spring, you should place the seeds in a damp paper towel inside a plastic bag and keep them in the fridge for 4 to 5 weeks.
Surface Sowing and Light
Unlike many other seeds, Angelica needs light to germinate. Do not bury them deep in the soil. Instead, press them firmly into the surface of the soil so they have good contact, but remain exposed to the light. I usually cover them with a very thin dusting of vermiculite or fine compost—just enough to keep them from blowing away but not enough to block the sun.
Spacing and Transplanting
If you start your seeds in trays, you must move them to their permanent home as soon as they have two true leaves. Because of that sensitive taproot, wait too long and you will stunt the plant forever. Space your plants at least 3 feet (90 cm) apart. It might look like a lot of empty space at first, but by the second year, that single plant will easily fill the gap.
Ideal Garden Conditions
Angelica is not a “set it and forget it” plant for a dry, sunny border. It is a child of the North, and it likes its feet wet and its head relatively cool. If you live in a region with scorching summers, you must give it some afternoon shade. In cooler climates, it can handle full sun as long as the soil never dries out.
Soil and Moisture Requirements
The ideal soil for Angelica is deep, rich, and slightly acidic (pH 6.0 to 7.0). It loves a high amount of organic matter. Before planting, I always dig in a generous amount of well-rotted compost or leaf mold. This helps the soil hold onto moisture, which is the single most important factor for success.
If your soil is sandy or prone to drying out, you will struggle. I have found that planting Angelica near a low-lying area of the garden or near a leaky rain barrel works wonders. In the wild, they often grow right at the edge of streams. Aim for a soil consistency that feels like a wrung-out sponge—moist but not a stagnant swamp.
Wind Protection and Staking
Because of its height, a tall Angelica plant can become a sail in high winds. The stems are hollow and surprisingly sturdy, but a heavy summer storm can snap them or uproot the whole plant if the soil is very soft. I like to plant mine at the back of a border against a fence or wall. If you are growing them in an open field, you might need to use a heavy-duty stake for the flower stalks in the second year.
Benefits of Growing This Majestic Herb
The practical benefits of Angelica extend far beyond its visual impact. Every part of the plant—the roots, stems, leaves, and seeds—is useful in the kitchen or the home apothecary. It is one of the few plants that provides a massive harvest of biomass for composting while also serving as a high-value culinary crop.
DIY PROJECT: Collect rainwater no matter where you live...

This DIY project is the best way to legally collect rainwater NO MATTER where you live. Get chlorine-free water, cut down on your water bills, and have enough for an emergency situation or to water your garden. Read More Here...
Pollinator Magnetism
If you want to see your garden come alive, plant Angelica. The broad, flat umbels are the perfect landing pad for hoverflies, ladybugs, and parasitic wasps. These are the “good guys” of the garden that eat aphids and other pests. In my experience, having a few Angelica plants is better for pest control than any organic spray you can buy.
Culinary Versatility
The stems are traditionally peeled and simmered in sugar to create candied Angelica, a bright green confection used to decorate cakes. The leaves have a delicate, slightly licorice-like flavor that pairs beautifully with tart fruits like rhubarb. In fact, adding a few Angelica leaves to a rhubarb pot can reduce the amount of sugar you need by half.
Medicinal Heritage
While I am just a gardener and not a doctor, I can tell you that the roots have been used for centuries to aid digestion and support respiratory health. The aromatic oils in the seeds and roots are also used as a fixative in perfumes and potpourri. It is a plant that appeals to all the senses, providing a deep, musky scent that lingers in the garden on warm evenings.
Challenges and Common Mistakes
The biggest mistake I see is gardeners treating Angelica like a standard perennial. They buy it in a gallon pot from a nursery in the middle of a hot July. By the time they get it in the ground, the taproot is circling the pot, and the plant is already in heat shock. Most of these plants will flower prematurely and die before they ever get big.
The Seed Viability Trap
As I mentioned before, do not trust old seeds. If you can’t find a reputable source for fresh seed, find a friend who grows it and ask for a few seed heads in August. Rub the seeds directly onto the soil where you want them to grow. This “wild” approach almost always results in better germination than the most careful indoor seed-starting setup.
Water Stress and Wilting
If an Angelica plant wilts, it is sending out a distress signal. Unlike some plants that can bounce back from a dry spell, Angelica often suffers permanent damage if the soil dries out completely. This is especially true in the first year when the root system is still establishing. Mulching is your best friend here. A thick layer of straw or wood chips will keep the soil temperature down and the moisture in.
Limitations: When Not to Grow Angelica
As much as I love this plant, it isn’t for everyone. If you have a very small urban garden with only a few square feet of space, Angelica might be too aggressive. It doesn’t just grow up; it grows out. A single second-year plant can have a spread of 4 feet (1.2 meters). It will easily shade out smaller herbs like thyme or oregano.
Climate Boundaries
If you live in a tropical or subtropical climate, you will likely find it impossible to grow Angelica archangelica. It requires a significant cold period in the winter to reset its biological clock. In places with mild winters and high humidity, the plant is prone to rotting at the crown before it ever reaches maturity.
A Note on Safety
You must be absolutely sure of your identification. Angelica is a member of the Apiaceae family, which includes some of the most poisonous plants on earth, such as Poison Hemlock and Water Hemlock. Never forage for wild Angelica unless you are an expert. Stick to seeds or plants from a trusted nursery to ensure you are getting the true garden variety.
Practical Tips for Success
Advanced Considerations: Extending the Life of the Plant
For those who want to get the most out of their Angelica, there is a trick to making it live longer. Since the plant dies after it seeds, you can delay its death by cutting off the flower stalk as soon as it appears in the second year. By preventing it from using its energy to create seeds, the plant will often survive for another season.
I have seen plants reach their third or fourth year using this method. The leaves remain lush, and the root continues to thicken. This is particularly useful if you are growing the plant primarily for its medicinal roots, as the older roots are more substantial. However, you will eventually have to let one flower if you want to keep the cycle going in your garden.
Scenario: The Shady Corner Apothecary
Imagine a corner of your yard that gets morning sun but stays shaded and damp in the afternoon—perhaps near a north-facing fence. This is the perfect spot for an Angelica-centered herb bed.
I usually plant three Angelica seedlings in a triangular pattern, spaced 3 feet (90 cm) apart. In front of them, I plant lower-growing, shade-tolerant herbs like Sweet Woodruff or Lemon Balm. The Angelica provides the “ceiling” of the garden, creating a cool microclimate for the plants below. By the second year, this corner will look like a lush, prehistoric jungle. It requires very little weeding because the massive Angelica leaves shade out any competition.
Final Thoughts
Growing Angelica is more than just a gardening task; it is an act of preservation. By bringing this ancient herb back into our backyards, we are keeping a piece of botanical history alive. It teaches us to respect the natural rhythm of the biennial cycle and to value the deep, slow growth of a taproot over the instant gratification of a greenhouse flower.
Do not be discouraged if your first attempt with store-bought seeds fails. It happens to the best of us. Focus on finding fresh seed, keeping the soil moist, and giving the plant the space it needs to breathe. Once you have successfully grown a seven-foot giant, you will never want to be without it again.
Experiment with the stems in your kitchen and watch the bees dance around the flower heads in July. You will soon see why our ancestors treated this plant with such reverence. It is a majestic, generous plant that gives back far more than it takes, provided you treat it with a little ancestral respect.