
Why your marjoram tastes like cardboard (and how to fix the soil). High-flavor marjoram isn’t born in a bag of sterile potting mix. It’s built in a living ecosystem. Learn how to transform your herb bed into a microbial powerhouse that feeds your plants naturally and boosts essential oil production.
I have spent many mornings leaning against my garden gate, watching the sun hit my herb patch and wondering why one year the marjoram is sweet enough to perfume the whole yard, while the next it is as bland as old hay. It took me a long time to realize that the secret isn’t in a bottle of fertilizer. It is in the ground beneath our boots.
Marjoram, or Origanum majorana, is a delicate soul compared to its rugged cousin, oregano. It comes from the warm, rocky soils of the Mediterranean and North Africa. In those places, the soil isn’t just “dirt”; it is a complex web of minerals and life that forces the plant to work for its keep, which in turn creates those rich essential oils we love.
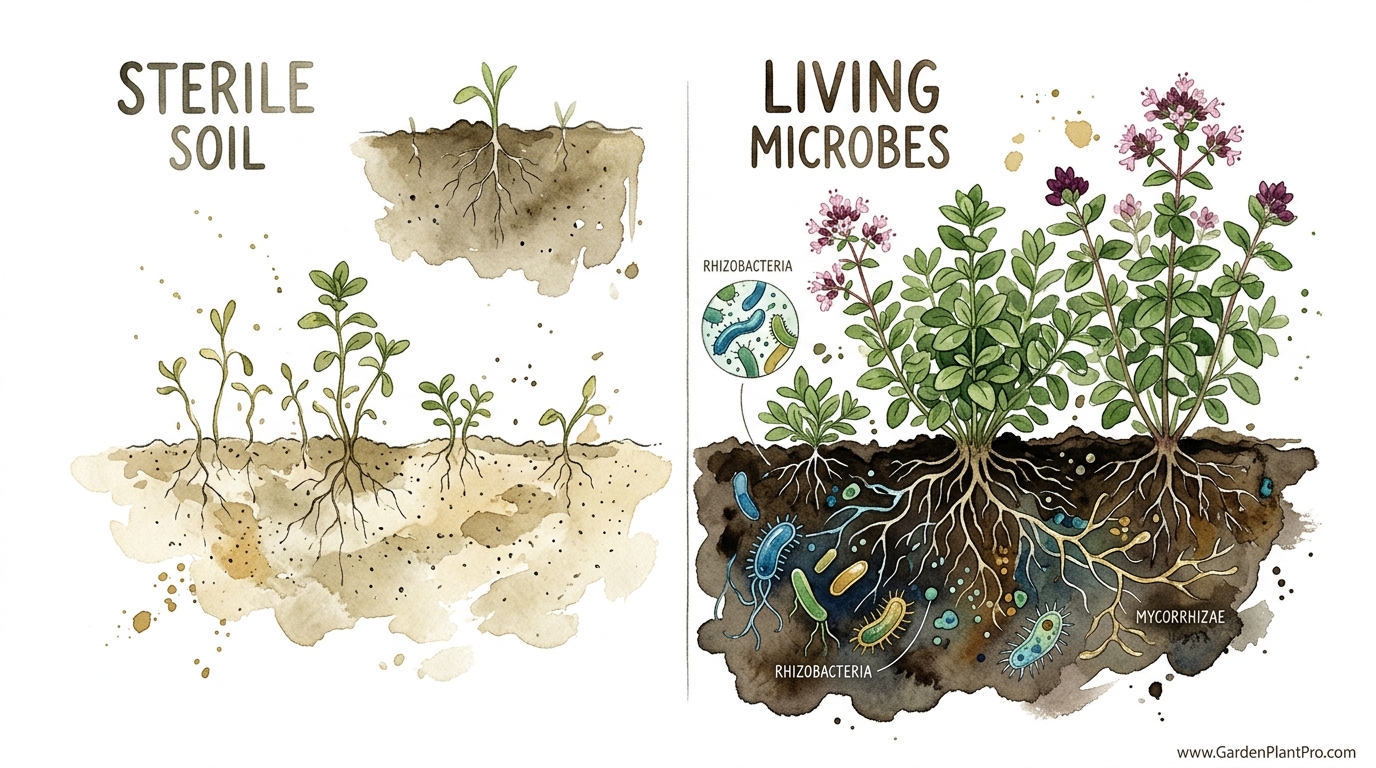
When we buy a bag of sterile potting soil from the big-box store, we are giving the plant a clean room, but we are also cutting it off from the “microbial magic” that defines its flavor. To get that deep, sweet, citrus-pine aroma, we need to stop thinking about feeding the plant and start thinking about feeding the soil.
Best Soil For Marjoram Plants
The best soil for marjoram plants is a well-draining, sandy loam with a slightly acidic to neutral pH, ideally between 6.0 and 7.5. In my experience, if you can get the drainage right, you are eighty percent of the way to a happy plant. Marjoram has fine, sensitive roots that simply will not tolerate “wet feet.”
Think of the soil like a sponge that has been wrung out. It should hold enough moisture to keep the plant hydrated but have enough air pockets—what we gardeners call pore space—to let the roots breathe. In the wild, marjoram grows on dry slopes and in rocky places where water moves through the ground quickly.
Texture is the second piece of the puzzle. A sandy loam is the “goldilocks” of soil textures. It has enough sand to ensure drainage and enough silt and clay to hold onto a bit of nutrition. If your soil feels greasy or sticks to your shoes in a big clump, it has too much clay. If it feels like a beach, it needs more organic matter.
Finally, we have to talk about the “living” part of the soil. Marjoram relies on a community of beneficial bacteria and fungi to thrive. These microbes break down organic matter and hand-deliver nutrients to the roots. Without them, the plant might grow, but it will lack the complex terpene profile—the chemical compounds responsible for its flavor—that makes it worth growing in the first place.
The Living Ecosystem: How Soil Microbes Build Flavor
High-flavor herbs are a product of their environment. When marjoram grows in a living soil, it engages in a beautiful trade with the fungi and bacteria in the ground. The plant produces sugars through photosynthesis and pumps some of those sugars out through its roots as “exudates.”
In exchange for these sugary snacks, beneficial fungi like mycorrhizae extend their tiny filaments far beyond the reach of the plant’s own roots. They find pockets of phosphorus and trace minerals that the plant could never reach on its own. This extra nutrition allows the marjoram to produce more terpinene-4-ol and cis-sabinene hydrate, the primary components of its essential oil.
Sterile soil, on the other hand, is a lonely place. When you use synthetic fertilizers in a dead medium, you are essentially “force-feeding” the plant nitrogen. This causes the marjoram to put on a lot of lush, green growth very quickly. However, that growth is often “watery” and lacks the concentration of oils. It’s the difference between a vine-ripened tomato and one grown in a lab; the appearance is there, but the soul is missing.
By encouraging a diverse microbial population, you also help the plant’s natural defense system. A plant that has to defend itself against minor environmental stressors—with the help of its microbial partners—actually produces *more* aromatic oils as a shield. Those oils are what we taste in our cooking.
Steps to Build Your Living Marjoram Bed
If you are starting with a patch of yard that has been neglected or a container that feels a bit “dead,” you can bring it back to life with a few simple steps. You don’t need a degree in biology to do this; you just need to follow the cues nature gives us.
1. Test and Adjust the pH
Before you dig, it is worth knowing where you stand. Most marjoram varieties prefer a pH near 6.5 to 7.0. If your soil is too acidic (below 6.0), the plant will struggle to take up calcium and magnesium. You can add a bit of garden lime or crushed eggshells to gently nudge the pH up. If it is too alkaline (above 7.5), a bit of elemental sulfur or well-rotted leaf mold can help bring it down.
2. Amending for Texture
If you have heavy clay soil, do not just add sand. Adding sand to clay often results in something resembling concrete. Instead, work in plenty of high-quality compost. Compost acts as a “buffer,” breaking up the tight clay particles and allowing water to move through. For a standard 1 square meter (roughly 10 square feet) bed, I usually work in about 5 to 10 centimeters (2 to 4 inches) of compost into the top 15 centimeters (6 inches) of soil.
3. Introducing the Life
To jump-start the microbial population, I like to use worm castings or a “compost tea.” These are packed with the bacteria and fungi your marjoram needs. You can also buy mycorrhizal inoculants, which are powders you sprinkle directly onto the root ball when you are transplanting. It’s like giving your plant a team of tiny bodyguards and chefs right from day one.
4. The Mediterranean Mineral Boost
Since marjoram originates in mineral-rich, often chalky soils, I often add a handful of rock dust or bone meal to the planting hole. These provide trace minerals and calcium that synthetic fertilizers usually skip over. Calcium, in particular, helps build strong cell walls, making your marjoram more resistant to the wilting that can happen during a mid-summer heatwave.
Benefits of Using a Biologically Active Soil
Switching from a “feeding the plant” mindset to a “feeding the soil” mindset offers several measurable advantages. Once the ecosystem is established, the garden starts to do the heavy lifting for you.
- Enhanced Essential Oils: As mentioned, the symbiotic relationship with microbes leads to a higher concentration of terpenes, meaning more flavor and a stronger aroma.
- Better Water Management: Living soil has a better structure. The glues produced by bacteria and the webs of fungi help the soil hold onto just the right amount of water. This means you won’t have to water as often, and the soil won’t stay soggy after a rain.
- Natural Pest Resistance: Healthy plants in living soil are less attractive to pests like aphids. They have thicker cell walls and a more robust “immune system” fueled by the diverse nutrients they can access.
- Long-Term Fertility: Instead of the “boom and bust” cycle of synthetic fertilizers, a living soil provides a slow, steady release of nutrients. You won’t see the yellowing of lower leaves that often happens when a liquid fertilizer wears off.
Common Challenges and How to Avoid Them
Even with the best intentions, it is easy to make a few “neighborly” mistakes. I’ve made most of them myself over the years, and here is what I have learned to watch out for.
DIY PROJECT: Collect rainwater no matter where you live...

This DIY project is the best way to legally collect rainwater NO MATTER where you live. Get chlorine-free water, cut down on your water bills, and have enough for an emergency situation or to water your garden. Read More Here...
The “Too Much Love” Trap: Gardeners often think that if a little compost is good, a lot must be better. But marjoram isn’t a hungry cabbage; it doesn’t want to sit in a bed of pure, rich manure. Too much nitrogen will give you a giant, flavorless plant that is prone to flopping over. Aim for a soil that is “lean but alive.”
Ignoring the Drainage: If you see moss growing on the surface of your soil or if a hole filled with water takes more than an hour to drain, your marjoram will likely die of root rot. In these cases, it is better to grow marjoram in a raised bed or a terracotta pot where you can control the drainage perfectly.
Using Treated Wood: If you are building a raised bed for your herbs, avoid using pressure-treated wood that contains old-school chemicals like arsenic. While modern treatments are safer, I still prefer cedar or heat-treated wood to keep the soil ecosystem as clean as possible for my culinary herbs.
Limitations: When This Approach Might Not Work
There are times when even the best soil won’t save a marjoram plant. It is important to be realistic about your environment. Marjoram is a sun-worshiper. If your “living soil” is in a spot that gets less than six hours of direct sunlight, the plant will become leggy and lose its flavor regardless of the microbial health.
Humidity is another hurdle. In very humid climates, the air itself can cause fungal issues like powdery mildew, even if the soil is perfectly drained. In these regions, you need to space your plants further apart—at least 30 centimeters (12 inches)—to ensure plenty of air circulation around the gray-green leaves.
Finally, remember that Sweet Marjoram is a tender perennial. In USDA zones 9 and 10, it might live for several years. However, in cooler regions (Zones 8 and below), it is usually treated as an annual because it cannot survive a hard freeze. If you want it to live through the winter, you’ll need to pot it up in a well-draining mix and bring it indoors to a sunny windowsill.
Comparing Soil Approaches
Not everyone has the space for a full garden bed, so it helps to see how different soil strategies stack up. Whether you are using a pot on the balcony or a dedicated herb spiral, the principles remain the same.
| Factor | Sterile Potting Mix | Living “Super” Soil | Native Garden Soil |
|---|---|---|---|
| Microbial Life | Nearly Zero | High / Diverse | Variable (Low to High) |
| Flavor Profile | Mild / Bland | Complex / Intense | Moderate |
| Maintenance | High (Needs regular feeding) | Low (Self-sustaining) | Medium |
| Risk of Disease | Low initially | Very Low (Natural defenses) | Higher (Soil-borne pathogens) |
Practical Tips for Ongoing Soil Care
Once you have your marjoram in the ground, the goal is to maintain that living ecosystem without disturbing it too much. Soil is like a fine wine; it generally gets better with age if you treat it right.
- Mulch Wisely: Use a light mulch like pea gravel or a thin layer of straw. This protects the soil microbes from the harsh sun and prevents the soil from splashing onto the leaves during rain, which can spread fungi. Avoid heavy, bark-based mulches that can hold too much moisture against the stem.
- Avoid Over-Tilling: Once your bed is established, try not to dig it up every year. Tilling breaks the fungal networks (mycorrhizae) that you’ve worked so hard to build. Instead, just “top-dress” with a fresh centimeter (half-inch) of compost every spring.
- Water at the Base: Always water the soil, not the leaves. Overhead watering is an invitation for leaf spot and mildew. I like to water early in the morning so any accidental splashes have time to dry before the sun gets too high.
- Seasonal Refresh: If you are growing in containers, the soil can become “tired” after a season. Every spring, I remove the top third of the soil and replace it with fresh compost and a sprinkle of worm castings to wake up the microbial community.
Advanced Considerations: Tuning Your Soil for Maximum Potency
For those of you who really want to geek out on your herb garden, there are a few advanced techniques to push your marjoram’s oil production to the limit. Some commercial growers in places like Egypt and Tunisia actually use mild “stressors” to boost flavor.
Controlled Water Stress: Once your marjoram is well-established, you can try letting the soil dry out slightly more than usual between waterings. This slight drought stress signals the plant to produce more protective oils. Just don’t let the plant wilt! It’s a delicate balance.
The Role of Salinity: Interestingly, some studies have shown that a very slight increase in soil salinity can increase the essential oil yield in marjoram. I wouldn’t recommend dumping salt in your garden, but using a diluted seaweed extract as a foliar spray or soil drench once a month can provide those trace salts and minerals that mimic a coastal Mediterranean breeze.
Biochar: Adding a small amount of biochar (essentially a specialized form of charcoal) to your soil can act as a “permanent hotel” for microbes. It provides a massive amount of surface area for bacteria and fungi to live in, and it never breaks down, meaning your soil health will continue to improve for decades.
Example: Transforming a “Dead” Clay Patch
Let’s look at a real-world scenario. Imagine you have a spot in your yard where the grass barely grows, and the soil feels like heavy, grey putty. Most people would say you can’t grow Mediterranean herbs there. But you can.
First, you would build a simple wooden frame for a raised bed, perhaps 20 centimeters (8 inches) high. Instead of filling it with just “dirt,” you would create a mix. I recommend 40% compost, 40% native soil (to provide local minerals), and 20% coarse sand or perlite for drainage.
To this mix, you would add a “flavor kit”: two cups of bone meal and a bag of worm castings. After planting your marjoram, you would top it with a thin layer of gravel. By the middle of summer, that “dead” spot will be a buzzing hub of pollinators, and your marjoram will be so fragrant that you’ll smell it every time you walk past. This is the power of a living system over a sterile one.
Final Thoughts
Getting the soil right for your marjoram is more of an art than a strict science. It’s about creating a home for the plant that feels familiar to its ancestors—a place that is warm, well-drained, and full of the microscopic life that turns a simple green leaf into a culinary treasure. When we treat our garden like a living ecosystem, we get back so much more than just a few sprigs of garnish.
The reward for your effort will be marjoram that tastes nothing like the grey, dusty stuff in the spice aisle. It will be vibrant, sweet, and complex, with notes of citrus and flowers that can transform a simple roasted chicken or a pot of tomato sauce into something extraordinary. It all starts with the life beneath your fingernails.

Do you have some charcoal in your house right now? We call charcoal a “miracle leftover” for anyone who wants to be a little more self-sufficient and cut costs. That’s because it can help you with so many different things around the house and garden. You can even use it to make an energy-free fridge. Read More Here...
I encourage you to experiment. Try a pot with living soil next to one with standard mix and taste the difference for yourself. Gardening is a lifelong conversation with the earth, and marjoram is one of the most rewarding partners you can have in that dialogue. Happy planting!