
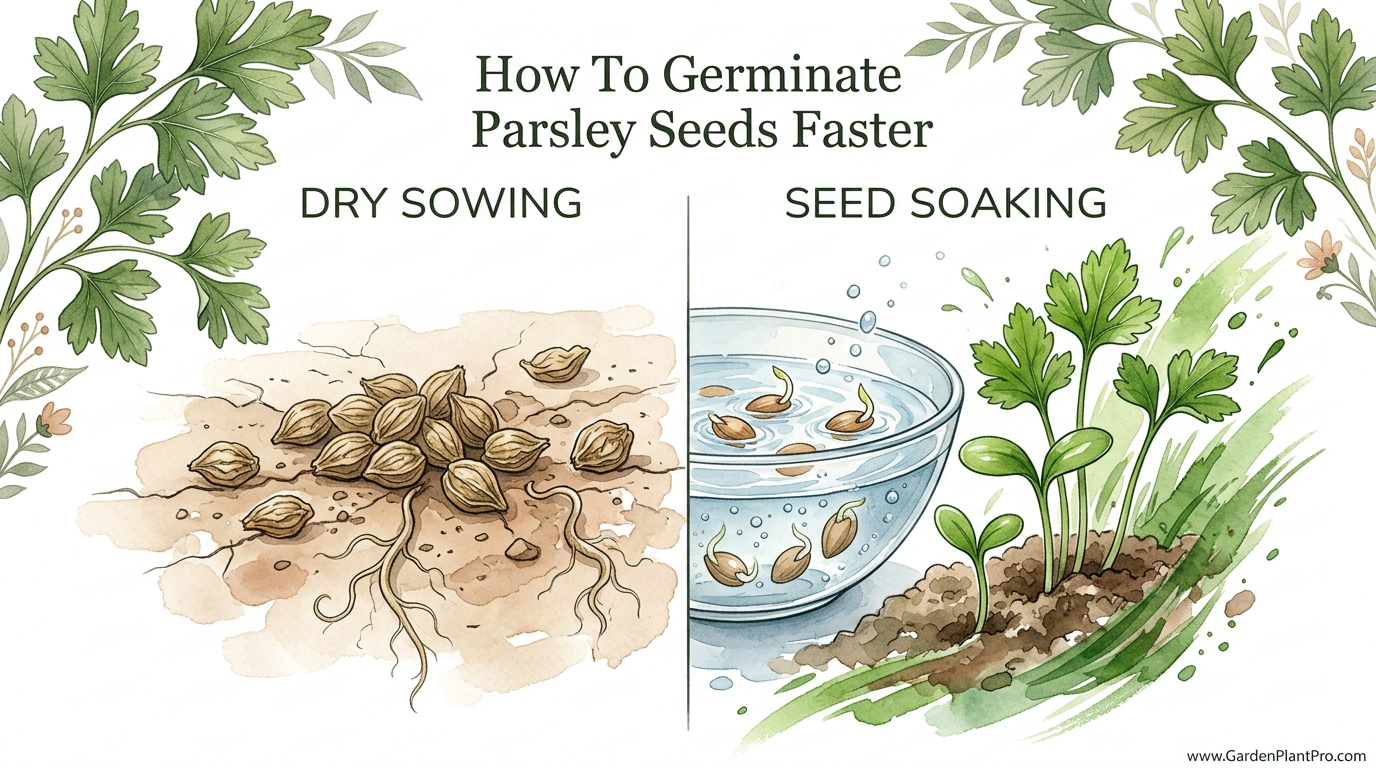
Parsley seeds are notoriously slow and stubborn, but this pro trick cuts germination time in half. Tired of waiting 4 weeks for parsley to sprout? The pros know that parsley seeds contain natural chemical inhibitors that need to be washed away. A simple 24-hour bath changes everything.
Most folks treat every seed the same, but the carrot family, which includes parsley, parsnips, and celery, has its own set of rules. I have spent years watching neighbors get frustrated when their herb garden looks like a patch of bare dirt long after the basil and cilantro have taken off. They often think they bought bad seeds, but usually, they just didn’t know how to wake the seeds up.
When you plant parsley seeds straight from the packet into the ground, you are essentially asking a tiny sprinkler or a light spring rain to do in weeks what a focused soak can do in a day. It is all about biology and a little bit of patience. By understanding what is happening inside that hard little husk, you can transform your gardening success rate.
Short, friendly sentences and everyday language make this process accessible for everyone. Whether you are a seasoned grower or just starting your first windowsill herb box, getting parsley to pop up in ten days instead of thirty feels like a real victory. Let us walk through the process together, just like we were chatting over the garden fence on a Saturday morning.
How To Germinate Parsley Seeds Faster
Parsley seeds are famous for their sluggishness because they contain compounds called furanocoumarins. These are natural chemical inhibitors located in the seed coat that act like a protective, oily raincoat. In the wild, these inhibitors prevent the seed from germinating too early during a brief warm spell in winter. It takes weeks of cold, consistent rain to slowly wash these chemicals away and tell the embryo it is finally safe to grow.
How this works in a practical setting is simple: we simulate that long rainy season in a single day. This process is often called “hydropriming” or “seed soaking.” Instead of letting the seed sit in the soil and wait for nature to take its course, we actively leach out those inhibitors and soften the tough outer shell. This allows water and oxygen to reach the center of the seed almost immediately.
Gardeners use this trick when they want a head start on the season or when they need their herbs to sprout in a predictable window. Without soaking, parsley can take anywhere from 21 to 40 days to show its first green leaves. With a proper soak, you can often see sprouts in 7 to 14 days. This timing is critical if you have a short growing season or if you are trying to time your harvest for a specific culinary event.
The Step-by-Step Soaking Process
The most reliable way to jumpstart your parsley is a warm-water soak. You do not need fancy equipment, just a small jar or bowl and some patience. Follow these steps to ensure your seeds are ready for the soil:
- Select Your Seeds: Fresh seeds always work best. If your seeds are more than a year old, their viability drops significantly, though the soaking trick can sometimes revive older stock.
- Prepare the Water: Use warm water, around 110°F (43°C). It should feel like a comfortable bath, not scalding. Some old-timers swear by using very hot water for the initial pour, but 110°F (43°C) is the safest temperature to avoid damaging the delicate embryo inside.
- The 24-Hour Bath: Place your seeds in the water and let them sit for a full 24 hours. During this time, the water might turn a dingy brown or amber color. That is a great sign! Those are the furanocoumarins and other inhibitors leaching out of the seed coat.
- Change the Water (Optional): If you want to be extra thorough, you can change the water every 6 to 8 hours. This ensures the inhibitors are being completely removed rather than just sitting in a concentrated solution.
- Drain and Dry: Use a fine-mesh tea strainer or a paper towel to drain the seeds. Let them air-dry for an hour or two on a clean paper towel until they are just dry enough to handle. If you try to plant them while they are soaking wet, they will stick to your fingers and be nearly impossible to space correctly.
Sowing the seeds immediately after they have been “primed” is essential. Once the germination process has started internally, the seed cannot go back into dormancy. If you let them sit out and dry out completely for a few days, you might actually kill the seed.
Benefits of Pre-Soaking Your Seeds
Choosing to soak your seeds offers more than just a faster timeline. It provides a level of control that dry sowing simply cannot match. One of the biggest advantages is germination synchrony. When you sow dry seeds, they often pop up at different times—some at two weeks, some at five. Soaking ensures that most of the seeds “wake up” at the same time, giving you a uniform patch of herbs.
Uniformity makes garden maintenance much easier. You can thin your seedlings all at once and manage your watering schedule more effectively. When half the row is an inch (2.5 cm) tall and the other half hasn’t sprouted, it is hard to keep the soil at the right moisture level for both groups.
Furthermore, pre-soaking increases the overall germination rate. In many cases, seeds that might have struggled to break through their shell in the soil are given enough of a boost to survive and thrive. This is especially helpful for expensive or rare varieties of Italian flat-leaf or Moss Curled parsley where every seed counts.
Common Mistakes to Avoid
Even with a simple process like soaking, there are pitfalls that can ruin a good batch of seeds. The most common error is over-soaking. Leaving seeds in water for 48 hours or longer can lead to fermentation or oxygen deprivation. If the seeds start to smell sour or look mushy, they are likely dead. Stick to the 24-hour window for the best results.
Another mistake is planting too deep. Parsley seeds are tiny. If you bury them more than 1/4 inch (6 mm) deep, the tiny sprout may run out of energy before it reaches the surface. I usually aim for about 1/8 inch (3 mm) of fine soil or sifted compost over the top.
Letting the soil dry out after planting is the number one cause of failure. Once a seed has been soaked and planted, it is in a vulnerable state. The moisture has “unlocked” the seed. If the soil dries out even for a few hours, the emerging sprout can wither and die. Many gardeners find success by covering the seedbed with a piece of damp burlap or a light dusting of vermiculite to hold moisture in during those first few critical days.
Environmental Factors and Soil Conditions
Parsley is a cool-season herb, but it still needs a certain amount of warmth to get moving. The ideal soil temperature for germination is between 70°F and 85°F (21°C–29°C). If you are planting outdoors in early spring when the soil is still 50°F (10°C), expect the process to take much longer, even with the soaking trick.
Soil quality matters just as much as temperature. Parsley loves a moist, fertile, and well-draining soil with a pH between 6.0 and 7.0. If your soil is heavy clay or very sandy, it can be hard to keep the moisture levels consistent. Amending your garden bed with aged compost or leaf mold provides the organic matter needed to hold onto water while allowing the roots to breathe.
If you are starting your seeds indoors, consider using a heat mat. Setting the mat to 75°F (24°C) can significantly accelerate the sprouting of soaked seeds. Once they emerge, parsley seedlings are quite hardy and can handle cooler air, but that initial warmth is the key that turns the lock.
When This Method Might Not Be Ideal
While soaking is a “pro trick,” it isn’t always the right choice for every situation. If you are a large-scale farmer planting thousands of seeds across an acre of land, soaking and drying seeds so they can run through a mechanical seeder is often too labor-intensive and technically difficult. In those cases, “dry sowing” followed by consistent overhead irrigation is the standard.
DIY PROJECT: Collect rainwater no matter where you live...

This DIY project is the best way to legally collect rainwater NO MATTER where you live. Get chlorine-free water, cut down on your water bills, and have enough for an emergency situation or to water your garden. Read More Here...
Environmental conditions can also make soaking risky. If you live in an area with extremely high humidity and frequent fungal issues, soaked seeds might be more prone to damping off—a soil-borne fungal disease that kills young seedlings. In very wet climates, the natural, slower process of dry sowing might actually protect the seed from rotting before it gets its roots established.
Additionally, if you are a “hands-off” gardener who prefers to let nature take its course, there is nothing wrong with dry sowing. You just have to be prepared for the 4-week wait. Some gardeners enjoy the “winter sowing” method, where seeds are put out in containers in January or February (Northern Hemisphere) to let the snow and rain naturally leach the inhibitors away over several months.
Comparing Seed Starting Methods
Understanding the differences between the common ways to start parsley can help you choose the best path for your garden. Below is a comparison of the most popular techniques based on effort and speed.
| Method | Germination Time | Complexity | Best For |
|---|---|---|---|
| Dry Sowing | 21–40 Days | Very Low | Patient gardeners, large plots |
| Warm Water Soak | 7–14 Days | Moderate | Fastest results, home gardeners |
| Winter Sowing | Seasonal | Low | Naturalizing, low maintenance |
| Paper Towel Method | 10–14 Days | High | Testing seed viability |
Practical Tips and Best Practices
If you want the very best results, try the Burlap Trick. After you sow your soaked seeds 1/8 inch (3 mm) deep, lay a single layer of damp burlap directly on top of the soil. This prevents the sun from drying out the surface and protects the seeds from being washed away during watering. Check under the burlap every morning; as soon as you see a single green loop breaking the soil, remove the burlap immediately.
Spacing is another area where many gardeners struggle. Because soaked seeds can be “fiddly” and sticky, try mixing them with a little bit of dry sand before sowing. This helps separate the seeds so you don’t end up with a clump of ten plants in one spot. Aim for 3 seeds per inch (2.5 cm) if direct sowing, then thin them to 8–12 inches (20–30 cm) apart once they are established.
Consider the variety you are growing. Italian Large Leaf (Flat Leaf) tends to be slightly more vigorous and faster-growing than the Curly leaf varieties. If you are a beginner, the flat-leaf variety is often more forgiving. Regardless of the type, parsley is a heavy feeder. Once your seedlings have their first set of “true leaves,” a diluted liquid fertilizer high in nitrogen will help them develop that lush, deep green foliage we all love.
Advanced Considerations for Serious Growers
For those who want to dive deeper, you can explore osmotic priming. This involves soaking seeds in a solution that limits the amount of water they can absorb, allowing them to start the metabolic processes without actually sprouting. While usually done with chemicals like Polyethylene Glycol (PEG) in commercial settings, home gardeners can achieve similar results by using a precise salt or sugar solution. However, for most of us, the warm water soak is more than sufficient.
Another advanced technique is scarification. If you have particularly old or “hard” seeds, you can gently rub them between two pieces of fine-grit sandpaper for 10 seconds before soaking. This creates microscopic nicks in the seed coat, allowing the water to penetrate even faster. Be very gentle—you only want to scuff the surface, not crush the embryo.
Think about the long-term lifecycle. Parsley is a biennial, meaning it lives for two years. In the first year, it produces the leaves we eat. In the second year, it flowers and goes to seed. If you find that your second-year parsley tastes bitter or the leaves are tough, it is time to pull it and start fresh with your newly soaked seeds. Many experienced gardeners plant a new batch every spring to ensure a perpetual harvest of tender leaves.
A Realistic Gardening Scenario
Imagine two neighbors, Sarah and Mike. Sarah buys a packet of Italian parsley and sows them directly into her garden bed on a sunny Saturday in April. She waters them every few days when she remembers. Mike, however, takes the same packet of seeds and puts them in a jar of warm water on Friday night. By Saturday morning, he sees the water has turned a light tea color. He drains them, lets them dry on a towel for an hour, and plants them carefully.
Ten days later, Mike sees tiny, grass-like sprouts emerging from his soil. He keeps them misted and happy. Meanwhile, Sarah is still looking at bare dirt. By day twenty, Sarah is convinced her seeds were duds and goes to the nursery to buy expensive transplants. Just as she is planting her store-bought herbs, her original seeds finally start to peek through—but they are patchy and uneven.
Mike’s plants are already an inch tall and developing their first true leaves. Because he used the soaking trick, he saved money on transplants and has a much more established, uniform herb bed. This is the difference that 24 hours of preparation can make in a real-world garden.
Final Thoughts
Mastering the art of parsley germination is a rite of passage for many herb gardeners. It teaches us that gardening is as much about chemistry and biology as it is about soil and sun. By taking the time to wash away those natural chemical inhibitors, you are working with the plant’s biology rather than against it.
This simple soak-and-sow method is the secret to a lush, reliable harvest. It removes the guesswork and the long weeks of wondering if your garden will ever turn green. Whether you are growing parsley for its nutritional value, its culinary versatility, or to attract beautiful swallowtail butterflies to your yard, starting with strong, fast-germinating seeds is the best foundation you can provide.
I encourage you to experiment this season. Try soaking half of your seeds and dry-sowing the other half. Seeing the results with your own eyes is the best way to learn. Once you see those sprouts appearing in record time, you will never go back to the old way of waiting. Happy planting, and may your garden be ever green and productive!