
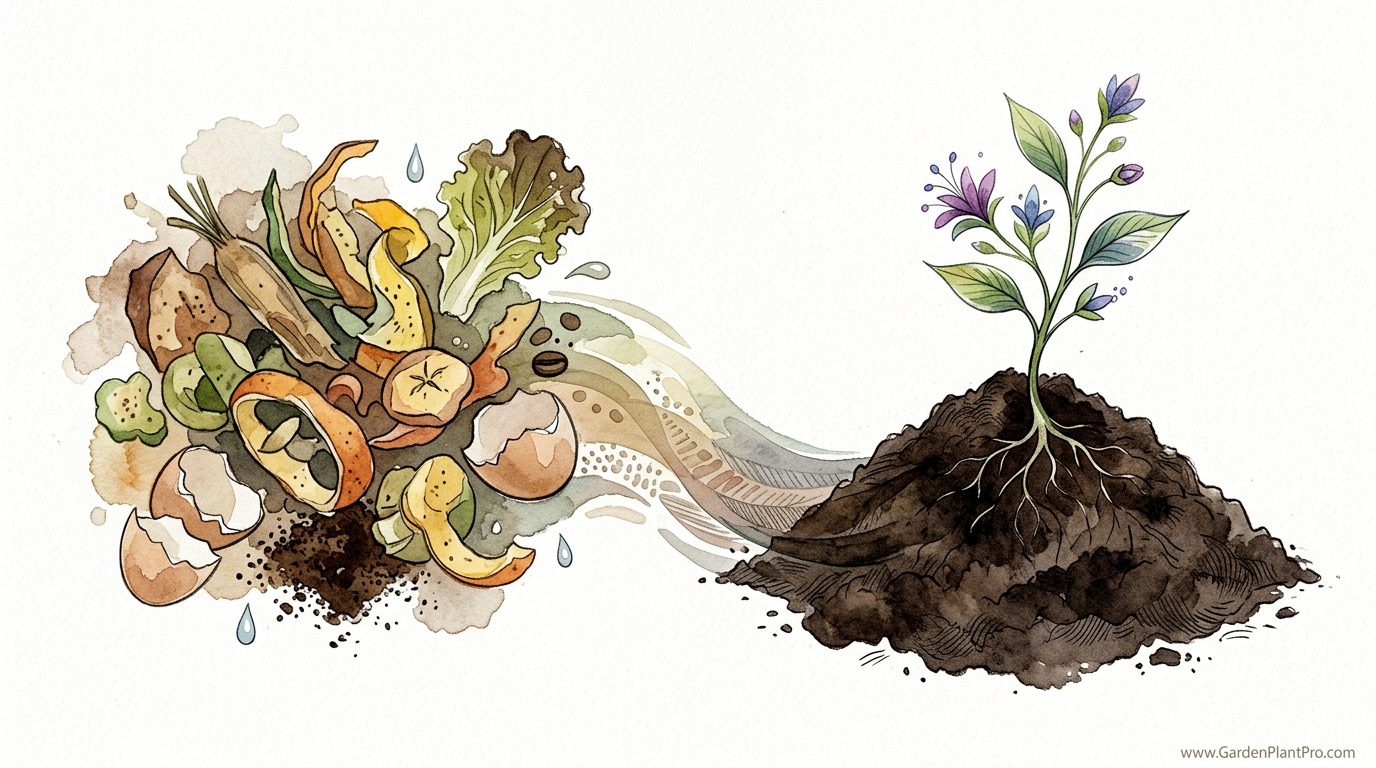
That soggy bag of trash is actually the secret to growing 10-pound tomatoes. Most people see garbage; gardeners see liquid gold. Turning your kitchen scraps into compost doesn’t just save the planet—it supercharges your soil’s biology for massive yields without the chemical price tag.
When you walk through a thriving garden, you aren’t just looking at plants; you are looking at the result of a hidden, microscopic engine fueled by what we often throw away. Kitchen waste is the raw energy that drives this engine. Every potato peel and coffee ground contains the elemental building blocks that plants crave.
Think of your garden soil as a living organism. If you feed it synthetic fertilizers, you are essentially giving it a caffeine jolt—a quick burst of energy followed by a crash that leaves the soil’s natural biology depleted. If you feed it compost made from kitchen waste, you are providing a slow-release, nutrient-dense feast that builds long-term health.
The transition from KITCHEN WASTE to SOIL FUEL is a journey of transformation. It is where biology meets the bucket. Over the years, I have found that the simplest methods often yield the most impressive results, provided you understand the rhythms of decomposition.
How To Compost Kitchen Waste For Soil
Composting kitchen waste is the managed process of aerobic decomposition where microorganisms break down organic matter into a stable, nutrient-rich substance called humus. In simpler terms, it is a way of recycling the nutrients from your dinner table back into the earth.
This practice exists because nature never wastes a single atom. In a forest, leaves fall and animals return to the earth, creating a rich layer of topsoil. In a home garden, we often remove “waste,” which breaks this natural cycle. By composting kitchen scraps, we close the loop.
Real-world gardening relies on this humus to improve soil structure. Whether you have heavy clay that sticks to your boots or sandy soil that drains like a sieve, compost is the universal fix. It creates “pockets” in the soil that hold both air and water, allowing roots to breathe and stay hydrated simultaneously.
Most gardeners use this process to create a biological “primer.” When you add finished compost to your beds, you are inoculating the ground with billions of beneficial bacteria and fungi. These tiny workers act as a bridge, taking minerals locked in the soil and delivering them directly to your plant’s roots in a form they can actually use.
The Anatomy of a Successful Compost Pile
The process of turning scraps into soil fuel requires four essential components: nitrogen, carbon, oxygen, and water. When these four elements are in balance, the microbes in your pile will thrive, and decomposition will happen rapidly and without unpleasant odors.
Nitrogen-rich materials, often called “greens,” are the proteins that allow microbes to grow and reproduce. These include your fruit and vegetable scraps, coffee grounds, and fresh green clippings. Most kitchen waste falls into this category, with vegetable scraps having a Carbon-to-Nitrogen (C:N) ratio of about 15:1.
Carbon-rich materials, known as “browns,” are the carbohydrates that provide energy for the microbes. These are typically dry, woody materials like shredded cardboard, dried leaves, or straw. These materials have much higher C:N ratios, such as 60:1 for dry leaves or even 450:1 for shredded cardboard.
Oxygen is vital because the best composting happens through aerobic decomposition. If the pile becomes too packed or too wet, oxygen is squeezed out, and anaerobic bacteria take over. This is when a pile starts to smell like rotten eggs. Regularly turning the pile introduces fresh air and keeps the process moving.
Water is the final piece of the puzzle. Microbes need a thin film of moisture to move and digest their food. A healthy compost pile should feel like a wrung-out sponge—damp to the touch but not dripping. If it is too dry, the process stops; if it is too wet, it becomes a soggy mess.
Benefits of Using Kitchen Waste as Soil Fuel
The primary advantage of composting kitchen waste is the creation of a diverse microbial environment. Unlike commercial fertilizers, which usually provide only Nitrogen, Phosphorus, and Potassium (N-P-K), kitchen-based compost contains a full spectrum of micronutrients and trace minerals.
When you use this “soil fuel,” you are improving the Cation Exchange Capacity (CEC) of your soil. This is a scientific way of saying the soil becomes better at holding onto nutrients so they don’t wash away during a heavy rain. This efficiency means you can grow more food with fewer inputs.
Another practical benefit is moisture management. Compost can hold several times its weight in water. In a drought, a garden bed amended with compost will stay green long after an unamended bed has withered. This reduces the need for frequent irrigation and saves on water bills.
Compost also acts as a natural buffer for soil pH. While most vegetables prefer a slightly acidic environment, compost helps stabilize the soil, making it easier for plants to absorb nutrients even if your native soil is slightly off-balance. It creates a “comfort zone” for the root systems.
Challenges and Common Mistakes
One of the most common pitfalls is adding the wrong types of waste. While almost anything that was once alive will eventually break down, certain items cause problems in a backyard setting. Meat, dairy, and oily foods should stay out of your basic compost bin.
These high-fat items take a long time to break down and often produce foul odors that attract unwanted visitors like raccoons, rats, or neighborhood dogs. Stick to plant-based scraps and eggshells to keep your pile clean and manageable.
DIY PROJECT: Collect rainwater no matter where you live...

This DIY project is the best way to legally collect rainwater NO MATTER where you live. Get chlorine-free water, cut down on your water bills, and have enough for an emergency situation or to water your garden. Read More Here...
Managing moisture levels is another frequent struggle. I often see gardeners let their piles dry out completely in the summer heat, thinking that “rotting” just happens naturally. Without water, the microbes go dormant, and your kitchen scraps will just sit there for months without changing.
Conversely, some people overwater their bins. This leads to a compaction issue where the weight of the water squeezes out the air. If your pile smells like ammonia or vinegar, it is a sign that things have gone anaerobic. Adding more “browns” like shredded paper or dry straw and giving it a good stir usually fixes the problem.
Limitations and Environmental Considerations
While composting is a powerful tool, it does have realistic constraints. Space is often the biggest hurdle for urban gardeners. A traditional “hot” compost pile needs to be at least 3 feet by 3 feet by 3 feet (about 0.9 meters cubed) to generate enough internal heat to kill weed seeds and pathogens.
Climate also plays a major role. In colder regions, the biological activity in an outdoor bin will slow down or stop entirely during the winter months. While you can still add scraps to the pile, they won’t transform into soil fuel until the spring thaw awakens the microbes.
For those in small apartments or without a backyard, traditional piling isn’t an option. In these cases, you might look toward specialized systems like vermicomposting (worm bins) or Bokashi fermentation. These methods are designed for smaller volumes and can be kept indoors or on a balcony.
It is also important to remember that compost is a soil conditioner, not a replacement for soil itself. You cannot grow most plants in 100% compost because it is too rich and can sometimes hold too much moisture, leading to root rot. It is meant to be mixed with the native earth to improve it.
Practical Tips for the Home Gardener
One of the best habits you can start is chopping your kitchen waste into smaller pieces. A whole watermelon rind might take six months to break down, but if you chop it into 1-inch (2.5 cm) squares, it will disappear in weeks. This increases the surface area for microbes to attack.
Layering is another key technique. I like to follow the “lasagna” method: start with a layer of coarse browns at the bottom for drainage, add a layer of green kitchen scraps, and then immediately cover those scraps with a fresh layer of browns. This “capping” of the greens prevents fruit flies and helps trap heat.
If you want to speed up the process, you can “innoculate” a new pile. Whenever I start a fresh bin, I throw in a few shovelfuls of finished compost or even just some good garden soil. This introduces an active population of microbes right from the start, effectively jump-starting the engine.
Monitoring the temperature can be very rewarding. If you are aiming for “hot” composting, you want the center of the pile to reach between 130°F and 140°F (54°C to 60°C). At these temperatures, the breakdown happens rapidly, and most harmful elements are neutralized.
Advanced Strategies: Moving Beyond the Basics
For the gardener who wants to take their soil fuel to the next level, consider integrating biochar. Biochar is a type of charcoal made from organic waste that has been burned in a low-oxygen environment. When added to a compost pile, it acts like a “microbe hotel,” providing a permanent structure for beneficial organisms to live in.
Another advanced technique is the use of compost tea. By soaking finished compost in water with a bit of aeration (using an aquarium bubbler), you can create a liquid fertilizer that is teeming with life. This can be sprayed directly onto plant leaves or poured around the roots for an immediate nutrient boost.
Understanding the “phases” of composting can also help you manage your expectations. The first stage is the mesophilic phase, where moderate-temperature microbes begin the work. As they multiply, they generate heat, leading to the thermophilic phase where the “heavy lifting” of decomposition occurs.
Finally, consider mineralizing your compost. Adding a small amount of rock dust or crushed eggshells provides essential minerals like calcium and magnesium. These minerals are slowly broken down by the compost microbes, making them highly bioavailable to your plants once the compost is applied to the garden.
Real-World Example: Prepping for a Giant Tomato
Let’s look at how I would prepare a bed for one of those legendary 10-pound tomatoes. It starts months before the seed even hits the dirt. In the autumn, I select a spot and dig a trench about 12 inches (30 cm) deep.
I fill the bottom 6 inches (15 cm) with raw kitchen scraps—mostly banana peels for potassium and coffee grounds for a slow nitrogen release. I then layer in 4 inches (10 cm) of shredded fall leaves (my “browns”) and a sprinkling of garden soil.
By the time spring arrives, the worms and microbes have turned that trench into a concentrated vein of soil fuel. When I plant my tomato seedling directly into that spot, its roots grow down into a reservoir of nutrients. The compost holds moisture during the summer heat, and the biology in the soil protects the plant from soil-borne diseases.

Do you have some charcoal in your house right now? We call charcoal a “miracle leftover” for anyone who wants to be a little more self-sufficient and cut costs. That’s because it can help you with so many different things around the house and garden. You can even use it to make an energy-free fridge. Read More Here...
This “trench composting” method is a simple way to use kitchen waste directly where it is needed most. It requires no turning and no expensive bins—just a shovel and a little bit of patience.
Integrating Composting into Your Daily Routine
The secret to successful composting is making it easy on yourself. Keep a small, lidded container on your kitchen counter to collect scraps throughout the day. This prevents multiple trips to the outdoor bin and keeps the kitchen tidy.
Empty the container once a day to avoid any smells or fruit flies in the house. If you find that your outdoor bin is too far away, consider keeping a secondary “holding” bucket closer to the door during the winter or rainy season.
I also recommend keeping a pile of “browns” (like a bag of dry leaves or a stack of cardboard) right next to your compost bin. This makes it effortless to cover your greens every time you add them. If you have to go hunting for browns every time you dump your kitchen scraps, you are less likely to do it correctly.
Over time, this becomes a natural rhythm. You start to see every meal not just as food for your family, but as the beginning of next year’s harvest. It changes your perspective on “trash” forever.
Comparison: Traditional Piles vs. Specialized Systems
| Feature | Backyard Pile (Hot/Cold) | Vermicomposting (Worms) | Bokashi (Fermentation) |
|---|---|---|---|
| Best For | Large gardens/yards | Apartments/Small spaces | Kitchens/Meat & Dairy waste |
| Maintenance | Moderate (turning) | Low (feeding worms) | High (burying waste) |
| Speed | 2 months to 1 year | 2 to 3 months | 4 to 6 weeks total |
| Output | Bulk humus | Concentrated castings | Fermented “pre-compost” |
Each of these systems has its place. In my garden, I use a combination. I have a large backyard pile for garden waste and leaves, a worm bin for the highest-quality scraps, and a Bokashi bucket for the citrus peels and occasional plate scrapings that the worms don’t like.
Final Thoughts
Transforming your kitchen waste into soil fuel is perhaps the most rewarding thing you can do as a gardener. It takes a problem—waste—and turns it into the solution for a thriving, productive garden. By understanding the balance of carbon, nitrogen, air, and water, you can create a resource that is far superior to anything you can buy in a plastic bag at the store.
Remember that composting is a living process. It doesn’t need to be perfect to work. Even if you just throw your scraps in a corner and walk away, nature will eventually find a way to break them down. But with a little bit of care and the right “recipe,” you can accelerate that process and see incredible results in your soil health.
I encourage you to start today. Grab a bucket, save those potato peels, and start building your own liquid gold. Your soil will thank you, and your future harvests will be the proof that the best gardens are built from the bottom up. Experiment with different methods, see what works for your space, and never look at a bag of trash the same way again.