
While others wait months for seeds to sprout, smart gardeners are cloning their best performers in days. Why gamble on seed genetics and slow growth cycles? Learning the art of strategic stem cuttings allows you to replicate your most resilient plants with 100% genetic accuracy. It’s not just faster; it’s a smarter way to scale your garden without the manual grind of seed starting.
Whenever I look across the garden fence, I see folks struggling with packets of seeds, hoping for the best but often getting a mixed bag of results. You see, seeds are a roll of the dice; you never quite know if that tomato or rose will have the same spirit as the parent. Stem cuttings, however, are a sure thing. If you have a plant that stands up to the heat or produces the sweetest fruit, a cutting gives you an exact twin of that winner.
I’ve spent plenty of seasons watching the soil, and there is a particular satisfaction in seeing a bare stick turn into a thriving shrub. It feels a bit like a magic trick, but it is actually just understanding how a plant thinks. Once you know where the energy is hiding in the stem, you can nudge it to grow roots instead of leaves. It’s a skill that saves money and fills your garden beds twice as fast as the old-fashioned way.
In this guide, I’ll walk you through everything I’ve picked up over the years. We will talk about the timing, the tools, and those little secrets like why a 45-degree cut matters or how a simple jar of willow water can do wonders. Whether you are working with soft herbs or tough old fruit trees, these steps will help you get those roots moving.
Plant Propagation Methods For Beginners
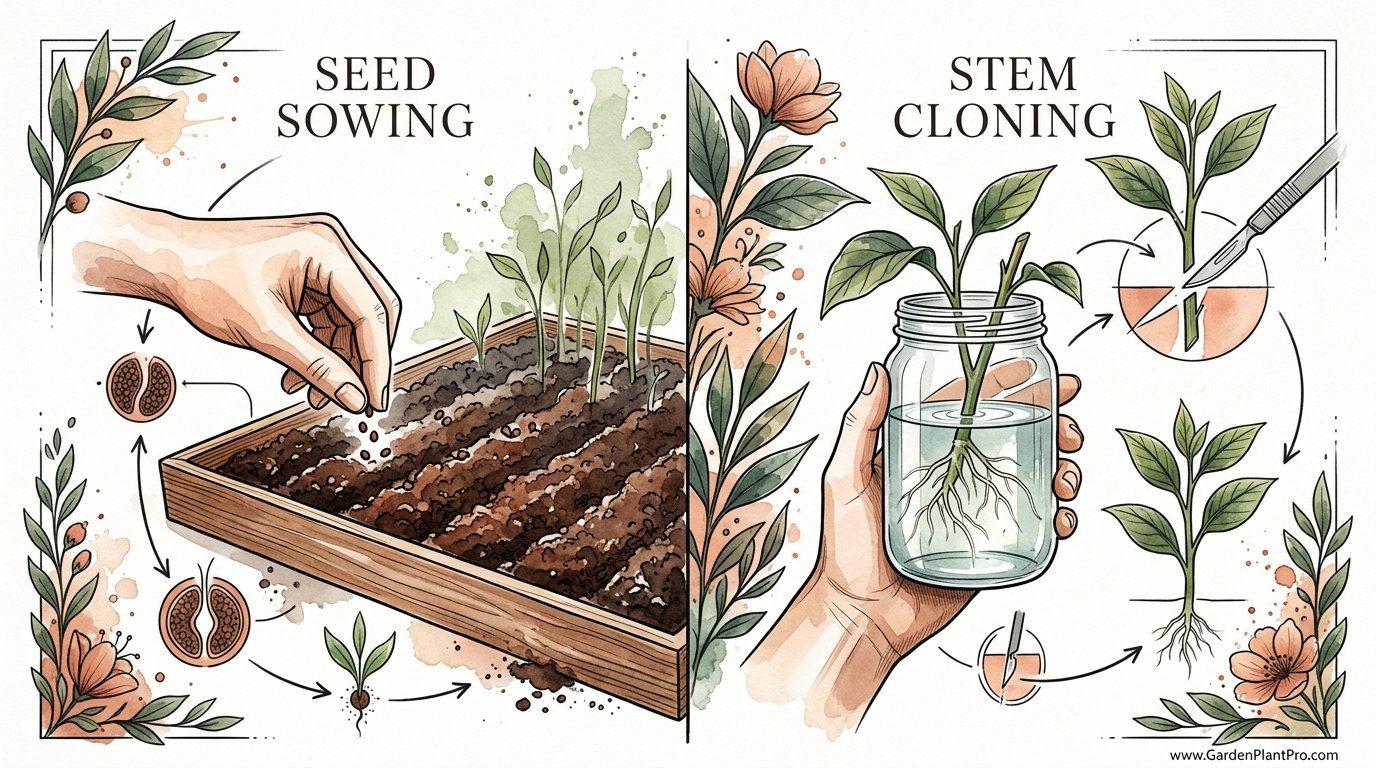
Propagation is just a fancy word for making more plants. In the gardening world, we usually talk about two main roads: the sexual path (seeds) and the asexual path (clones). When you sow a seed, you are dealing with the genetic lottery of two parent plants. But when you take a stem cutting, you are performing a type of vegetative propagation. You are taking a piece of “living tissue” and encouraging it to regenerate its missing parts—specifically, the roots.
This works because plants contain something called meristematic cells. Think of these as the plant’s version of stem cells. These cells are usually found at the “nodes”—those little bumps where leaves or branches meet the main stem. When you cut the plant and put it in the right environment, those cells get a signal to stop making leaves and start making roots to survive. It is a survival mechanism that we gardeners have learned to tap into over centuries.
Most beginners start with “water propagation” because it is easy to see the progress. You stick a mint or pothos stem in a glass of water, and within a week, you see white nubs appearing. However, as you get more serious, you will find that “soil propagation” or using “rooting mediums” like perlite often produces stronger, more resilient plants. These methods are used everywhere from small backyard greenhouses to massive commercial nurseries to ensure that every new plant is a carbon copy of the high-performing “mother plant.”
Understanding the Types of Cuttings
You can’t just snip a branch at any time of year and expect it to behave. The “hardness” of the wood determines how you treat it. I usually break these down into four categories based on the plant’s growth stage.
Herbaceous Cuttings
These come from non-woody plants like basil, mint, or coleus. They are soft, green, and very flexible. You can take these almost any time the plant is actively growing. They root very quickly, often in just 5 to 10 days, but they also wilt the fastest if they get too hot or dry.
Softwood Cuttings
These are taken from the very first flush of new growth on woody shrubs or trees. This usually happens in late spring or early summer. If you bend the stem and it snaps like a fresh green bean, it is at the softwood stage. Plants like hydrangeas and lilacs love this method. They root fast but need high humidity to keep from drying out.
Semi-Hardwood Cuttings
Taken in mid-to-late summer, these stems are starting to mature. The base of the cutting might be a bit brown and woody, while the tip is still green and flexible. This is the sweet spot for many evergreen shrubs, herbs like rosemary, and some fruit bushes. They are tougher than softwood but still have enough active growth to root before winter sets in.
Hardwood Cuttings
These are the tough ones. You take these in the dead of winter or very early spring while the plant is dormant. The wood is fully brown and stiff. This method is common for grapes, figs, and roses. They take much longer to root—sometimes several months—but they are very hardy and don’t require the constant misting that soft cuttings do.
How to Do It: Step-by-Step Instructions
Taking a cutting is a surgery of sorts, and you want to be as clean and precise as possible. Follow these steps to give your new plant the best chance at life.
- Select the Mother Plant: Always pick a healthy, vigorous plant. Never take cuttings from a plant that is diseased, struggling with pests, or under heavy drought stress. If the parent is weak, the clone will be weak too.
- Water the Parent First: I always water my plants heavily about 24 hours before taking cuttings. This ensures the stems are “turgid” or full of water, which gives them a reservoir to live on while they are rootless.
- Prepare Your Tools: Use a very sharp pair of shears or a razor blade. Dull tools crush the stem fibers, which leads to rot. Sterilize your blade with 70% isopropyl alcohol to ensure you aren’t introducing fungi or bacteria.
- The Cut: Snip a stem that is about 4 to 6 inches (10 to 15 cm) long. Make the cut at a 45-degree angle. This increases the surface area for water absorption and root growth. Crucially, make the cut just below a node.
- Trim the Leaves: Remove the leaves from the bottom half of the cutting. You don’t want leaves buried in the soil or submerged in water, as they will just rot. If the remaining leaves are very large, you can actually snip them in half to reduce the amount of water the plant loses through evaporation.
- Apply Hormone (Optional): Dip the bottom inch of the stem into a rooting hormone. This can be a commercial powder, gel, or a natural alternative. It’s not always necessary for easy-to-root plants, but it definitely helps for woody ones.
- Planting: Use a pencil to poke a hole in your rooting medium (this prevents the hormone from being rubbed off). Insert the cutting about 2 inches (5 cm) deep and firm the soil around it.
Choosing the Right Rooting Medium
You might be tempted to just use garden soil, but that’s a mistake I made early on. Garden soil is often too heavy and full of pathogens. You want something sterile that holds moisture but allows plenty of air to reach the developing roots.
- Coarse Sand: Great for drainage, but it doesn’t hold much water. Best when mixed with something else.
- Perlite: This is that white, popcorn-like stuff. It is amazing for aeration. It keeps the soil from compacting around tender new roots.
- Peat Moss or Coconut Coir: Excellent for holding moisture. I usually mix one of these with perlite at a 50/50 ratio.
- Vermiculite: Holds more water than perlite. Good for plants that like to stay very damp.
- Water: Simple and transparent. Use it for herbaceous plants, but be sure to change it every few days to keep oxygen levels up.
The Practical Benefits of Stem Cloning
Why go through the trouble of taking cuttings when you can just buy a plant at the store? Well, for one, it’s essentially free. But there are more practical reasons for the serious gardener.
Predictability: When you grow from a cutting, you know exactly what the fruit will taste like, how tall the plant will grow, and how it handles your specific soil. This is vital for maintaining a consistent harvest in a vegetable garden or a uniform look in a landscape.
Speed: A cutting is already a “mature” piece of tissue. While a seedling has to spend weeks or months just getting its first set of true leaves, a cutting can often reach flowering or fruiting size in half the time. For many shrubs, this can save you two or three years of waiting.
Preservation: Sometimes a plant is no longer sold in catalogs, or maybe you have an heirloom variety from a grandparent’s garden. Cloning is the only way to ensure that specific plant lives on for another generation.
Challenges and Common Mistakes
Even the most experienced gardener loses a few cuttings now and then. The most common enemy is rot. This happens when the medium is too wet and the air is stagnant. If the base of your stem turns black and mushy, it’s a goner. To avoid this, make sure your pots have drainage holes and don’t overwater.
DIY PROJECT: Collect rainwater no matter where you live...

This DIY project is the best way to legally collect rainwater NO MATTER where you live. Get chlorine-free water, cut down on your water bills, and have enough for an emergency situation or to water your garden. Read More Here...
On the flip side is desiccation (drying out). Because the cutting has no roots, it can’t drink enough to keep up with what it loses through its leaves. This is why we use humidity domes—like a plastic bag or a clear plastic bottle—to trap moisture in the air around the plant. Just remember to “burp” the bag daily to let fresh air in, or you’ll invite mold.
Another mistake is incorrect lighting. Many beginners put their fresh cuttings on a sunny windowsill. Direct sunlight is too much for a rootless plant; it will literally cook. Give them bright, indirect light. A spot near a north-facing window or under a simple shop light is usually perfect.
Limitations of Stem Cuttings
Not every plant can be cloned this way. Some plants, like most conifers or very old trees, have “difficult” wood that requires professional-grade equipment and hormones. Other plants, like tap-rooted vegetables (carrots, parsnips), simply don’t have the right kind of tissue to regrow from a stem.
You also have to consider genetic fatigue. While a clone is a copy, doing it over and over for decades without ever introducing new genetics via seeds can sometimes make the line more susceptible to certain pests or environmental shifts. It’s always a good idea to have a mix of clones and seed-grown plants in your garden to keep the overall ecosystem healthy.
Comparison: Seeds vs. Stem Cuttings
| Feature | Seed Sowing | Stem Cuttings (Cloning) |
|---|---|---|
| Genetic Accuracy | Variable (Mix of parents) | 100% Identical |
| Cost | Low (Cost of seeds) | Near Zero (Free from parent) |
| Time to Maturity | Slow (Months to years) | Fast (Weeks to months) |
| Success Rate | High (70-90%) | Medium (Depends on species) |
| Root Structure | Often develops a taproot | Fibrous root system |
Practical Tips for Best Success
Over the years, I’ve found that the little things make the biggest difference. If you want to move from a 50% success rate to near 100%, keep these tips in mind.
- Temperature Control: Roots love a bit of warmth. If you are propagating in a cool basement, a seedling heat mat can speed up the process by days. Aim for a soil temperature around 21°C to 24°C (70°F to 75°F).
- Oxygenate Your Water: If you’re rooting in water, stir it or change it every two days. Roots need oxygen to grow; stagnant water loses its oxygen and encourages anaerobic bacteria (the smelly kind).
- Use Willow Water: This is an old-school trick. Willows are packed with natural rooting hormones. Chop up some young willow branches, soak them in water for 24 hours, and use that “willow tea” to water your cuttings.
- Check for “Callousing”: For succulents or hardwood cuttings, let the cut end dry out and form a “scab” or callus for a day or two before planting. This prevents rot from entering the open wound.
Advanced Considerations: Wounding and Air Layering
For those “stubborn” plants that just won’t root, like camellias or certain fruit trees, you might need to use wounding. This involves taking a sharp knife and peeling back a tiny sliver of bark (about 1 cm or 1/2 inch) at the base of the cutting. This exposes more of the cambium layer and triggers a stronger healing response, which often leads to more roots.
Another advanced move is air layering. Instead of removing the cutting first, you wound the stem while it is still attached to the mother plant. You wrap that wound in damp sphagnum moss and seal it with plastic. The branch continues to get nutrients from the parent while it grows roots into the moss. Once you see roots through the plastic, you snip it off and pot it up. It’s the safest way to clone valuable or slow-growing plants.
Real-World Example: Replicating a Prize Rose
Let’s say you have a rose bush that has survived three harsh winters and still produces fragrant red blooms. To clone it, wait until the blooms have faded in early summer. Select a “pencil-thick” stem that is starting to get firm. Cut a 6-inch (15 cm) length, remove the lower leaves, and dip it in a rooting gel.
Insert it into a mix of 50% perlite and 50% potting soil. Cover it with a clear plastic dome and place it in a shaded spot. In about 4 to 6 weeks, give the stem a very gentle tug. If you feel resistance, you’ve got roots! Gradually “harden off” the new plant by removing the dome for a few hours each day until it can handle the open air. By next spring, you’ll have a blooming copy of your favorite rose.
Final Thoughts
Propagation is more than just a way to save a few bucks at the garden center; it’s a way to truly connect with the plants you grow. When you understand how to guide a stem from a simple cutting to a fully rooted individual, you stop being just a consumer of plants and start being a producer. It gives you a level of control over your garden’s genetics that seed-starting alone can never provide.
Don’t be discouraged if your first few tries end up in the compost pile. Every master gardener has killed more cuttings than most people will ever plant. The key is to keep experimenting with different mediums, timings, and humidity levels. Once you find the rhythm that works for your climate and your plants, you’ll find yourself snipping “backups” of every prize performer in your yard.
Take what you’ve learned here and try it on something simple first, like a sprig of basil or a stem of rosemary. Once you see those first white roots poking through the soil, you’ll be hooked for life. From there, you can start exploring deeper topics like soil health, irrigation methods, or advanced garden planning to make sure your new clones have the best possible home.