
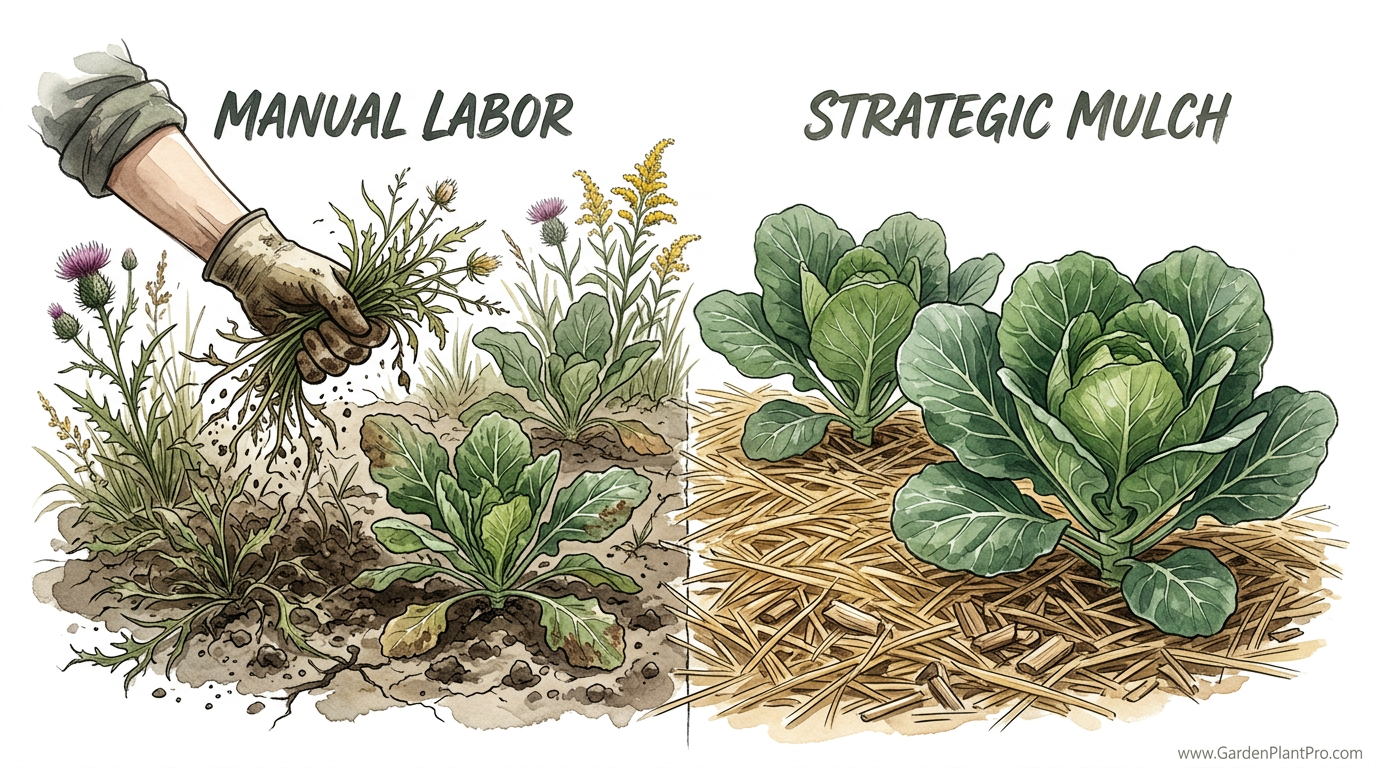
One of these gardeners will be back weeding tomorrow, while the other is done for the season. Are you spending your weekends pulling weeds and fighting dry soil? You are trapped in the manual labor cycle. Switch to a strategic mulch system to lock in moisture, suppress weeds, and finally enjoy your garden instead of serving it.
Walking through the neighborhood in late spring, I often see the same sight: a neighbor bent double over a row of collard greens, hula hoe in hand, scraping away at the crusty earth. They are fighting a war against the sun and the seeds, and it is a war they are destined to repeat every seven days. On the other side of the fence, my collard patch sits quiet and cool under a thick blanket of golden straw. I haven’t pulled a weed in three weeks, and my soil is as damp as a morning sponge despite the lack of rain.
Collard greens are the backbone of a productive backyard garden. These hardy brassicas are versatile, nutrient-dense, and capable of producing massive harvests from a small footprint. However, because they stay in the ground for a long time—sometimes from early spring all the way through a winter frost—they are prime targets for weed encroachment. If you leave the soil bare, nature will fill that void with pigweed, crabgrass, and lambsquarters. A strategic approach to mulching is not just about aesthetics; it is about creating a self-sustaining ecosystem where the plants thrive and the gardener rests.
Effortless Collard Green Weed Control
Effortless weed control for collard greens is the practice of using a high-density, strategic mulch system to create a physical and biological barrier against unwanted plants. Unlike traditional “clean” gardening, which relies on constant tilling and hoeing to keep the soil bare, this method focuses on “armoring” the soil. This armor prevents sunlight from reaching weed seeds and keeps the soil surface moist enough for beneficial microbes to thrive.
In the real world, this looks like a garden bed where you cannot see a single square inch of dark earth. Instead, you see a uniform layer of organic material—usually straw, shredded leaves, or wood chips—wrapped around the base of the collard plants. We use this method because it works with the plant’s biology. Collards have relatively shallow feeder roots that can be easily damaged by a garden hoe. Using mulch eliminates the need for mechanical cultivation, protecting those sensitive roots and allowing the plant to focus its energy on leaf production rather than recovering from root trauma.
Think of your garden soil like a living skin. When that skin is exposed to the elements, it “scabs” over, forming a hard crust that prevents water from soaking in. Weeds are nature’s way of trying to heal that skin. By applying a strategic mulch layer, you are providing a “bandage” that does the work for the soil, so the weeds don’t have to. It turns the exhausting task of weeding into a one-time setup that pays dividends for months.
The Mechanics of a Strategic Mulch System
Understanding how a mulch system works is the first step toward mastering it. It is not just about throwing some hay on the ground and calling it a day. A strategic system relies on three core principles: light exclusion, moisture regulation, and thermal buffering.
Light exclusion is the most immediate factor in weed control. Most common garden weeds are “pioneer species.” Their seeds can sit dormant in the soil for years, waiting for a flash of sunlight to trigger germination. When you till the soil, you bring those seeds to the surface. When you leave the soil bare, you give them the light they need to grow. A layer of mulch at least 3 inches (7.5 cm) deep blocks nearly 100% of that light, effectively keeping those seeds in a permanent state of sleep.
Moisture regulation is where the “effortless” part of the name really comes in. Bare soil loses water rapidly through evaporation. In fact, research shows that mulched soil can retain 25% to 50% more moisture than bare earth. For a heavy-feeding, water-loving crop like collards, this is the difference between tender, sweet leaves and tough, bitter ones. The mulch acts as a lid on a pot, keeping the “stew” of the soil from drying out in the midday sun.
Thermal buffering refers to the mulch’s ability to keep the soil at a steady temperature. Collards are cool-season crops. While they can handle heat, their roots prefer the cool dampness of early spring or autumn. Bare soil in the summer sun can reach temperatures of 140°F (60°C), which is hot enough to kill beneficial soil bacteria and stress the plant. Mulch keeps the root zone up to 20 degrees cooler, ensuring the plant stays in its “growth zone” even during a heatwave.
How to Implement Strategic Mulching for Collards
Moving from manual labor to a strategic system requires a bit of upfront work, but once the bed is set, your maintenance time drops to nearly zero. Follow these steps to set up your collard bed for success.
Step 1: Clean the Slate
Before you lay down your armor, you must remove any existing perennial weeds. Mulch is a preventative, not a cure. If you have deep-rooted weeds like dandelions or Canada thistle already established, they may have enough energy stored in their roots to push through the mulch. Pull these out by the root or use a “sheet mulch” layer of cardboard directly over them before adding your top mulch.
Step 2: Hydrate the Foundation
One of the biggest mistakes gardeners make is mulching over dry soil. Mulch is an insulator; if the ground is bone-dry when you cover it, the mulch will keep it dry by preventing light rain from reaching the surface. Give your bed a deep, thorough soaking—aim for about 1 inch (2.5 cm) of water—right before you apply the mulch.
Step 3: Transplant and Space
Collards need room to breathe. Space your transplants about 18 to 24 inches (45 to 60 cm) apart. This might look like a lot of empty space early in the season, but those gaps are exactly where weeds want to grow. Having your plants properly spaced allows you to easily maneuver your mulch around each stem.
Step 4: The Layering Process
Apply your chosen mulch in a thick, even blanket. For straw or shredded leaves, aim for a depth of 3 to 4 inches (7.5 to 10 cm). It will settle over the first few days, so don’t be afraid to go a little heavy. For heavier materials like wood chips or bark nuggets, 2 to 3 inches (5 to 7.5 cm) is usually sufficient.
Step 5: The “Donut” Technique
Never pile mulch directly against the stem of the collard plant. This is a common pitfall that leads to “stem rot.” Instead, leave a small circle of bare soil (about 2 inches or 5 cm in diameter) around the base of each plant. This allows for air circulation and prevents moisture from being trapped against the plant’s delicate “neck.”
Benefits of the Strategic Mulch System
The most obvious benefit is the time saved. If you spend 30 minutes a week weeding a 100-square-foot (9-square-meter) bed, that is over 10 hours of labor in a single 20-week growing season. With a strategic mulch system, you might spend one hour installing the mulch and maybe 10 minutes total over the rest of the season pulling the occasional stray weed that found a thin spot.
Beyond labor, the health of the collard greens themselves is significantly improved. Because the soil moisture is consistent, the plants don’t go through the “stress-wilt-recover” cycle that leads to bitterness. You will also notice that your greens stay much cleaner. Heavy rain on bare soil splashes dirt and pathogens onto the lower leaves. Mulch acts as a shock absorber, preventing “splash-back” and keeping your harvest pristine.
There is also the hidden benefit of soil building. As organic mulches like straw or leaves decompose, they feed the earthworms and fungi in your soil. These “soil engineers” move through the ground, creating tunnels that improve aeration and depositing nutrient-rich castings exactly where the collard roots can reach them. You are essentially composting in place while you sleep.
DIY PROJECT: Collect rainwater no matter where you live...

This DIY project is the best way to legally collect rainwater NO MATTER where you live. Get chlorine-free water, cut down on your water bills, and have enough for an emergency situation or to water your garden. Read More Here...
Common Challenges and Pitfalls
While the system is highly effective, it is not without its hurdles. The most frequent issue I hear from neighbors is the “slug explosion.” Slugs love the cool, damp environment under a layer of mulch. In a wet year, they can decimate young collard transplants overnight. To combat this, I recommend waiting until the plants are at least 6 inches (15 cm) tall before applying a heavy mulch layer, or using organic slug bait (iron phosphate) under the mulch.
Another challenge is nitrogen “tie-up.” If you use fresh, uncomposted wood chips directly on your soil, the bacteria that break down the high-carbon wood will temporarily steal nitrogen from the top inch of soil. Since collards are heavy nitrogen feeders, this can cause yellowing of the leaves. You can avoid this by either using a more balanced mulch like composted leaves or by sprinkling a high-nitrogen organic fertilizer (like blood meal or feather meal) on the soil before you lay down the wood chips.
Lastly, be wary of “tainted” mulch. If you buy straw from a farmer who uses persistent herbicides on their hay fields, those chemicals can linger in the straw and stunt or kill your garden plants. Always ask your supplier if their straw or hay is “herbicide-free” or “omri-listed” for organic use.
Limitations and Environmental Factors
The strategic mulch system works best in temperate and arid climates where moisture conservation is a priority. However, if you live in an area with extremely heavy clay soil and frequent, torrential rains, a thick mulch layer can actually keep the soil *too* wet. This leads to anaerobic conditions where roots “drown” because they cannot get oxygen. In these specific conditions, you might choose a lighter, more breathable mulch like pine needles (pine straw) or simply use a thinner layer until the rainy season passes.
Another limitation is soil warming. In the early spring, bare soil warms up much faster than mulched soil because it absorbs direct solar radiation. If you mulch your beds too early in a cold climate, you might inadvertently keep the soil “refrigerated,” which will slow the growth of your collard seedlings. The “sweet spot” is to wait until the soil temperature has reached at least 60°F (15.5°C) before applying the full blanket of mulch.
Strategic Mulch vs. Manual Labor Comparison
To truly appreciate the difference, it helps to see the numbers. The following table compares the typical requirements for a standard 100-square-foot collard patch over a 4-month growing season.
| Factor | Manual Labor System | Strategic Mulch System |
|---|---|---|
| Weekly Weeding Time | 30 – 45 Minutes | 0 – 5 Minutes |
| Watering Frequency | Every 1-2 Days | Every 4-7 Days |
| Tool Requirement | Hoes, Cultivators, Weeders | Pitchfork or Shovel (One time) |
| Soil Health Impact | Compaction & Erosion Risk | Builds Humus & Microbial Life |
| Initial Cost | Low ($0) | Low to Moderate ($10-$30) |
Practical Tips for Success
If you are new to this system, start with one bed and observe the difference. Here are a few “pro tips” from my years of trial and error:
- Use “Living Mulch” in the walkways: While you mulch the beds with straw, consider planting white clover in your garden paths. It stays low, fixes nitrogen, and can be mowed. It prevents the walkways from becoming a source of weed seeds that blow into your collard rows.
- Shred your leaves: If you use autumn leaves as mulch, run over them with a lawnmower first. Whole leaves (especially maple and oak) can mat together and form an impenetrable “tarp” that prevents water from getting to the soil. Shredding them allows for better air and water flow.
- The “Cardboard Shortcut”: If you are starting a new bed in a grassy area, don’t dig up the sod. Just mow it as short as possible, lay down thick, non-glossy cardboard (remove all tape), and put 6 inches (15 cm) of mulch on top. You can cut holes in the cardboard to plant your collards. The grass will die and feed the soil, and you won’t have to break your back with a tiller.
- Watch the birds: Sometimes robins or thrashers will go digging through your mulch looking for worms, scattering it onto your pathways. A quick 30-second “kick-back” every few days is all it takes to keep the coverage even.
Advanced Considerations: The Soil Food Web
For the serious practitioner, the strategic mulch system is about more than just weed control—it’s about “farming” the soil itself. When you keep the ground covered, you are supporting a massive network of mycorrhizal fungi. These fungi form a symbiotic relationship with collard roots, extending their reach to pull in phosphorus and micronutrients that the plant couldn’t access on its own.
In a tilled, bare-earth system, these fungal networks are constantly being shattered. By switching to a mulch system, you allow these networks to mature. Over several years, you will find that you need less and less fertilizer because the biological activity in the soil is doing the heavy lifting for you. You are essentially shifting your role from a “weeder and waterer” to a “manager of the soil ecosystem.”
Example Scenario: The Tale of Two Patches
Imagine two identical 10-foot by 10-foot (3-meter by 3-meter) garden patches. Gardener A decides to keep their soil clean and bare, hoeing every Saturday morning. Gardener B spends one hour in April laying down two bales of straw and a layer of compost.
By July, a heatwave hits. Gardener A is watering for 20 minutes every evening because the bare soil is “crusting” and the plants are wilting by 2 PM. Despite the hoeing, small weeds are popping up daily. Gardener B hasn’t watered in five days; the soil under the straw is still cool and moist. The collard leaves in Patch B are dark green and 14 inches (35 cm) wide, while the leaves in Patch A are slightly yellowed and only 9 inches (23 cm) across.
At the end of the season, Gardener B harvests 40% more greens by weight. More importantly, Gardener B spent that extra time on the porch with a glass of lemonade, watching the sunset instead of fighting the pigweed. This is the power of working *with* the garden’s natural systems rather than against them.
Final Thoughts
The transition from manual labor to a strategic mulch system is often the single most important step a backyard gardener can take. It shifts the focus from managing problems—like weeds and drought—to fostering growth. Collard greens, with their long season and hardy nature, are the perfect crop to demonstrate the efficiency of this method.
By investing a small amount of time and resources into armoring your soil, you are protecting the biological life that makes your garden productive. You will find that your plants are more resilient, your harvests are more bountiful, and your back is far less sore at the end of the weekend.
Take a look at your garden beds this week. If you see bare dirt, you are seeing a future weeding chore. Cover that soil with a thick layer of organic mulch and let nature do the hard work for you. Once you experience a season where you are “done for the season” after a single afternoon of mulching, you will never go back to the hoe again. Experiment with different materials, keep an eye on the slugs, and enjoy the peace that comes with a well-armored garden.